FREE DINNER EBOOK! Get your copy!
  • Cookie Policy
  • GDPR Policy
  • Disclaimer
  • Terms Of Use
  • Visit my other site: Fun Cookie Recipes
tastykitchentales
  • Home
  • Dinner
  • Desserts
  • Drinks
  • Appetizers
  • Contact
  • About
  • Privacy Policy
  • Home
  • Dinner
  • Desserts
  • Drinks
  • Appetizers
  • Contact
  • About
  • Privacy Policy
  • Cookie Policy
  • GDPR Policy
  • Disclaimer
  • Terms Of Use
Visit my other site: Fun Cookie Recipes

HOME / CATEGORIES /

Latest

To make this dish, gather the following ingredients: - 4 boneless, skinless chicken breasts - 1 cup cherry tomatoes, halved - 1 red bell pepper, sliced - 1 yellow bell pepper, sliced - 1 red onion, diced - 1/2 cup pitted Kalamata olives, sliced - 1/4 cup artichoke hearts, chopped - 3 cloves garlic, minced - 1 teaspoon dried oregano - 1 teaspoon dried basil - 1 teaspoon paprika - 1/2 teaspoon salt - 1/4 teaspoon black pepper - 1/4 cup olive oil - Juice of 1 lemon - Fresh parsley, for garnish Choosing between fresh and dried ingredients can change the flavor. Fresh herbs add bright notes. Dried herbs offer strong, concentrated flavors. I prefer using fresh garlic and parsley for a lively taste. However, dried oregano and basil work well here too. They blend nicely during the slow cooking process. Always aim for quality. Fresh ingredients can elevate your dish's taste. Garnishing makes your meal look inviting. I suggest using fresh parsley for color. Feta cheese adds creaminess and tang. Serve the chicken over fluffy couscous or warm pita bread. Both options soak up the flavorful juices. You can also add a fresh salad on the side. This balances the richness of the chicken. Feel free to mix and match based on your taste. Start by preparing your slow cooker. Lightly coat the inner pot with olive oil. This helps prevent sticking. Next, lay the chicken breasts flat at the bottom. Make sure they form a single layer. This step makes sure the chicken cooks evenly. In a bowl, mix cherry tomatoes, red and yellow bell peppers, red onion, Kalamata olives, artichoke hearts, and minced garlic. Stir well to combine. In a small bowl, mix oregano, basil, paprika, salt, and black pepper. Evenly sprinkle this blend over the chicken. Then, pour the vegetable mixture over the chicken. Ensure the veggies are spread out evenly. Drizzle olive oil and lemon juice on top. This adds a burst of flavor as they cook. Close the slow cooker lid tightly. For low heat, cook for 6-7 hours. If you choose high heat, cook for 3-4 hours. The chicken should be tender and fully cooked. After cooking, shred the chicken with two forks in the slow cooker. Mix it with the veggies and juices. Taste the mix and adjust the seasonings, if needed. Serve hot, garnished with chopped parsley for a fresh touch. Enjoy your Mediterranean Chicken delight! For the full details, check the [Full Recipe]. To make your chicken burst with flavor, use fresh herbs. Fresh herbs give a great taste. I love using parsley for garnish. It adds color and taste. When you season the chicken, use salt and pepper wisely. They bring out the natural flavors. You can also use lemon juice for a zesty kick. Tender chicken is key for a great dish. For tender results, don't skip marinating. Let the chicken soak in lemon juice and olive oil for at least 30 minutes. This helps break down the meat fibers. Cook on low heat for 6-7 hours. This slow cooking makes it juicy and soft. You can check if it’s done by using a fork. If the chicken shreds easily, it’s perfect. Avoid cooking on high heat for too long. It can dry out the chicken. Also, don’t overcrowd the slow cooker. This can lead to uneven cooking. Make sure to layer ingredients properly. Place the chicken at the bottom and vegetables on top. Lastly, resist the urge to lift the lid too often. This lets heat escape and slows the cooking. Follow these tips for a delicious Slow Cooker Mediterranean Chicken experience. You can find the Full Recipe in the article for more detailed steps. {{image_4}} You can easily swap ingredients to fit your diet. For a low-carb option, use zucchini noodles instead of couscous. If you're dairy-free, skip the feta. You can also use skinless turkey breasts for a leaner protein. If olives are not your favorite, try capers for a similar briny flavor. For gluten-free meals, ensure your sides match your needs. You can cook this dish in different ways. If you prefer the oven, preheat it to 375°F. Place the chicken and veggies in a baking dish. Cover with foil and bake for 30-40 minutes. For stovetop cooking, heat a large skillet on medium heat. Add olive oil, then the chicken. Cook for about 5 minutes before adding the veggies. Stir and cover, cooking for another 20 minutes. Want to add more flavor? Try different herbs like thyme or rosemary. A splash of balsamic vinegar will give it a tangy twist. You could even add a pinch of red pepper flakes for heat. For a Mediterranean touch, toss in some sun-dried tomatoes. Each addition can take your dish to the next level. Once your Mediterranean chicken cools, store it in an airtight container. This keeps the flavors fresh. Use glass or plastic containers that seal well. Label the container with the date. This helps you remember when you made it. The dish will last in the fridge for up to four days. To enjoy your chicken again, reheat it gently. You can use a microwave or a stovetop. If using a microwave, cover the dish with a damp paper towel. This keeps it moist. Heat for 1-2 minutes or until warm. On the stovetop, add a splash of water or broth. Stir gently over low heat until hot. This method helps keep the chicken tender. If you want to save some for later, freezing is a great option. Place the cooled chicken in a freezer-safe container. Make sure to leave some space for expansion. You can also use freezer bags. Squeeze out excess air before sealing. The chicken will stay good for up to three months. When ready to eat, thaw it in the fridge overnight before reheating. You can check the chicken's doneness by using a meat thermometer. The internal temperature should reach 165°F (75°C). If you don't have a thermometer, cut into the thickest part of the chicken. The meat should be white and juices should run clear, not pink. Yes, you can prepare this dish in advance. Chop the vegetables and marinate the chicken the night before. Store them in the fridge in an airtight container. When ready, just layer them in the slow cooker. This saves time and adds flavor. This dish pairs well with many sides. Here are some ideas: - Fluffy couscous - Warm pita bread - Simple green salad - Roasted vegetables - Quinoa for a healthy twist Feel free to mix and match to find your perfect meal! For the full recipe, check out the Mediterranean Chicken Delight. In this post, we explored how to make Slow Cooker Mediterranean Chicken. We covered the full ingredients list, including fresh and dried options. You learned step-by-step how to prepare and cook the dish. I shared tips for the best flavor and common mistakes to avoid. Variations let you adjust for different diets or cooking methods. Lastly, I provided storage and reheating advice. This dish offers flavor and ease, making it a great choice for any meal. Enjoy creating your own version!

Flavorful Slow Cooker Mediterranean Chicken Recipe

- 2 boneless, skinless chicken breasts, diced into bite-sized pieces - 1 cup long-grain white rice - 1 can (20 oz) pineapple chunks in juice, drained (reserve the juice for later use) - 1 medium bell pepper (red or yellow), diced - 1 medium onion, chopped - 2 cloves garlic, minced For the Pineapple Chicken and Rice Skillet, we start with fresh, quality ingredients. The chicken provides lean protein, while the rice serves as a hearty base. Pineapple adds sweetness and a tropical flair. I love using colorful bell peppers and onions to enhance both flavor and nutrition. - 1 cup chicken broth (homemade or low-sodium) - 2 tablespoons soy sauce (low-sodium recommended) - 1 tablespoon olive oil - 1 teaspoon fresh ginger, grated - Salt and black pepper to taste - Sliced green onions and toasted sesame seeds for garnish Seasonings make this dish pop. Soy sauce adds umami, while ginger gives a warm kick. I recommend low-sodium soy sauce to keep it balanced. For garnish, green onions and sesame seeds add both flavor and a nice touch for presentation. - Olive oil The cooking oil is simple but key. I choose olive oil for its light flavor and health benefits. It helps the chicken brown nicely and prevents sticking. For the full recipe, check out the details in the main article. This blend of ingredients creates a vibrant, tasty meal that is easy to make. Enjoy every bite! To start, heat olive oil in a large skillet over medium heat. Once the oil is hot, add the diced chicken. Season it with salt and black pepper. Cook the chicken for 5-7 minutes. Stir occasionally to ensure even cooking. It should look golden brown and be fully cooked. Next, add the chopped onion and diced bell pepper to the skillet. Toss in minced garlic too. Cook these for about 3-4 minutes. You want the onion to turn translucent and the bell pepper to soften. Stir to keep them from sticking to the pan. Now, it’s time to mix in the rice and pineapple. Stir in the grated ginger and the pineapple chunks. Pour back in the reserved pineapple juice. Mix everything well to coat the rice with flavor evenly. This step helps the rice absorb all the tasty juices. Pour in the chicken broth and soy sauce over the mixture. Gently stir to combine. Increase your heat to bring it all to a boil. Once boiling, reduce the heat to low. Cover the skillet and let it simmer for 15-20 minutes. This allows the rice to cook and soak up the liquid. After cooking, remove the skillet from the heat. Let it sit for 5 minutes. This resting time helps the flavors meld together. Afterward, fluff the rice gently with a fork. Taste the dish and adjust the seasoning if needed. Add salt, pepper, or soy sauce to suit your taste. For a full recipe, check out the complete details! To ensure even cooking, cut the chicken into similar-sized pieces. This helps them cook at the same rate. Heat the olive oil until it shimmers before adding the chicken. Stir frequently to prevent sticking. If the rice sticks to the pan, add a splash of chicken broth to loosen it. Cover the skillet while simmering; this traps steam and cooks the rice evenly. You can boost the dish's taste with a few extras. Try adding crushed red pepper for a spicy kick. Fresh herbs like cilantro or basil can add brightness. If you love heat, a dash of sriracha or chili sauce works well. You might also consider adding cashews or peanuts for texture. Mixing in other fruits, like mango or bell peppers, adds sweetness and color. This dish pairs well with simple sides. Serve it alongside a fresh green salad for crunch. Lime wedges add a zesty touch and brighten the flavors. You could also serve it with steamed broccoli or snap peas for extra veggies. For a cozy meal, consider pairing it with a light soup or a refreshing cucumber salad. Enjoy the vibrant colors and flavors! {{image_4}} You can swap chicken for shrimp, tofu, or pork in this dish. Shrimp cooks quickly and adds a nice ocean flavor. Tofu gives a plant-based twist, soaking up all the tasty juices. Pork adds a savory depth to the meal. Just remember to adjust cooking times so that all proteins are cooked perfectly. If you want to change the rice, try using brown rice or cauliflower rice. Brown rice adds more fiber and a nutty flavor. It will take longer to cook, so add extra water and time. Cauliflower rice is a great low-carb choice. It cooks fast and absorbs flavors well, making it light and fresh. Adding different fruits or vegetables can change the dish's taste. Consider mango, which brings sweetness and a tropical vibe. You can also add snap peas for crunch or carrots for color. Don’t be afraid to mix and match until you find your favorite flavor. The Full Recipe allows you to explore these options easily. To store leftovers, let the dish cool first. Place the Pineapple Chicken and Rice Skillet in an airtight container. Make sure to seal it well. This keeps the flavors fresh and tasty. Store it in the fridge for up to three days. When ready to eat, just heat it up on the stove or in the microwave. For freezing, use a freezer-safe container. Divide the dish into smaller portions. This makes it easy to reheat. Seal the containers tightly and label them with the date. You can freeze the skillet for up to three months. When you’re ready to eat, thaw it overnight in the fridge. Reheat it on low heat, adding a little chicken broth if needed. This keeps the rice from drying out. In the fridge, the Pineapple Chicken and Rice Skillet lasts about three days. If frozen, it can last up to three months. Always check for any strange smells or colors before eating. If it looks or smells off, it’s best to toss it. Enjoy your leftovers safely! For the full recipe, check out the [Full Recipe]. To reheat your Pineapple Chicken and Rice Skillet, use a skillet. Heat on medium-low. Add a splash of water or chicken broth. Stir often to keep it moist. You can also use a microwave. Place in a bowl, cover with a damp paper towel, and heat in short bursts. This keeps the rice fluffy and prevents drying out. Yes, you can prepare this dish ahead of time. Cook it fully, then let it cool. Store it in an airtight container in the fridge. It stays fresh for up to three days. When you are ready to eat, just reheat it using the methods above. This is a great meal prep idea! Pineapple Chicken and Rice Skillet pairs well with fresh salads. A simple green salad with a light vinaigrette works great. You can also serve it with steamed broccoli or snap peas for added crunch. As for drinks, try a light iced tea or sparkling water with lime. These options balance the dish's sweetness. This recipe is mild but can be adjusted. If you want more heat, add red pepper flakes or diced jalapeños during cooking. For less spice, simply skip those ingredients. The flavors from the pineapple and soy sauce shine through, so you can customize it to your taste. This blog post covered delicious Pineapple Chicken and Rice Skillet. You learned about the main ingredients, seasonings, and cooking essentials. I shared step-by-step instructions to make perfect chicken and rice. Tips for flavor and serving made it even better. We discussed fun variations, smart storage, and answered common questions. Try this dish to impress your family or friends. Enjoy your cooking and make it your own!

Flavorful Pineapple Chicken and Rice Skillet Recipe

- 1 lb boneless, skinless chicken thighs - 2 tablespoons fresh ginger - 2 cloves garlic - 1 red bell pepper - 1 cup snap peas - 2 green onions - 3 tablespoons soy sauce - 1 tablespoon honey - 1 tablespoon sesame oil - 1 teaspoon red chili flakes - Salt and pepper to taste Gathering the right ingredients is key to a great dish. For this Spicy Ginger Chicken Stir-Fry, I recommend using fresh chicken thighs. They stay juicy and tender when cooked. Fresh ginger gives a warm kick and bright flavor. Minced garlic adds depth to the taste. Next, the veggies add color and crunch. I like red bell pepper for sweetness. Snap peas bring a nice snap. Green onions not only taste great but also add a fresh look. Now, let's talk about the marinade. Soy sauce brings umami. Honey adds a touch of sweetness. Sesame oil gives a nutty flavor. Red chili flakes make it spicy, so adjust to your liking. Season with salt and pepper to round it all out. This simple mix of ingredients makes a wonderful meal. For the full recipe, check out the details above. Enjoy cooking! - In a bowl, mix soy sauce, honey, sesame oil, minced ginger, minced garlic, and red chili flakes. - Whisk until blended. This creates a tasty marinade. - Place chicken strips in the marinade. Make sure they are well coated. - Cover the bowl and let it sit for 15 minutes at room temperature. - For a stronger flavor, let it marinate for up to 1 hour in the fridge. - Heat vegetable oil in a large skillet over medium-high heat. - Once the oil shimmers, add the chicken. Cook it for 5–7 minutes. - Stir the chicken occasionally until it turns golden brown and is fully cooked. - Remove the chicken and set it aside on a plate. - Now, add sliced red bell pepper and snap peas to the same skillet. - Stir-fry the vegetables for 3–4 minutes. They should be tender yet crunchy. - Return the cooked chicken to the skillet with the veggies. - Pour in the reserved marinade. Mix everything well. - Cook for an extra 2–3 minutes until the sauce thickens slightly. - Fold in the sliced green onions just before serving. - Season with salt and pepper to your taste. - Serve your spicy ginger chicken stir-fry over cooked jasmine rice. For fun, add extra green onions or sesame seeds on top. For the full recipe, be sure to check the ingredients above! - Choose the right pan: A large skillet or wok works best. This gives you plenty of space to toss the chicken and veggies. A non-stick surface helps prevent sticking and burning. - Maintain high heat: Keep the heat on high. This helps the chicken cook fast and stay juicy. High heat also gives vegetables a nice crunch. - Modify red chili flakes: Start with less if you prefer mild heat. You can always add more later. - Add fresh chilies if desired: Sliced fresh chilies can boost the heat. Try Thai bird’s eye chilies for a serious kick. - Experiment with additional spices: Try adding garlic powder or five-spice powder for extra depth. Each spice brings its own unique twist. - Use fresh herbs for garnish: Fresh cilantro or basil adds brightness. Sprinkle them on top just before serving for a fresh look and taste. For more information on this dish, check the Full Recipe. {{image_4}} You can change the protein in this dish. If you want a vegan option, substitute chicken with tofu. Tofu soaks up flavors well and adds a nice texture. Another option is to use shrimp or beef. Both cook quickly and pair perfectly with the ginger sauce. Switch up the veggies for more variety. Incorporate broccoli or carrots for color and crunch. They add nutrition and taste. Adding mushrooms gives the stir-fry a great texture. They absorb the sauce, making each bite delicious and hearty. Think about how you serve this dish. Pair it with quinoa or noodles for a filling meal. Both options complement the flavors well. A side salad can also work nicely. It adds freshness and balances the heat from the stir-fry. For the complete guide, check the Full Recipe. To store leftovers, let the stir-fry cool to room temperature. Place it in an airtight container. Make sure to eat it within three days for the best taste. Storing it properly keeps it fresh and tasty. Freezing stir-fry is easy. Divide it into single servings before placing it in freezer-safe bags. Remove as much air as possible to prevent freezer burn. It can last up to three months in the freezer. To reheat, thaw overnight in the fridge. Heat it in a pan over medium heat until hot. Cooking in batches saves time. Make a larger batch of stir-fry for the week. Portion it into containers for quick meals. This way, you have ready-to-eat meals for busy days. You can mix and match the stir-fry with different sides, like rice or noodles. Yes, you can make this stir-fry ahead of time. To meal prep, cook the chicken and veggies as usual. Let them cool before storing them in an airtight container. You can keep it in the fridge for up to three days. To reheat, simply warm it in a skillet over medium heat until hot. This method keeps the flavors fresh and makes dinner quick on busy nights. You can also cook the chicken and veggies in advance and mix them with the sauce right before serving. Stir-fry pairs well with many side dishes. Here are a few suggestions: - Cooked jasmine rice - Brown rice for a healthier option - Quinoa for extra protein - Noodles for a different texture - A simple cucumber salad for crunch - Steamed broccoli or bok choy for added veggies These sides will complement the flavors of the spicy ginger chicken stir-fry and create a balanced meal. You can use dried ginger, but fresh ginger has a brighter flavor. Fresh ginger gives a zesty and bold taste that dried ginger lacks. If you must use dried ginger, use only a small amount, as it is stronger. A good rule is to use one-fourth the amount of dried ginger. This way, you maintain the dish's flavor. Fresh ginger also adds texture, which makes the stir-fry more interesting. This stir-fry recipe combines tender chicken and fresh vegetables in a simple dish. You learned the key ingredients and step-by-step cooking tips. Remember, you can adjust the spice and even swap proteins or veggies. Meal prep helps you save time and enjoy this dish throughout the week. With the right techniques, your stir-fry will always taste great. Keep experimenting and enjoy this easy and healthy meal whenever you like.

Spicy Ginger Chicken Stir-Fry Flavorful and Quick Meal

- 1 cup almond flour - 1 3/4 cups powdered sugar - 3 large egg whites (aged for 24 hours at room temperature) - 1/4 cup granulated sugar - 1/2 teaspoon cream of tartar - Red gel food coloring (for the festive hue) - 1/2 cup unsalted butter, softened to room temperature - 1 cup powdered sugar (for the cream cheese filling) - 1 teaspoon vanilla extract - 1/2 cup cream cheese, softened - Mini chocolate chips (for decoration) - Edible gold glitter (optional, for a festive sparkle) If you want to swap almond flour, try using finely ground hazelnuts. This gives a nice flavor and texture. For cream cheese, you can use mascarpone or a dairy-free cream cheese. Both work well in the filling. For natural food coloring, beet juice can add a lovely red hue. You can also use pomegranate juice for a lighter shade. Just remember, natural colors may not be as bright as gel colors. - First, preheat your oven to 300°F (150°C). While the oven heats, line two baking sheets with parchment paper. This helps with easy clean-up and prevents sticking. - Next, in a food processor, combine 1 cup of almond flour and 1 3/4 cups of powdered sugar. Pulse them well. Sift the mixture into a bowl to remove lumps. This step is key for smooth shells. - In a clean bowl, whip 3 large egg whites. Use an electric mixer on medium speed. Whip until foamy. - Gradually add 1/4 cup of granulated sugar and 1/2 teaspoon of cream of tartar. Switch to high speed. Whip until stiff peaks form. The meringue should look glossy. - Add a few drops of red gel food coloring. Fold gently until the right shade is reached. Be careful not to over-mix. - Gently fold the sifted almond flour mixture into the meringue with a spatula. Avoid deflating the meringue. The batter should flow like molten lava. It should keep its shape when piped. - Spoon the batter into a piping bag fitted with a round tip. Pipe small circles, about 1.5 inches wide, on the lined sheets. Make sure to space them out. - Tap the sheets on the counter to release air bubbles. Let them rest at room temperature for 30-60 minutes. They should form a dry skin on top. - Place the macarons in the oven and bake for 15-18 minutes. They should rise and have firm tops. - Cool the macarons completely on the baking sheets. This step is important before you assemble them. - Follow the [Full Recipe] for filling and decorating your Santa Claus macarons. Using aged egg whites is key for great macarons. Why? They whip better and create a more stable meringue. Let your egg whites sit at room temperature for 24 hours. This helps remove moisture, leading to a better texture. Common mistakes can ruin your macarons. Overmixing can deflate your batter. It should flow like lava but still hold shape. If your shells crack, check your oven temperature. Too high can cause cracks. If they do not rise, your meringue might not be whipped enough. Get creative with your decorations! Use mini chocolate chips for Santa's eyes. A little red frosting can make a cute hat. Edible glitter adds a festive sparkle. Just sprinkle it on top before your macarons set. Consider using different colors for a fun twist. You can mix red and white to match the Santa theme. Try adding fun patterns with icing. Your guests will love the personal touch! Showcase your macarons on a pretty platter. Arrange them in festive colors for a holiday vibe. You can also place them in gift boxes for friends and family. This makes a lovely gift during the holiday season. Pair these sweet treats with hot cocoa or coffee. Their creamy filling complements warm drinks nicely. Consider serving them at a holiday party for a delightful treat! {{image_4}} You can have fun with flavors for your Santa Claus macarons. Chocolate, peppermint, and pistachio are great choices. To make chocolate macarons, simply add cocoa powder to your almond flour mix. For peppermint, mix in peppermint extract to your filling. Pistachio adds a nice nutty twist. You can also mix different fillings for unique treats. Try a chocolate ganache paired with peppermint cream for a festive delight! Macarons are perfect for themed decorations during the holidays. You can design them to look like snowmen or Christmas trees. Use green and white colors for a snowy look. You can also customize them for different occasions, like birthdays or anniversaries. Use different colors and toppings to match your theme. Edible glitter and sprinkles can add a festive touch! If you have dietary needs, you can adapt these macarons. For gluten-free options, almond flour is already a great choice. You can also make dairy-free macarons by using dairy-free cream cheese. For vegan macarons, replace the egg whites with aquafaba (chickpea water). This way, everyone can enjoy these festive treats! To keep your Santa Claus macarons fresh, follow a few simple tips. First, store them in an airtight container. This helps prevent them from drying out. You can store them at room temperature for up to two days. However, for longer freshness, refrigerate them. When you refrigerate, place them in a container with parchment paper to avoid sticking. Always let them sit at room temperature for about 30 minutes before enjoying. Freezing is a great option if you want to save some macarons for later. Start with unfilled macaron shells. Place them on a baking sheet in a single layer. Freeze them for about one to two hours until they are firm. Once frozen, transfer them to a freezer-safe bag or container. Make sure to remove as much air as possible to prevent freezer burn. To thaw your macarons, take them out of the freezer and leave them in the fridge overnight. This helps them thaw slowly and stay fresh. Before serving, let them sit at room temperature for about 20-30 minutes. This will help revive their texture and flavor. Enjoy your festive treats whenever you like! If you want to learn how to make these delightful treats, check out the Full Recipe. To get smooth macaron shells, sifting is key. Always sift your almond flour and powdered sugar together. This helps break up any lumps. Make sure to fold the mixtures carefully. Over-mixing can ruin the texture. Aim for a batter that flows like lava. Cracks on macarons usually mean they did not rest long enough. After piping, let them sit until a skin forms on top. High oven temperatures can also cause cracking. Ensure your oven is set to the right temperature. A reliable oven thermometer can help. You can store macarons for about five days at room temperature. For longer storage, keep them in an airtight container in the fridge for up to a week. If you freeze them, they can last for up to three months. Just remember to thaw them in the fridge before eating. Yes, you can use a stand mixer! A stand mixer can whip the egg whites faster. Just make sure to use a clean bowl. This helps create a stable meringue. You will get the same great results whether you use a hand mixer or a stand mixer. If the batter is too runny, you may have over-mixed it. A thick batter usually means it was not mixed enough. For a runny batter, try adding a bit more almond flour. If it’s too thick, mix in a little water or egg white. Always aim for a smooth, flowing consistency. For a complete guide on making these festive treats, check the Full Recipe. In this blog post, we explored key ingredients needed for perfect macarons and provided easy step-by-step instructions. We discussed helpful tips for perfecting your macarons, including common mistakes to avoid and creative decorating ideas. You can add unique flavors and dietary options to make your macarons special. Remember, storing them correctly helps maintain freshness. With practice, you will master the art of making macarons at home. Enjoy the process and share your delicious creations with others.

Santa Claus Macarons Festive Holiday Treats Delight

This Jamaican Coconut Shrimp Pasta is a fun and tasty dish. It features shrimp, pasta, and coconut flavors. The jerk seasoning adds a unique kick. You can serve it with lime for extra zest. This dish is easy to make and perfect for any day. - 8 oz spaghetti or fettuccine - 1 lb large shrimp, peeled and deveined - 1 tablespoon coconut oil - 1/2 medium onion, finely chopped - 2 cloves garlic, minced - 1 red bell pepper, thinly sliced - 1/2 cup coconut milk - 1/2 cup chicken or vegetable broth - 1 tablespoon jerk seasoning - 1/2 teaspoon chili flakes (adjust to taste) - Salt and black pepper to taste - Fresh cilantro or parsley, for garnish - Lime wedges, for serving - Add veggies like spinach or zucchini for more color. - Use whole wheat pasta for a healthier option. - For more heat, add more chili flakes. - Swap shrimp for chicken or tofu for different flavors. - Use lime juice instead of lime wedges for a tangy kick. Feel free to mix and match these options to make the recipe your own! Start by boiling water in a large pot. Add salt to the water for flavor. Cook the spaghetti or fettuccine as per the package. Aim for an al dente texture. Once done, drain the pasta but save a cup of its water. Set the pasta aside. While the pasta cooks, chop the onion, garlic, and red bell pepper. Make sure the shrimp is peeled and deveined. This way, everything is ready for quick cooking. Heat coconut oil in a large skillet on medium heat. Add the chopped onion first. Sauté for about 3-4 minutes until it softens. Then, add the minced garlic and sliced bell pepper. Cook for another 2-3 minutes. Stir often to keep it from burning. Next, add the shrimp into the skillet. Sprinkle jerk seasoning and chili flakes evenly over them. Cook for 2-3 minutes. You want the shrimp to turn pink and opaque. This shows they are fully cooked. Now, pour in the coconut milk and broth. Mix it well to combine all the flavors. Bring the mixture to a gentle simmer. Let it cook for another 3-4 minutes. This allows the flavors to blend nicely. If the sauce gets too thick, use the reserved pasta water. Add it slowly until you reach your desired consistency. To get perfectly cooked shrimp, watch the color. They should turn from gray to pink. This change means they are ready. Avoid cooking them too long; otherwise, they can become tough. Always ensure to season your shrimp well. The jerk seasoning adds a lot of flavor. You can adjust the chili flakes based on your spice preference. Finally, toss the drained pasta into the skillet. Mix well to coat the pasta with the sauce. Season with salt and black pepper to taste. Serve hot, garnished with fresh herbs and lime wedges. Enjoy this vibrant dish! For the full recipe, refer to the section above. To boost the taste of your Jamaican shrimp pasta, focus on fresh herbs. Use cilantro or parsley for a bright finish. Lime juice adds a zesty kick that wakes up the dish. Also, consider adding fresh ginger for a warm flavor. A splash of soy sauce can deepen the umami notes too. One common mistake is overcooking the shrimp. You want them tender, not rubbery. Cook them just until they turn pink and opaque. Another mistake is skipping the reserved pasta water. This starchy water helps the sauce cling to the pasta. Lastly, don’t forget to season your dish well. Salt and pepper are key! If you prefer a milder dish, cut back on jerk seasoning and chili flakes. You can also add more coconut milk for creaminess. For extra heat, try adding fresh chopped chili or more chili flakes. Just remember to taste as you go. Adjusting flavors while cooking ensures you get it just right. For the complete guide, check out the Full Recipe. {{image_4}} To make this dish vegetarian or vegan, you can swap the shrimp. Try using chickpeas or tofu instead. Both options soak up flavors well and add protein. For the broth, use vegetable broth instead of chicken broth. Replace the coconut milk with a plant-based cream for a vegan spin. You still get that creamy texture and rich taste. If you want a gluten-free version, use gluten-free pasta. Many brands make great spaghetti or fettuccine alternatives. You can also use rice noodles for a different texture. Just remember to check the ingredient label to ensure they are truly gluten-free. Feel free to get creative with regional ingredients! Instead of jerk seasoning, you can use Cajun spices for a different flavor profile. If you can't find coconut milk, try using almond milk or cashew cream. You can even add local vegetables like zucchini or corn for a fresh twist. Each swap gives a new taste to the dish. For the full recipe, check out the Jamaican Coconut Shrimp Pasta. After you enjoy your Jamaican shrimp pasta, let it cool. Place it in an airtight container. Store it in the fridge for up to three days. This keeps your meal fresh and tasty. When you're ready to eat again, take the pasta out of the fridge. You can reheat it in the microwave or on the stove. If using the stove, add a splash of broth or coconut milk. This helps restore the creamy sauce. Heat it gently until warm. For longer storage, you can freeze the pasta. Put it in a freezer-safe container or bag. Make sure to remove as much air as possible. It can stay frozen for up to three months. When you want to eat it, thaw it in the fridge overnight. Reheat as mentioned earlier. Enjoy the flavors of Jamaica anytime! You can serve Jamaican shrimp pasta with a fresh side salad. A simple green salad pairs well. You can add sliced cucumbers or cherry tomatoes for color. Garlic bread also makes a great side. It helps soak up the creamy sauce. If you want a drink, try a fruity mocktail or coconut water. These options balance the dish's bold flavors. Yes, you can use frozen shrimp in this recipe. Just make sure to thaw them first. Place the shrimp in cold water for about 15-20 minutes. Once thawed, peel and devein them if they aren’t already. Frozen shrimp work well and save time. They still offer great taste and texture in the dish. To make this recipe dairy-free, simply skip any dairy ingredients. Use coconut milk, which is already in the recipe. Ensure that your broth is also dairy-free. Most vegetable or chicken broths are safe. You can add extra herbs for more flavor if you like. This keeps the dish rich and creamy without dairy. This blog post covers the ingredients and steps for a delicious Jamaican Shrimp Pasta. You learned about the key ingredients and how to customize your dish. I shared tips for preparing perfect shrimp and avoiding common mistakes. You also discovered various options for dietary needs and how to properly store leftovers. In summary, cooking can be easy and fun. With these tips, your meals will shine. Enjoy creating your own Jamaican Shrimp Pasta!

Jamaican Shrimp Pasta Flavorful and Simple Dish

- Mushrooms: I love using a mix of 500g of sliced mushrooms. Cremini, shiitake, and button mushrooms work best. They add great texture and flavor. Each type brings its own unique taste; cremini adds earthiness, shiitake offers umami, and button mushrooms provide a mild note. - Butter: I recommend 4 tablespoons of unsalted butter. Choose a high-quality butter for the best flavor. Room temperature butter melts evenly and helps achieve that perfect nutty brown. Look for butter that is creamy and rich, as it enhances the dish. - Garlic and Thyme: Fresh garlic is a must. Use 4 garlic cloves, finely minced. It adds a strong, savory kick. Fresh thyme leaves are also key; 1 tablespoon brings a fragrant touch. If you use dried thyme, just 1 teaspoon will do. Fresh herbs make the dish lively and aromatic. - Salt and Pepper: Choose flaky sea salt and freshly ground pepper for seasoning. These add depth to the flavor. Start with a pinch and adjust to your taste. A good salt enhances all the other flavors without overpowering them. - Acidity: A splash of lemon juice is important. It brightens the dish and balances the richness of the butter. Use 1 tablespoon, and feel free to add more if you like a tart kick. This little touch makes a big difference. - Fresh Parsley: For garnish, I like to use finely chopped fresh parsley. It adds color and freshness to the dish. Sprinkle it just before serving to keep it vibrant. It’s a small detail that makes your meal look stunning. For the full recipe, check out the detailed steps to create this delightful dish! Start by heating the butter in a large skillet over medium heat. This is key for the perfect dish. Watch closely as the butter melts completely. Swirl the pan gently to ensure even heating. You want the butter to foam up nicely. Keep your eyes on it; in about 4-5 minutes, it will turn a golden brown color. At this stage, it releases a wonderful nutty aroma. If the butter starts to smell burnt, it’s too late. Remove it from heat immediately and start over. Next, add minced garlic to the browned butter. Sauté it for about 30 seconds. Stir continuously so the garlic doesn’t burn. We want it fragrant and slightly golden. Now, carefully add the sliced mushrooms. Use a spatula to toss them in the garlic butter. Make sure each piece gets coated well. Cook the mushrooms for about 5-7 minutes. Stir them occasionally to promote even cooking. You want them to caramelize and become tender. Once your mushrooms are browned, sprinkle fresh thyme over them. Season with salt and freshly cracked pepper to taste. The thyme adds depth and aroma. Drizzle in the lemon juice and stir well. This helps blend all the flavors together. Let everything cook for another minute. When you serve this dish, the flavors will dance on your palate. For the full recipe, check out the detailed cooking instructions that guide you through this delightful process. For the best flavor, choose mushrooms like cremini, shiitake, or button. Each type brings its own taste. Cremini adds depth, while shiitake offers a rich, umami punch. Button mushrooms are mild, making them a great base. To avoid overcooking, watch the heat closely. Cook the mushrooms on medium heat. Stir them gently to ensure even cooking. Overcooked mushrooms become tough and lose their flavor. Aim for a tender and slightly caramelized texture. Balancing flavors is key. Adding a splash of lemon juice brightens the dish. If you want more depth, consider a splash of white wine or a pinch of red pepper flakes. Fresh herbs like parsley can also lift the flavors, making each bite pop. Serve the browned butter garlic thyme mushrooms in a warm bowl. This keeps them cozy and inviting. For a rustic touch, use a wooden platter. Place a lemon wedge on the side for a fresh burst. Plating is important for visual appeal. Arrange the mushrooms in a neat pile, allowing the colors to shine. Garnish with fresh parsley to add a pop of green. This not only makes the dish look great but also enhances the flavor. Enjoy this dish as a side or on toasted bread. For the full recipe, check out the Browned Butter Garlic Thyme Mushrooms 🧄 recipe. {{image_4}} You can change the flavors by using different herbs. Rosemary adds a piney note that pairs well. Sage brings a warm, earthy flavor that complements mushrooms nicely. You can also mix herbs. Try using a blend of herbs for a unique taste. Browned butter garlic thyme mushrooms shine as a side dish. They pair beautifully with proteins like chicken or fish. The rich flavors enhance the meat. If you want a vegetarian main dish, serve the mushrooms on toasted bread. Add a sprinkle of cheese for extra taste. These mushrooms make any meal feel special. For more ideas, check out the full recipe. To keep your browned butter garlic thyme mushrooms fresh, use proper storage containers. Glass or airtight plastic containers work best. Make sure your mushrooms have cooled to room temperature before sealing them. This helps prevent sogginess. Store them in the fridge for up to three days. To reheat without losing texture, use a skillet over medium heat. Add a splash of water or broth to help steam the mushrooms. Stir gently until heated through. This method keeps them moist and flavorful. Avoid using the microwave, as it can make them rubbery. For best results, reheat in small batches to retain their taste and texture. To make these mushrooms, follow these key steps: 1. Melt the Butter: Start by melting unsalted butter in a large skillet over medium heat. 2. Brown the Butter: Swirl the pan until the butter turns golden brown and smells nutty. This takes about 4-5 minutes. 3. Sauté the Garlic: Add minced garlic and cook for 30 seconds, stirring to avoid burning. 4. Add the Mushrooms: Toss in sliced mushrooms, coating them in the brown butter. 5. Cook Until Tender: Let the mushrooms cook for 5-7 minutes, stirring occasionally until they're caramelized. 6. Season and Add Thyme: Sprinkle fresh thyme, salt, and pepper over the mushrooms. 7. Finish with Lemon Juice: Drizzle lemon juice and mix well before serving. 8. Garnish: Top with fresh parsley for a pop of color. For more details, check out the Full Recipe. Yes, you can use dried thyme. However, fresh thyme has a brighter taste. Use 1 teaspoon of dried thyme for every tablespoon of fresh thyme. Remember, dried herbs are stronger. Adjust to your taste. For this recipe, I recommend using a mix of: - Cremini mushrooms: They add rich flavor. - Shiitake mushrooms: They offer a meaty texture. - Button mushrooms: They keep the dish light and simple. Combining these types gives the best flavor and texture for your dish. This blog post covered the key ingredients for making delicious Browned Butter Garlic Thyme Mushrooms. We explored the importance of fresh mushrooms, quality butter, and the right herbs for flavor. The cooking steps highlighted the technique for perfect browning and seasoning, while tips offered ways to enhance taste and presentation. In the end, whether you make this dish for a cozy meal or a special occasion, remember that good ingredients and careful cooking create the best flavor. Enjoy making this dish your own!

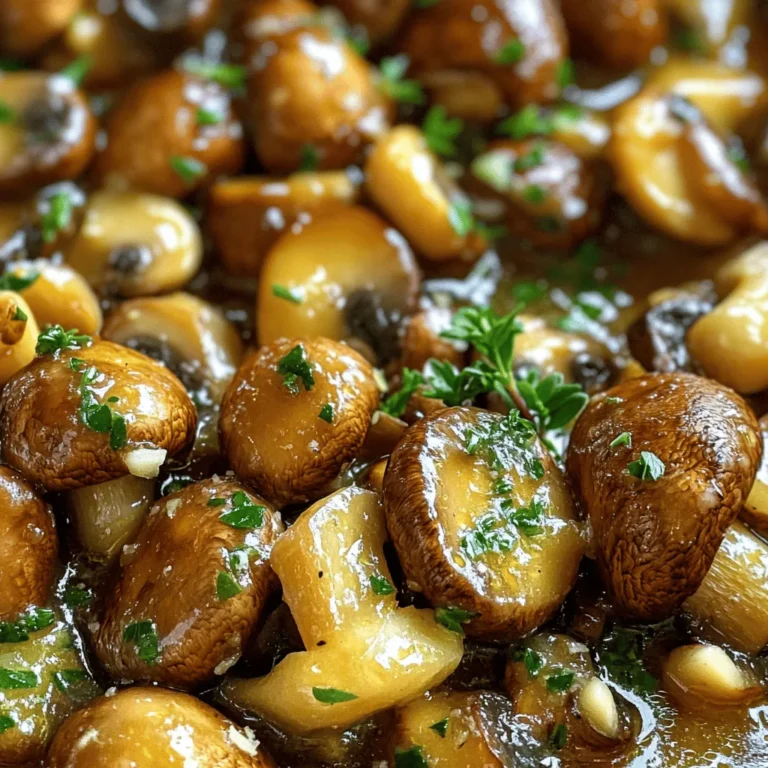
Browned Butter Garlic Thyme Mushrooms Flavorful Delight

To make Minute Ranch Cucumber Bites, you need fresh and simple ingredients. Here is a list of what you will need: - 2 large cucumbers - 1 cup ranch dressing - 1/2 cup cherry tomatoes, halved - 1/4 cup finely chopped red onion - 1/4 cup crumbled feta cheese - 1 tablespoon fresh dill, finely chopped - Salt and pepper, to taste These ingredients come together to create a snack that is both fresh and tasty. The cucumbers bring a crisp texture, while the ranch dressing adds smoothness. The cherry tomatoes pop with flavor, and the feta cheese gives a nice saltiness. Fresh dill adds a fragrant touch. You can find the full recipe in the article, where I guide you step by step in making these bites. - Rinse and dry cucumbers: Start by rinsing the cucumbers under cold water. This helps remove dirt. After rinsing, pat them dry with a clean towel. - Cut cucumbers into thick rounds: Next, slice each cucumber into thick rounds. Aim for pieces about 1 inch thick. You will get around 16 to 20 rounds. - Mix ranch dressing with fresh dill: In a small bowl, combine the ranch dressing and finely chopped fresh dill. Stir it well. This mix adds a bright flavor to the bites. - Arrange cucumber on a platter: Take a serving platter and lay out the cucumber slices. Make sure they are in a single layer for a nice look. - Add ranch dressing, tomatoes, and red onions: Use a spoon or piping bag to add dill ranch dressing to each cucumber slice. Top each bite with a half cherry tomato and a sprinkle of finely chopped red onion. - Finish with feta cheese and seasoning: Crumble feta cheese on top of each cucumber slice. Finally, season lightly with salt and pepper to boost the taste. Enjoy these fresh and tasty snacks right away or chill them for 30 minutes to let the flavors blend. For the full recipe, check the section above. To make your Minute Ranch Cucumber Bites shine, focus on how they look. Use a bright, colorful platter. This enhances their fresh appeal. Add extra sprigs of dill on top for a pop of green. Arrange the bites in a circle or a fun pattern. This adds flair and makes them more inviting. - Garnishes to Enhance Flavor - A drizzle of balsamic glaze can add a sweet touch. - Crushed black pepper gives a nice kick. - Fresh herbs like parsley or basil can freshen the taste. You can make these bites even tastier by adding herbs. Consider using fresh basil or chives. These herbs bring a new layer of flavor. You can also swap the dill for something else if you prefer. - Optional Ingredients for Varied Taste - Add crispy bacon bits for a savory crunch. - Replace feta with goat cheese for a creamier bite. - Try adding sliced olives for a briny flavor. These tips and tricks will help you create a snack that everyone loves. For the complete preparation details, check out the Full Recipe. Enjoy your cooking! {{image_4}} You can change the ranch dressing to mix things up. Try using hummus for a creamy twist. Greek yogurt also works well; it adds a tangy taste. If you want a spicy kick, use sriracha sauce mixed with mayo. Each option gives your cucumber bites a fresh flavor. You don’t have to stick with cucumbers. Carrots or bell peppers make great substitutes. They add a nice crunch and color. You can also switch the cheese. Cream cheese provides a rich taste, while goat cheese gives a tangy flavor. These swaps allow you to customize the bites to your liking. For the full recipe, check out Minute Ranch Cucumber Bites 🥒. After making Minute Ranch Cucumber Bites, store any leftovers in the fridge. Use an airtight container to keep them fresh. If you don’t have a container, wrap them in plastic wrap. These bites stay good for about 2 to 3 days. The cucumbers may lose some crunch, but they will still taste great! You can make these cucumber bites ahead of time! To do this, prepare the cucumbers and the dressing separately. Keep the cucumbers in a cool place until you're ready to serve. This way, they stay fresh and crisp. Mix the dressing with the dill, but store it in a separate bowl. You can combine everything just before serving for the best flavor. If you follow these steps, your cucumber bites will be a hit! Minute Ranch Cucumber Bites stay fresh for about three days in the fridge. For best taste, store them in an airtight container. This keeps them crisp and tasty. Avoid stacking them too high to prevent squishing. If you want to keep them longer, store the ingredients separate. This way, your cucumbers stay crunchy. Yes, you can prepare these cucumber bites ahead of time. I suggest making the dressing and cutting the cucumbers in advance. Keep the dressing in the fridge until you are ready to serve. This helps keep the cucumbers fresh. Assemble the bites just before serving. This way, they stay nice and crisp. You can serve Minute Ranch Cucumber Bites with many dishes. They pair well with other appetizers like cheese and crackers. You could also enjoy them with fresh fruit or a light salad. For a fun twist, serve them with grilled meats or sandwiches. These bites can brighten any meal! These cucumber bites are easy to make and tasty. We covered the key ingredients, from cucumbers to feta cheese. You learned how to prepare the filling and assemble the bites. Also, I shared tips for serving and ways to change up the flavors. Enjoy these bites as a fresh snack or appetizer. They are perfect for gatherings or a quiet night in. Keep experimenting with new ingredients and flavors. You’ll find so many delicious ways to enjoy this dish!

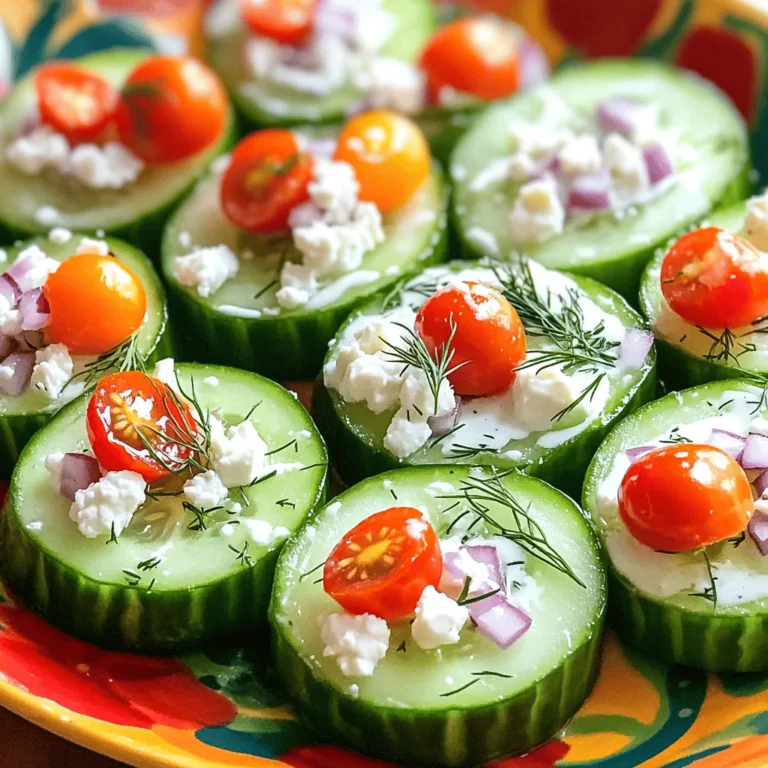
Minute Ranch Cucumber Bites Fresh and Tasty Snack

To make General Tso's Chicken, you need a mix of chicken, veggies, and sauce. This dish has a nice balance of sweet, salty, and spicy flavors. You can easily follow the Full Recipe for step-by-step guidance. Here are the key ingredients you’ll need: - 1 lb boneless, skinless chicken breast, cut into bite-sized pieces - 1/2 cup cornstarch - 2 large eggs, beaten - 1 cup broccoli florets, fresh or frozen - 1/2 cup bell pepper, sliced (red or green for color) - 1/4 cup green onions, finely chopped (reserve some for garnish) - 3 cloves garlic, minced - 1 tablespoon fresh ginger, minced - 1/3 cup soy sauce (low sodium preferred) - 1/4 cup chicken broth (homemade or low sodium) - 1 tablespoon sesame oil - 2 tablespoons rice vinegar - 1 tablespoon granulated sugar - 1 teaspoon chili flakes (adjust to your heat preference) - Vegetable oil, for frying You can add or change some ingredients to suit your taste: - Add carrots or snap peas for extra crunch. - Use a different protein like shrimp or tofu. - Adjust the chili flakes for more or less heat. - Add sesame seeds for a crunchy topping. To start, gather all your ingredients. You need chicken, cornstarch, eggs, and some veggies. Here’s what you’ll need: - 1 lb boneless, skinless chicken breast, cut into bite-sized pieces - 1/2 cup cornstarch - 2 large eggs, beaten - 1 cup broccoli florets, fresh or frozen - 1/2 cup bell pepper, sliced - 1/4 cup green onions, finely chopped - 3 cloves garlic, minced - 1 tablespoon fresh ginger, minced - 1/3 cup soy sauce - 1/4 cup chicken broth - 1 tablespoon sesame oil - 2 tablespoons rice vinegar - 1 tablespoon granulated sugar - 1 teaspoon chili flakes - Vegetable oil, for frying Now, mix your sauce. In a bowl, combine soy sauce, chicken broth, sesame oil, rice vinegar, sugar, and chili flakes. Whisk it well and set it aside. Next, prepare the chicken. Coat the chicken pieces with cornstarch. Make sure each piece is covered well. Then dip them into beaten eggs. This gives the chicken a nice batter. Heat vegetable oil in a deep pan over medium-high heat. When the oil is hot, add chicken pieces in small batches. Fry for about 4-5 minutes until they turn golden brown. Once cooked, place them on a plate lined with paper towels to absorb extra oil. Now, it’s time to add flavor. In the same pan, add a little vegetable oil if needed. Sauté the minced garlic and ginger for 30 seconds until they smell great. Be careful not to burn them. Add broccoli and bell pepper to the pan. Stir-fry for 3-4 minutes. You want them to be bright and crisp. Then, pour in your prepared sauce, stirring well. Let it simmer for about 2-3 minutes until it thickens a bit. Finally, add the fried chicken back into the pan. Toss everything together, making sure the chicken is coated. Cook for another minute so all the flavors mix well. You can now sprinkle chopped green onions on top for a fresh touch. For the full recipe, check out the details above. Enjoy your delicious General Tso's Chicken! To make General Tso's Chicken crispy, use the right oil. Vegetable oil works best. Heat the oil until it shimmers, not smoking. This ensures the chicken cooks quickly and evenly. Fry in small batches. This prevents the temperature from dropping too much. You want that nice golden brown color. For extra flavor, add a dash of sesame oil to the sauce. This gives a nutty taste that blends well. Fresh garlic and ginger also boost the dish. Use them in the sauté step to release their full aroma. You can even add a squeeze of lime juice before serving. This will brighten the flavors. One mistake is overcrowding the pan while frying. This leads to steaming instead of frying. Ensure the chicken pieces have space. Another mistake is not letting the oil heat enough. If the oil is not hot, the chicken will absorb too much oil. Lastly, don’t skip the cornstarch coating. It creates that desired crispy texture. For the complete cooking process, check the [Full Recipe]. {{image_4}} If you want a meat-free option, try tofu or seitan. Both work well in this dish. Simply cube the tofu and press it to remove excess water. Then, follow the same steps for frying. Tofu absorbs the sauce nicely, giving you that savory taste. You can also use tempeh for a different texture and flavor. To add more heat, increase the chili flakes. You can also include sliced fresh chili peppers. I love using Thai bird chilies for a real kick. Just remember, start small. You can always add more heat later. This way, you can adjust to your taste. Feel free to mix in other veggies. Snap peas, carrots, and baby corn add great color and crunch. You could also use bok choy or green beans for a fresh twist. Just make sure to cut everything into bite-sized pieces for even cooking. Using a variety of colors makes your dish look vibrant and appealing. To keep your General Tso's Chicken fresh, store it in the fridge. Place it in an airtight container. This helps keep moisture in and prevents it from drying out. It can stay good for about 3 to 4 days. Make sure to allow it to cool down before sealing it up. This will help maintain its texture and flavor. If you want to save some for later, freezing is a great option. Let the chicken cool completely before freezing. Place the chicken in a freezer-safe bag or container. Squeeze out any extra air to prevent freezer burn. It can last up to 2 to 3 months in the freezer. When you're ready to eat, allow it to thaw in the fridge overnight. Reheating General Tso's Chicken can be simple. For the best results, use a skillet on medium heat. Add a splash of water or broth to keep it moist. Stir it gently until heated through. You can also use a microwave, but be careful not to overheat. This way, you keep the chicken juicy and tasty. Enjoy your flavorful dish again with these storage and reheating tips! For the full recipe, check out the General Tso's Chicken Delight section above. General Tso's Chicken started in China but grew popular in the United States. It is named after General Tso Tsung-t'ang, a 19th-century military leader. This dish blends sweet, spicy, and savory flavors. Many believe it was created by Chef Peng Chang-kuei in Taiwan. In the 1970s, it came to the U.S. and became a favorite takeout option. You can serve General Tso's Chicken with several tasty sides. Here are my top picks: - Steamed white rice or fried rice - Egg rolls or spring rolls - Fried wontons - A fresh cucumber salad - Stir-fried vegetables These sides will enhance your meal and balance the flavors of the chicken. To make General Tso's Chicken healthier, you can try these tips: - Use skinless chicken thighs or breasts for leaner protein. - Bake or air-fry the chicken instead of deep-frying. - Add more vegetables, like bok choy or snap peas, for fiber and nutrients. - Substitute sugar with honey or agave syrup for a natural sweetener. - Use low-sodium soy sauce to cut down on salt. These changes will help you enjoy this dish while keeping it nutritious. For the complete dish, check out the Full Recipe. This blog covered the recipe for General Tso's Chicken, its ingredients, and cooking steps. You learned about essential and optional ingredients to customize your dish. We discussed tips for frying, flavor boosts, and errors to avoid. Variations included vegetarian and spicy options, along with storage tips. In closing, making General Tso's Chicken can be fun and tasty. Experiment and make the dish your own! Enjoy your cooking journey and share your results with others.

General Tso’s Chicken Savory and Flavorful Dish

- 4 medium-sized Yukon gold potatoes - 1/4 cup unsalted butter, softened - 4 cloves garlic, finely minced - 2 tablespoons fresh parsley, finely chopped - 1 tablespoon fresh thyme leaves, finely chopped - 1 teaspoon sea salt - 1/4 cup grated Parmesan cheese - Olive oil for drizzling To make Hasselback potatoes, start with the right ingredients. Yukon gold potatoes work best due to their creamy texture. The unsalted butter gives a rich base, while garlic adds great flavor. Fresh herbs like parsley and thyme bring life to the dish. You can use sea salt to enhance all the flavors. For a cheesy touch, add grated Parmesan. A drizzle of olive oil adds richness too. Remember, the right mix makes a huge difference. You can find the full recipe online for more details. - Preheat your oven to 425°F (220°C). - Line a baking sheet with parchment paper for easy cleanup. - Rinse each potato under cold water. Use a scrub brush to remove dirt. - Dry the potatoes with a kitchen towel to ensure they roast well. - Place a potato between two chopsticks or wooden spoons. This guides your cuts. - Slice the potato down the length, making cuts about 1/8 inch apart. - Be careful not to cut all the way through; the chopsticks prevent deep cuts. - In a bowl, mix softened butter with minced garlic, chopped parsley, thyme, salt, and pepper. - Stir until the mix is smooth and fragrant. - Spread a portion of the herb butter between the potato slices. - Use the rest to cover the tops of the potatoes for full flavor. - Arrange the potatoes on your baking sheet. - Drizzle olive oil over each potato, then sprinkle with Parmesan cheese if you want. - Bake in the preheated oven for 45 to 50 minutes. - Look for a crispy outside and fluffy inside. Baste halfway through for added flavor. - After baking, let the potatoes cool for a few minutes. - This step makes them safer to handle. - For a nice look, serve on a platter with extra herbs and a drizzle of olive oil. - These potatoes are the perfect side dish to enjoy! For Hasselback potatoes, slice thickness matters. Aim for slices about 1/8 inch thick. This thickness lets the butter and flavors seep in well. Keep the slices spaced evenly. Use chopsticks or wooden spoons to guide your cuts. This tool prevents slicing all the way through. When baking, set your oven to 425°F (220°C). Line your baking sheet with parchment paper for easy cleanup. Bake the potatoes for 45-50 minutes. This time gives you a crispy outside and a fluffy inside. Baste the potatoes with leftover herb butter halfway through. It adds extra flavor and moisture. Want to elevate your Hasselback potatoes? Try different herbs! Rosemary and sage work great with garlic. You can also mix in some smoked paprika for a nice kick. Adjust the seasoning to your taste. Add more salt or pepper if you like it spicier. Don’t forget to sprinkle some Parmesan cheese on top! It melts beautifully and gives a savory crust. You can also use other cheeses like cheddar or Gruyère for variety. For this recipe, you need a few kitchen tools. A sharp knife is key for slicing the potatoes. Use a cutting board to keep your workspace clean. A mixing bowl helps combine the herb butter. After cooking, clean your tools right away. Wash the knife and cutting board with hot, soapy water. This step helps keep your kitchen safe and tidy. Also, dry your tools well to prevent rust and maintain their quality. {{image_4}} Hasselback potatoes are great for many flavors. You can spice them up by adding chili flakes. This gives the potatoes a nice kick. If you love cheese, try different kinds. Cheddar, Gouda, or feta all work well. Choose your favorite cheese to create a rich taste. You can add more fun by using toppings. Adding cooked bacon bits gives a smoky taste. You can also mix in some veggies, like roasted peppers or spinach. Another option is to drizzle flavored oils on top. Garlic or herb-infused oils add extra flavor to your potatoes. You can cook Hasselback potatoes in various ways. Try making them in an air fryer for a crisp finish. The air fryer cooks them faster and keeps them tender inside. For a unique twist, grill the potatoes. Grilling gives them a smoky flavor that is hard to beat. You can find the full recipe to guide you through all these variations. Let your Hasselback potatoes cool before you store them. This step helps prevent moisture build-up. Place the cooled potatoes in a container that is airtight. A glass or plastic container works well. Avoid using aluminum foil, as it can trap moisture and make the potatoes soggy. To reheat leftover Hasselback potatoes, use the oven for best results. Preheat your oven to 350°F (175°C). Place the potatoes on a baking sheet and cover them with aluminum foil. This keeps them from drying out. Heat them for about 15-20 minutes. To keep the skin crispy, remove the foil for the last few minutes. You can freeze Hasselback potatoes, but they may lose some texture. To prepare for freezing, first let them cool completely. Wrap each potato tightly in plastic wrap. Then, place them in a freezer-safe bag. When you want to eat them, thaw in the fridge overnight. Reheat in the oven to restore some crispness. Hasselback potatoes are a fun way to prepare potatoes. They have thin slices cut into them, but not all the way through. This dish comes from Sweden and gets its name from a restaurant in Stockholm. The slices create a crispy outside, while the inside stays soft and fluffy. You can add herbs and butter to enhance their flavor, making them special. You can tell when they are done by looking at their color and texture. The outside should be golden and crispy. The inside should feel soft when pierced with a fork. Baking them for 45-50 minutes at 425°F (220°C) usually gives the best results. If they look brown and smell great, they are ready to eat. Yes, you can use many types of potatoes for Hasselback. Yukon gold potatoes are popular because they are creamy and hold their shape. You can also try red potatoes or even sweet potatoes. The key is to choose potatoes that are firm. This way, they won’t fall apart while baking. Customizing Hasselback potatoes is easy and fun. You can add herbs like rosemary or dill for a fresh taste. Try using different cheeses like cheddar or feta for a rich flavor. You can also sprinkle on some bacon bits or top with sour cream. The options are endless, so get creative! Hasselback potatoes go well with many dishes. They make a great side for roasted chicken or grilled steak. You can also serve them with fish or a hearty vegetable stew. Pairing them with a fresh salad adds a nice crunch. Enjoying them with your favorite main dish will make any meal special. Hasselback potatoes are a tasty and fun dish to make. We covered the main ingredients, like Yukon gold potatoes and garlic butter. I shared step-by-step instructions for cutting, baking, and serving. You learned tips for perfect texture and flavor. Exploring variations and storage options adds to their charm. Now you can impress your family or friends with this great recipe. So grab your potatoes and start cooking!

Hasselback Potatoes Flavorful Recipe to Try Today

- 2 ¼ cups all-purpose flour - 1 teaspoon baking soda - ½ teaspoon salt - 1 cup unsalted butter, softened - ¾ cup packed brown sugar - ¾ cup granulated sugar - 2 large eggs - 1 teaspoon pure vanilla extract The base of Kitchen Sink Christmas Cookies starts with simple staples. These ingredients create a soft and chewy texture. The flour gives structure, while the butter adds richness. Brown sugar brings a lovely caramel flavor, and granulated sugar adds sweetness. Eggs help bind everything together, making the cookies moist. - 1 cup semi-sweet chocolate chips - ½ cup white chocolate chips - ½ cup crushed candy canes - ½ cup chopped walnuts or pecans - ½ cup dried cranberries or raisins - ½ teaspoon ground cinnamon The fun part of these cookies is the mix-ins! You can choose any combination of flavors. Chocolate chips add sweetness and richness. White chocolate chips give a creamy taste. Crushed candy canes add a festive crunch and minty flavor. Nuts like walnuts or pecans add a nice texture. Dried cranberries or raisins provide a burst of sweetness. Ground cinnamon adds warmth and spice, making these cookies perfect for the holidays. Feel free to get creative! You can adapt the mix-ins based on what you like. This way, every batch feels special. You can find the full recipe in the earlier section to guide your baking adventure. - Preheat oven to 350°F (175°C). - Line baking sheets with parchment paper. - In a bowl, whisk together the flour, baking soda, salt, and cinnamon. - In another bowl, cream the butter, brown sugar, and granulated sugar until fluffy. - Add eggs one at a time, mixing well after each. - Stir in the vanilla until fully combined. - Gradually mix the dry and wet ingredients until just combined. - Gently fold in the chocolate chips, candy canes, nuts, and dried fruit. - Use a tablespoon or scoop to drop dough onto baking sheets. - Bake for 10-12 minutes until edges are golden. - Let cookies cool on sheets for 5 minutes before moving to racks. These steps will help you create delicious Kitchen Sink Christmas Cookies. Follow the Full Recipe for all details! To make perfect Kitchen Sink Christmas Cookies, avoid overmixing the dough. When you mix too much, the cookies can turn tough. Mix just until everything comes together. This keeps the cookies soft and chewy. For the right texture, use room-temperature butter and eggs. This helps the dough blend well. A good mix of wet and dry ingredients leads to fluffy cookies. Also, remember to scoop the dough with care. Use a tablespoon or cookie scoop for even sizes. Your cookies deserve a festive look! Arrange them on a bright platter for a fun display. You can sprinkle crushed candy canes on top for a pop of color. Dusting cookies with powdered sugar adds a sweet touch. Consider using edible glitter for extra sparkle during the holidays. Pair your cookies with hot cocoa or milk for a cozy treat. They also go well with coffee or tea. For holiday gatherings, place the cookies on a big platter. Mix different flavors to surprise your guests. Add some fresh fruit or nuts around the cookies for a nice touch. Enjoy the fun and flavors of these festive treats. Don't forget to check the Full Recipe for more details! {{image_4}} You can easily change the flavors in your Kitchen Sink Christmas Cookies. Try swapping the chocolate types. Dark, milk, or mini chocolate chips all work great. Each type adds its own unique taste. You can also change the nuts or dried fruits. Try pecans or walnuts if you like crunch. Dried apricots or cherries add a fruity twist. Mixing up these ingredients makes each batch special. If you need gluten-free cookies, you can use alternative flours. Almond flour or oat flour works well. They provide a nice texture and flavor. For vegan options, consider egg substitutes. You can use flax eggs or applesauce. These keep your cookies soft and moist. You’ll get tasty treats that everyone can enjoy. To bring in festive flavors, add spices like nutmeg or ginger. These spices warm up the cookies for the holidays. You can also include seasonal flavors like peppermint or orange zest. A hint of peppermint can brighten the taste. Orange zest adds a fresh twist. These seasonal additions make your cookies even more fun. For the full recipe, check out the Kitchen Sink Christmas Cookies section. To keep your Kitchen Sink Christmas Cookies fresh, store them in an airtight container. This helps lock in moisture and flavor. I suggest using a plastic or glass container with a secure lid. Layer the cookies with parchment paper to prevent sticking. You can also add a slice of bread to maintain softness. The bread absorbs excess moisture, keeping cookies chewy. Freezing cookies is easy and a great way to save some for later. First, let the cookies cool completely. Then, place them in a single layer on a baking sheet. Freeze them for about an hour to firm up. After that, transfer the cookies to a freezer bag. Remove the air and seal it tight. To thaw, simply take out the desired number of cookies and let them sit at room temperature for about 15-20 minutes. They will taste fresh and delicious! These cookies can last for about one week at room temperature. You might notice they become drier over time. To check if they are stale, look for a change in texture or an off smell. If they feel hard or crumbly, it’s best to toss them. Keep an eye on them, and enjoy while they're still soft and tasty! How to make Kitchen Sink Christmas Cookies? To make Kitchen Sink Christmas Cookies, start by mixing flour, baking soda, and salt. In another bowl, cream butter with sugars. Next, add eggs and vanilla. Combine wet and dry mixes. Finally, fold in your favorite mix-ins like chocolate chips and nuts. Bake at 350°F for 10-12 minutes. Can I substitute the butter with margarine? Yes, you can use margarine instead of butter. It will change the taste slightly. The texture may also differ, but your cookies will still be tasty. How do I know when my cookies are done? Check the edges of your cookies. They should be golden brown. The centers may look soft, but they will firm up as they cool. What can I use instead of eggs? You can use flaxseed meal or applesauce as an egg substitute. For each egg, mix 1 tablespoon of flaxseed meal with 2.5 tablespoons of water or use 1/4 cup of applesauce. What's the best way to store freshly baked cookies? Store cookies in an airtight container. This keeps them fresh and soft. You can also add a slice of bread to help them stay moist. Why are my cookies flat? Flat cookies may happen if the butter is too warm or if you overmix the dough. Always chill your dough for 30 minutes before baking if it seems too soft. What to do if the dough is too sticky? If your dough is sticky, add a little more flour, one tablespoon at a time. Mix until you reach the right consistency for scooping. How to fix undercooked cookies once baked? If your cookies are undercooked, return them to the oven for a few more minutes. This helps firm them up without burning. Tips on scaling the recipe for larger batches. To scale the recipe, simply multiply each ingredient by the number of batches you want to make. For example, for double the cookies, use double the ingredients. Nutritional information per cookie. Each cookie contains roughly 150 calories. This may vary with added mix-ins and exact measurements. Important notes for baking in high altitudes. At high altitudes, reduce sugar and increase flour slightly. This helps cookies hold their shape. Also, bake them for a shorter time to prevent over-baking. You learned how to make delicious Kitchen Sink Christmas Cookies with simple steps. We covered the key ingredients, proper mixing techniques, and baking tips to achieve the perfect texture. I shared ways to customize your cookies, along with storage methods to keep them fresh. Finally, I answered common questions to help you troubleshoot any issues. Enjoy experimenting with flavors and sharing these treats during the holidays. Happy baking!

Kitchen Sink Christmas Cookies Festive and Fun Treats

PREV 1 2 3 NEXT
tastykitchentales

explore

DessertsDinnerAppetizersDrinks

Our Policies

  • Cookie Policy
  • Copyright Policy
  • Disclaimer
  • GDPR Policy
  • Terms Of Use
Back to Top
  • About
  • Contact Us
  • Privacy Policy
© 2025 tastykitchentales