WANT TO SAVE THIS RECIPE?
If you’re searching for an easy and tasty snack, look no further! Savory Bisquick sausage balls are perfect for parties or quick bites. With just a few simple ingredients, you can whip up these flavorful treats in no time. I’ll guide you through the steps, share some great tips, and help you elevate your snacking experience. Let’s dive into the delicious world of Bisquick sausage balls!

Why I Love This Recipe
- Quick and Easy: This recipe takes only 15 minutes of prep time, making it perfect for a last-minute snack or party treat.
- Flavorful Combinations: The blend of sausage, cheese, and spices creates a mouthwatering flavor that everyone will love.
- Versatile: You can easily customize the recipe by choosing different types of sausage or cheese based on your preferences.
- Great for Any Occasion: These sausage balls are perfect for parties, game days, or as a hearty breakfast option.
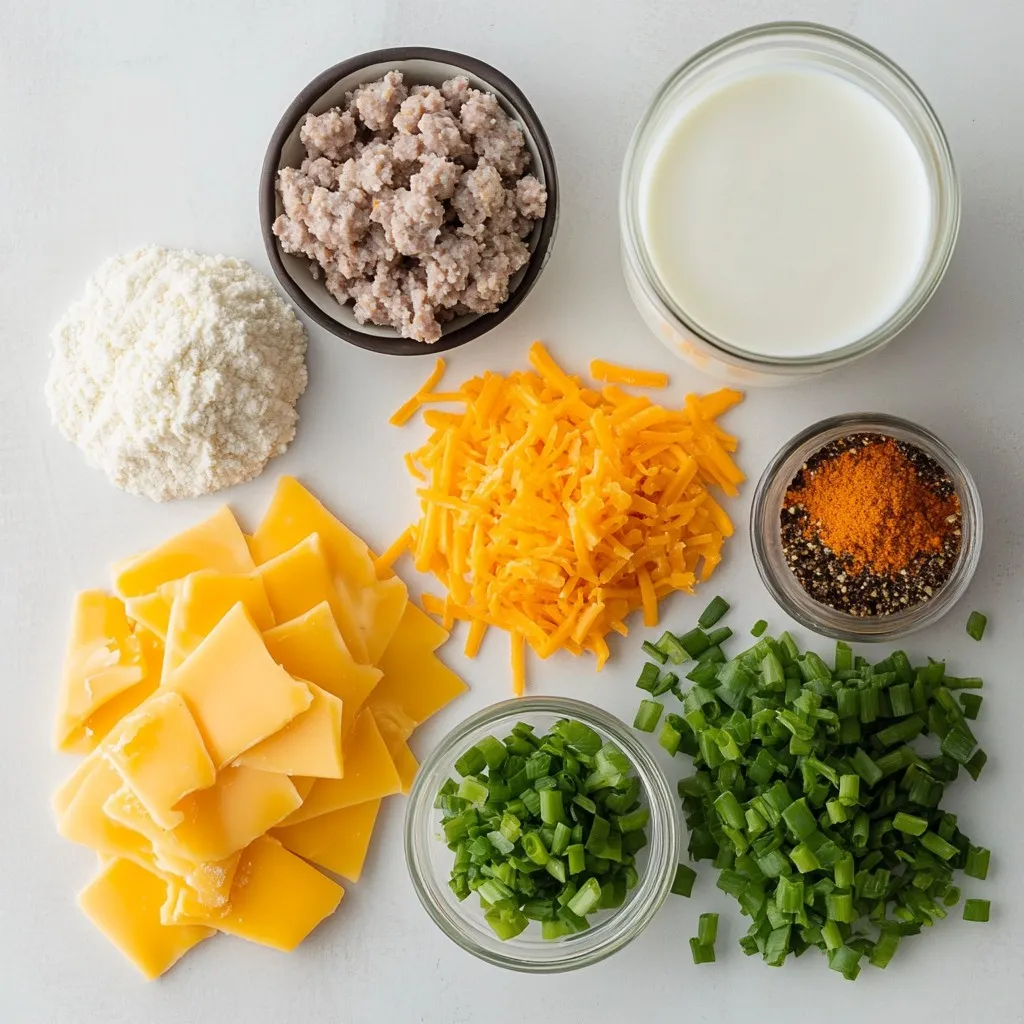
Ingredients
Main Ingredients
– 1 lb breakfast sausage (mild or spicy)
– 2 cups Bisquick mix
– 2 cups shredded cheese (sharp cheddar or blend)
Seasoning Ingredients
– 1/4 cup minced green onions
– 1/2 teaspoon garlic powder
– 1/2 teaspoon onion powder
– 1/2 teaspoon freshly ground black pepper
– 1/4 teaspoon cayenne pepper (optional)
Binding Ingredient
– 1/2 cup milk
When making these sausage balls, the main ingredients set the base for flavor. The choice of breakfast sausage is key. You can pick mild if you prefer a lighter taste or spicy for a kick. Bisquick mix offers the perfect fluffy texture. The shredded cheese adds richness, and sharp cheddar gives a bold flavor.
For seasoning, minced green onions add freshness and color. Garlic powder and onion powder deepen the taste. Black pepper gives a subtle heat, while cayenne is optional for those who love spice.
Finally, milk acts as a binding agent. It helps bring everything together without making the mixture too wet. This balance ensures your sausage balls hold their shape during baking.
Step-by-Step Instructions
Prepping the Oven and Baking Sheet
– Preheat your oven to 375°F (190°C).
– Line a baking sheet with parchment paper. This helps keep the sausage balls from sticking.
Mixing Ingredients
– In a large bowl, combine the breakfast sausage, Bisquick, shredded cheese, minced green onions, garlic powder, onion powder, black pepper, and cayenne pepper, if you want some heat.
– Use your hands to mix everything well. Make sure it’s fully combined.
Forming and Baking the Balls
– Gradually pour in the milk and mix until the mixture is cohesive. It should feel moist but not sticky.
– With clean hands, take bits of the dough and roll them into 1-inch balls. Arrange the balls on the prepared baking sheet, leaving space between each one.
– Bake them in the oven for 18-20 minutes. They should turn golden brown and be cooked through. The internal temperature should reach 160°F (71°C).
Tips & Tricks
Achieving the Perfect Texture
To make your sausage balls great, mix the ingredients gently. Use your hands for this. If you mix too much, your dough can become tough. Just combine until everything is together.
To ensure the sausage balls hold their shape, roll them carefully. Make each ball about one inch wide. Leave space on the baking sheet. This way, they cook evenly and stay round.
Serving Suggestions
When serving Bisquick sausage balls, dips add fun. Try spicy mustard or ranch dressing. They pair well with the savory flavor.
For a nice look, place the sausage balls on a pretty platter. Add a bowl of dip in the center. Garnish with chopped parsley for color. This makes a great dish for parties!
Storing Leftovers
After enjoying your sausage balls, store leftovers in the fridge. Place them in an airtight container. They can stay fresh for up to three days.
When reheating, use the oven for best results. Set it to 350°F (175°C). Place the sausage balls on a baking sheet and warm for about 10 minutes. This keeps them crispy and tasty!
Pro Tips
- Choose Your Sausage Wisely: Select a breakfast sausage that matches your flavor preference—mild for a subtle taste or spicy for a kick.
- Cheese Varieties Matter: Using sharp cheddar or a flavorful cheese blend enhances the overall flavor profile of the sausage balls.
- Consistent Size: Roll the sausage balls to uniform size for even cooking and a professional presentation.
- Don’t Skip the Garnish: A sprinkle of freshly chopped parsley not only adds color but also elevates the visual appeal of your dish.
Variations
Cheese Options
You can switch up the cheese in your sausage balls. Try pepper jack for a spicy kick. Swiss cheese adds a nice mild flavor and melts well. Blend different cheeses for a unique taste. Mixing sharp cheddar with mozzarella gives a great texture and flavor.
Spice Level Adjustments
To make milder sausage balls, use less cayenne pepper. You can skip it if you want a gentle taste. For more heat, add extra cayenne or use spicy sausage. Experiment with different spices like chili powder or red pepper flakes for added zing.
Add-ins for Extra Flavor
Adding herbs like parsley or thyme can really enhance the taste. You can mix in chopped bell peppers for color and a slight crunch. Diced jalapeños will give your sausage balls more spice and a fresh twist. Try adding garlic or onion for an extra flavor boost.
Storage Info
Refrigeration Guidelines
You can store Bisquick sausage balls in the fridge for up to three days. Keep them in an airtight container to maintain their flavor and texture. If you want to keep them fresh longer, consider freezing them instead.
Freezing Instructions
To freeze sausage balls, first let them cool completely. Arrange them in a single layer on a baking sheet. Place the baking sheet in the freezer for about an hour. Once frozen, transfer the balls to a freezer-safe bag or container. This method helps them stay separate and not clump together. You can thaw them in the fridge overnight or heat them directly from the freezer in the oven.
Expiration and Quality Tips
Check for spoilage by looking for changes in color or texture. If the sausage balls smell off or feel slimy, it’s best to toss them. Proper storage helps keep them tasty and safe to eat. If you’re unsure, it’s always smart to err on the side of caution.
FAQs
Can I make Bisquick sausage balls ahead of time?
Yes, you can prepare sausage balls in advance. This snack is easy to make ahead. To do this, mix all the ingredients as per the recipe. Once mixed, shape the mixture into balls. Place the balls on a baking sheet lined with parchment paper. Freeze the balls for about 30 minutes. Once firm, transfer them to a freezer bag. You can store them in the freezer for up to three months. When ready to bake, you can cook them straight from the freezer. Just add a few extra minutes to the baking time.
What can I substitute for Bisquick mix?
If you need a substitute for Bisquick mix, there are great options. You can use any all-purpose baking mix available. Brands like Jiffy or Pioneer work well. If you prefer homemade, mix 2 cups of all-purpose flour, 1 tablespoon baking powder, and 1/2 teaspoon salt. This mix will give you similar results. You can also try gluten-free baking mixes if needed. These substitutes allow for flexibility in your snack-making journey.
Are Bisquick sausage balls gluten-free?
Bisquick sausage balls are not gluten-free due to the Bisquick mix. The original Bisquick contains wheat flour, which has gluten. However, you can make gluten-free sausage balls. Use a gluten-free baking mix instead of Bisquick. Many brands offer gluten-free options that work well. Always check the labels to ensure they meet your needs. This way, everyone can enjoy this tasty snack without worry.
Your journey through making Bisquick sausage balls is now complete. We covered the main ingredients, seasoning, and binding components. You learned step-by-step instructions for mixing, shaping, and baking. Tips helped you achieve the perfect texture, serving suggestions added flair, and storage advice ensures freshness. Remember, you can vary ingredients to suit your taste, making these sausage balls truly yours. Enjoy creating delicious bites for gatherings or snacks at hom
Savory Cheesy Bisquick Sausage Balls
Delicious and easy-to-make sausage balls with a cheesy flavor, perfect for parties or snacks.
Prep Time 15 minutes mins
Cook Time 20 minutes mins
Total Time 35 minutes mins
Course Appetizer
Cuisine American
Servings 24
Calories 150 kcal
- 1 lb breakfast sausage
- 2 cups Bisquick mix
- 2 cups shredded cheese
- 1 4 cup minced green onions
- 1 2 teaspoon garlic powder
- 1 2 teaspoon onion powder
- 1 2 teaspoon freshly ground black pepper
- 1 4 teaspoon cayenne pepper
- 1 2 cup milk
Preheat your oven to 375°F (190°C) and line a large baking sheet with parchment paper.
In a spacious mixing bowl, combine the breakfast sausage, Bisquick mix, shredded cheese, minced green onions, garlic powder, onion powder, black pepper, and cayenne pepper (if desired). Mix thoroughly until fully incorporated.
Gradually pour in the milk, mixing with your hands until the dough comes together. It should feel slightly moist but not excessively sticky.
Take small portions of the dough and roll them into balls approximately 1 inch in diameter. Arrange them on the prepared baking sheet with space between each ball.
Bake in the preheated oven for 18-20 minutes or until golden brown and cooked through, checking that the internal temperature reaches 160°F (71°C).
Allow the sausage balls to cool for a few minutes before serving.
Serve warm with spicy mustard or ranch dressing for dipping.
Keyword cheesy snacks, party food, sausage balls
WANT TO SAVE THIS RECIPE?