FREE DINNER EBOOK! Get your copy!
  • Cookie Policy
  • GDPR Policy
  • Disclaimer
  • Terms Of Use
  • Visit my other site: Fun Cookie Recipes
tastykitchentales
  • Home
  • Dinner
  • Desserts
  • Drinks
  • Appetizers
  • Contact
  • About
  • Privacy Policy
  • Home
  • Dinner
  • Desserts
  • Drinks
  • Appetizers
  • Contact
  • About
  • Privacy Policy
  • Cookie Policy
  • GDPR Policy
  • Disclaimer
  • Terms Of Use
Visit my other site: Fun Cookie Recipes

HOME / CATEGORIES /

Latest

- 1 cup all-purpose flour - 1 cup rolled oats - 1/2 cup brown sugar, packed - 1/2 cup unsalted butter, melted - 1/2 teaspoon baking powder - 1/2 teaspoon ground cinnamon - 1/4 teaspoon ground nutmeg - 1/4 teaspoon salt - 1 can (15 oz) pumpkin puree - 1 cup sweetened condensed milk - 2 large eggs, at room temperature - 1 teaspoon vanilla extract - 1/2 cup chopped pecans (optional) - Whipped cream, for serving The ingredients for pumpkin crunch squares create a perfect blend of flavors. You need simple items that work well together. The all-purpose flour and oats form a hearty base. Brown sugar adds sweetness and depth. Butter gives richness, while baking powder helps the crust rise. The spices, cinnamon and nutmeg, make it taste like fall. The pumpkin puree brings a creamy texture. Sweetened condensed milk adds extra sweetness and creaminess. Eggs help bind everything. The vanilla extract gives a nice aroma. If you love nuts, add chopped pecans for crunch. - 1 cup all-purpose flour = 125 grams - 1 cup rolled oats = 90 grams - 1/2 cup brown sugar = 110 grams - 1/2 cup unsalted butter = 115 grams - 1/2 teaspoon baking powder = 2 grams - 1/2 teaspoon ground cinnamon = 1.5 grams - 1/4 teaspoon ground nutmeg = 0.5 grams - 1/4 teaspoon salt = 1.5 grams - 1 can (15 oz) pumpkin puree = 425 grams - 1 cup sweetened condensed milk = 300 grams - 2 large eggs = about 100 grams - 1 teaspoon vanilla extract = 5 grams - 1/2 cup chopped pecans = 60 grams These conversions help if you prefer measuring in grams. You can easily switch between cups and grams. You can change some ingredients if needed. Use whole wheat flour for a nuttier taste. For a gluten-free option, try almond flour or oat flour. If you want less sugar, use coconut sugar or maple syrup. For a dairy-free version, use coconut oil instead of butter. Substitute the sweetened condensed milk with a dairy-free option, like almond milk mixed with a thickener. Feel free to experiment with the spices. More cinnamon or a hint of ginger adds a nice twist. Just remember, these squares are all about balance. Keep the flavors in harmony for the best result. - Preheat your oven to 350°F (180°C) and grease a 9x13 inch baking dish. - In a large bowl, mix 1 cup of all-purpose flour, 1 cup of rolled oats, and 1/2 cup of packed brown sugar. To make the crust, pour in 1/2 cup of melted unsalted butter. Use a fork or your hands to mix until it looks like coarse crumbs. Take half of this crumb mixture and press it into the bottom of the greased dish. Set the rest aside for later. - In a different bowl, add 1 can (15 oz) of pumpkin puree, 1 cup of sweetened condensed milk, and 2 large eggs (beaten). - Mix in 1 teaspoon of vanilla extract, 1/2 teaspoon of ground cinnamon, 1/4 teaspoon of ground nutmeg, and 1/4 teaspoon of salt. Stir until it is smooth. - Carefully pour this pumpkin mix over the crust. Use a spatula to spread it evenly. - Sprinkle the reserved crumb mixture on top of the pumpkin layer. If you like, add 1/2 cup of chopped pecans for extra crunch. - Bake for 30-35 minutes. The top should turn golden brown, and a toothpick inserted in the center should come out clean. - Let the squares cool in the dish for 15-20 minutes before cutting them into squares. - Adjusting spices to taste: Start with the basic spices. You can add more cinnamon or nutmeg if you want a stronger flavor. Taste the pumpkin mix before you pour it into the crust. Make it yours! - Achieving the right texture: The crust should feel crumbly but hold together. If it feels too dry, add a little melted butter. If it's too wet, add a bit of flour or oats. Keep it balanced for the best crunch. Serve your Pumpkin Crunch Squares warm or at room temperature. A dollop of whipped cream on top makes them special. You can also sprinkle a bit of cinnamon for extra flavor. For a fun twist, add some caramel sauce or chocolate drizzle. To store leftovers, keep them in an airtight container. They last for about three days at room temperature. If you want to keep them longer, refrigerate them for up to a week. You can also freeze the squares for up to three months. Just wrap them well to avoid freezer burn. Enjoy your fall treat! {{image_4}} You can make vegan pumpkin crunch squares easily. Start by swapping eggs for flax eggs. Mix one tablespoon of flaxseed meal with three tablespoons of water. Let it sit for five minutes to thicken. Use coconut oil instead of butter for a rich taste. For the sweetened condensed milk, use a store-bought vegan version or make your own using coconut milk and sugar. This keeps the creamy texture while being animal-friendly. If you need a gluten-free version, simply switch to gluten-free flour. Almond flour or oat flour works well. Both add a nice flavor and texture. When using almond flour, blend it with a bit of cornstarch for better results. - Alternative flour suggestions: - Almond flour - Oat flour - Coconut flour (use less, as it absorbs moisture) For a chocolatey twist, stir in chocolate chips into the pumpkin filling. Dark or semi-sweet chips add depth. You can also add dried fruit, like cranberries or raisins, for a sweet chew. Chopped nuts, such as walnuts or pecans, can enhance the crunch. Just remember to mix lightly to keep the filling smooth. Enjoy experimenting with flavors! You can keep Pumpkin Crunch Squares at room temperature. Place them in a covered container. They will stay fresh for about two days. Enjoy them while they are soft and tasty! For longer storage, put the squares in the fridge. They will last about a week. Make sure to cover them well. This keeps them moist and flavorful. When you want to eat them, simply take them out and enjoy! In the fridge, Pumpkin Crunch Squares stay good for up to seven days. This makes it easy to prepare them in advance for guests or special occasions. Just remember to keep them sealed to avoid drying out. You can freeze Pumpkin Crunch Squares for later. Cut them into squares and wrap each one tightly in plastic wrap. Then place them in a freezer bag. They can last for up to three months in the freezer. When you're ready to eat, let them thaw in the fridge overnight. They will taste just as good as fresh! You can use evaporated milk for a similar texture. If you want a dairy-free option, try coconut milk. It adds a nice flavor. You can also mix almond milk with a sweetener to mimic the taste. This works well for those with dietary needs. Yes, you can. Prepare the pumpkin crunch squares a day in advance. Just store them in the fridge after they cool. This allows the flavors to blend well. When you're ready to serve, warm them slightly in the oven. Top with whipped cream right before serving for a fresh touch. To enhance the flavor, add more spices like ginger or cloves. A pinch of nutmeg can also elevate the taste. You can mix in chocolate chips or dried fruit for extra sweetness. Toasted pecans add a nice crunch and a deeper flavor too. Enjoy experimenting with what you have! This article covered how to make delicious Pumpkin Crunch Squares. We discussed key ingredients and steps to create a tasty treat. I shared tips to perfect your baking and options for variations, like vegan and gluten-free. In the end, this dessert is simple and rewarding. You can enjoy it fresh or stored for later. Get creative with your flavors and share with friends. Enjoy your baking adventure!

Pumpkin Crunch Squares Delicious Fall Dessert Recipe

- 2 cups mixed nuts (walnuts, pecans, almonds) - 1 cup pumpkin seeds (pepitas) - 1 cup dried cranberries - 1 cup dried apple chunks - 1 cup popcorn (popped and lightly salted) - 1 teaspoon ground cinnamon - ½ teaspoon ground nutmeg - ¼ cup pure maple syrup - A pinch of sea salt You can easily change some ingredients. If you have nut allergies, use seeds like sunflower seeds or more pumpkin seeds. For sweeteners, try honey or agave syrup instead of maple syrup. Using fall ingredients gives you great health perks. Nuts are full of healthy fats and protein. Dried fruits offer fiber and vitamins. Pumpkin seeds are great for minerals. Eating with the season means you get the freshest flavors and nutrients. It also helps local farmers and reduces food waste. Enjoying seasonal food can make your meals richer in taste and health! 1. First, preheat your oven to 350°F (175°C). This is key for toasting the mix. 2. Next, grab a large mixing bowl. Add 2 cups of mixed nuts, 1 cup of pumpkin seeds, 1 cup of dried cranberries, and 1 cup of dried apple chunks. Stir gently to mix everything well. 1. In a small saucepan, warm ¼ cup of pure maple syrup. Add 1 teaspoon of ground cinnamon, ½ teaspoon of nutmeg, and a pinch of sea salt. Stir until warm and blended nicely. 2. Pour the warm syrup over the nut and fruit blend in your mixing bowl. Use a spatula to toss everything together. Make sure all pieces are coated evenly. 3. Spread the coated mix on a parchment-lined baking sheet. This helps with even toasting and easy cleanup. 4. Bake for 15 to 20 minutes. Stir halfway through to ensure even cooking. You want the nuts to turn golden brown and smell great. 1. Once the mix is toasted, take it out of the oven. Let it cool completely at room temperature. Cooling is crucial for getting that crunchy texture. 2. After cooling, add 1 cup of popped and lightly salted popcorn to the nut and fruit mixture. Toss gently to combine everything well. Enjoy your tasty Autumn Harvest Snack Mix! To get the best flavor in your Autumn Harvest Snack Mix, even coating is key. When you pour the warm syrup over the nuts and fruits, make sure to stir gently. This helps each piece get the tasty syrup. If you skip this, some nuts may taste plain. Toasting the mix boosts its flavor. Bake the snack mix in the oven at 350°F for 15-20 minutes. Stir halfway through to ensure even toasting. Look for a golden brown color. This will make the nuts crunchy and enhance their taste. When serving your snack mix, presentation matters. Use rustic bowls or clear jars for a cozy, autumn look. You can even add a sprinkle of cinnamon on top for a nice touch. Pair your snack mix with warm apple cider or herbal tea. These drinks match the fall flavors well. Guests will love this tasty combination! Make your mix unique by adding chocolate or coconut. A handful of dark chocolate chips or shredded coconut can add a fun twist. You can also adjust the spice levels. If you like more heat, try a pinch of cayenne pepper. For less spice, skip the nutmeg or reduce the cinnamon. Tailor the mix to match your taste! {{image_4}} You can make your Autumn Harvest Snack Mix sweet or savory. For a savory mix, try adding spices like paprika or garlic powder. These spices bring a warm taste that balances the sweetness of the dried fruits. You can also mix in some cheese, like cheddar or parmesan, for a rich flavor. Adding olives gives a nice salty bite. If you need gluten-free options, use gluten-free oats instead of popcorn. This keeps the crunch while supporting your diet. For a vegan twist, swap maple syrup with agave nectar. It offers similar sweetness without animal products. You can also use coconut nectar as a sweetener. Think about global flavors to spice up your mix. Add curry powder for an Indian flair or chili powder for a Mexican kick. You can even use dried fruits from different cultures, like mango or goji berries. These choices add unique tastes and seasonal flavors from around the world. Store your Autumn Harvest Snack Mix in an airtight container. This keeps it fresh and crunchy. A glass jar or a plastic container with a tight lid works great. Place it in a cool, dry place, away from sunlight. A pantry or a cupboard is perfect. Your snack mix stays fresh for up to two weeks. After that, it may lose its crunch. Signs of spoilage include a stale smell or a soft texture. If your mix feels gummy or sticky, it's time to toss it. Yes, you can freeze the snack mix! Freezing helps you save it for later. To freeze, put the mix in a freezer-safe bag. Squeeze out as much air as you can. When you want to eat it, take it out and let it thaw at room temperature. Enjoy it crunchy and fresh! Your Autumn Harvest Snack Mix will stay fresh for up to two weeks. Store it in an airtight container. Keep it in a cool, dry place. This way, it will stay crunchy and tasty. If you see any signs of spoilage, like a bad smell or soft texture, it is best to toss it. Yes, you can make this snack mix ahead of time. It is perfect for parties or busy days. Just follow the recipe and let it cool completely. Once cooled, store it in an airtight container. You can make it a few days in advance. The flavors will blend well, making it even yummier. If you want a different texture, you can skip popcorn. Try using puffed rice or crunchy cereal instead. Both will add a nice crunch. You could also use pretzel pieces for a salty twist. Just remember to adjust the salt in your mix if you add salty snacks. This blog post guides you to create a delicious Autumn Harvest Snack Mix. We covered the best ingredients and how to prepare them. You learned substitution ideas for dietary needs and the benefits of using seasonal ingredients. I shared helpful tips for perfecting your mix and suggested unique variations. Proper storage tips ensure your snack stays fresh. Enjoy making this mix as a cozy treat for fall. It's an easy way to celebrate the season with tasty flavors and healthy options. Try it out and let your creativity shine!

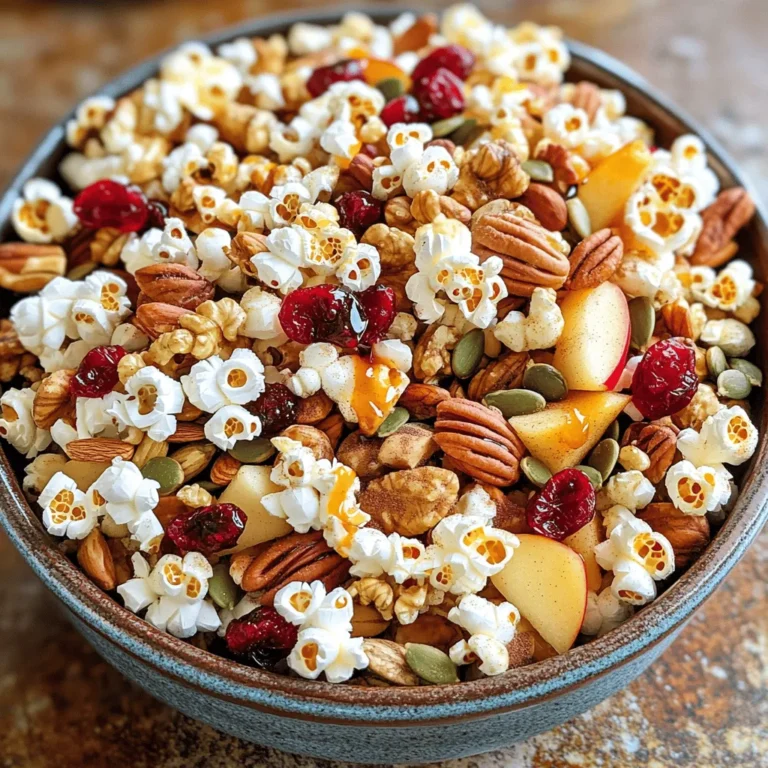
Autumn Harvest Snack Mix Crunchy and Flavorful Recipe

- 1 lb (450g) beef sirloin, thinly sliced - 4 cups green cabbage, shredded - 1 red bell pepper, thinly sliced - 2 green onions, chopped - 3 cloves garlic, minced - 1 tablespoon fresh ginger, minced - 3 tablespoons soy sauce - 1 tablespoon sesame oil - 1 tablespoon vegetable oil - 1 teaspoon red pepper flakes - Salt and pepper to taste - Sesame seeds for garnish In this Minute Beef and Cabbage Stir Fry, the ingredients play a big role in flavor. You want fresh beef sirloin for tender bites. Thinly sliced beef cooks quickly, giving you a juicy texture. Shredded cabbage adds a nice crunch while soaking up the sauce. The red bell pepper brings sweetness and color, making the dish look great. Chopped green onions give a fresh kick at the end. For pantry staples, garlic and ginger are key. They create a strong base flavor. Soy sauce gives that savory umami taste. Sesame oil adds a nutty aroma, enhancing the overall profile. Red pepper flakes let you control the heat. You can adjust them based on your taste. Finally, don't forget salt and pepper. They bring out all the other flavors. If you want to impress, sprinkle sesame seeds on top. They add a nice crunch and look great. This dish is quick, tasty, and full of fresh ingredients. First, take your thinly sliced beef sirloin and place it in a medium bowl. Add 1 tablespoon of soy sauce, a pinch of salt, and some pepper. Mix everything well to coat the beef evenly. Let the beef marinate for 10 minutes. This step makes the beef taste better. Next, heat 1 tablespoon of vegetable oil in a large skillet over medium-high heat. When the oil shimmers, add your marinated beef slices. Stir-fry the beef for about 2-3 minutes until it turns brown. Once cooked, remove the beef from the skillet and set it aside. This keeps the beef tender. Now, keep the same skillet on the heat. Add the minced garlic and ginger. Stir-fry them for about 30 seconds until they smell great. This will add a nice flavor to your dish. Now it's time to add some color! Add 4 cups of shredded cabbage, the sliced red bell pepper, and the chopped green onions to the skillet. Stir-fry this mix for about 3-4 minutes. The cabbage should wilt but still stay crunchy. Once the vegetables look good, return the cooked beef to the skillet. Pour in the remaining 2 tablespoons of soy sauce, 1 tablespoon of sesame oil, and a teaspoon of red pepper flakes. Toss everything together for another 2-3 minutes. This helps all the flavors blend well. Taste your stir fry and adjust the seasoning as needed. Now, you are ready to serve this delicious meal hot! To make your stir fry pop, you can adjust the taste. Add more soy sauce if you need a stronger flavor. If you like heat, consider adding more red pepper flakes. For a zesty twist, a splash of lime juice brightens the dish. This little touch makes a big difference! Always keep your ingredients chopped and ready. This helps with quick cooking. When you stir-fry, stir continuously. This prevents sticking and ensures even cooking. You want everything to cook just right! For the best results, use a non-stick skillet or a wok. A non-stick surface helps with easy cooking and clean-up. Woks are great for high heat and quick cooking, making them perfect for stir fries. Choose what works best for you! {{image_4}} You can switch up the beef for other proteins. Chicken, tofu, or shrimp work great. Each option brings its own flavor. Chicken is light and healthy. Tofu is perfect for a vegan twist. Shrimp adds a nice seafood taste. Just make sure to adjust cooking times. Cook chicken until it’s no longer pink. Tofu should be golden and crispy. Shrimp cooks in just a few minutes. Feel free to add more veggies to your stir fry. Broccoli, carrots, or snap peas are great choices. They add color and crunch. Broccoli brings in vitamins and fiber. Carrots add a sweet touch and vibrant color. Snap peas give a nice snap and fresh taste. You can mix and match according to your taste. Just cut them into small pieces for even cooking. Don’t be afraid to change the sauce. Teriyaki or sweet and sour sauce can change the flavor. Teriyaki adds a sweet and savory taste. Sweet and sour gives a tangy twist. You could even mix in some chili sauce for heat. Experimenting will help you find your favorite. Just remember to balance the flavors so they blend well. After enjoying your stir fry, store leftovers in an airtight container. This keeps the flavors fresh. Place the container in the fridge. The dish stays good for about three days. If you want to save some for later, freeze the stir fry in portions. Use freezer-safe bags or containers. This makes it easy to reheat later. Just remember to label them with the date! For the best taste, reheat your stir fry in a skillet. This helps keep the texture nice and crunchy. Heat it over medium heat until warmed through. Stir often to prevent sticking. Enjoy your quick meal again! Total prep and cook time is about 15 minutes. This quick meal is perfect for busy days. You can enjoy a tasty dish without spending hours in the kitchen. Yes, but it's best freshly made for taste and texture. If you cook it ahead, the veggies may get soggy. To enjoy the best flavors, make it right before serving. Absolutely! Make it gluten-free by using tamari. Adjust for low-carb by omitting the rice. You can also swap beef for chicken or tofu. This recipe fits many diets. Serve with steamed rice, quinoa, or cauliflower rice. These sides add great texture and flavor. They also help soak up the tasty sauce from the stir fry. Enjoy experimenting with your favorites! This blog post detailed how to create a quick and tasty Minute Beef and Cabbage Stir Fry. We explored key fresh ingredients and pantry staples, along with easy step-by-step instructions. Flavor tips and variations helped show that this dish adapts well to your taste. Finally, storage options and reheating tips ensure your leftovers remain delicious. Remember, cooking can be fun and simple. Enjoy experimenting with flavors and making this dish your own!

Minute Beef and Cabbage Stir Fry Quick and Easy Meal

To make classic stuffed cabbage rolls, gather these ingredients: - 1 large head of green cabbage - 1 cup uncooked quinoa or rice - 1 pound ground turkey or beef - 1 medium onion, finely chopped - 2 cloves garlic, minced - 1 can (14 oz) diced tomatoes, undrained - 1 teaspoon paprika - 1 teaspoon dried thyme - 1 teaspoon dried oregano - Salt and pepper to taste - 1 egg (optional, for binding) - 2 cups tomato sauce for baking - Fresh parsley, chopped, for garnish Each ingredient plays a key role in flavor. The cabbage gives a nice crunch. The meat adds protein and richness. The quinoa or rice offers a hearty texture. Together, these create a warm and satisfying dish. The spices elevate the taste. Oregano and thyme bring a comforting aroma. Paprika adds a touch of warmth. The tomatoes give moisture and tang. Don't skip the egg if you want a firmer filling. It helps bind everything together. Fresh parsley at the end adds color and freshness. These simple ingredients make stuffed cabbage rolls a family favorite. They are perfect for gatherings or cozy dinners at home. First, let's prep the cabbage leaves. Bring a big pot of water to a rolling boil. Carefully cut out the core of the cabbage head. Then, gently peel off 8-10 leaves. Blanch these leaves in the boiling water for 2-3 minutes until they soften. This helps make them easy to roll. Once done, remove the leaves and let them cool on a plate or towel. Next, we need to cook the quinoa or rice. In a medium pot, follow the package instructions for cooking. Once it's done, set it aside to cool. This step is key for perfect texture in your rolls. Now, we’ll create the filling. In a large skillet, heat a splash of water or broth over medium heat. Add the chopped onion and minced garlic. Cook them for about 3-4 minutes until the onion turns translucent. This step brings out their natural sweetness. In a big bowl, mix the ground turkey or beef, cooked quinoa or rice, sautéed onion, and garlic. Add the undrained diced tomatoes, paprika, thyme, oregano, salt, and pepper. If you want a firmer filling, include the egg. Mix everything until well combined. Time to make the rolls! Lay a softened cabbage leaf flat on your work surface. At the base of the leaf, place about 2-3 tablespoons of the filling. Fold in the sides of the leaf, then roll it up tightly from the bottom to the top. This keeps the filling secure. Repeat this with the rest of the cabbage leaves and filling. For baking, first, spread a thin layer of tomato sauce on the bottom of a baking dish. Place the stuffed cabbage rolls seam-side down in the dish. Cover them with the remaining tomato sauce. Next, cover the dish with aluminum foil. Bake in your preheated oven at 350°F (175°C) for 45 minutes. After that, remove the foil and bake for another 15 minutes. This lets the sauce bubble and the flavors mix well. To get soft cabbage leaves, start by boiling water. Remove the core from the cabbage head first. Peel off 8-10 leaves carefully. Blanch these leaves in boiling water for 2-3 minutes. This step makes them easier to roll. After blanching, place them on a plate to cool. You can also freeze cabbage leaves for later use. Just thaw them before cooking. To make a tasty filling, focus on seasoning. Use fresh herbs like thyme and oregano. They add depth to the dish. A good mix of meat and grains also helps. I like to use ground turkey or beef with quinoa or rice. This blend keeps the filling moist. If you want a firmer texture, add an egg to bind the filling. Mix everything well to distribute the flavors evenly. When baking, cover your dish with foil for the first part. This helps steam the rolls and keep them moist. After 45 minutes, remove the foil. This allows the top to brown slightly. It also helps the sauce bubble, creating a rich flavor. Keep an eye on them to prevent burning. The final bake time should be about 15 minutes without the cover. Enjoy watching the flavors meld together! {{image_4}} For a vegetarian or vegan version, you can skip the meat. Use lentils or mushrooms for a hearty filling. Tofu also works well as a meat substitute. You can add some grated carrots for sweetness and texture. Instead of an egg, use ground flaxseed mixed with water as a binding agent. This mix helps hold the filling together. You can swap rice with quinoa, barley, or farro. Quinoa is a superfood packed with protein. It cooks fast and has a nutty taste. Rice is classic and absorbs flavors well. Barley gives a chewy texture, while farro adds a rich, earthy flavor. Each grain brings its own unique twist to the rolls. Changing herbs and spices can create new tastes. Try fresh dill or basil for a bright kick. Adding cumin or coriander gives a warm, spicy note. You can also use smoked paprika for a deeper flavor. Don't forget to taste as you mix! Adjust seasonings to match your preferences for a perfect dish. Store your leftover cabbage rolls in an airtight container. This keeps them fresh and tasty. Ideally, eat them within three to four days. To keep them from drying out, add a bit of extra sauce on top before sealing. To freeze cabbage rolls, let them cool completely first. Place them in a single layer on a baking sheet. Freeze until solid, then move them to a freezer-safe bag. You can store them for up to three months. Label the bags with the date, so you know when to use them. For reheating, you can use either a microwave or an oven. If using a microwave, place a roll on a plate and cover it with a damp paper towel. Heat for 1-2 minutes, checking for warmth. For the oven, preheat it to 350°F (175°C). Place the rolls in a baking dish, cover with foil, and heat for about 20 minutes. Enjoy your warm and flavorful meal! Yes, you can use different meats in stuffed cabbage rolls. Ground beef works well. You can also try ground chicken or pork. Each type of meat adds its own flavor. Experiment to find what you like best! Leftover cabbage can be used in many ways. You can chop it for salads or stir-fries. It also makes a great addition to soups. Don't forget to try coleslaw! Cabbage rolls are fully cooked when they reach an internal temperature of 165°F. You can check with a meat thermometer. The filling should be hot and the cabbage soft. The sauce should be bubbling too! Yes, you can prepare stuffed cabbage rolls ahead of time. Assemble the rolls and place them in the baking dish. Cover with sauce and wrap tightly. Store in the fridge for up to 24 hours before baking. Cabbage rolls pair well with many sides. You can serve them with mashed potatoes or rice. A fresh salad adds nice crunch too. Bread or rolls are great for dipping in sauce. To make the best stuffed cabbage rolls, gather your ingredients. You will need: - 1 large head of green cabbage - 1 cup uncooked quinoa or rice - 1 pound ground turkey or beef - 1 medium onion, finely chopped - 2 cloves garlic, minced - 1 can (14 oz) diced tomatoes, undrained - 1 teaspoon paprika - 1 teaspoon dried thyme - 1 teaspoon dried oregano - Salt and pepper to taste - 1 egg (optional, for binding) - 2 cups tomato sauce for baking - Fresh parsley, chopped, for garnish Now, let’s start cooking! 1. Preheat your oven to 350°F (175°C). 2. Bring a large pot of water to a boil. Carefully remove the core from the cabbage head. Peel off 8-10 leaves gently. Blanch these leaves in boiling water for 2-3 minutes until they soften. Remove them and let them cool. 3. Cook your quinoa or rice according to the package directions. Once cooked, set it aside to cool a bit. 4. In a large skillet, heat a splash of water or vegetable broth over medium heat. Add the chopped onion and minced garlic. Cook until the onion turns translucent, about 3-4 minutes. 5. In a large bowl, mix the ground turkey or beef with the cooked quinoa or rice. Add the sautéed onion, garlic, undrained diced tomatoes, paprika, thyme, oregano, salt, and pepper. If you want, add the egg for better binding. Mix well. 6. Lay a softened cabbage leaf flat on your work surface. At the base of the leaf, place about 2-3 tablespoons of the filling. Fold in the sides and roll it up tightly from bottom to top. Repeat this with the remaining leaves and filling. 7. Spread a thin layer of tomato sauce on the bottom of a baking dish. Place the cabbage rolls seam-side down in the dish. Pour the remaining tomato sauce over them. 8. Cover the dish with aluminum foil and bake for 45 minutes. After 45 minutes, remove the foil and bake for another 15 minutes. This helps the sauce bubble and the flavors blend. 9. Once cooked, take the dish out of the oven. Let it cool for a few minutes before serving. For a nice touch, drizzle more tomato sauce on top and sprinkle with fresh parsley. Enjoy your savory stuffed cabbage rolls! You now have a complete guide for making savory stuffed cabbage rolls. We covered every step, from ingredients to baking, ensuring tasty results. Remember to use fresh herbs and spices for the best flavor. Feel free to experiment with grains and fillings based on your taste. With these tips, you’ll impress anyone who tries your dish. Enjoy your cooking adventure and make these rolls a staple for your meals!

Classic Stuffed Cabbage Rolls Flavorful Family Favorite

- 12 cups freshly popped popcorn - 2 cups packed brown sugar - 1/2 cup unsalted butter - 1/2 cup light corn syrup - 1/2 teaspoon baking soda - 1 teaspoon pure vanilla extract - 1/4 teaspoon sea salt - Optional: 1 cup chopped nuts The main ingredient is freshly popped popcorn. You can pop it using an air popper or on the stove. It gives the best texture. Next, we need brown sugar. This adds sweetness and depth. Unsalted butter gives richness. Light corn syrup helps the caramel stay soft and chewy. Baking soda is key. It makes the caramel light and airy. Vanilla extract adds a nice flavor. Finally, sea salt balances the sweetness. If you like, add chopped nuts for crunch. Salted peanuts or toasted almonds work great. - Medium saucepan - Mixing bowl - Baking sheet - Parchment paper - Spatula You’ll need a medium saucepan for the caramel. A mixing bowl is best for the popcorn. A baking sheet lined with parchment paper helps the caramel corn not stick. A spatula is great for mixing the caramel with the popcorn. Each serving has about 200 calories. You get carbs from the popcorn and sugar. You also get some fat from the butter and nuts. If you want a healthier version, use less sugar or try coconut oil instead of butter. This way, you keep the taste but cut back on calories. First, pop the popcorn. You can use an air popper or a stovetop method. I prefer the stovetop for a nice crunch. Measure about 12 cups of freshly popped popcorn. This is roughly 1 cup of unpopped kernels. Next, check for unpopped kernels. These can ruin your snack. It’s best to remove them from the bowl. You want every piece covered in that sweet caramel. Now, let’s make the caramel. In a medium saucepan, mix 2 cups of packed brown sugar, 1/2 cup of unsalted butter, and 1/2 cup of light corn syrup. Cook over medium heat. Stir until the mix boils. This will take a few minutes. Watch closely. You want a rich, deep caramel color. This usually takes about 4 to 5 minutes. Be careful, as the mix gets very hot. When it’s ready, remove the saucepan from the heat. Add 1/2 teaspoon of baking soda, 1 teaspoon of pure vanilla extract, and 1/4 teaspoon of sea salt. The mixture will bubble, so be cautious. Pour the caramel over the popcorn. Use a large spatula to fold and toss the popcorn. Make sure every kernel is coated. If you want extra crunch, fold in 1 cup of chopped nuts at this stage. Spread the caramel-coated popcorn evenly on a lined baking sheet. This helps it bake evenly. Make sure it’s not clumped together. Bake in your preheated oven at 250°F (120°C) for 1 hour. Stir the popcorn every 15 minutes. This helps the caramel coat evenly and prevents burning. Once baked, take it out and let it cool on the sheet. After it cools, break it into pieces and serve. Enjoy this sweet homemade treat! To get the best crunch, start with fresh popcorn. Use an air popper for light, fluffy kernels. Avoid old or stale popcorn, as it can lead to a chewy texture. When making the caramel, let it boil for 4 to 5 minutes. This helps it reach the right color and flavor. If the caramel is too soft, your popcorn may end up sticky. Stir the popcorn gently but quickly when adding caramel. This helps coat each kernel without crushing it. Amish Caramel Corn looks great in colorful bowls for parties. You can also package it in clear bags tied with ribbons for gifts. It pairs well with warm apple cider or hot chocolate in the fall. For summer, serve it with lemonade or iced tea. Try making popcorn balls for a fun twist. Just mold the caramel-coated popcorn into balls for a grab-and-go snack. Store your caramel corn in an airtight container at room temperature. This keeps it fresh for up to two weeks. If you live in a humid area, use glass jars to prevent stickiness. For longer storage, you can freeze it. Just make sure to let it cool completely before sealing it in a freezer bag. When you're ready to eat, just thaw it at room temperature. {{image_4}} You can have fun with flavor by adding different nuts or candies. Try tossing in chopped peanuts, toasted almonds, or even chocolate chips. This gives the caramel corn a nice crunch. You can also experiment with flavors, like drizzling chocolate on top. Melt some chocolate and use a spoon to swirl it over the popcorn. Let it cool, and you have a sweet treat that stands out! For those with dietary needs, there are easy swaps. You can make this recipe gluten-free by using gluten-free corn syrup. If you want a vegan option, swap the unsalted butter for coconut oil or a dairy-free butter spread. These changes keep the taste delicious while fitting your diet. Seasonal twists can make your caramel corn even more special. For the holidays, add spices like cinnamon or nutmeg to the caramel mix. This gives it a warm taste that feels festive. You can also shape the corn into holiday-themed clusters. Try using cookie cutters to create fun shapes for any holiday. These creative touches will impress your friends and family! You can find Amish caramel corn at local farmers' markets. These markets often have special booths for homemade snacks. Look for shops that focus on local goods. Many small towns have stores that sell Amish products. These shops offer authentic flavors and traditional recipes. Specialty food stores also carry this tasty treat. They often have a section for gourmet snacks. Visiting these places gives you a chance to taste before you buy. If local options are limited, many websites sell Amish caramel corn. Amazon is a popular choice for packaged versions. Other sites, like Etsy, feature homemade options from small sellers. When shopping online, check reviews for quality. Look for sellers with good ratings and detailed descriptions. This helps ensure you get a genuine product. Several brands are known for their delicious caramel corn. Some popular names include Fisher's and Amish Country Popcorn. These brands have loyal fans who rave about their taste. Many online reviews highlight flavor and crunch. Comparing brands can help you find your favorite. Try reading reviews to see what others think. This can help you make the best choice for your next snack. Amish Caramel Corn is a sweet snack that comes from Amish cooking. It has a rich history in America, especially in the Midwest. This treat combines fluffy popcorn with a crunchy, sweet caramel coating. Families often make it for gatherings and special occasions. The love for this snack shows the Amish spirit of sharing and community. Yes, you can make caramel corn ahead of time. It keeps well if stored correctly. To prep it in advance, follow these steps: - Make the caramel corn as directed. - Allow it to cool completely. - Store it in an airtight container at room temperature. This way, you can enjoy it later without losing its crunch. Homemade caramel corn can last about 1 to 2 weeks. To keep it fresh, store it in an airtight container. If you see any signs of spoilage, like a stale smell or soft texture, it's time to toss it. To reduce the sweetness of your caramel corn, you can try these tips: - Cut down on brown sugar by 1/4 cup. - Use less corn syrup, but keep in mind this may affect texture. - Add a pinch of more sea salt to balance the sweetness. These changes let you enjoy the flavor without the extra sugar rush. Yes, you can make caramel corn without corn syrup. Here are some alternatives: - Use honey or maple syrup. They add a unique flavor. - Brown rice syrup is another option that works well. - Keep in mind that these substitutes may change the texture slightly. Try these options to find what works best for your taste! Amish Caramel Corn brings unique flavor and crunch to any snack table. You need simple ingredients like popcorn, brown sugar, and butter. Follow the steps for cooking and coating to perfect your batch. Enjoy tips for storage and serving to keep your treats fresh. Don't hesitate to try variations with nuts or seasonal spices. With this guide, you're set to delight friends and family. Embrace the joy of making this timeless treat at home. Your popcorn game will never be the same!

Amish Caramel Corn Irresistible Homemade Snack Delight

- 3 medium apples (Fuji or Honeycrisp) - 1/2 cup all-purpose flour - 1 teaspoon ground cinnamon - 1/2 teaspoon ground nutmeg - 1/4 cup granulated sugar - 2 large eggs - 1 cup panko breadcrumbs - Cooking spray - Optional dipping sauces (caramel or chocolate) To make air fryer apple fries, you need fresh apples. I love using Fuji or Honeycrisp. They are sweet and crisp, perfect for this treat. You will also need all-purpose flour. This flour helps the spices stick to the apples. Ground cinnamon adds warmth and flavor. Nutmeg gives a nice kick and works well with apples. The sugar adds sweetness and helps with browning. Eggs are essential for the coating. They help the breadcrumbs stick. For texture, I use panko breadcrumbs. They make the fries extra crunchy. Don’t forget cooking spray! It prevents sticking and helps achieve a golden finish. You can serve the apple fries with caramel or chocolate sauce for dipping. It adds a fun touch! - Preheat air fryer to 375°F (190°C). - In a shallow bowl, mix flour, cinnamon, nutmeg, and sugar. - Beat eggs in a separate bowl until frothy. - Take one apple slice, coat it in the flour mixture. - Dip the slice in the beaten eggs, letting excess egg drip off. - Roll the apple slice in panko breadcrumbs for extra crunch. - Spray the air fryer basket with cooking spray to prevent sticking. - Arrange apple fries in a single layer, leaving space between each one. - Air fry for 10-12 minutes, flipping halfway through. They should look golden brown when done. To get the best crispiness, always preheat your air fryer. Preheating makes a big difference. It helps the apple fries cook evenly and become golden. Next, space the apple fries well in the basket. If they touch, they won't crisp up right. Finally, cooking times may vary by air fryer. Check your model for the best time. For most, 10 to 12 minutes works well. Flip them halfway through for even cooking. You can adjust the spices to make your apple fries special. If you like a little kick, add a pinch of ginger or even a bit of vanilla. Different apple types change the flavor too. Fuji apples are sweet, while Granny Smith apples are tart. Try mixing apple types for a fun twist. Each bite can surprise you with new tastes! How you present food matters. Arrange the apple fries on a pretty plate. Drizzle some caramel or chocolate sauce over them for a touch of flair. Use small bowls for dipping sauces to make it fun. This way, everyone can enjoy their favorite dip. It adds excitement and flavor to your tasty treat! {{image_4}} You can easily change the flavor of your apple fries. Adding ginger or pumpkin spice to the flour mix gives a warm touch. The spice blend adds depth. You can also experiment with vanilla powder for a sweet aroma. For a healthier twist, try using whole wheat flour or almond flour. These options boost nutrition without losing taste. You can also explore oat or nut-based coatings. These alternatives keep the fries crunchy while adding different flavors. Dipping sauces can make your apple fries even better. Consider making homemade caramel or chocolate sauce. Both pair well with the sweet apples. You can also try fruit-based sauces or yogurt alternatives for a fresh taste. These options add a fun twist to your snacking experience. To keep your leftover apple fries fresh, store them in an airtight container. Place a paper towel at the bottom to absorb moisture. This keeps them crispy. Store in the refrigerator for up to three days. When you want to enjoy them again, the air fryer works best for reheating. Heat at 375°F (190°C) for about 5 minutes. This brings back the crunch! You can freeze apple fries to enjoy later. For uncooked fries, lay them in a single layer on a baking sheet. Freeze until solid, then move them to a freezer bag. For cooked fries, let them cool first. Then, place them in a freezer-safe container. To thaw, leave them in the fridge overnight. Reheat cooked fries in the air fryer at 375°F (190°C) for about 7-8 minutes. This keeps them crispy and tasty. Apple fries last about three days in the fridge. If frozen, they can stay fresh for up to three months. Check for signs of spoilage like a sour smell or mushy texture. If they look or smell off, it’s best to toss them. Enjoy your apple fries while they are at their best! Yes, you can use many types of apples. Fuji and Honeycrisp are great choices. They add sweetness and crunch. Other varieties like Granny Smith offer tartness. Each type changes the taste and texture. Choose what you like best for a fun twist! You can bake or pan-fry apple fries. For baking, preheat the oven to 375°F. Place the coated apple slices on a baking sheet. Bake for 15-20 minutes, flipping halfway. For pan-frying, heat oil in a skillet. Fry the apple slices until golden brown. Each method gives you tasty fries! Apple fries pair well with many treats. Try caramel or chocolate sauce for dipping. Ice cream or yogurt also works well. You can even serve them with nuts for crunch. These options make your snack extra special! Look for a golden brown color. The fries should be crispy on the outside. A fork or toothpick should easily pierce the apples inside. If they feel soft and tender, they are done. Keep an eye on them as they cook! Absolutely! Use gluten-free flour instead of all-purpose flour. Almond flour or coconut flour are great options. For breadcrumbs, look for gluten-free panko. This way, everyone can enjoy these tasty treats! In this post, we explored how to make tasty apple fries using simple ingredients. You learned to prepare, coat, and cook the apple slices in an air fryer. We looked at tips for getting that perfect crunch and how to serve these delicious treats. Finally, I shared ways to store and freeze any leftovers. Apple fries are fun and easy to make any time. Enjoy experimenting with flavors and find your perfect dip!

Air Fryer Apple Fries Crunchy and Tasty Treat

To make your fall spice pumpkin bread, gather these simple ingredients: - 1 cup canned pumpkin puree (ensure it’s not pumpkin pie filling) - 1/2 cup vegetable oil - 1/2 cup packed brown sugar - 1/2 cup granulated sugar - 3 large eggs - 1 1/2 cups all-purpose flour - 1 teaspoon baking soda - 1/2 teaspoon baking powder - 1 teaspoon ground cinnamon - 1/2 teaspoon ground nutmeg - 1/4 teaspoon ground ginger - 1/4 teaspoon ground allspice - 1/2 teaspoon salt - 1/2 cup chopped walnuts or pecans (optional for crunch) - 1/2 cup chocolate chips (optional for sweetness) Each ingredient plays a key role in creating the perfect loaf. The pumpkin puree gives moisture and flavor. The oil keeps the bread soft. Brown sugar adds a deep sweetness, while granulated sugar balances it out. Eggs help bind everything together. In the dry mix, baking soda and baking powder help the bread rise. The spices bring warmth and comfort. Finally, optional nuts or chocolate chips add fun and texture. Feel free to mix and match! First, heat your oven to 350°F (175°C). This step is key to baking the bread properly. While the oven warms, take a 9x5-inch loaf pan. Grease it with butter or oil, then dust with flour. You can also line it with parchment paper for easy removal later. In a large bowl, add 1 cup of canned pumpkin puree, 1/2 cup of vegetable oil, 1/2 cup of brown sugar, and 1/2 cup of granulated sugar. Whisk or use an electric mixer to blend them together. You want a smooth mixture, so take your time here. Now, beat in 3 large eggs one at a time. Make sure to mix each egg well before adding the next. This helps to create a nice, fluffy batter. In another bowl, whisk together 1 1/2 cups of all-purpose flour, 1 teaspoon of baking soda, 1/2 teaspoon of baking powder, 1 teaspoon of ground cinnamon, 1/2 teaspoon of ground nutmeg, 1/4 teaspoon of ground ginger, 1/4 teaspoon of ground allspice, and 1/2 teaspoon of salt. Ensure there are no lumps. This mix brings all the fall flavors. Slowly add the dry mix to the wet mix. Use a spatula or wooden spoon to gently stir them together. Be careful not to overmix, as this can make the bread dense. You want it to be just combined. If you want extra texture, fold in 1/2 cup of chopped walnuts or pecans and/or 1/2 cup of chocolate chips. Make sure they are evenly spread in the batter without overmixing. Pour the batter into your prepared loaf pan. Use a spatula to smooth the top. This helps the bread rise evenly. Place the pan in the oven and bake for 55 to 65 minutes. To check if it’s done, insert a toothpick into the center. It should come out clean. Once baked, let the bread cool in the pan for about 10 minutes. Then, transfer it to a wire rack to cool completely. To get that soft, moist bread, mix your wet and dry ingredients well. However, do not overmix. Overmixing makes the bread dense. When adding the dry mix to the wet mix, fold gently. Look for a few lumps; that’s okay! The batter should remain thick but not dry. If you add nuts or chocolate chips, fold them in carefully. This keeps your bread light and airy. Store your pumpkin bread in an airtight container. This keeps it moist and fresh. Place a piece of wax paper between slices to avoid sticking. You can also wrap the loaf in plastic wrap. For longer storage, freeze it. Wrap the bread tightly in foil or plastic wrap, then place it in a freezer bag. This way, you can enjoy a slice whenever you want! Slice your bread only when it’s fully cool. This helps it hold its shape. For a lovely touch, warm the slices slightly before serving. Drizzle with maple syrup or add cream cheese frosting on top. A sprinkle of cinnamon adds both flavor and a nice look. Arrange slices on a pretty plate to impress your guests! This bread pairs well with many drinks. Try it with a hot cup of coffee or tea. For a fun twist, serve it with spiced cider. A scoop of vanilla ice cream or whipped cream adds a sweet touch too. If you like savory, try cheese for a unique taste combo. Enjoy exploring these pairings! {{image_4}} To make this pumpkin bread gluten-free, swap all-purpose flour with a gluten-free blend. Look for one that includes xanthan gum, which helps mimic the texture of wheat flour. Measure the flour carefully to ensure you get the right consistency. Gluten-free baking can be tricky, but this swap works well and keeps the bread moist and tasty. You can easily turn this bread into a vegan treat. Replace the eggs with flaxseed meal or applesauce. For every egg, mix 1 tablespoon of flaxseed meal with 2.5 tablespoons of water and let it sit for five minutes. Use a neutral oil like coconut or avocado oil in place of vegetable oil. Your bread will still rise beautifully and taste great. Want to jazz up your pumpkin bread? Try adding more spices! You can boost the flavor by increasing the amounts of cinnamon or nutmeg. Cardamom or cloves also add a warm touch. Each spice brings a new depth that makes your bread even more special. Experiment until you find your perfect mix. Add-ins make pumpkin bread exciting! If you want a crunch, try using pecans or walnuts. For a sweeter touch, toss in chocolate chips or dried fruit. You can even mix in seeds like sunflower or pumpkin seeds for added texture. Feel free to get creative with your favorite flavors and textures! To keep your Fall Spice Pumpkin Bread fresh, wrap it well. Use plastic wrap or foil. You can also place it in an airtight container. Store it at room temperature for up to three days. If you want it to last longer, keep it in the fridge. This will add a few more days to its life. Remember, the bread tastes best when fresh. Freezing this bread is very simple. Slice the bread first for easier thawing later. Wrap each slice in plastic wrap. Then place them in a freezer bag. You can freeze the bread for up to three months. When you are ready to eat, just take out a slice. Let it sit at room temperature or warm it in the oven. Enjoy the fresh taste any time! To reheat your pumpkin bread, use your oven for best results. Preheat it to 350°F. Place the bread on a baking sheet. Heat for about 10-15 minutes. This warms the bread and brings back its soft texture. You can also use a microwave. Heat it for 10-15 seconds. Be careful not to overheat it, or it will dry out. Enjoy your delicious, warm bread just like fresh! If you can’t find canned pumpkin puree, fresh pumpkin works well. Cook it, then mash it. You can also use butternut squash puree. Both options taste great in this bread. Fall spice pumpkin bread lasts up to a week at room temperature. Keep it in an airtight container. If you want it to last longer, store it in the fridge for about two weeks. Yes, you can make mini loaves! Adjust the baking time to 25-30 minutes. Check with a toothpick to see if they are done. Mini loaves make fun gifts and are easy to share. To check if the bread is done, insert a toothpick into the center. If it comes out clean, your bread is ready. If it has wet batter, bake for a few more minutes. You can use melted butter or applesauce instead of oil. Butter adds a rich flavor. Applesauce keeps the bread moist and lighter. Both options will still create a tasty loaf. We covered the must-have ingredients for delicious fall spice pumpkin bread. You learned step-by-step instructions for a perfect bake. Tips about texture, storage, and serving enhance your bread-making skills. Variations allow for gluten-free, vegan, and spiced options to suit your taste. Remember, proper storage keeps your bread fresh for longer. Enjoy experimenting and sharing this delightful treat with others. Happy baking!

Fall Spice Pumpkin Bread Flavorful and Easy Recipe

To make a tasty Mexican Street Corn Salad, you need these fresh ingredients: - 4 ears of fresh corn, husked and cleaned - 1/2 cup mayonnaise - 1/2 cup crumbled queso fresco (or feta cheese for a twist) - 1/4 cup fresh cilantro, finely chopped - 1 jalapeño, finely diced (seeds removed for milder flavor) - 2 cloves garlic, minced - Juice of 2 limes - 1 teaspoon chili powder - Salt and pepper to taste You can add more flavors or textures with these optional ingredients: - 1/4 cup diced red onion for added crunch - Avocado for creaminess - Black beans for protein Choosing the best ingredients makes a big difference. Here are some tips: - Corn: Look for bright, plump kernels. Fresh corn should feel firm and sweet. - Cheese: Get queso fresco that is creamy and crumbly. Taste it to ensure freshness. - Limes: Choose limes that feel heavy for their size. They should be firm with a smooth skin. - Cilantro: Pick vibrant green leaves. Avoid any that look wilted or yellow. - Jalapeño: Select firm peppers with smooth skin. They should have a bright color without blemishes. These tips help ensure your salad is fresh and full of flavor. Enjoy making your Mexican Street Corn Salad! First, you need to grill the corn. Preheat your grill to medium-high heat. Once it is hot, place the husked corn on the grill. Grill the corn for about 10 to 12 minutes. Turn it every few minutes. You want the kernels to be charred and tender. After grilling, carefully take the corn off the grill and let it cool. Once the corn is cool enough, grab a sharp knife. Cut the kernels off the cob and let them fall into a large mixing bowl. Make sure to get all the kernels for a nice texture. Now, let's make the dressing. In a medium bowl, add 1/2 cup of mayonnaise. Squeeze the juice of 2 limes into the bowl. Add 2 minced garlic cloves and 1 teaspoon of chili powder. Sprinkle in some salt and pepper to taste. Whisk it all together until the mixture is smooth. This creamy dressing will bring everything together. Next, it’s time to combine everything. Pour the dressing over your bowl of corn kernels. Then, add 1/2 cup of crumbled queso fresco, 1/4 cup of finely chopped cilantro, and 1 diced jalapeño. If you like, you can add 1/4 cup of diced red onion for some crunch. Using a spatula, gently fold the ingredients until every kernel is coated in dressing. This step is key for great flavor. Taste the salad. You can adjust the seasoning if needed. Add more salt, pepper, or lime juice according to your taste. For the best flavor, cover the bowl with plastic wrap and chill it in the fridge for at least 30 minutes. This lets all the flavors mingle. Before serving, give the salad a gentle toss. Garnish it with extra cilantro and a sprinkle of chili powder for a pop of color. Enjoy! To get the best grilled corn, start with fresh ears. Choose corn that feels firm and has bright green husks. Remove the husks and silk before grilling. Preheat your grill to medium-high heat. - Place the corn directly on the grill. - Grill for 10-12 minutes. - Rotate every few minutes to char evenly. This will give you sweet, smoky kernels. Use a sharp knife to cut off the kernels. Make sure to get all the kernels for a nice texture. Store leftover salad in an airtight container. It keeps well in the fridge for about 3 days. Serve it chilled for the best flavor. - Pair it with grilled meats for a perfect meal. - Use colorful bowls to showcase its vibrant look. - Add a sprinkle of chili powder before serving for extra flair. You can boost the flavors in your salad. Try adding more lime juice for tang. A bit more chili powder can give it a spicy kick. - Consider adding diced red onion for crunch. - Cilantro adds freshness, so don’t skip it. - For a creamier taste, mix in more mayonnaise. Feel free to experiment with your favorite ingredients. Each twist makes the dish your own! {{image_4}} To make a spicy version of this salad, add more heat. Start with an extra jalapeño or use serrano peppers instead. These will give your salad a nice kick. You can also mix in some hot sauce for extra flavor. Try adding a sprinkle of cayenne pepper to the dressing. It will bring a bold flavor that is hard to resist. To make the salad vegetarian, stick to the original ingredients. It’s already meat-free and packed with flavor. If you want to add more veggies, think about diced bell peppers or even avocado. These add creaminess and depth to the dish. You can also replace the mayo with a vegan alternative if you want a plant-based option. While queso fresco is great, you can switch it up. Feta cheese works well if you want a tangy taste. If you're looking for something creamier, try goat cheese. It adds a rich flavor that blends nicely. For a dairy-free option, consider using a nut-based cheese. Each choice brings a unique twist to your salad and keeps it fresh and exciting. To keep your Mexican street corn salad fresh, store it in an airtight container. This helps keep moisture in and prevents the salad from drying out. Place the container in the fridge right after serving. The salad tastes best if eaten within three days, but it can last up to five days. Freezing is not the best option for this salad. The texture of corn and cheese can change when frozen. If you need to store it longer, consider freezing the corn separately. Cook the corn, cool it, and store it in a freezer bag. It can last for six months. When ready to use, just thaw and mix with fresh ingredients. - Refrigerated: 3 to 5 days. - Frozen Corn: Up to 6 months. - Thawed Corn: Use immediately after thawing. Following these tips will help you enjoy your Mexican street corn salad at its best! Mexican Street Corn Salad is a fresh and tasty dish made with grilled corn. We use sweet corn, creamy mayonnaise, and zesty lime juice. The salad has a great mix of flavors and textures. You get the crunch from the corn and the soft cheese. The cilantro adds a nice herbal note. It's a fun twist on traditional elote, which is grilled corn on the cob served with toppings. Yes, you can make this salad ahead of time! Prepare it up to a day before you serve it. Just keep it in the fridge until you are ready to eat. Chilling helps the flavors blend well. You do want to toss it again before serving. This way, everything is mixed nicely and ready to enjoy. To make your Mexican Street Corn Salad spicier, add more jalapeño. You can keep the seeds in for extra heat. Another option is to add some hot sauce or diced serrano peppers. If you want a smoky flavor, try adding chipotle powder. Adjust these to your taste for the perfect kick! This blog post covered all you need to know about Mexican Street Corn Salad. We talked about selecting great ingredients, making the dressing, and how to combine flavors. I shared tips on grilling corn and serving it perfectly. You learned about tasty variations and how to store your salad for freshness. Embrace these methods to enjoy this fun dish. With these steps, you can create a salad that delights everyone. Enjoy your cooking journey!

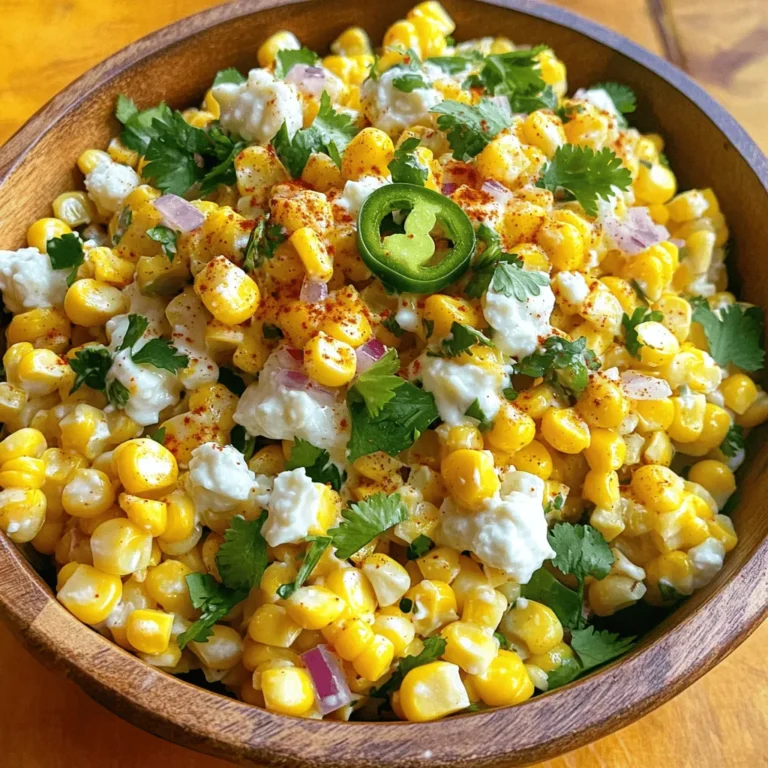
Mexican Street Corn Salad Fresh and Flavorful Dish

- 1 tablespoon extra virgin olive oil - 1 medium yellow onion, finely chopped - 3 large garlic cloves, minced - 2 medium carrots, diced into small cubes - 2 stalks of celery, diced finely - 1 medium zucchini, chopped into bite-sized pieces - 1 cup fresh or frozen green peas - 1 cup kale, stems removed and chopped - 4 cups rich vegetable broth - 2 fragrant bay leaves - 1 teaspoon dried thyme leaves - 1 teaspoon smoked paprika - Sea salt and freshly cracked black pepper, to taste - 1 tablespoon freshly squeezed lemon juice - 1 tablespoon nutritional yeast (optional) - 2 tablespoons fresh parsley, finely chopped, for garnish You can add some fun twists to your soup. Try adding: - A pinch of cayenne pepper for heat. - Chopped spinach for extra greens. - A splash of coconut milk for creaminess. - A few drops of hot sauce for a kick. These ingredients can make your soup even tastier and more unique. If you have special needs, you can swap out some ingredients. Here are some ideas: - Use olive oil or coconut oil for a vegan option. - Swap the vegetable broth for water if you are low on broth. - Use any green leafy vegetable instead of kale. - For a gluten-free option, ensure your broth is gluten-free. These swaps help everyone enjoy this delightful soup! To start, gather all your ingredients. This makes cooking smoother and more fun. Dice the onion, carrots, and celery. Chop the zucchini and kale into bite-sized pieces. Mince the garlic. If you use frozen peas, you can skip thawing them. In a large pot, heat one tablespoon of extra virgin olive oil over medium heat. When the oil shimmers, add the chopped onion. Sauté for about five minutes until it becomes clear and smells good. Then, mix in the minced garlic. Sauté for another minute to release its aroma. Next, add the diced carrots and celery. Cook these for about five to seven minutes. You want them to soften and sweeten. After that, toss in the chopped zucchini and green peas. Stir for three to four minutes until they look bright and tender. Now, pour in four cups of rich vegetable broth. Add two bay leaves, one teaspoon of dried thyme, and one teaspoon of smoked paprika. Season with sea salt and freshly cracked black pepper. Bring the soup to a boil. Once it boils, lower the heat and add the chopped kale. Let the soup simmer for 15 to 20 minutes. This helps the flavors blend well. After simmering, stir in one tablespoon of freshly squeezed lemon juice and the nutritional yeast, if you want that cheesy taste. Taste the soup and adjust seasoning as needed. Don’t forget to remove the bay leaves before serving. Serve the soup hot, garnished with finely chopped parsley. For a special touch, use rustic bowls and drizzle olive oil on top. Enjoy your magical bowl of Mystical Witch Soup! You can make Mystical Witch Soup your own. Start by adding your favorite vegetables. For a sweet touch, use sweet potatoes or butternut squash. If you like heat, toss in jalapeños or a pinch of cayenne pepper. You can also change the texture. Blend the soup for a creamy feel or keep it chunky for more bite. Use seasonal veggies for freshness and fun. Herbs and spices bring this soup to life. Fresh herbs like basil or cilantro can brighten the dish. Dried herbs like oregano and rosemary add depth. For a smoky taste, try adding more smoked paprika. A splash of soy sauce or tamari can give it umami. Always taste your soup as you go and adjust the seasoning to your liking. The way you cook your soup matters. Start with a good sauté. This builds flavor right from the start. Make sure not to overcook your vegetables. They should be tender but still colorful and vibrant. Simmering the soup slowly allows all the flavors to blend well. If you want a thicker soup, let it simmer longer, or blend a part of it for creaminess. {{image_4}} This soup is already vegan and gluten-free. Use vegetable broth and fresh veggies. You can skip the nutritional yeast if you want. This keeps the soup light and tasty. Want to make your soup heartier? Add some cooked lentils or chickpeas. These beans are rich in protein. You can also stir in some quinoa for extra texture. If you want meat, shredded chicken or turkey works great too. Feel like trying new flavors? Add spices like cumin or coriander for warmth. A pinch of cayenne can give a nice kick. You can also try adding coconut milk for a creamy twist. Fresh herbs like basil or cilantro can add freshness. Use these ideas to make the soup your own! After enjoying your Mystical Witch Soup, let it cool down first. Once it cools, store it in airtight containers. You can keep it in the fridge for up to five days. Make sure to label the containers with the date. This way, you know when you made it. To freeze the soup, pour it into freezer-safe bags or containers. Leave some space at the top for expansion. You can freeze it for up to three months. When ready to eat, thaw it overnight in the fridge before reheating. This keeps the flavors fresh and delicious. When reheating the soup, use a pot on the stove for the best taste. Heat it on low to avoid burning. Stir it often to warm it evenly. If it's too thick, add a splash of vegetable broth or water. Taste and adjust the seasoning if needed. Serve it hot for a comforting meal! Mystical Witch Soup has roots in folk traditions. People have made hearty soups for ages. They believed these soups brought comfort and magic. Some say it’s a way to use fresh, local ingredients. Others think it’s about sharing warmth and love in a bowl. This soup is a blend of flavors and cultures. It reflects a spirit of creativity and connection to nature. Yes, you can make Mystical Witch Soup in both a slow cooker and an Instant Pot. For a slow cooker, follow these steps: - Sauté the onion and garlic in a pan first. - Then, add all ingredients to the slow cooker. - Cook on low for 6-8 hours or high for 3-4 hours. For an Instant Pot, do this: - Use the sauté function for the onion and garlic. - Add the rest of the ingredients. - Seal the lid and cook on high pressure for 10 minutes. Both methods keep the soup flavorful and magical. You can serve many things with Mystical Witch Soup. Here are a few ideas: - Crusty bread for dipping and soaking. - A fresh green salad for a light side. - Grilled cheese for a warm, cheesy contrast. - Herbal tea for a cozy drink option. These pairings enhance the soup's charm and taste. Enjoy the whole meal! Mystical Witch Soup combines simple ingredients and easy steps for a delicious meal. We explored main and optional ingredients, plus swaps for different diets. The cooking process, with tips to customize, helps you create the perfect flavor. Variations like vegan and hearty options let you experiment. Finally, I covered storage tips for leftovers and answers to common questions. Embrace your cooking skills and enjoy this magical soup!

Mystical Witch Soup Powerful and Flavorful Recipe

- 1 cup ripe bananas, mashed - 1 cup canned pumpkin puree - 1/2 cup melted coconut oil - 1/2 cup brown sugar, packed - 1/2 cup granulated sugar - 2 large eggs - 1 teaspoon vanilla extract - 1 1/2 cups all-purpose flour - 1 teaspoon baking soda - 1/2 teaspoon baking powder - 1/2 teaspoon salt - 1 teaspoon ground cinnamon - 1/2 teaspoon ground nutmeg - 1/2 cup chocolate chips - 1/2 cup chopped walnuts or pecans When making banana chocolate chip pumpkin bread, I focus on fresh ingredients. My favorite part is using ripe bananas. They add natural sweetness to the bread. I usually use about two to three medium bananas. The canned pumpkin puree gives the bread a nice texture. I make sure to get plain pumpkin, not the pie filling. Coconut oil is my go-to choice for fat. It adds a subtle flavor and moistness. If you prefer, you can easily swap it for vegetable oil. The sugars, both brown and granulated, help create a perfect balance of sweetness. I always use large eggs at room temperature. This helps the batter blend smoothly. The vanilla extract adds warmth and depth. For the dry mix, I include all-purpose flour, baking soda, baking powder, and salt. These ingredients work together to create a light and fluffy loaf. For a fun twist, I often add ground cinnamon and nutmeg. They bring warmth and spice to the bread. The chocolate chips are a must for me, adding a rich, sweet touch. If you like nuts, walnuts or pecans are great optional add-ins. They add a nice crunch and depth of flavor to each slice. - Preheat the oven to 350°F (175°C). - Prepare your 9x5 inch loaf pan by greasing it lightly or lining it with parchment paper. - In a large bowl, combine the mashed bananas and pumpkin puree. Use a fork or whisk to mix until smooth. - Pour in the melted coconut oil. Add the brown sugar and granulated sugar. Mix well until everything blends together. - In another bowl, whisk together the flour, baking soda, baking powder, salt, cinnamon, and nutmeg. This helps spread the flavors evenly. - Slowly add the dry mixture to the wet mixture. Use a spatula to fold them together gently. Be careful not to overmix. - Fold in the chocolate chips and, if you like, add the chopped nuts. Make sure they are spread throughout the batter. - Pour the batter into the prepared loaf pan. Spread it out evenly. - Bake for 55-65 minutes. To check if it's done, insert a toothpick in the center. It should come out clean or with a few moist crumbs. - Use overripe bananas for enhanced sweetness. The darker the banana, the sweeter it is. This natural sweetness enriches the flavor of your bread. - Ensure all eggs are at room temperature. This helps the batter mix better. Warm eggs blend smoothly, making your bread light and fluffy. - Prevent sticking: grease or line the loaf pan. Use oil or parchment paper to make removal easy. This helps keep your bread intact. - Avoid overmixing for a tender loaf. When you mix, do it gently. Overmixing can lead to a dense texture. Stop mixing as soon as you see no dry flour. - Serve warm with butter or cream cheese. This adds a rich flavor that complements the bread. Warm bread with a spread is pure comfort. - For an attractive display, slice the bread and arrange the pieces on a rustic wooden board. Dust lightly with cocoa powder for an elegant touch. This makes your bread look as good as it tastes. {{image_4}} You can change up the flavors in your bread. Try adding spices like ginger or cloves. These spices give it a warm, cozy taste. You can also switch nuts for seeds. This makes a nut-free bread. Sunflower or pumpkin seeds work great! If you want a healthier option, use applesauce instead of oil. This cuts down on fat and adds moisture. You can also swap all-purpose flour for whole wheat flour. Whole wheat will add fiber and nutrients. For a vegan version, replace the eggs with flax eggs. To make a flax egg, mix one tablespoon of flaxseed meal with three tablespoons of water. Let it sit for a few minutes. You can also make this bread gluten-free. Just use a gluten-free flour blend instead of regular flour. To keep your Banana Chocolate Chip Pumpkin Bread fresh at room temperature, use a simple method. Wrap the bread in plastic wrap or foil. This helps keep moisture in. Store it in a cool, dry place. You can enjoy it like this for up to a week. For best results, place the bread in an airtight container. This prevents it from drying out. If you notice any mold or off smells, it’s best to toss it. If you want to save some bread for later, freezing is the way to go. First, wrap the bread tightly in plastic wrap. Then, place it in a freezer-safe bag. You can freeze it for up to three months. To enjoy your frozen bread, take it out and let it thaw at room temperature. This usually takes a few hours. If you want it warm, you can reheat slices in the oven at 350°F for about 10 minutes. You can also use a microwave. Just heat each slice for about 15-20 seconds. Enjoy your tasty treat! To check if the bread is done, use a toothpick or knife. Insert it into the center of the loaf. If it comes out clean, the bread is ready. If it has wet batter, it needs more time. Bake for 55 to 65 minutes, but check at 55 minutes. Yes, you can make this recipe ahead of time. Store it in the fridge for up to a week. You can also freeze it for up to three months. Wrap it tightly in plastic wrap. Then put it in a freezer bag. Thaw it in the fridge before serving. Yes, you can leave out the chocolate chips if you want. The bread will still taste great. You can add nuts or seeds instead. You can also use dried fruit for a different flavor. You can use sugar substitutes like stevia or erythritol. These will lower the sugar content. Be aware that the bread may taste different. The texture might also change slightly with these substitutes. If you don't have pumpkin puree, you can use sweet potato puree. Butternut squash puree works well too. Both options will give a nice flavor. Just ensure they are smooth before mixing. This blog post covered a tasty Banana Chocolate Chip Pumpkin Bread recipe. We explored main ingredients like ripe bananas and pumpkin puree, along with optional add-ins. The step-by-step instructions will help you bake it perfectly. I also shared tips for the best results, from storage to variations. Try this recipe to enjoy a moist bread that blends flavors. Change it up as you like to fit your taste. Happy baking!

Delicious Banana Chocolate Chip Pumpkin Bread Recipe

PREV 1 … 11 12 13 … 17 NEXT
tastykitchentales

explore

DessertsDinnerAppetizersDrinks

Our Policies

  • Cookie Policy
  • Copyright Policy
  • Disclaimer
  • GDPR Policy
  • Terms Of Use
Back to Top
  • About
  • Contact Us
  • Privacy Policy
© 2025 tastykitchentales