FREE DINNER EBOOK! Get your copy!
  • Cookie Policy
  • GDPR Policy
  • Disclaimer
  • Terms Of Use
  • Visit my other site: Fun Cookie Recipes
tastykitchentales
  • Home
  • Dinner
  • Desserts
  • Drinks
  • Appetizers
  • Contact
  • About
  • Privacy Policy
  • Home
  • Dinner
  • Desserts
  • Drinks
  • Appetizers
  • Contact
  • About
  • Privacy Policy
  • Cookie Policy
  • GDPR Policy
  • Disclaimer
  • Terms Of Use
Visit my other site: Fun Cookie Recipes

HOME / CATEGORIES /

Latest

- Mushrooms: I love using a mix of 500g of sliced mushrooms. Cremini, shiitake, and button mushrooms work best. They add great texture and flavor. Each type brings its own unique taste; cremini adds earthiness, shiitake offers umami, and button mushrooms provide a mild note. - Butter: I recommend 4 tablespoons of unsalted butter. Choose a high-quality butter for the best flavor. Room temperature butter melts evenly and helps achieve that perfect nutty brown. Look for butter that is creamy and rich, as it enhances the dish. - Garlic and Thyme: Fresh garlic is a must. Use 4 garlic cloves, finely minced. It adds a strong, savory kick. Fresh thyme leaves are also key; 1 tablespoon brings a fragrant touch. If you use dried thyme, just 1 teaspoon will do. Fresh herbs make the dish lively and aromatic. - Salt and Pepper: Choose flaky sea salt and freshly ground pepper for seasoning. These add depth to the flavor. Start with a pinch and adjust to your taste. A good salt enhances all the other flavors without overpowering them. - Acidity: A splash of lemon juice is important. It brightens the dish and balances the richness of the butter. Use 1 tablespoon, and feel free to add more if you like a tart kick. This little touch makes a big difference. - Fresh Parsley: For garnish, I like to use finely chopped fresh parsley. It adds color and freshness to the dish. Sprinkle it just before serving to keep it vibrant. It’s a small detail that makes your meal look stunning. For the full recipe, check out the detailed steps to create this delightful dish! Start by heating the butter in a large skillet over medium heat. This is key for the perfect dish. Watch closely as the butter melts completely. Swirl the pan gently to ensure even heating. You want the butter to foam up nicely. Keep your eyes on it; in about 4-5 minutes, it will turn a golden brown color. At this stage, it releases a wonderful nutty aroma. If the butter starts to smell burnt, it’s too late. Remove it from heat immediately and start over. Next, add minced garlic to the browned butter. Sauté it for about 30 seconds. Stir continuously so the garlic doesn’t burn. We want it fragrant and slightly golden. Now, carefully add the sliced mushrooms. Use a spatula to toss them in the garlic butter. Make sure each piece gets coated well. Cook the mushrooms for about 5-7 minutes. Stir them occasionally to promote even cooking. You want them to caramelize and become tender. Once your mushrooms are browned, sprinkle fresh thyme over them. Season with salt and freshly cracked pepper to taste. The thyme adds depth and aroma. Drizzle in the lemon juice and stir well. This helps blend all the flavors together. Let everything cook for another minute. When you serve this dish, the flavors will dance on your palate. For the full recipe, check out the detailed cooking instructions that guide you through this delightful process. For the best flavor, choose mushrooms like cremini, shiitake, or button. Each type brings its own taste. Cremini adds depth, while shiitake offers a rich, umami punch. Button mushrooms are mild, making them a great base. To avoid overcooking, watch the heat closely. Cook the mushrooms on medium heat. Stir them gently to ensure even cooking. Overcooked mushrooms become tough and lose their flavor. Aim for a tender and slightly caramelized texture. Balancing flavors is key. Adding a splash of lemon juice brightens the dish. If you want more depth, consider a splash of white wine or a pinch of red pepper flakes. Fresh herbs like parsley can also lift the flavors, making each bite pop. Serve the browned butter garlic thyme mushrooms in a warm bowl. This keeps them cozy and inviting. For a rustic touch, use a wooden platter. Place a lemon wedge on the side for a fresh burst. Plating is important for visual appeal. Arrange the mushrooms in a neat pile, allowing the colors to shine. Garnish with fresh parsley to add a pop of green. This not only makes the dish look great but also enhances the flavor. Enjoy this dish as a side or on toasted bread. For the full recipe, check out the Browned Butter Garlic Thyme Mushrooms 🧄 recipe. {{image_4}} You can change the flavors by using different herbs. Rosemary adds a piney note that pairs well. Sage brings a warm, earthy flavor that complements mushrooms nicely. You can also mix herbs. Try using a blend of herbs for a unique taste. Browned butter garlic thyme mushrooms shine as a side dish. They pair beautifully with proteins like chicken or fish. The rich flavors enhance the meat. If you want a vegetarian main dish, serve the mushrooms on toasted bread. Add a sprinkle of cheese for extra taste. These mushrooms make any meal feel special. For more ideas, check out the full recipe. To keep your browned butter garlic thyme mushrooms fresh, use proper storage containers. Glass or airtight plastic containers work best. Make sure your mushrooms have cooled to room temperature before sealing them. This helps prevent sogginess. Store them in the fridge for up to three days. To reheat without losing texture, use a skillet over medium heat. Add a splash of water or broth to help steam the mushrooms. Stir gently until heated through. This method keeps them moist and flavorful. Avoid using the microwave, as it can make them rubbery. For best results, reheat in small batches to retain their taste and texture. To make these mushrooms, follow these key steps: 1. Melt the Butter: Start by melting unsalted butter in a large skillet over medium heat. 2. Brown the Butter: Swirl the pan until the butter turns golden brown and smells nutty. This takes about 4-5 minutes. 3. Sauté the Garlic: Add minced garlic and cook for 30 seconds, stirring to avoid burning. 4. Add the Mushrooms: Toss in sliced mushrooms, coating them in the brown butter. 5. Cook Until Tender: Let the mushrooms cook for 5-7 minutes, stirring occasionally until they're caramelized. 6. Season and Add Thyme: Sprinkle fresh thyme, salt, and pepper over the mushrooms. 7. Finish with Lemon Juice: Drizzle lemon juice and mix well before serving. 8. Garnish: Top with fresh parsley for a pop of color. For more details, check out the Full Recipe. Yes, you can use dried thyme. However, fresh thyme has a brighter taste. Use 1 teaspoon of dried thyme for every tablespoon of fresh thyme. Remember, dried herbs are stronger. Adjust to your taste. For this recipe, I recommend using a mix of: - Cremini mushrooms: They add rich flavor. - Shiitake mushrooms: They offer a meaty texture. - Button mushrooms: They keep the dish light and simple. Combining these types gives the best flavor and texture for your dish. This blog post covered the key ingredients for making delicious Browned Butter Garlic Thyme Mushrooms. We explored the importance of fresh mushrooms, quality butter, and the right herbs for flavor. The cooking steps highlighted the technique for perfect browning and seasoning, while tips offered ways to enhance taste and presentation. In the end, whether you make this dish for a cozy meal or a special occasion, remember that good ingredients and careful cooking create the best flavor. Enjoy making this dish your own!

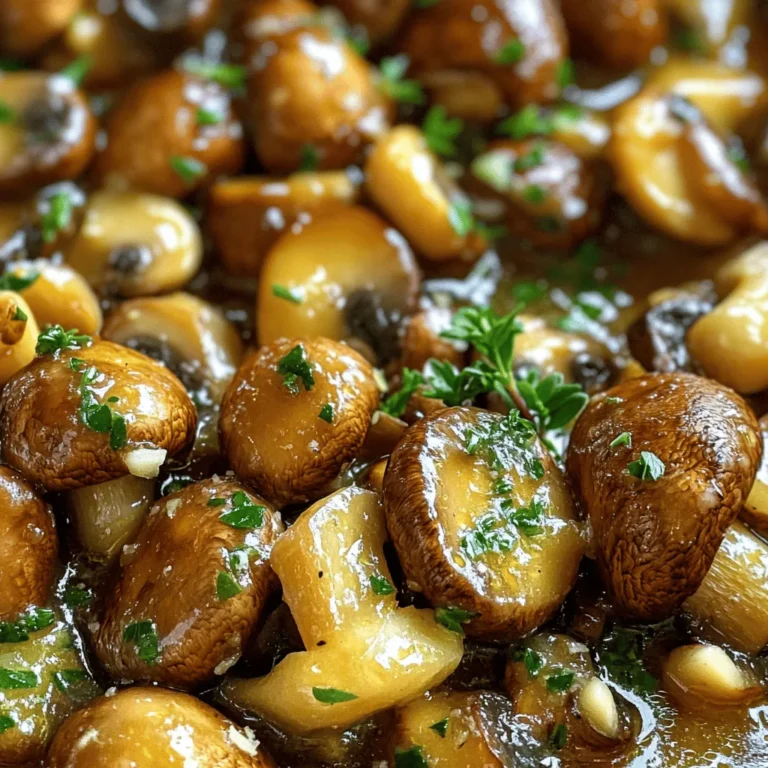
Browned Butter Garlic Thyme Mushrooms Flavorful Delight

To make Minute Ranch Cucumber Bites, you need fresh and simple ingredients. Here is a list of what you will need: - 2 large cucumbers - 1 cup ranch dressing - 1/2 cup cherry tomatoes, halved - 1/4 cup finely chopped red onion - 1/4 cup crumbled feta cheese - 1 tablespoon fresh dill, finely chopped - Salt and pepper, to taste These ingredients come together to create a snack that is both fresh and tasty. The cucumbers bring a crisp texture, while the ranch dressing adds smoothness. The cherry tomatoes pop with flavor, and the feta cheese gives a nice saltiness. Fresh dill adds a fragrant touch. You can find the full recipe in the article, where I guide you step by step in making these bites. - Rinse and dry cucumbers: Start by rinsing the cucumbers under cold water. This helps remove dirt. After rinsing, pat them dry with a clean towel. - Cut cucumbers into thick rounds: Next, slice each cucumber into thick rounds. Aim for pieces about 1 inch thick. You will get around 16 to 20 rounds. - Mix ranch dressing with fresh dill: In a small bowl, combine the ranch dressing and finely chopped fresh dill. Stir it well. This mix adds a bright flavor to the bites. - Arrange cucumber on a platter: Take a serving platter and lay out the cucumber slices. Make sure they are in a single layer for a nice look. - Add ranch dressing, tomatoes, and red onions: Use a spoon or piping bag to add dill ranch dressing to each cucumber slice. Top each bite with a half cherry tomato and a sprinkle of finely chopped red onion. - Finish with feta cheese and seasoning: Crumble feta cheese on top of each cucumber slice. Finally, season lightly with salt and pepper to boost the taste. Enjoy these fresh and tasty snacks right away or chill them for 30 minutes to let the flavors blend. For the full recipe, check the section above. To make your Minute Ranch Cucumber Bites shine, focus on how they look. Use a bright, colorful platter. This enhances their fresh appeal. Add extra sprigs of dill on top for a pop of green. Arrange the bites in a circle or a fun pattern. This adds flair and makes them more inviting. - Garnishes to Enhance Flavor - A drizzle of balsamic glaze can add a sweet touch. - Crushed black pepper gives a nice kick. - Fresh herbs like parsley or basil can freshen the taste. You can make these bites even tastier by adding herbs. Consider using fresh basil or chives. These herbs bring a new layer of flavor. You can also swap the dill for something else if you prefer. - Optional Ingredients for Varied Taste - Add crispy bacon bits for a savory crunch. - Replace feta with goat cheese for a creamier bite. - Try adding sliced olives for a briny flavor. These tips and tricks will help you create a snack that everyone loves. For the complete preparation details, check out the Full Recipe. Enjoy your cooking! {{image_4}} You can change the ranch dressing to mix things up. Try using hummus for a creamy twist. Greek yogurt also works well; it adds a tangy taste. If you want a spicy kick, use sriracha sauce mixed with mayo. Each option gives your cucumber bites a fresh flavor. You don’t have to stick with cucumbers. Carrots or bell peppers make great substitutes. They add a nice crunch and color. You can also switch the cheese. Cream cheese provides a rich taste, while goat cheese gives a tangy flavor. These swaps allow you to customize the bites to your liking. For the full recipe, check out Minute Ranch Cucumber Bites 🥒. After making Minute Ranch Cucumber Bites, store any leftovers in the fridge. Use an airtight container to keep them fresh. If you don’t have a container, wrap them in plastic wrap. These bites stay good for about 2 to 3 days. The cucumbers may lose some crunch, but they will still taste great! You can make these cucumber bites ahead of time! To do this, prepare the cucumbers and the dressing separately. Keep the cucumbers in a cool place until you're ready to serve. This way, they stay fresh and crisp. Mix the dressing with the dill, but store it in a separate bowl. You can combine everything just before serving for the best flavor. If you follow these steps, your cucumber bites will be a hit! Minute Ranch Cucumber Bites stay fresh for about three days in the fridge. For best taste, store them in an airtight container. This keeps them crisp and tasty. Avoid stacking them too high to prevent squishing. If you want to keep them longer, store the ingredients separate. This way, your cucumbers stay crunchy. Yes, you can prepare these cucumber bites ahead of time. I suggest making the dressing and cutting the cucumbers in advance. Keep the dressing in the fridge until you are ready to serve. This helps keep the cucumbers fresh. Assemble the bites just before serving. This way, they stay nice and crisp. You can serve Minute Ranch Cucumber Bites with many dishes. They pair well with other appetizers like cheese and crackers. You could also enjoy them with fresh fruit or a light salad. For a fun twist, serve them with grilled meats or sandwiches. These bites can brighten any meal! These cucumber bites are easy to make and tasty. We covered the key ingredients, from cucumbers to feta cheese. You learned how to prepare the filling and assemble the bites. Also, I shared tips for serving and ways to change up the flavors. Enjoy these bites as a fresh snack or appetizer. They are perfect for gatherings or a quiet night in. Keep experimenting with new ingredients and flavors. You’ll find so many delicious ways to enjoy this dish!

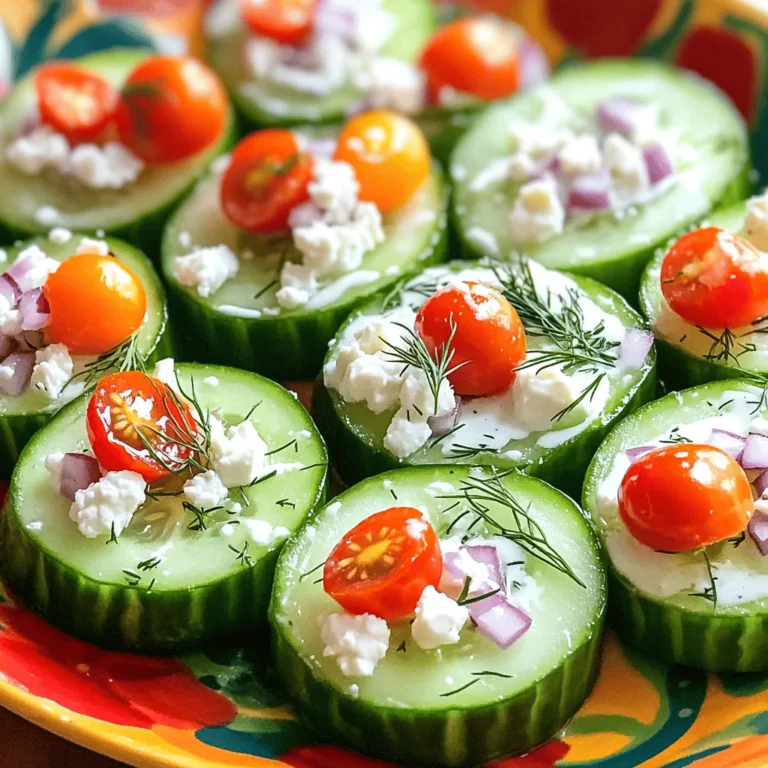
Minute Ranch Cucumber Bites Fresh and Tasty Snack

To make General Tso's Chicken, you need a mix of chicken, veggies, and sauce. This dish has a nice balance of sweet, salty, and spicy flavors. You can easily follow the Full Recipe for step-by-step guidance. Here are the key ingredients you’ll need: - 1 lb boneless, skinless chicken breast, cut into bite-sized pieces - 1/2 cup cornstarch - 2 large eggs, beaten - 1 cup broccoli florets, fresh or frozen - 1/2 cup bell pepper, sliced (red or green for color) - 1/4 cup green onions, finely chopped (reserve some for garnish) - 3 cloves garlic, minced - 1 tablespoon fresh ginger, minced - 1/3 cup soy sauce (low sodium preferred) - 1/4 cup chicken broth (homemade or low sodium) - 1 tablespoon sesame oil - 2 tablespoons rice vinegar - 1 tablespoon granulated sugar - 1 teaspoon chili flakes (adjust to your heat preference) - Vegetable oil, for frying You can add or change some ingredients to suit your taste: - Add carrots or snap peas for extra crunch. - Use a different protein like shrimp or tofu. - Adjust the chili flakes for more or less heat. - Add sesame seeds for a crunchy topping. To start, gather all your ingredients. You need chicken, cornstarch, eggs, and some veggies. Here’s what you’ll need: - 1 lb boneless, skinless chicken breast, cut into bite-sized pieces - 1/2 cup cornstarch - 2 large eggs, beaten - 1 cup broccoli florets, fresh or frozen - 1/2 cup bell pepper, sliced - 1/4 cup green onions, finely chopped - 3 cloves garlic, minced - 1 tablespoon fresh ginger, minced - 1/3 cup soy sauce - 1/4 cup chicken broth - 1 tablespoon sesame oil - 2 tablespoons rice vinegar - 1 tablespoon granulated sugar - 1 teaspoon chili flakes - Vegetable oil, for frying Now, mix your sauce. In a bowl, combine soy sauce, chicken broth, sesame oil, rice vinegar, sugar, and chili flakes. Whisk it well and set it aside. Next, prepare the chicken. Coat the chicken pieces with cornstarch. Make sure each piece is covered well. Then dip them into beaten eggs. This gives the chicken a nice batter. Heat vegetable oil in a deep pan over medium-high heat. When the oil is hot, add chicken pieces in small batches. Fry for about 4-5 minutes until they turn golden brown. Once cooked, place them on a plate lined with paper towels to absorb extra oil. Now, it’s time to add flavor. In the same pan, add a little vegetable oil if needed. Sauté the minced garlic and ginger for 30 seconds until they smell great. Be careful not to burn them. Add broccoli and bell pepper to the pan. Stir-fry for 3-4 minutes. You want them to be bright and crisp. Then, pour in your prepared sauce, stirring well. Let it simmer for about 2-3 minutes until it thickens a bit. Finally, add the fried chicken back into the pan. Toss everything together, making sure the chicken is coated. Cook for another minute so all the flavors mix well. You can now sprinkle chopped green onions on top for a fresh touch. For the full recipe, check out the details above. Enjoy your delicious General Tso's Chicken! To make General Tso's Chicken crispy, use the right oil. Vegetable oil works best. Heat the oil until it shimmers, not smoking. This ensures the chicken cooks quickly and evenly. Fry in small batches. This prevents the temperature from dropping too much. You want that nice golden brown color. For extra flavor, add a dash of sesame oil to the sauce. This gives a nutty taste that blends well. Fresh garlic and ginger also boost the dish. Use them in the sauté step to release their full aroma. You can even add a squeeze of lime juice before serving. This will brighten the flavors. One mistake is overcrowding the pan while frying. This leads to steaming instead of frying. Ensure the chicken pieces have space. Another mistake is not letting the oil heat enough. If the oil is not hot, the chicken will absorb too much oil. Lastly, don’t skip the cornstarch coating. It creates that desired crispy texture. For the complete cooking process, check the [Full Recipe]. {{image_4}} If you want a meat-free option, try tofu or seitan. Both work well in this dish. Simply cube the tofu and press it to remove excess water. Then, follow the same steps for frying. Tofu absorbs the sauce nicely, giving you that savory taste. You can also use tempeh for a different texture and flavor. To add more heat, increase the chili flakes. You can also include sliced fresh chili peppers. I love using Thai bird chilies for a real kick. Just remember, start small. You can always add more heat later. This way, you can adjust to your taste. Feel free to mix in other veggies. Snap peas, carrots, and baby corn add great color and crunch. You could also use bok choy or green beans for a fresh twist. Just make sure to cut everything into bite-sized pieces for even cooking. Using a variety of colors makes your dish look vibrant and appealing. To keep your General Tso's Chicken fresh, store it in the fridge. Place it in an airtight container. This helps keep moisture in and prevents it from drying out. It can stay good for about 3 to 4 days. Make sure to allow it to cool down before sealing it up. This will help maintain its texture and flavor. If you want to save some for later, freezing is a great option. Let the chicken cool completely before freezing. Place the chicken in a freezer-safe bag or container. Squeeze out any extra air to prevent freezer burn. It can last up to 2 to 3 months in the freezer. When you're ready to eat, allow it to thaw in the fridge overnight. Reheating General Tso's Chicken can be simple. For the best results, use a skillet on medium heat. Add a splash of water or broth to keep it moist. Stir it gently until heated through. You can also use a microwave, but be careful not to overheat. This way, you keep the chicken juicy and tasty. Enjoy your flavorful dish again with these storage and reheating tips! For the full recipe, check out the General Tso's Chicken Delight section above. General Tso's Chicken started in China but grew popular in the United States. It is named after General Tso Tsung-t'ang, a 19th-century military leader. This dish blends sweet, spicy, and savory flavors. Many believe it was created by Chef Peng Chang-kuei in Taiwan. In the 1970s, it came to the U.S. and became a favorite takeout option. You can serve General Tso's Chicken with several tasty sides. Here are my top picks: - Steamed white rice or fried rice - Egg rolls or spring rolls - Fried wontons - A fresh cucumber salad - Stir-fried vegetables These sides will enhance your meal and balance the flavors of the chicken. To make General Tso's Chicken healthier, you can try these tips: - Use skinless chicken thighs or breasts for leaner protein. - Bake or air-fry the chicken instead of deep-frying. - Add more vegetables, like bok choy or snap peas, for fiber and nutrients. - Substitute sugar with honey or agave syrup for a natural sweetener. - Use low-sodium soy sauce to cut down on salt. These changes will help you enjoy this dish while keeping it nutritious. For the complete dish, check out the Full Recipe. This blog covered the recipe for General Tso's Chicken, its ingredients, and cooking steps. You learned about essential and optional ingredients to customize your dish. We discussed tips for frying, flavor boosts, and errors to avoid. Variations included vegetarian and spicy options, along with storage tips. In closing, making General Tso's Chicken can be fun and tasty. Experiment and make the dish your own! Enjoy your cooking journey and share your results with others.

General Tso’s Chicken Savory and Flavorful Dish

- 4 medium-sized Yukon gold potatoes - 1/4 cup unsalted butter, softened - 4 cloves garlic, finely minced - 2 tablespoons fresh parsley, finely chopped - 1 tablespoon fresh thyme leaves, finely chopped - 1 teaspoon sea salt - 1/4 cup grated Parmesan cheese - Olive oil for drizzling To make Hasselback potatoes, start with the right ingredients. Yukon gold potatoes work best due to their creamy texture. The unsalted butter gives a rich base, while garlic adds great flavor. Fresh herbs like parsley and thyme bring life to the dish. You can use sea salt to enhance all the flavors. For a cheesy touch, add grated Parmesan. A drizzle of olive oil adds richness too. Remember, the right mix makes a huge difference. You can find the full recipe online for more details. - Preheat your oven to 425°F (220°C). - Line a baking sheet with parchment paper for easy cleanup. - Rinse each potato under cold water. Use a scrub brush to remove dirt. - Dry the potatoes with a kitchen towel to ensure they roast well. - Place a potato between two chopsticks or wooden spoons. This guides your cuts. - Slice the potato down the length, making cuts about 1/8 inch apart. - Be careful not to cut all the way through; the chopsticks prevent deep cuts. - In a bowl, mix softened butter with minced garlic, chopped parsley, thyme, salt, and pepper. - Stir until the mix is smooth and fragrant. - Spread a portion of the herb butter between the potato slices. - Use the rest to cover the tops of the potatoes for full flavor. - Arrange the potatoes on your baking sheet. - Drizzle olive oil over each potato, then sprinkle with Parmesan cheese if you want. - Bake in the preheated oven for 45 to 50 minutes. - Look for a crispy outside and fluffy inside. Baste halfway through for added flavor. - After baking, let the potatoes cool for a few minutes. - This step makes them safer to handle. - For a nice look, serve on a platter with extra herbs and a drizzle of olive oil. - These potatoes are the perfect side dish to enjoy! For Hasselback potatoes, slice thickness matters. Aim for slices about 1/8 inch thick. This thickness lets the butter and flavors seep in well. Keep the slices spaced evenly. Use chopsticks or wooden spoons to guide your cuts. This tool prevents slicing all the way through. When baking, set your oven to 425°F (220°C). Line your baking sheet with parchment paper for easy cleanup. Bake the potatoes for 45-50 minutes. This time gives you a crispy outside and a fluffy inside. Baste the potatoes with leftover herb butter halfway through. It adds extra flavor and moisture. Want to elevate your Hasselback potatoes? Try different herbs! Rosemary and sage work great with garlic. You can also mix in some smoked paprika for a nice kick. Adjust the seasoning to your taste. Add more salt or pepper if you like it spicier. Don’t forget to sprinkle some Parmesan cheese on top! It melts beautifully and gives a savory crust. You can also use other cheeses like cheddar or Gruyère for variety. For this recipe, you need a few kitchen tools. A sharp knife is key for slicing the potatoes. Use a cutting board to keep your workspace clean. A mixing bowl helps combine the herb butter. After cooking, clean your tools right away. Wash the knife and cutting board with hot, soapy water. This step helps keep your kitchen safe and tidy. Also, dry your tools well to prevent rust and maintain their quality. {{image_4}} Hasselback potatoes are great for many flavors. You can spice them up by adding chili flakes. This gives the potatoes a nice kick. If you love cheese, try different kinds. Cheddar, Gouda, or feta all work well. Choose your favorite cheese to create a rich taste. You can add more fun by using toppings. Adding cooked bacon bits gives a smoky taste. You can also mix in some veggies, like roasted peppers or spinach. Another option is to drizzle flavored oils on top. Garlic or herb-infused oils add extra flavor to your potatoes. You can cook Hasselback potatoes in various ways. Try making them in an air fryer for a crisp finish. The air fryer cooks them faster and keeps them tender inside. For a unique twist, grill the potatoes. Grilling gives them a smoky flavor that is hard to beat. You can find the full recipe to guide you through all these variations. Let your Hasselback potatoes cool before you store them. This step helps prevent moisture build-up. Place the cooled potatoes in a container that is airtight. A glass or plastic container works well. Avoid using aluminum foil, as it can trap moisture and make the potatoes soggy. To reheat leftover Hasselback potatoes, use the oven for best results. Preheat your oven to 350°F (175°C). Place the potatoes on a baking sheet and cover them with aluminum foil. This keeps them from drying out. Heat them for about 15-20 minutes. To keep the skin crispy, remove the foil for the last few minutes. You can freeze Hasselback potatoes, but they may lose some texture. To prepare for freezing, first let them cool completely. Wrap each potato tightly in plastic wrap. Then, place them in a freezer-safe bag. When you want to eat them, thaw in the fridge overnight. Reheat in the oven to restore some crispness. Hasselback potatoes are a fun way to prepare potatoes. They have thin slices cut into them, but not all the way through. This dish comes from Sweden and gets its name from a restaurant in Stockholm. The slices create a crispy outside, while the inside stays soft and fluffy. You can add herbs and butter to enhance their flavor, making them special. You can tell when they are done by looking at their color and texture. The outside should be golden and crispy. The inside should feel soft when pierced with a fork. Baking them for 45-50 minutes at 425°F (220°C) usually gives the best results. If they look brown and smell great, they are ready to eat. Yes, you can use many types of potatoes for Hasselback. Yukon gold potatoes are popular because they are creamy and hold their shape. You can also try red potatoes or even sweet potatoes. The key is to choose potatoes that are firm. This way, they won’t fall apart while baking. Customizing Hasselback potatoes is easy and fun. You can add herbs like rosemary or dill for a fresh taste. Try using different cheeses like cheddar or feta for a rich flavor. You can also sprinkle on some bacon bits or top with sour cream. The options are endless, so get creative! Hasselback potatoes go well with many dishes. They make a great side for roasted chicken or grilled steak. You can also serve them with fish or a hearty vegetable stew. Pairing them with a fresh salad adds a nice crunch. Enjoying them with your favorite main dish will make any meal special. Hasselback potatoes are a tasty and fun dish to make. We covered the main ingredients, like Yukon gold potatoes and garlic butter. I shared step-by-step instructions for cutting, baking, and serving. You learned tips for perfect texture and flavor. Exploring variations and storage options adds to their charm. Now you can impress your family or friends with this great recipe. So grab your potatoes and start cooking!

Hasselback Potatoes Flavorful Recipe to Try Today

- 2 ¼ cups all-purpose flour - 1 teaspoon baking soda - ½ teaspoon salt - 1 cup unsalted butter, softened - ¾ cup packed brown sugar - ¾ cup granulated sugar - 2 large eggs - 1 teaspoon pure vanilla extract The base of Kitchen Sink Christmas Cookies starts with simple staples. These ingredients create a soft and chewy texture. The flour gives structure, while the butter adds richness. Brown sugar brings a lovely caramel flavor, and granulated sugar adds sweetness. Eggs help bind everything together, making the cookies moist. - 1 cup semi-sweet chocolate chips - ½ cup white chocolate chips - ½ cup crushed candy canes - ½ cup chopped walnuts or pecans - ½ cup dried cranberries or raisins - ½ teaspoon ground cinnamon The fun part of these cookies is the mix-ins! You can choose any combination of flavors. Chocolate chips add sweetness and richness. White chocolate chips give a creamy taste. Crushed candy canes add a festive crunch and minty flavor. Nuts like walnuts or pecans add a nice texture. Dried cranberries or raisins provide a burst of sweetness. Ground cinnamon adds warmth and spice, making these cookies perfect for the holidays. Feel free to get creative! You can adapt the mix-ins based on what you like. This way, every batch feels special. You can find the full recipe in the earlier section to guide your baking adventure. - Preheat oven to 350°F (175°C). - Line baking sheets with parchment paper. - In a bowl, whisk together the flour, baking soda, salt, and cinnamon. - In another bowl, cream the butter, brown sugar, and granulated sugar until fluffy. - Add eggs one at a time, mixing well after each. - Stir in the vanilla until fully combined. - Gradually mix the dry and wet ingredients until just combined. - Gently fold in the chocolate chips, candy canes, nuts, and dried fruit. - Use a tablespoon or scoop to drop dough onto baking sheets. - Bake for 10-12 minutes until edges are golden. - Let cookies cool on sheets for 5 minutes before moving to racks. These steps will help you create delicious Kitchen Sink Christmas Cookies. Follow the Full Recipe for all details! To make perfect Kitchen Sink Christmas Cookies, avoid overmixing the dough. When you mix too much, the cookies can turn tough. Mix just until everything comes together. This keeps the cookies soft and chewy. For the right texture, use room-temperature butter and eggs. This helps the dough blend well. A good mix of wet and dry ingredients leads to fluffy cookies. Also, remember to scoop the dough with care. Use a tablespoon or cookie scoop for even sizes. Your cookies deserve a festive look! Arrange them on a bright platter for a fun display. You can sprinkle crushed candy canes on top for a pop of color. Dusting cookies with powdered sugar adds a sweet touch. Consider using edible glitter for extra sparkle during the holidays. Pair your cookies with hot cocoa or milk for a cozy treat. They also go well with coffee or tea. For holiday gatherings, place the cookies on a big platter. Mix different flavors to surprise your guests. Add some fresh fruit or nuts around the cookies for a nice touch. Enjoy the fun and flavors of these festive treats. Don't forget to check the Full Recipe for more details! {{image_4}} You can easily change the flavors in your Kitchen Sink Christmas Cookies. Try swapping the chocolate types. Dark, milk, or mini chocolate chips all work great. Each type adds its own unique taste. You can also change the nuts or dried fruits. Try pecans or walnuts if you like crunch. Dried apricots or cherries add a fruity twist. Mixing up these ingredients makes each batch special. If you need gluten-free cookies, you can use alternative flours. Almond flour or oat flour works well. They provide a nice texture and flavor. For vegan options, consider egg substitutes. You can use flax eggs or applesauce. These keep your cookies soft and moist. You’ll get tasty treats that everyone can enjoy. To bring in festive flavors, add spices like nutmeg or ginger. These spices warm up the cookies for the holidays. You can also include seasonal flavors like peppermint or orange zest. A hint of peppermint can brighten the taste. Orange zest adds a fresh twist. These seasonal additions make your cookies even more fun. For the full recipe, check out the Kitchen Sink Christmas Cookies section. To keep your Kitchen Sink Christmas Cookies fresh, store them in an airtight container. This helps lock in moisture and flavor. I suggest using a plastic or glass container with a secure lid. Layer the cookies with parchment paper to prevent sticking. You can also add a slice of bread to maintain softness. The bread absorbs excess moisture, keeping cookies chewy. Freezing cookies is easy and a great way to save some for later. First, let the cookies cool completely. Then, place them in a single layer on a baking sheet. Freeze them for about an hour to firm up. After that, transfer the cookies to a freezer bag. Remove the air and seal it tight. To thaw, simply take out the desired number of cookies and let them sit at room temperature for about 15-20 minutes. They will taste fresh and delicious! These cookies can last for about one week at room temperature. You might notice they become drier over time. To check if they are stale, look for a change in texture or an off smell. If they feel hard or crumbly, it’s best to toss them. Keep an eye on them, and enjoy while they're still soft and tasty! How to make Kitchen Sink Christmas Cookies? To make Kitchen Sink Christmas Cookies, start by mixing flour, baking soda, and salt. In another bowl, cream butter with sugars. Next, add eggs and vanilla. Combine wet and dry mixes. Finally, fold in your favorite mix-ins like chocolate chips and nuts. Bake at 350°F for 10-12 minutes. Can I substitute the butter with margarine? Yes, you can use margarine instead of butter. It will change the taste slightly. The texture may also differ, but your cookies will still be tasty. How do I know when my cookies are done? Check the edges of your cookies. They should be golden brown. The centers may look soft, but they will firm up as they cool. What can I use instead of eggs? You can use flaxseed meal or applesauce as an egg substitute. For each egg, mix 1 tablespoon of flaxseed meal with 2.5 tablespoons of water or use 1/4 cup of applesauce. What's the best way to store freshly baked cookies? Store cookies in an airtight container. This keeps them fresh and soft. You can also add a slice of bread to help them stay moist. Why are my cookies flat? Flat cookies may happen if the butter is too warm or if you overmix the dough. Always chill your dough for 30 minutes before baking if it seems too soft. What to do if the dough is too sticky? If your dough is sticky, add a little more flour, one tablespoon at a time. Mix until you reach the right consistency for scooping. How to fix undercooked cookies once baked? If your cookies are undercooked, return them to the oven for a few more minutes. This helps firm them up without burning. Tips on scaling the recipe for larger batches. To scale the recipe, simply multiply each ingredient by the number of batches you want to make. For example, for double the cookies, use double the ingredients. Nutritional information per cookie. Each cookie contains roughly 150 calories. This may vary with added mix-ins and exact measurements. Important notes for baking in high altitudes. At high altitudes, reduce sugar and increase flour slightly. This helps cookies hold their shape. Also, bake them for a shorter time to prevent over-baking. You learned how to make delicious Kitchen Sink Christmas Cookies with simple steps. We covered the key ingredients, proper mixing techniques, and baking tips to achieve the perfect texture. I shared ways to customize your cookies, along with storage methods to keep them fresh. Finally, I answered common questions to help you troubleshoot any issues. Enjoy experimenting with flavors and sharing these treats during the holidays. Happy baking!

Kitchen Sink Christmas Cookies Festive and Fun Treats

- 2 pounds baby potatoes - 3 tablespoons honey - 2 tablespoons Dijon mustard - 3 tablespoons extra virgin olive oil - 1 teaspoon garlic powder - 1 teaspoon onion powder - 1 teaspoon smoked paprika - Salt and pepper to taste - Fresh parsley, finely chopped When I make honey mustard potatoes, I start with fresh baby potatoes. Their small size cooks quickly and has a nice texture. Honey adds sweetness, while Dijon mustard brings tang. Extra virgin olive oil gives a rich flavor and helps with roasting. Next, I layer in my seasonings. Garlic powder adds a savory kick, and onion powder gives depth. Smoked paprika adds a hint of smoke, making each bite special. I always season with salt and pepper to enhance the taste. For garnish, I love to use fresh parsley. It adds color and freshness to the dish. It makes everything look nice on the plate. You can find the full recipe for these honey mustard roasted potatoes in the main article. - Preheat the oven to 400°F (200°C). This helps the potatoes cook evenly. - In a large bowl, whisk together honey, Dijon mustard, olive oil, garlic powder, onion powder, smoked paprika, salt, and pepper. This mixture is the heart of the dish. It gives the potatoes a sweet and tangy flavor. - Take your baby potatoes and cut them in half. This helps them cook faster. - Add the halved potatoes to the bowl with the marinade. Toss the potatoes well until every piece is fully coated. This step is key. A good coating ensures that each bite is full of flavor. - Line a baking sheet with parchment paper. This makes for easy cleanup later. - Spread the coated potatoes on the baking sheet in a single layer. Be careful not to overcrowd them. This way, they roast nicely. - Place the baking sheet in the oven. Roast for 25-30 minutes, stirring halfway through. This helps them brown evenly and become crispy. - After 30 minutes, check the potatoes. They should be fork-tender and golden. Remove them from the oven, and let them cool for a few minutes. Enjoy the delicious flavors of your honey mustard potatoes! If you want the full recipe, you can find it above. To get the best honey mustard potatoes, do not overcrowd the baking sheet. Crowding leads to steaming instead of roasting. Each potato needs space to cook evenly. This step is key for a nice, crispy texture. To check for doneness, poke the potatoes with a fork. They should feel soft inside and have a crispy skin. If they are not tender, give them a few more minutes. You can add herbs or spices to change the flavor. Try fresh rosemary or thyme for an extra kick. Garlic powder gives depth, but you can also use fresh garlic if you prefer. Honey mustard potatoes pair well with grilled chicken or fish. They also work great with roasted vegetables for a full meal. Feel free to mix and match based on what you love! Serve your honey mustard potatoes on a bright platter for special occasions. Add a sprinkle of fresh parsley on top for color. Drizzle a bit of extra honey for a sweet touch. For a family dinner, consider using a rustic bowl. It adds warmth and charm to your meal. Make your dish look as good as it tastes! For the full recipe, check out the detailed instructions above. {{image_4}} You can switch up the type of potatoes you use. Red potatoes bring a creamy texture. Yukon Gold potatoes add a buttery flavor. Both work great with the honey mustard glaze. If you want a vegan option, swap honey for maple syrup. This gives a unique twist while keeping the dish sweet and tasty. It works well with the Dijon mustard too. For those watching sodium, try low-sodium mustard. This small change still packs flavor without extra salt. You can also use fresh herbs to add depth and taste. If you need gluten-free options, rest easy. The main ingredients in this recipe are naturally gluten-free. Just ensure any mustard you use is labeled gluten-free. Want to take it up a notch? Add cheese or crispy bacon. Both will enhance the dish, making it richer and heartier. Cheddar cheese melts well and pairs nicely with the sweet mustard. Another fun idea is to toss in some veggies. Carrots, bell peppers, or Brussels sprouts blend well. This creates a one-pan meal that’s colorful and full of flavor. For the full recipe, check the earlier section. You’ll find all you need to make these honey mustard potatoes shine. To store leftover honey mustard potatoes, let them cool first. Then, place them in an airtight container. This helps keep the potatoes fresh and tasty. You can store them in the fridge for up to four days. Make sure you check for any signs of spoilage before eating. Reheating honey mustard potatoes correctly is key to keeping them crisp. The best way is to use an oven. Preheat the oven to 350°F (175°C). Spread the potatoes on a baking sheet and heat them for about 10-15 minutes. This method helps maintain their texture. Alternatively, you can use an air fryer for about 5-7 minutes. Avoid microwaving them, as this can make them soggy. You can freeze honey mustard potatoes for later meals. First, let them cool completely. Then, place them in a freezer-safe bag or container. Remove as much air as you can to prevent freezer burn. They can last up to three months in the freezer. When you're ready to eat, thaw them in the fridge overnight. Reheat them using the oven or air fryer for the best taste and texture. For more details, check the Full Recipe for additional tips. Yes, you can prepare honey mustard potatoes in advance. To do this, follow these steps. First, cook the potatoes as directed in the Full Recipe. Once they are roasted, let them cool completely. After cooling, store them in an airtight container in the fridge for up to three days. When you're ready to eat, simply reheat them in the oven or microwave until warm. This lets the flavors meld even more, making them even tastier. Honey mustard potatoes pair well with many dishes. Here are some great options: - Grilled chicken or steak - Roasted vegetables like carrots or Brussels sprouts - A fresh green salad with a light vinaigrette - Baked fish with lemon - A hearty soup, like tomato or lentil These sides balance the rich flavor of the potatoes and create a complete meal. To check if the potatoes are done, look for a few signs: - They should be fork-tender, meaning a fork easily pierces them. - The edges should be golden brown and crispy. - If you shake the pan gently, they should not stick to the bottom. These indicators ensure you achieve that perfect roasted texture. Yes, you can adapt this recipe for a vegan diet. To make honey mustard potatoes vegan, simply swap the honey for maple syrup or agave nectar. Both options offer a sweet flavor that works well with the mustard. Other than that, the recipe remains the same. Enjoy this tasty dish while keeping your meal plant-based! This article covered how to make delicious honey mustard roasted potatoes. We discussed the simple ingredients, techniques, and tips for perfect results. Use of variations and storage info help you create meals that fit your needs. These potatoes can be a great side for any dinner. Remember, you can adapt the recipe to match your taste. Enjoy cooking and experimenting with flavors! Your dining table will thank you.

Honey Mustard Potatoes Deliciously Roasted Delight

To make the best crockpot BBQ chicken, you need key ingredients. These ingredients work together to create a tasty meal. Here is what you need: - 4 boneless, skinless chicken breasts - 1 cup of your favorite BBQ sauce - 1/4 cup honey - 2 tablespoons apple cider vinegar - 1 tablespoon Worcestershire sauce - 1 teaspoon smoked paprika - 1 teaspoon garlic powder - 1 teaspoon onion powder - Salt and pepper to taste - Fresh parsley, chopped (for garnish) These ingredients bring out the flavor in the chicken and make it tender. Sometimes, I like to add more flavor to my BBQ chicken. Here are some optional ingredients you can try: - 1 teaspoon chili powder for some heat - 1 tablespoon mustard for a tangy twist - 1/2 cup diced onions for extra sweetness - 1/4 cup apple juice for a fruity note Feel free to mix and match these options to suit your taste. Choosing the right BBQ sauce can make a big difference. Here are some great options: - Classic tomato-based BBQ sauce for a traditional flavor - Spicy chipotle BBQ sauce for a kick - Honey mustard BBQ sauce for a sweet and tangy blend - Smoky BBQ sauce for a rich, deep taste Pick a sauce that you love. It can set the mood for the whole dish. For the full recipe, check out the details above. Start with a medium bowl. Combine the BBQ sauce, honey, apple cider vinegar, Worcestershire sauce, smoked paprika, garlic powder, onion powder, and salt and pepper. Whisk these ingredients together until smooth. This mix adds a sweet, tangy flavor to the chicken. You can taste it and adjust the seasoning if you want. Place the chicken breasts in a single layer at the bottom of the crockpot. Pour the BBQ sauce mixture evenly over the chicken. Make sure each piece is well-coated. This step ensures that every bite is full of flavor. Cover the crockpot with the lid. Set it to cook on low for 6 to 8 hours or on high for 3 to 4 hours. The chicken is ready when it is tender and shreds easily with a fork. When the cooking time is up, use two forks to shred the chicken right in the crockpot. Mix it with the sauce for full flavor. If the sauce is too thin, remove the lid and cook on high for another 30 minutes. Serve your BBQ chicken on toasted buns or over rice. Don’t forget to garnish it with fresh parsley for a pop of color. For more details, check out the Full Recipe. Shredding chicken is quick and easy. After cooking, take two forks. Use one fork to hold the chicken. With the other fork, pull apart the meat. It should come apart easily. If you want to save time, you can also use a hand mixer. Just place the chicken in a bowl and mix for a few seconds. This works well for large batches. To make your BBQ chicken even better, try adding spices. You can mix in more smoked paprika or a pinch of cayenne for heat. Fresh herbs, like cilantro or basil, can add brightness. If you love sweet tastes, add more honey or a splash of apple juice. These small changes can take your BBQ chicken to the next level. If your sauce is too runny, don’t worry! Just uncover the crockpot for the last 30 minutes of cooking. This lets some liquid evaporate, making the sauce thicker. If it’s too thick, you can add a bit of water or extra BBQ sauce. Stir well to combine. Finding the right consistency is key to a tasty meal. Check the Full Recipe for more details on how to balance flavors. {{image_4}} If you like heat, you can make spicy BBQ chicken. Start by adding cayenne pepper to the sauce. Just one teaspoon will add a kick. You can also use spicy BBQ sauce instead of the regular kind. For an extra layer of flavor, add some diced jalapeños. This will make your dish sizzle with excitement. BBQ chicken tacos are a fun twist on the classic dish. After cooking the chicken, shred it as usual. Then, warm up some soft tortillas. Fill each tortilla with shredded chicken and top with fresh veggies. Try adding crunchy cabbage, diced tomatoes, and avocado slices. A drizzle of extra BBQ sauce makes these tacos pop with flavor. You can easily swap chicken for other proteins. Try pork shoulder for a rich and tasty alternative. Cook it the same way as chicken. Beef brisket is another great choice, giving a hearty flavor. For a lighter option, use turkey breasts. Each protein will absorb the BBQ sauce, making every bite delicious. Check out the full recipe for more tips! Store your leftover BBQ chicken in an airtight container. Make sure the chicken cools to room temperature first. This helps keep it fresh longer. Use it within three to four days. If you want to save it for longer, consider freezing it. To reheat your BBQ chicken, you have a few options. The best way is to use the microwave. Place the chicken in a microwave-safe dish. Add a splash of BBQ sauce to keep it moist. Cover it with a lid or wrap. Heat it on medium power for 2-3 minutes. Stir halfway through to ensure even heating. You can also reheat it on the stove. Just warm it in a pan over low heat until hot. Freezing is great for long-term storage. First, let the chicken cool completely. Then, portion it into freezer bags. Squeeze out as much air as possible before sealing. Label the bags with the date. Your BBQ chicken will last for up to three months in the freezer. When you're ready to eat, thaw it in the fridge overnight. Reheat as mentioned above for the best taste. For the full recipe, check out the Ultimate Slow-Cooked BBQ Chicken. Cooking BBQ chicken in a crockpot takes about 6 to 8 hours on low. If you choose high heat, it will take around 3 to 4 hours. The chicken should be tender and shred easily with a fork when done. This slow cooking makes the flavors blend well. Yes, you can use frozen chicken breasts. However, the cooking time will be longer. It may take about 7 to 9 hours on low or 4 to 5 hours on high. Make sure the chicken reaches 165°F (75°C) to ensure it is safe to eat. BBQ chicken pairs well with many sides. Here are some tasty options: - Coleslaw - Corn on the cob - Baked beans - Garlic bread - Potato salad - Macaroni and cheese These sides add crunch, creaminess, or sweetness to your meal. Try them for a perfect family dinner. For the full recipe, check out the Ultimate Slow-Cooked BBQ Chicken. This blog post covered all you need for great Crockpot BBQ Chicken. We explored key ingredients, step-by-step cooking methods, and added tips for the best results. You learned how to add flavor and even how to store leftovers. With a few simple changes, you can customize this dish to fit your taste. Enjoy making this meal for friends and family. You’ll find it easy and rewarding. Try different sauces or protein options for variety. Your BBQ chicken adventure starts now!

The Best Crockpot BBQ Chicken for Easy Family Meals

To make your pumpkin spice coffee creamer, you will need: - 1 cup heavy cream - 1 cup whole milk - 1/2 cup canned pumpkin puree - 1/4 cup pure maple syrup - 1 teaspoon pure vanilla extract - 1 teaspoon ground cinnamon - 1/4 teaspoon ground nutmeg - 1/4 teaspoon ground ginger - A pinch of salt These ingredients blend to create a rich and cozy flavor that makes your coffee special. Using real maple syrup is key. It gives your creamer a depth that fake syrups lack. Real syrup also adds a nice sweetness without being too sugary. When it comes to pumpkin puree, not all are the same. Some brands have added sugar or spices, which can change the taste. Look for pure canned pumpkin for the best results. This ensures you get that fresh pumpkin taste that shines through in your coffee. If you're looking for dairy-free options, try using almond milk or oat milk. These alternatives can still give you a creamy texture without the dairy. Some brands even make non-dairy heavy cream, which works well too. For sweeteners, you can use stevia or agave syrup for a lower-calorie option. These choices can help you enjoy your creamer without the added calories, making it a guilt-free treat. Feel free to explore these alternatives to find what works best for you! - Preparation time: 10 minutes - Cooking time: 15 minutes To make your pumpkin spice coffee creamer, follow these steps: 1. Combine Ingredients: Start by pouring 1 cup of heavy cream and 1 cup of whole milk into a medium saucepan. Add 1/2 cup of canned pumpkin puree. Place the saucepan over medium heat. 2. Stir Until Smooth: Gently stir the mixture with a whisk or spoon. Keep stirring until everything blends well. Be careful not to let it boil! 3. Mix in Sweetness and Spices: Once warm, pour in 1/4 cup of pure maple syrup, 1 teaspoon of pure vanilla extract, 1 teaspoon of ground cinnamon, 1/4 teaspoon of ground nutmeg, 1/4 teaspoon of ground ginger, and a pinch of salt. Stir continuously until the mixture smells amazing. 4. Simmer for Flavor: Lower the heat and let the mixture simmer for about 5 minutes. This helps the spices mix well into the cream. 5. Cool and Store: After simmering, remove the saucepan from heat. Let it cool for a few minutes. Carefully pour the creamer into a clean jar or airtight container. 6. Refrigerate: Store your homemade pumpkin spice coffee creamer in the fridge. It stays fresh for up to one week. Shake well before each use to mix the ingredients again. To get your creamer just right, focus on these: - Achieving a Smooth Texture: Stir well at each step. This helps make the creamer smooth and creamy. - Avoiding Curdled Cream: Keep the heat on medium and avoid boiling. Too much heat can lead to curdling. With these steps, you create a rich and cozy pumpkin spice coffee creamer that warms the soul. For the full recipe, check back at the beginning! To make your pumpkin spice coffee creamer even better, think about adding more spices. Try a pinch of cloves for a warm kick. Cardamom can add a unique twist too. If you like it sweeter, adjust the maple syrup. Start with less and taste as you go. This way, you can find your perfect balance. Pair your creamer with different coffee types. It works well in lattes and cappuccinos. You can also drizzle it over iced coffee for a refreshing treat. Want to use it in desserts? Pour it over vanilla ice cream or mix it into pumpkin pie. This adds a rich flavor that everyone will love. Make your coffee look special by using fun serving ideas. Pour the creamer into a clear glass pitcher. This shows off its beautiful color. Top it with whipped cream and a sprinkle of cinnamon for a nice touch. Even a few pumpkin seeds can add a fun visual element. These small details make your drink feel festive and inviting. For the full recipe, check the earlier section. Enjoy your cozy pumpkin spice coffee creamer! {{image_4}} You can add fun seasonal flavors to your pumpkin spice coffee creamer. For Halloween, a touch of nutmeg can enhance the cozy vibe. During winter, try adding peppermint extract for a festive twist. For Thanksgiving, mix in some clove for a warm spice note. You can also change it up for special occasions like Christmas or Valentine's Day. Tailoring your creamer to fit these holidays makes it extra special. Simply adjust the spices in the recipe to match the season’s mood. Mixing flavors can take your creamer to the next level. For a richer taste, add chocolate syrup for a mocha twist. You can also try caramel for a sweet indulgence. If you like a bit of zest, a dash of orange zest adds freshness. Don’t hesitate to blend in other coffee creamers you enjoy. Almond or hazelnut creamers pair well with pumpkin spice too. Just remember to adjust the sweetness accordingly to keep the balance. Different milk types can change the taste and texture of your creamer. Almond milk gives a nutty flavor and is lower in calories. Oat milk adds creaminess without dairy, perfect for a smooth sip. Soy milk is another option, providing a good protein boost. Each type has its pros and cons. Almond milk may be too thin for some, while soy can have a stronger taste. Experiment to find your favorite milk for the best pumpkin spice experience. To keep your pumpkin spice coffee creamer fresh, store it in the refrigerator. I recommend using a mason jar or an airtight container. This helps keep out air and light, which can spoil the creamer. Make sure to seal it tightly after each use. When you pour, use a clean spoon to avoid contamination. Your homemade pumpkin spice coffee creamer lasts about one week in the fridge. After that, it may spoil. Look for signs like a sour smell, separation, or unusual texture. If you see any of these signs, it’s best to toss it out. Always check before using! When warming the creamer, do it gently. Pour it into a small saucepan and heat it on low. Stir it often to keep it smooth. Avoid boiling, as high heat can change the flavor and texture. If you want a quick option, microwave it in short bursts. Stir well between each burst to ensure even heating. Enjoy the rich and cozy flavors in your coffee! What is pumpkin spice coffee creamer? Pumpkin spice coffee creamer is a rich mix for coffee. It has flavors of pumpkin, cinnamon, and nutmeg. This blend gives your coffee a warm, cozy taste. You can make it at home with simple ingredients. It adds a festive touch to your morning routine. Can I freeze pumpkin spice coffee creamer? Yes, you can freeze pumpkin spice coffee creamer. Pour it into an ice cube tray for easy use. Once frozen, pop the cubes into a bag. This way, you can add a cube to hot coffee anytime. Just remember to shake it well before use. Benefits of making homemade creamer Making your own pumpkin spice coffee creamer is fun and easy. You control the flavors and ingredients. You can use fresh spices and real maple syrup. This means no strange additives or excess sugar. Plus, it tastes fresher and more vibrant than store-bought options. Cost comparison with store-bought options Homemade creamer can save you money. A bottle of store-bought creamer may cost around $3. Making your own, using the ingredients from the Full Recipe, can be cheaper. You get more servings for less money and enjoy a more delicious flavor. Overview of calories and nutrients in the recipe This homemade pumpkin spice coffee creamer has about 80 calories per tablespoon. It includes healthy fats from the cream and milk. The pumpkin provides vitamins like A and C. Maple syrup adds some natural sweetness without refined sugars. Comparisons to commercial creamers Store-bought creamers often have added sugars and preservatives. Many can have up to 100 calories per tablespoon. They may also contain artificial flavors. Making your own means you know exactly what goes in it, making it a healthier choice. In this post, I shared how to make pumpkin spice coffee creamer. We covered ingredients like heavy cream, pumpkin puree, and real maple syrup. I offered tips on storage, flavor enhancements, and serving suggestions. This creamer not only tastes great but also allows you to customize it. Making it at home saves money and adds unique flavors. Enjoy your delicious creation and make every coffee special!

Pumpkin Spice Coffee Creamer Rich and Cozy Flavor

- 1 cup water - 1 cup brown sugar - 1/2 cup pure pumpkin puree - 1 teaspoon vanilla extract - 1 teaspoon ground cinnamon - 1/2 teaspoon ground nutmeg - 1/4 teaspoon ground ginger - 1/4 teaspoon ground allspice - Pinch of salt - You can use coconut sugar or maple syrup instead of brown sugar. - Try adding a bit of ground cloves for a warm kick. - For a different taste, use almond or hazelnut extract instead of vanilla. This recipe is simple and fun. You can customize it to fit your taste. I love to think of new ideas. Each spice adds its own twist to the syrup. The pumpkin puree makes it rich and creamy. You can make this syrup in just a few minutes! For the full recipe, check out the detailed steps. Start by pouring 1 cup of water and 1 cup of brown sugar into a medium saucepan. Place the pan over medium heat. Stir the mixture continuously. You want the brown sugar to dissolve fully. This step creates a simple syrup. Once the sugar dissolves, add 1/2 cup of pure pumpkin puree into the pan. Use a whisk to mix well. Your goal is a smooth and lump-free syrup. Next, add 1 teaspoon of vanilla extract, 1 teaspoon of ground cinnamon, 1/2 teaspoon of ground nutmeg, 1/4 teaspoon of ground ginger, 1/4 teaspoon of ground allspice, and a pinch of salt. Stir well to combine all the flavors. Now, bring the mixture to a gentle simmer. You should see small bubbles forming. Let it cook for about 5 to 7 minutes. Stir occasionally to ensure even cooking. This simmering thickens the syrup and enhances its flavor. After simmering, remove the saucepan from the heat. Let the syrup cool for a few minutes. Then, strain the syrup through a fine mesh sieve into a clean jar. This will remove any solid bits, leaving you with a smooth texture. Allow the syrup to cool to room temperature. Seal the jar with a lid and store it in the fridge. It stays fresh for up to 2 weeks. To get the best syrup, focus on consistency. Stir the mixture well while it cooks. This helps blend in the pumpkin and spices smoothly. If you want a thicker syrup, simmer it a bit longer. Just watch it closely so it doesn’t burn. You can add extra flavors, too. A pinch of clove can give your syrup a warm kick. A splash of maple syrup adds depth. Try different spices and see what you like best. You can change the sweetness to your taste. If you like it sweeter, add more brown sugar. Just remember, the more sugar, the thicker the syrup. For a spicier flavor, add more cinnamon or ginger. If you prefer milder flavors, reduce the spice amounts. Taste as you go. This way, you get the perfect blend for your palate. This syrup is very versatile. You can stir it into coffee or tea for a warm drink. It also tastes great on pancakes or waffles. Pour it over oatmeal for a tasty breakfast. In baking, add it to muffins or cakes for a hint of fall. You can mix it into whipped cream for a fun topping. The options are endless with pumpkin spice syrup, and it’s always a cozy choice. For the full recipe, check out the Homemade Pumpkin Spice Syrup section. {{image_4}} You can give your pumpkin spice syrup a fun twist. Consider adding cloves for warmth. Cloves have a strong flavor that pairs well with pumpkin. Just use a small pinch to avoid overpowering the mix. You might also try different pumpkin varieties. Each type brings its own taste. For instance, sugar pumpkins are sweeter, while pie pumpkins are creamier. Experimenting with these can change your syrup's flavor profile. If you want a lighter syrup, choose sugar-free options. Sweeteners like stevia or monk fruit work great. They keep the syrup sweet without added calories. You can also use erythritol, which has a similar taste to sugar. If you go this route, adjust the amount based on your taste. Remember that some sweeteners can taste different, so test a little first. Want to make your syrup unique? Try adding citrus zest or fresh herbs. Orange or lemon zest can brighten the flavor. You can also use rosemary or mint for an herbal twist. This gives your syrup a special touch for any holiday. For example, use peppermint for winter drinks or orange zest for spring treats. The possibilities are endless, and it’s fun to experiment! To keep your pumpkin spice syrup fresh, store it in an airtight jar. Glass jars work best. Make sure the cap fits tightly. This keeps air out and preserves flavor. The syrup lasts about two weeks in the refrigerator. Always check for any changes in smell or color before using. You can freeze pumpkin spice syrup if you want to save some for later. Pour the syrup into an ice cube tray. This way, you can use small amounts as needed. Once frozen, pop the cubes into a freezer-safe bag. For thawing, simply leave the cubes out at room temperature. You can also put them in the fridge overnight. It's important to know when your syrup has gone bad. If the syrup smells off or has changed color, do not use it. If you see any mold, throw it away right away. To maintain freshness, always use clean utensils when scooping syrup. This helps prevent bacteria from getting in. Homemade pumpkin spice syrup lasts about two weeks in the fridge. Make sure to store it in an airtight jar. Always check for signs of spoilage before using. Yes, you can use pumpkin spice syrup in baking. It adds flavor to cakes, muffins, and cookies. Just replace some sugar or liquid in your recipe with the syrup. Yes, pumpkin spice syrup is gluten-free. All the ingredients used are safe for people with gluten sensitivities. You can enjoy this syrup without worry. Absolutely! You can double or triple the recipe. Just keep the same proportions for each ingredient. Store the extra syrup in the fridge for later use. You can drizzle it on pancakes or waffles. Stir it into your coffee or tea for a tasty drink. It also works well in smoothies or as a topping for desserts. In this blog post, we explored how to make delicious pumpkin spice syrup with simple ingredients. We covered the main components, detailed instructions, and tips to enhance your recipe. You can customize the syrup with various spices and sweeteners, making it perfect for many drinks and recipes. Remember to store it properly and watch for spoilage signs. Enjoy using this syrup to add warm flavors to your favorite fall treats! Choose your favorite variations and get creative.

Homemade Pumpkin Spice Syrup Easy Flavor Boost Recipe

- 1 cup orzo pasta - 2 cups mixed seasonal vegetables (like zucchini, bell peppers, cherry tomatoes, and carrots) - 3 tablespoons extra virgin olive oil - 1 teaspoon dried oregano - 1 teaspoon garlic powder - Salt and freshly cracked black pepper, to taste - ½ cup feta cheese, crumbled (optional) - Fresh basil leaves for garnish - Juice of 1 fresh lemon - You can add fresh spinach for extra color and nutrients. - Cherry tomatoes add sweetness and juiciness. - A sprinkle of red pepper flakes gives a nice kick. - If you don’t have orzo, try using quinoa or rice. - Use any seasonal vegetables you have on hand. Carrots, broccoli, or asparagus work well. - Swap feta with goat cheese or omit it for a dairy-free option. - Olive oil can be replaced with avocado oil or melted butter for a different flavor. This dish is simple yet packed with flavor. You can easily mix and match ingredients based on what you like or have in your kitchen. Enjoy creating your own version! {{ingredient_image_2}} Start by preheating your oven to 425°F (220°C). This high heat helps the vegetables roast well and caramelize nicely. Next, rinse and chop your mixed seasonal vegetables. You want them in bite-sized pieces. Try to keep them uniform for even cooking. Some great options are zucchini, bell peppers, cherry tomatoes, and carrots. In a large bowl, mix the chopped vegetables with 2 tablespoons of olive oil, dried oregano, garlic powder, salt, and pepper. Toss the vegetables until they are fully coated with the oil and spices. Spread them out on a baking sheet in a single layer. Roast them for about 20-25 minutes. Halfway through, stir them gently to promote even cooking. You want them to be golden and fork-tender. While the vegetables roast, bring a pot of salted water to a boil. Add 1 cup of orzo pasta and cook it according to the package instructions, about 8-10 minutes. Once done, drain the orzo and set it aside. In a large serving bowl, combine the roasted vegetables and the cooked orzo. Drizzle with the last tablespoon of olive oil and the juice of one fresh lemon. Toss everything gently until well mixed. If you like, sprinkle crumbled feta cheese on top just before serving. This adds a creamy texture and tangy flavor. Serve the dish in shallow bowls and garnish with fresh basil leaves. A lemon wedge on the side adds color and extra flavor when squeezed over the dish. Enjoy every bite! To get the best roasted vegetables, choose a mix that has color and texture. Use zucchini, bell peppers, cherry tomatoes, and carrots. Cut them into bite-sized pieces. This helps them cook evenly. Toss the veggies with olive oil, oregano, garlic powder, salt, and pepper. Make sure they are coated well. Spread them out on a baking sheet. This keeps them from steaming and helps them caramelize. Roast them at 425°F (220°C) for 20-25 minutes. Stir them halfway for even cooking. They should be tender and golden. Cooking orzo is simple. Bring a pot of salted water to a boil. Add the orzo and cook according to package instructions for about 8-10 minutes. You want it to be al dente, not mushy. Test it a minute before the time is up. Once it’s ready, drain it well. Do not rinse it, as that removes the starch that helps the sauce stick later. To make your dish look great, serve the roasted vegetable orzo in shallow bowls. This allows the colors to shine. Garnish with fresh basil leaves for a pop of green. Add a lemon wedge on the side. This gives a nice touch and a burst of flavor when squeezed over the dish. The key is to make it look as good as it tastes! Pro Tips Choose Seasonal Vegetables: Opt for seasonal vegetables to enhance flavor and nutritional value. The freshest produce will always yield the best results. Don't Overcrowd the Baking Sheet: Spread the vegetables out in a single layer for even roasting. Overcrowding can lead to steaming instead of roasting. Reserve Pasta Water: If you find your orzo is too dry after mixing, add a splash of reserved pasta cooking water to loosen it up and add flavor. Serve Warm: This dish is best enjoyed warm. If making ahead, reheat gently to preserve the texture of the vegetables and orzo. {{image_4}} You can mix and match vegetables in this dish. Use what you love or what you have. Some great choices are: - Zucchini - Bell peppers - Cherry tomatoes - Carrots - Eggplant - Broccoli Each vegetable brings its own taste and texture. Roasting makes them sweet and flavorful. Adding protein boosts the dish. You can use: - Grilled chicken - Chickpeas - Shrimp For a meat option, grill chicken and cut it into pieces. For a vegan choice, toss in chickpeas right before serving. This makes your meal hearty and filling. Seasoning can change the whole dish. Try these options for a twist: - Fresh herbs like thyme or rosemary - Spices like cumin or smoked paprika - A splash of balsamic vinegar These flavors add depth. Don't be afraid to experiment! A new spice can create a whole new dish. Store your roasted vegetable orzo in an airtight container. It will stay fresh for up to three days in the fridge. When you want to eat it again, check the smell and look for any changes in color. If it looks good, you’re ready to enjoy! To freeze leftover orzo, place it in a freezer-safe container. It can last for up to three months in the freezer. When you freeze it, make sure to leave some space at the top of the container. This allows for expansion as it freezes. When you’re ready to eat your orzo, you can reheat it in a few ways. For the best texture, use the stovetop. Add a splash of water or olive oil to a pan and heat over medium. Stir it often until warm. You can also use the microwave. Place the orzo in a bowl and cover it. Heat for one minute, then stir. If it's still cold, heat for another 30 seconds or until warm. Orzo is a type of pasta that looks like rice. It's small and often used in soups or salads. Made from semolina flour, orzo cooks quickly and adds a nice texture to dishes. You can find it in most grocery stores. Yes, you can easily make roasted vegetable orzo vegan. Simply leave out the feta cheese. You can add a splash of lemon or a sprinkle of nutritional yeast for a cheesy flavor. This keeps the dish tasty and plant-based. Roasted vegetable orzo lasts about 3 to 5 days in the fridge. Store it in an airtight container to keep it fresh. Reheat it in the microwave or on the stove with a splash of water to bring back some moisture. Absolutely! You can use other cheeses like goat cheese, mozzarella, or Parmesan. Each cheese brings a different flavor and texture. Just choose the one that you enjoy most, and add it to your dish for a tasty twist. This post covers all you need for roasted vegetable orzo. You learned about key ingredients, step-by-step cooking, and helpful tips. I shared different ways to change this dish, like adding proteins or trying new veggies. You also got storage advice to keep leftovers fresh. Remember, cooking should be fun and creative. Use this guide to make your roasted vegetable orzo shine in your kitchen. Enjoy your cooking journey!

Roasted Vegetable Orzo Flavorful and Nutritious Dish

PREV 1 … 13 14 15 … 17 NEXT
tastykitchentales

explore

DessertsDinnerAppetizersDrinks

Our Policies

  • Cookie Policy
  • Copyright Policy
  • Disclaimer
  • GDPR Policy
  • Terms Of Use
Back to Top
  • About
  • Contact Us
  • Privacy Policy
© 2025 tastykitchentales