FREE DINNER EBOOK! Get your copy!
  • Cookie Policy
  • GDPR Policy
  • Disclaimer
  • Terms Of Use
  • Visit my other site: Fun Cookie Recipes
tastykitchentales
  • Home
  • Dinner
  • Desserts
  • Drinks
  • Appetizers
  • Contact
  • About
  • Privacy Policy
  • Home
  • Dinner
  • Desserts
  • Drinks
  • Appetizers
  • Contact
  • About
  • Privacy Policy
  • Cookie Policy
  • GDPR Policy
  • Disclaimer
  • Terms Of Use
Visit my other site: Fun Cookie Recipes

HOME / CATEGORIES /

Latest

- 1 lb chicken thighs, skinless and diced into bite-sized pieces - 4 cups rich chicken broth - 2 cups tomatillos, husked, rinsed, and roughly chopped - 1 cup green chiles (either fresh or canned), chopped - 1 medium onion, finely diced - 3 cloves of garlic, minced - 2 medium potatoes, peeled and cut into uniform cubes - 1 teaspoon ground cumin - 1 teaspoon dried oregano - 1 tablespoon extra virgin olive oil - Salt and freshly ground black pepper to taste - Fresh cilantro leaves, chopped, for garnish In this recipe, the chicken thighs serve as the heart of the stew. They add a rich flavor and tender texture. The chicken broth acts as the base, making the stew warm and comforting. Tomatillos and green chiles bring a fresh taste and a gentle heat. The tomatillos add a tangy note, while the chiles give that signature kick. Onion and garlic round out the flavor profile, providing depth and aroma. Potatoes not only add substance but also help absorb the flavors. Spices like cumin and oregano enhance the overall taste, making each bite a delight. For garnish, fresh cilantro adds brightness. It gives a colorful touch and balances the stew's heat. A sprinkle of salt and pepper at the end allows you to personalize the flavor. With these ingredients, you create a hearty and flavorful Green Chile Stew that is sure to please everyone at the table. {{ingredient_image_2}} 1. Sautéing onions and garlic: Start by heating 1 tablespoon of extra virgin olive oil in a large pot over medium heat. Once the oil shines, add 1 finely diced medium onion. Sauté it for about 5 minutes until it becomes soft and clear. This step builds a tasty base for our stew. Then add 3 minced cloves of garlic. Cook for another minute until the garlic smells good. 2. Cooking chicken to perfection: Now, add 1 pound of diced skinless chicken thighs to the pot. Season the chicken with salt, black pepper, 1 teaspoon of ground cumin, and 1 teaspoon of dried oregano. Cook for 5-7 minutes, stirring often. You want the chicken to brown nicely on all sides. This adds depth to the flavor. 3. Combining ingredients for the stew: Carefully pour in 4 cups of rich chicken broth. Next, add 2 cups of chopped tomatillos, 1 cup of chopped green chiles, and 2 peeled and cubed medium potatoes. Stir everything well to mix the flavors. 1. Boiling and reducing heat: Increase the heat to bring the pot to a gentle boil. Once you see bubbles rising, reduce the heat to low. This will let the stew simmer slowly. 2. Cooking time details: Let the stew cook uncovered for about 30-35 minutes. Stir occasionally. You want the potatoes to become tender and the flavors to blend well. 1. How to present the stew: Once the stew is ready, ladle it into bowls. Serve it hot, as it tastes best fresh. 2. Garnishing tips: For a pop of color and flavor, sprinkle fresh chopped cilantro on top just before serving. This adds a nice touch to your dish. Enjoy your hearty green chile stew! To create a rich flavor, start by browning the chicken well. This adds depth to the stew. Use fresh ingredients whenever possible. Fresh tomatillos and green chiles give the best taste. For texture, cut potatoes into uniform cubes. This helps them cook evenly. Stir the stew often to prevent sticking. This keeps the flavors mixed well. You can use other proteins if chicken isn’t your choice. Turkey or pork works great too. Just adjust cooking times as needed. For vegetables, feel free to swap in what you like. Zucchini or carrots can add a nice twist. You can also play with spices. Add more cumin for a bolder taste or try smoked paprika for a smoky flavor. Pro Tips Freshness is Key: Use fresh tomatillos and green chiles for the best flavor. They add a vibrant taste and bright color to your stew. Customize Your Heat: Adjust the amount of green chiles based on your spice tolerance. You can use milder varieties for a gentler kick. Perfect Potatoes: Cut your potatoes into uniform cubes to ensure they cook evenly and become tender at the same time. Let It Simmer: Allow the stew to simmer uncovered to help concentrate the flavors. The longer it simmers, the better the taste! {{image_4}} To make a vegetarian version, you can replace the chicken with hearty vegetables. Some great options include: - 1 can of black beans or pinto beans for protein - 2 cups of zucchini, chopped - 1 cup of corn for sweetness - 1 cup of carrots, diced When cooking, use vegetable broth instead of chicken broth. You can sauté the veggies just like the chicken. Cook until they are soft, and then add the remaining ingredients. This method keeps the stew full of flavor while making it meat-free. Using an Instant Pot makes this stew quick and easy. To prepare, follow these steps: 1. Use the sauté function for onions and garlic. 2. Add chicken (or veggies) and spices, browning them for a few minutes. 3. Pour in the broth, tomatillos, green chiles, and potatoes. Set your Instant Pot to high pressure for 10 minutes. Once done, let the steam release naturally for 10 minutes. This method saves time and keeps all the flavors locked in. Green chile stew varies by region and culture. In New Mexico, you might find it spicier with fresh Hatch chiles. In Texas, they may add beans and extra meat, making it heartier. Unique local ingredients can change the dish too. For example, in some places, people use roasted chiles for a smoky flavor. In others, fresh herbs like cilantro or parsley may be added for freshness. Each version tells a story of its roots and brings a new flavor to the table. After you enjoy your green chile stew, store leftovers safely. Let the stew cool to room temperature first. Then, place it in an airtight container. This helps keep the stew fresh. I recommend using glass containers for best results. They don’t absorb odors and are safe for reheating. Make sure to label your container with the date. This way, you know when to eat it by. You can store the stew in the fridge for about 3 to 4 days. If you want to keep it longer, freezing is a great option. Freezing green chile stew is easy and keeps it tasty. First, let the stew cool completely. Then, pour it into a freezer-safe container. Leave some space at the top. This allows for expansion when it freezes. You can also use freezer bags, but make sure to squeeze out the air. Seal them tight. To thaw, place the container in the fridge overnight. This keeps the stew safe. If you need it fast, you can use the microwave. Just be sure to stir it often to heat evenly. When you're ready to eat, reheat the stew on the stove. Use low heat and stir occasionally. This helps maintain the flavors. If it seems thick, add a bit of broth or water. Enjoy your hearty dish again! How spicy is green chile stew? Green chile stew has a mild to medium spice level. The heat comes from the green chiles used. If you prefer less heat, choose milder chiles or use less. If you like it spicy, add more chiles or even some jalapeños. This stew can be adjusted to fit your taste. Can I make it in advance? Yes, you can make green chile stew in advance. It tastes even better the next day as flavors meld. Store it in an airtight container. Keep it in the fridge for up to three days. You can also freeze it for up to three months. Just thaw it in the fridge overnight before reheating. Calorie count per serving Each serving of green chile stew has about 350 calories. This can vary based on the chicken and broth you use. It's a hearty meal packed with nutrients, making it a great choice for lunch or dinner. Health benefits of green chile stew This stew is full of healthy ingredients. Chicken provides protein for muscle health. Potatoes add fiber for digestion. Tomatillos and green chiles are rich in vitamins and antioxidants. Eating this stew can boost your immune system and keep you strong. What goes well with green chile stew? Green chile stew pairs well with many sides. You can serve it with warm tortillas for dipping. Rice also complements it nicely, soaking up the stew's rich flavors. A simple side salad adds freshness to your meal. Recommended accompaniments Try topping your stew with shredded cheese or a dollop of sour cream. Fresh cilantro adds a nice touch as well. For a crunch, serve with tortilla chips on the side. These sides enhance the stew and make your meal more enjoyable. This blog post covered how to make a delicious green chile stew. We looked at the key ingredients, from chicken thighs to spices. You learned the step-by-step process, including how to sauté and simmer effectively. I shared tips for flavor, texture, and ingredient swaps. Plus, we explored variations like vegetarian options and Instant Pot shortcuts. In conclusion, this stew is simple yet satisfying. You can enjoy it in many ways. Happy cooking, and trust your taste buds!

Green Chile Stew Hearty and Flavorful Comfort Dish

- 1 lb flank steak - 2 tablespoons olive oil - 2 teaspoons smoked paprika - 1 teaspoon garlic powder - 1 teaspoon ground cumin - 1 cup cherry tomatoes, halved - 1 cucumber, diced into small cubes - 1 red onion, thinly sliced - 1 cup Kalamata olives, pitted and halved - 1 cup feta cheese, crumbled - Fresh parsley, finely chopped - 1 lemon, zested and juiced - 4 tablespoons tahini sauce The main star of this dish is the flank steak. This cut cooks quickly and tastes great. I like to use smoked paprika, garlic powder, and cumin for the marinade. These spices give the steak a warm, rich flavor. Olive oil helps the spices stick to the meat. Fresh veggies add color and crunch. Cherry tomatoes burst with juice, while cucumbers cool each bite. Red onion gives a sharp taste, and Kalamata olives bring a briny touch. Feta cheese crumbles on top add creaminess. Fresh parsley brightens the dish, while lemon juice and zest give it a zesty pop. The tahini sauce ties everything together, making each bite creamy and rich. This mix of flavors and textures makes the Mediterranean Steak Power Bowls a fun meal. You get a bit of everything in each bite! {{ingredient_image_2}} - In a medium bowl, mix: - 2 tablespoons olive oil - 2 teaspoons smoked paprika - 1 teaspoon garlic powder - 1 teaspoon ground cumin - Salt and black pepper, to taste - Rub this marinade all over 1 lb flank steak. Make sure the steak is well-coated. Cover it and let it sit for at least 30 minutes. For more flavor, refrigerate it for 1-2 hours. - Preheat your grill or a heavy skillet over high heat. - Take the steak out of the marinade, tossing the leftover marinade. - Grill or sear the steak for about 4-6 minutes on each side. Adjust the time for your desired doneness. - After cooking, let the steak rest for 5-10 minutes. Then slice it against the grain into thin strips. - In a large serving bowl, create a base with 2 cups of cooked quinoa. Spread it evenly at the bottom. - Layer on the fresh ingredients: - 1 cup cherry tomatoes, halved - 1 cucumber, diced - 1 red onion, thinly sliced - 1 cup Kalamata olives, halved - Sprinkle 1 cup of crumbled feta cheese on top. - Lay the sliced steak over the fresh ingredients. Ensure every bowl has a good portion. - Drizzle 4 tablespoons of tahini sauce on top. Squeeze fresh lemon juice, then sprinkle lemon zest. - Finish with finely chopped fresh parsley for color and flavor. For the best taste, know your cooking times. Aim for about 4-6 minutes on each side for medium-rare. If you want your steak more done, increase the time. Always check the center for doneness. After cooking, let the steak rest for 5-10 minutes. This helps keep the juices inside and makes for a tender bite. Fresh herbs add bright flavors. Use parsley or mint for a fresh touch. You can also try different sauces. A drizzle of balsamic glaze or a lemon vinaigrette can change the taste. Experiment and find what you love most! Layer your ingredients for a beautiful look. Start with the quinoa, then add the veggies in sections. This way, each ingredient stands out. For a final touch, garnish with parsley. It adds color and freshness. You could also add lemon wedges on the side. This makes your bowl even more appealing! Pro Tips Marinate Longer for Flavor: For the best flavor, marinate the flank steak for at least 2 hours or overnight. This will allow the spices to penetrate the meat deeply, making it more tender and flavorful. Rest the Steak: After cooking, always let the steak rest for 5-10 minutes before slicing. This helps retain the juices, ensuring each bite is succulent and flavorful. Use Warm Quinoa: For a better texture and flavor, serve the quinoa warm. This adds a comforting element to the bowl and helps meld the flavors together. Fresh Herbs Make a Difference: Don't skip the fresh parsley garnish! It adds a pop of color and a fresh, bright flavor that elevates the whole dish. {{image_4}} You can switch up the protein in this dish. Chicken is a great option. Use grilled chicken thighs for a juicy bite. Shrimp also works well, cooked quickly in a pan. If you want a plant-based choice, try tofu. Marinate and grill it just like the steak. Each option brings its own flavor. Grains add texture and flavor to your bowl. Brown rice gives a nutty taste and is filling. Couscous cooks fast and soaks up flavors well. Farro is chewy and adds a hearty feel to your meal. Choose the grain that fits your taste and diet. Dressings enhance the flavors of your bowl. A lemon vinaigrette adds brightness and zest. Just mix olive oil, lemon juice, and a pinch of salt. For a creamier option, use yogurt dressing. It adds a nice tang and complements the other ingredients. Choose a dressing that suits your mood! To keep your Mediterranean Steak Power Bowls fresh, store them in the fridge. Place the leftover bowls in airtight containers. This helps keep flavors intact and prevents spoilage. Make sure to separate the steak from the grains and veggies if possible. This way, they stay fresh longer. It is best to eat leftovers within three days. When you're ready to enjoy your leftovers, reheating is easy. For the steak, use a skillet over medium heat. This keeps it juicy. Heat the quinoa and veggies in the microwave for about one minute. Stir halfway through to ensure even heating. If you want to avoid drying out the steak, add a splash of water or broth. Here are some guidelines for how long each component lasts: - Cooked steak: 3-4 days in the fridge. - Quinoa: 5-7 days when stored properly. - Fresh veggies: 2-3 days for best taste. - Tahini sauce: 1-2 weeks if sealed tightly. Following these tips helps you enjoy your Mediterranean Steak Power Bowls longer! Yes, you can make parts of this recipe ahead of time. Cook your quinoa in advance and store it in the fridge. You can also marinate the steak the night before. Just grill it fresh when you are ready to serve. The fresh veggies can be chopped ahead too. Just keep them in separate containers to keep them crisp. This recipe is mostly gluten-free. The main ingredient to watch is the tahini. Ensure your tahini is gluten-free. Quinoa is a great grain choice. It is naturally gluten-free. Avoid any sauces that may contain gluten. Always check the labels to be safe. You can use marinated tofu or tempeh instead of steak. Both options provide great texture and flavor. Use a plant-based feta for a cheese alternative. Swap the tahini sauce for a vegan dressing. This way, you keep all the flavors while making it vegan. Yes, you can use hummus as a tasty alternative to tahini. You could also use a yogurt sauce if you prefer. A simple lemon and olive oil dressing can work well too. Just make sure to keep the flavors bright and fresh. Each bowl has about 450 calories. This includes protein from the steak and quinoa. You get healthy fats from the olive oil and tahini. The veggies add fiber and vitamins. The feta adds calcium, making this meal well-rounded and nutritious. This blog post guided you through making delicious Mediterranean Steak Power Bowls. We covered the essential ingredients, step-by-step cooking, and helpful tips to elevate your dish. Remember to choose fresh veggies and let the steak rest for the best flavor. You can also try different proteins or grains to match your taste. Enjoy experimenting with variations to keep your meals exciting. With this recipe, you have a healthy, tasty meal ready in no time. Enjoy every flavorful bite!

Mediterranean Steak Power Bowls Flavorful Meal Guide

- 1 package of refrigerated pizza dough - 1 cup shredded cheddar cheese - 1 cup cooked ground beef or turkey - 1/2 cup taco seasoning - 1 cup black beans, rinsed and drained - 1/2 cup corn, canned or frozen, thawed if frozen - 1/2 cup diced tomatoes, fresh or canned - 1/4 cup chopped fresh cilantro - 1 egg, beaten - Salsa, for dipping In this recipe, the main ingredients create a delicious base for cheesy taco sticks. The pizza dough wraps around a tasty filling of meat, cheese, and beans. Using shredded cheddar cheese gives these sticks a rich flavor. The cooked ground beef or turkey adds protein and heartiness. You can also swap the meat for black beans if you prefer a vegetarian option. The taco seasoning brings a burst of flavor to this dish. It gives the filling its signature taste. Black beans and corn add color and texture. Diced tomatoes provide freshness and moisture. These additional ingredients make your taco sticks even more tasty. For garnishing, fresh cilantro adds a pop of green and a hint of freshness. The beaten egg helps the dough get a golden crust. Serve with salsa for dipping to enhance the flavors. This simple combination makes the cheesy taco sticks a hit for any snack time! {{ingredient_image_2}} 1. Start by preheating your oven to 400°F (200°C). This helps cook the taco sticks evenly. 2. Prepare a baking sheet by lining it with parchment paper. This keeps the sticks from sticking to the pan. 3. In a large skillet, set it over medium heat. Add the cooked ground beef or turkey to the pan. 4. Mix in the taco seasoning. Stir well so every piece of meat is coated. 5. Add the black beans, corn, and diced tomatoes. Stir this mixture for about 3-5 minutes until heated through. 6. Once done, remove the skillet from the heat. Fold in the chopped cilantro for a fresh taste. 1. On a lightly floured surface, roll out the refrigerated pizza dough. Aim for a large rectangle about 1/4 inch thick. 2. Cut the rolled dough into 2-inch wide strips. Each strip will hold the filling. 3. Take a generous spoonful of the taco mixture. Place it down the center of each dough strip. 4. Sprinkle a tablespoon of shredded cheddar cheese over the taco mixture. This adds melty goodness to each bite. 1. Carefully fold the sides of the dough over the filling. Pinch the edges tightly to seal them well. 2. Arrange the sealed taco sticks on the prepared baking sheet. Leave space between each stick for even baking. 3. Brush the tops with the beaten egg. This gives the sticks a golden, shiny look. 4. Place the baking sheet in the oven and bake for 15-20 minutes. Keep an eye on them until they turn golden brown. 5. After baking, let them cool for a couple of minutes. They will be very hot, so be careful. 6. Serve the cheesy taco sticks warm, with salsa for dipping. Enjoy the flavors! Rolling out the dough is simple. First, lightly flour your surface. This step keeps the dough from sticking. Use a rolling pin to spread the dough into a rectangle. Aim for a thickness of about 1/4 inch. If the dough springs back, let it rest for a few minutes. This makes it easier to roll. To avoid spilling the filling, place a generous spoonful in the center. Make sure to leave space on the edges. When sealing the taco sticks, pinch the edges tightly. This method keeps the tasty filling inside while baking. You can boost the flavor with extra spices. Try adding cumin, garlic powder, or chili powder. These spices give the dish a nice kick. You can also mix in diced jalapeños for heat. If you want a milder taste, bell peppers work well too. Using fresh ingredients is key. Fresh tomatoes and herbs add vibrant flavor. Always choose high-quality products. They make a big difference in taste. To serve for parties, arrange the taco sticks on a large platter. Place a small bowl of salsa in the center. This makes a great dipping station for guests. You can also add some fresh cilantro on top for color. For garnishing, sprinkle extra cheese on top after baking. A squeeze of lime juice can also brighten the dish. These small touches make your Cheesy Taco Sticks look extra special. Pro Tips Use Fresh Ingredients: Fresh vegetables and high-quality cheese will enhance the flavor of your taco sticks, making them even more delicious. Customize the Filling: Feel free to add your favorite ingredients like jalapeños, olives, or even a different type of cheese for a unique twist. Keep an Eye on Baking: Ovens can vary in temperature; check the taco sticks a few minutes before the recommended time to avoid over-baking. Experiment with Dips: While salsa is a classic, try serving these sticks with guacamole, sour cream, or even a spicy queso dip for added flavor. {{image_4}} You can switch up the protein in your cheesy taco sticks. Ground turkey or chicken works great. They add a lighter flavor but still taste amazing. Just cook them the same way as beef. For a vegetarian option, you can use beans. Black beans are my favorite. They add protein and fiber. You can also mix in pinto or kidney beans if you like. Want to spice things up? Add jalapeños or bell peppers to the filling. Jalapeños give a nice kick, while bell peppers add sweetness. Both options make your taco sticks even tastier. You can also change the cheese. Try Monterey Jack or Pepper Jack instead of cheddar. These cheeses melt well and add unique flavors. Experimenting with different cheeses keeps the dish fresh and fun. Feeling adventurous? You can make sweet taco sticks, too! Use cinnamon sugar and cream cheese for a dessert version. Add chocolate chips or diced fruits for extra sweetness. These sweet taco sticks are perfect for kids and adults alike. To keep your cheesy taco sticks fresh, store them in an airtight container. Place them in the fridge if you eat them within a few days. This method keeps them tasty. To reheat, use an oven at 350°F (175°C) for about 10-12 minutes. This will make them warm and crispy again. You can also use a microwave for quick reheating, but they may not be as crispy. If you want to save taco sticks for later, freezing is a great option. You can freeze them before or after baking. If freezing before baking, wrap each stick in plastic wrap and place them in a freezer-safe bag. For baked sticks, let them cool first. Then, put them in a container or a freezer bag. Use freezer bags that seal well to prevent freezer burn. In the fridge, cheesy taco sticks last about 3-4 days. If you freeze them, they can last up to 2-3 months. For the best taste, eat them sooner rather than later. Always check for any signs of spoilage, like changes in smell or color, before eating. You can easily make Cheesy Taco Sticks vegetarian by swapping meat with plant-based options. Here are some great substitutes: - Use 1 cup of cooked lentils instead of ground beef or turkey. - Replace meat with 1 cup of black beans or pinto beans for added texture. - Add chopped mushrooms for a savory, earthy flavor. - Use extra veggies like bell peppers or zucchini for more color and taste. - Ensure your taco seasoning is vegetarian-friendly. These swaps keep the flavor strong while making it meat-free. Yes, you can use homemade pizza dough! Making it from scratch is simple. Here are some tips: - Combine 2 cups of all-purpose flour, 1 packet of yeast, and 1 teaspoon of salt. - Mix in 3/4 cup of warm water and 1 tablespoon of olive oil. - Knead the dough until smooth, then let it rise for about 1 hour. - Roll out the dough to 1/4 inch thick, just like the store-bought version. Homemade dough gives a fresh taste and a fun cooking experience. There are many great dipping sauce options for Cheesy Taco Sticks. Here are some recommendations: - Guacamole adds a creamy and rich flavor. - Ranch dressing gives a cool, tangy taste that pairs well. - Queso sauce offers extra cheesy goodness. - Hot sauce can spice things up for those who love heat. Pairing with salsa and sour cream enhances your meal. Salsa adds freshness, while sour cream balances the heat. Enjoy exploring these flavors! You learned how to make Cheesy Taco Sticks from start to finish. We talked about key ingredients like pizza dough, cheese, and taco seasoning. I gave you tips to make them tasty and fun for serving. You can even mix it up with different proteins and flavors. Enjoy sharing these cheesy delights at your next gathering or snack time! Now it’s time to get cooking and savor your creation.

Cheesy Taco Sticks Tasty and Simple Snack Idea

- 1 pound ground beef - 1/2 cup yellow onion, finely chopped - 1 cup sharp cheddar cheese, shredded - 1/2 cup dill pickles, finely chopped The main ingredients set the stage for our cheeseburger egg rolls. First, the ground beef gives a rich, savory flavor. The yellow onion adds sweetness when cooked. Sharp cheddar cheese brings a creamy texture and tangy taste. Dill pickles give a nice crunch and a touch of acidity. - 1 tablespoon ketchup - 1 tablespoon yellow mustard - 1 teaspoon garlic powder - Salt and black pepper, to taste Seasoning enhances the filling. Ketchup and mustard bring classic cheeseburger flavors. Garlic powder adds depth. Don't forget salt and black pepper to bring everything together. These small touches make a big taste difference. - 12 egg roll wrappers - Oil for frying (canola or vegetable recommended) Egg roll wrappers hold everything inside. They crisp up nicely when fried. Use canola or vegetable oil for the best results. This oil has a high smoke point, which means it will fry your rolls perfectly. Make sure the oil is hot enough before adding the rolls. This way, you get that perfect golden-brown color. {{ingredient_image_2}} 1. Start by heating a large skillet over medium heat. Add 1 pound of ground beef. Cook it until it turns brown. Use a spatula to break it apart as it cooks. 2. After the beef is browned, drain any extra grease. This keeps the filling from being too greasy. 3. Next, add 1/2 cup of finely chopped yellow onion. Sauté the onions for 3 to 4 minutes. They should become soft and clear. 4. Now, mix in 1 cup of shredded sharp cheddar cheese, 1/2 cup of chopped dill pickles, 1 tablespoon of ketchup, and 1 tablespoon of yellow mustard. Add 1 teaspoon of garlic powder, salt, and black pepper to taste. Stir everything well until the cheese melts. Remove the skillet from heat and let the filling cool for a few minutes. 1. Find a clean, dry surface. Lay an egg roll wrapper flat. Make sure one corner is facing you. 2. Spoon 2 to 3 tablespoons of the cheeseburger filling into the center of the wrapper. 3. Fold the bottom corner of the wrapper over the filling. Next, fold in the two side corners. 4. Carefully roll the wrapper away from you toward the top corner. Keep the filling secure inside. 5. To seal the edge, use a dab of water on the wrapper. Repeat this with the rest of the wrappers and filling until you finish. 1. In a large pot or deep skillet, heat oil over medium-high heat. Aim for a temperature of 350°F. 2. Once the oil is hot, gently place the egg rolls in batches into the oil. Don’t overcrowd the pan. 3. Fry each egg roll for about 3 to 4 minutes on each side. They should turn golden brown and crispy. 4. Use a slotted spoon to transfer the fried egg rolls to a plate lined with paper towels. This will soak up any extra oil. 5. Serve the cheeseburger egg rolls while hot. Add extra ketchup and mustard for dipping! - Check oil temperature for crispy results: Heat your oil to about 350°F. This gives you that golden, crispy outside. Use a thermometer if you can. This step is key. - Avoid overcrowding the pan: Fry in small batches. Too many at once cools the oil and makes soggy rolls. Keep them separate for the best crunch. - Experiment with additional seasonings: Try adding some smoked paprika or chili powder. These spices can add a nice kick to your filling. You can also mix in some onion powder for more depth. - Try different types of cheese: While sharp cheddar is great, consider pepper jack for heat or mozzarella for a more stretchy texture. Each cheese brings its unique taste. - Arrange on a platter with dipping sauces: Place the egg rolls on a nice platter. Use small bowls for ketchup and mustard. This makes it look inviting and fun. - Garnish with parsley or pickle slices: A sprinkle of parsley adds color. You can also lay a few pickle slices next to the rolls. It adds a fresh touch that pairs well with the flavors inside. Pro Tips Keep the Filling Cool: Allow the cheeseburger mixture to cool slightly before filling the wrappers. This prevents the wrappers from becoming soggy and helps maintain their crispiness during frying. Fry in Batches: Fry the egg rolls in small batches to ensure even cooking. Overcrowding the pan can lower the oil temperature, resulting in greasy egg rolls. Use a Thermometer: For perfectly fried egg rolls, use a kitchen thermometer to monitor the oil temperature, aiming for around 350°F. This ensures a golden brown and crispy exterior. Experiment with Fillings: Feel free to customize the filling! Add cooked bacon, sautéed mushrooms, or even jalapeños for a spicy twist on your cheeseburger egg rolls. {{image_4}} You can easily make cheeseburger egg rolls vegetarian. Simply swap ground beef for plant-based protein. This change keeps the taste while making it meat-free. You can use crumbled tofu or lentils as good alternatives. To add more color and crunch, mix in veggies like bell peppers or mushrooms. Chopped spinach also works well here. These additions bring more flavor and nutrients to your dish. For a fun twist, try different types of cheese. Creamy mozzarella or spicy pepper jack can change the taste. You can also add jalapeños for a spicy kick. This adds heat that many people love. Other ingredients like bacon bits or caramelized onions can also make great fillings. Get creative with options to find your favorite mix! Using an air fryer is a great way to cook cheeseburger egg rolls. It gives them a crispy texture without deep frying. Preheat your air fryer to 375°F. Spray the egg rolls lightly with cooking spray. Place them in the fryer basket in a single layer. Cook for about 10-12 minutes, flipping halfway through. Keep an eye on them to avoid burning. This method makes it easy to enjoy a healthier version of this snack! To keep your cheeseburger egg rolls fresh, cool them to room temperature first. Place them in an airtight container. This helps prevent sogginess. In the fridge, they last up to three days. For the best results, reheat egg rolls in an oven. Preheat your oven to 350°F. Place the egg rolls on a baking sheet. Heat for 10-15 minutes until they are warm and crispy. You can also use an air fryer at 350°F for about 5-7 minutes. Want a quick bite? Try microwaving them, but they won't stay as crispy. You can freeze both uncooked and cooked egg rolls. For uncooked, wrap them tightly in plastic wrap and place them in a freezer bag. They last up to three months. To cook from frozen, do not thaw. Fry them directly from the freezer for about 4-5 minutes longer than usual. Cooked egg rolls can also be frozen. Just let them cool first, then store similarly. Reheat directly from the freezer using the oven or air fryer. Yes, you can prep cheeseburger egg rolls ahead. Cook the filling and cool it first. Then, wrap the egg rolls. Store them in the fridge for up to one day. For longer storage, freeze them. Lay them on a baking sheet and freeze until firm. Then, place them in a bag for easy access later. I love serving these egg rolls with ketchup and yellow mustard. You can also try ranch dressing for a creamy touch. BBQ sauce adds a sweet twist, while spicy mustard gives it a kick. Don’t forget about sriracha for those who enjoy heat! Leftover cheeseburger egg rolls last for about three days in the fridge. Make sure to store them in an airtight container. To keep them crisp, reheat in the oven at 375°F for about 10 minutes. Avoid microwaving as it may make them soggy. In this post, we explored how to make tasty cheeseburger egg rolls. We covered the key ingredients, step-by-step cooking, and tips for frying. You learned about variations and how to store these delicious snacks. Egg rolls are fun to make and easy to enjoy. Try adding your twists to the recipe! Whether for a party or a snack, these rolls please everyone. Get creative, and make your own special version!

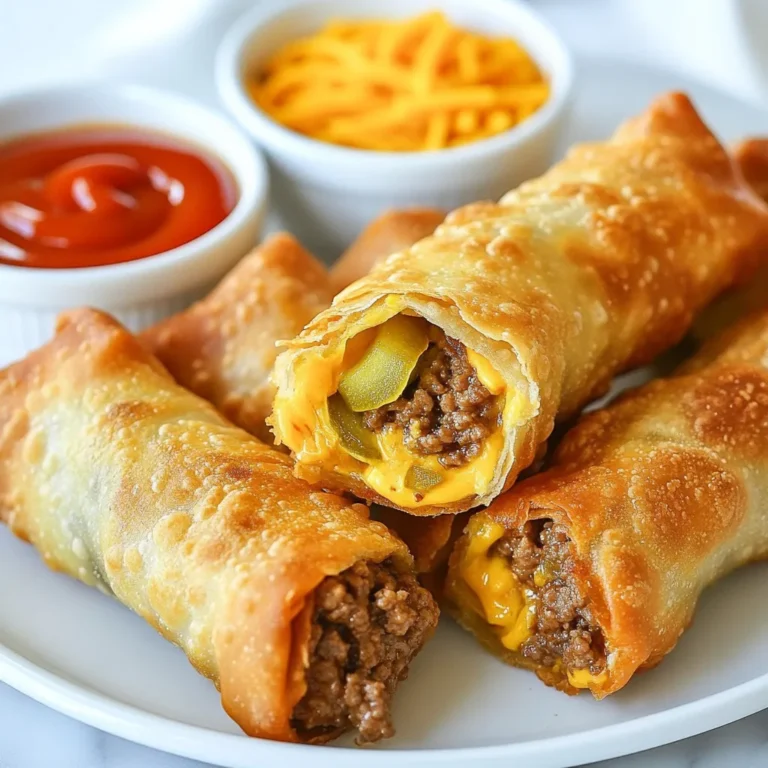
Cheeseburger Egg Rolls Crispy and Flavorful Snack

- 1 cup cooked white rice - 1 pound ground beef (or turkey) - 1 packet taco seasoning - 1 can (15 oz) black beans, drained and rinsed - 1 cup corn (frozen or canned) - 1 cup diced tomatoes (fresh or canned) - 1 cup shredded cheddar cheese - 1 cup lettuce, shredded - 1/2 cup sour cream - 1 cup Doritos (crushed, your choice of flavor) - 1 jalapeño, sliced (optional) - Fresh cilantro, for garnish This recipe serves four people. You can adjust the amounts for more or fewer servings. Each bowl includes a layer of rice, meat, cheese, and toppings. You can switch ground beef for turkey or even use plant-based meat. If you want less spice, skip the jalapeños. For a creamier texture, try Greek yogurt instead of sour cream. You can also use any cheese you like. If you want to add more veggies, consider bell peppers or avocado. {{ingredient_image_2}} First, grab a large skillet. Place your ground beef or turkey in it over medium heat. Cook until the meat is brown. Use a spatula to break it apart as it cooks. If there is too much fat, drain it carefully. Once browned, sprinkle the taco seasoning over the meat. Add 2/3 cup of water and stir well. Let this simmer for about 5 minutes. This step thickens the mixture and adds great flavor. While the meat simmers, take a large mixing bowl. Add the cooked white rice, drained black beans, corn, and diced tomatoes to the bowl. Mix everything together well. You want to make sure that each ingredient is evenly spread. This mixture will be the base for your taco rice bowl. Now it’s time to build your taco rice bowl! Start by layering the rice mixture at the bottom of your serving bowls. Next, spoon the seasoned meat over the rice, creating a nice second layer. Then, sprinkle shredded cheddar cheese on top. The heat from the meat will help it melt just a bit. After that, add a layer of shredded lettuce. Top it off with dollops of sour cream. If you enjoy a kick, add sliced jalapeños. Finally, finish with a handful of crushed Doritos for that crunchy touch. Garnish with fresh cilantro for color and flavor. Enjoy your delicious creation! To get the best meat for your Doritos Taco Rice Bowl, use fresh ground beef or turkey. Brown it well in a skillet over medium heat. Make sure to break it up with a spatula. This helps it cook evenly. Drain any extra fat to keep it lean. After that, add the taco seasoning and water. Let it simmer for five minutes to blend the flavors. This step makes the meat juicy and tasty. Flavor is key in a Taco Rice Bowl. To boost it, mix in the black beans, corn, and diced tomatoes with your cooked rice. This gives a nice base for your dish. You can also add spices like cumin or chili powder for extra kick. Fresh lime juice adds brightness. Don't forget to sprinkle fresh cilantro on top for a fresh touch. If you like heat, sliced jalapeños work great too. A great presentation makes your dish pop! Use clear bowls to show off the colorful layers. Start with the rice mixture as a base. Add the seasoned meat next. Top with cheddar cheese, lettuce, and sour cream. For crunch, finish with crushed Doritos. Garnish with cilantro for a nice look. Serve with a lime wedge on the side for a burst of flavor. This makes your Taco Rice Bowl not just tasty, but also beautiful! Pro Tips Use Leftover Rice: If you have leftover rice from a previous meal, this recipe is a great way to use it up, saving time and reducing waste. Customize Your Toppings: Feel free to add your favorite toppings like avocado, salsa, or different types of cheese to make the dish your own. Make it Vegetarian: Substitute the ground beef or turkey with a plant-based protein or mushrooms for a delicious vegetarian version. Adjust the Spice Level: Control the heat by adding more or fewer jalapeños, or by opting for a milder cheese if you're serving kids or those sensitive to spice. {{image_4}} You can easily make this dish vegetarian or vegan. Swap the ground beef for plant-based meat or sautéed mushrooms. Use black beans and corn as your protein source. For vegan cheese, try a nut-based option or skip it altogether. Instead of sour cream, use a vegan alternative like cashew cream or a dollop of guacamole. This way, you still get all the fun flavors without meat or dairy. If you want a different meat, you have options! Ground turkey or chicken works well in this dish. You can also use shredded rotisserie chicken for a quick fix. For a spicier kick, try chorizo or seasoned pork. Each meat brings its own flavor, making your Taco Rice Bowl unique every time. The toppings can change the whole vibe of the bowl. Top with diced avocado for creaminess. Use fresh salsa or pico de gallo for added zest. You can even add black olives or sliced radishes for crunch. If you love heat, consider jalapeños or hot sauce. The more toppings you add, the more fun your bowl becomes! After enjoying your Doritos Taco Rice Bowl, you can keep leftovers. Place the extra food in an airtight container. This helps keep it fresh. Store the container in the fridge. Your leftovers will last for about three to four days. Make sure to let the food cool down before sealing it. To reheat your leftovers, use the microwave. Place the bowl in the microwave for about one to two minutes. Stir halfway through to heat evenly. You can also use a skillet on low heat. This method keeps the texture nice. Add a splash of water if the rice seems dry. Heat until warm, stirring often. If you want to freeze your Taco Rice Bowl, start by cooling it first. Use freezer-safe containers for storage. Divide the food into portions to make it easy later. It can stay in the freezer for up to three months. When ready to eat it, thaw overnight in the fridge. Reheat it as mentioned above, and enjoy! Yes, you can use brown rice. Brown rice adds more fiber and nutrients. It will take longer to cook, so adjust your time. Cook it well before adding it to the bowl. The flavor is a bit nuttier than white rice. Many enjoy the added health benefits. I recommend serving this dish with: - Fresh guacamole - Salsa or pico de gallo - Corn tortilla chips - A light salad with lime dressing These sides pair well and add more flavor. They also bring a nice crunch and freshness to the meal. Yes, you can make it ahead. Prepare the meat and rice mixture in advance. Store them in separate containers in the fridge. This keeps the crunch of the Doritos fresh. You can assemble the bowls right before serving. This makes for an easy and quick meal. In this article, we explored how to make a delicious taco rice bowl. I covered the key ingredients, step-by-step cooking instructions, and some great tips to enhance your meal. You learned about variations for vegetarian options and different meat choices. Remember to store leftovers properly and follow the reheating tips for the best taste. This recipe is flexible and easy to adapt. Enjoy creating your perfect taco rice bowl that fits your taste!

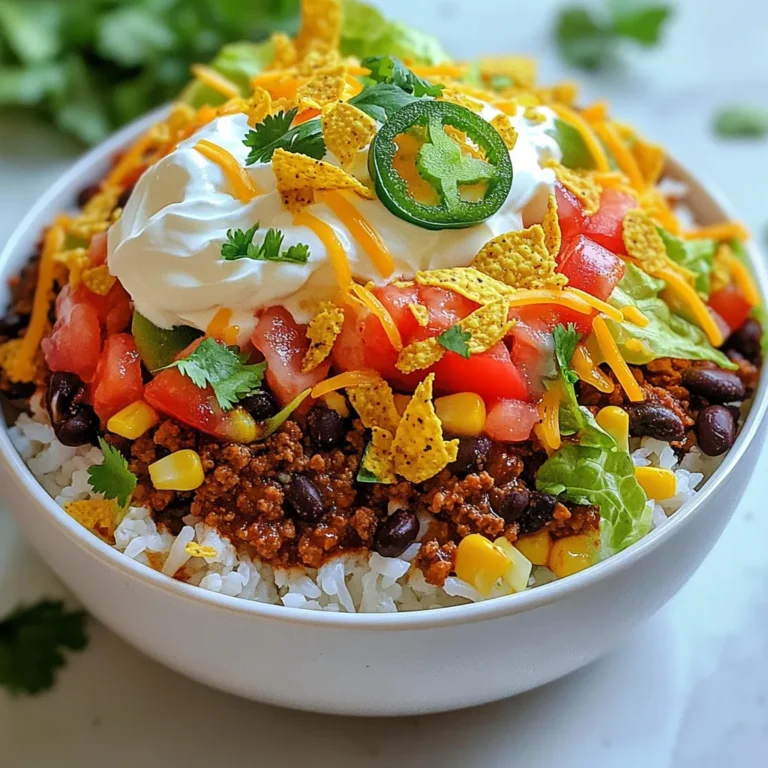
Doritos Taco Rice Bowl Flavorful and Easy Recipe

Here is what you need for Texas Chocolate Pecan Pie: - 1 pre-made pie crust (9 inches) - 1 cup pecans, toasted and chopped - 1 cup semi-sweet chocolate chips - 3/4 cup granulated sugar - 1/4 cup packed brown sugar - 1/2 cup light corn syrup - 3 large eggs - 1/4 cup unsalted butter, melted - 1 teaspoon vanilla extract - 1/4 teaspoon salt - Additional chocolate chips and pecans for topping Each ingredient plays a key role. The pre-made crust saves time and gives a nice base. The pecans add a crunchy texture. The chocolate chips bring rich sweetness. Both sugars enhance the flavor and sweetness of the filling. The corn syrup binds everything together. Eggs provide structure and creaminess. Butter adds richness, while vanilla boosts the pie's aroma. Finally, the salt balances all the flavors. Feel free to adjust the amount of chocolate chips and pecans on top. This customization makes the pie your own. The result? A dessert that is hard to resist! Enjoy making this pie and tasting every bite. {{ingredient_image_2}} First, preheat your oven to 350°F (175°C). This step is key for a perfect bake. Next, take your pre-made pie crust and fit it into a 9-inch pie pan. Use a fork to poke small holes in the bottom. This helps the crust not bubble during baking. In a large mixing bowl, add 3/4 cup granulated sugar, 1/4 cup brown sugar, and 1/2 cup light corn syrup. Pour in 1/4 cup melted unsalted butter and 1 teaspoon vanilla extract. Whisk it all together until smooth. The mixture should look glossy and well combined. Now, crack 3 large eggs into the bowl, adding them one at a time. Mix well after each egg. This helps the filling become creamy. Don't forget to add 1/4 teaspoon salt for flavor balance. Gently fold in 1 cup of toasted, chopped pecans and 1 cup of semi-sweet chocolate chips. Be careful not to overmix. You want the pecans and chocolate evenly spread in the filling. Carefully pour your chocolate pecan filling into the prepared pie crust. For a pretty finish, sprinkle some extra chocolate chips and chopped pecans on top. This adds a nice touch! Place the pie in the center of the preheated oven. Bake it for 50 to 55 minutes. The pie is done when the filling is firm in the center and the edges are golden brown. Once baked, take the pie out of the oven and set it on a wire rack. Let it cool for at least 1 hour. This cooling time helps the filling set, making it easier to slice. Enjoy your delicious Texas Chocolate Pecan Pie! When making Texas Chocolate Pecan Pie, some mistakes can spoil the fun. Here are a few to watch for: - Overbaking: This can dry out your pie. Check it at 50 minutes. - Not cooling properly: Let it cool for at least an hour. This helps the filling set. - Skipping the fork holes: Poking holes in the crust stops bubbles. Don't skip this step! A great crust makes the pie shine. Here are tips for a tasty, flaky crust: - Use a pre-made crust: It saves time and still tastes good. - Poke holes: As mentioned, this prevents bubbles. Use a fork to poke several holes. - Chill the crust: If you have time, chill it for 30 minutes. This helps keep it flaky. Serve your pie with flair! Here are some tasty ideas: - Whipped cream: A dollop on each slice adds creaminess. - Ice cream: Vanilla ice cream balances the rich chocolate. - Extra toppings: Sprinkle chocolate chips or pecans on top for a nice touch. These simple tips will help you enjoy Texas Chocolate Pecan Pie to the fullest! Pro Tips Use Fresh Pecans: For the best flavor, toast your pecans just before using them. This enhances their nuttiness and adds a wonderful crunch to your pie. Don't Overbake: Keep a close eye on your pie as it bakes. Overbaking can lead to a dry filling. The pie should be set but still slightly jiggly in the center when you take it out. Cool Completely: Allow the pie to cool completely before slicing. This helps the filling to set properly, making it easier to cut clean slices. Serve with a Twist: Elevate your pie by serving it with a scoop of vanilla ice cream or a dollop of whipped cream, providing a delightful contrast to the rich chocolate filling. {{image_4}} You can switch things up with dark chocolate. Use one cup of dark chocolate chips instead of semi-sweet. This change adds a rich flavor that pairs well with pecans. Another fun twist is to add bourbon. Mix in two tablespoons of bourbon with the filling. This ingredient boosts the pie's complexity and gives it a warm, inviting taste. If you need a gluten-free pie, look for a gluten-free crust. Many stores sell ready-made gluten-free options. Check the label to ensure it fits your needs. The filling remains the same and tastes just as great. To make this pie vegan, swap the eggs for flax eggs. Mix one tablespoon of ground flaxseed with three tablespoons of water for each egg. Let it sit for a few minutes until it thickens. Use vegan butter in place of unsalted butter for a creamy texture. You can also choose dairy-free chocolate chips for a fully vegan treat. Store leftover Texas chocolate pecan pie in an airtight container. Keep it in the fridge for up to four days. Make sure to cover it well to prevent it from drying out. If you want to enjoy it later, refrigerating it is your best bet. To freeze the pie, let it cool completely first. Wrap it tightly in plastic wrap, then place it in a freezer-safe bag. This method helps keep the flavors fresh. You can freeze it for up to three months. When you're ready to eat, just thaw it in the fridge overnight. Reheat your pie in the oven for the best taste. Preheat the oven to 350°F (175°C). Place the pie on a baking sheet and cover it with foil. Heat for about 15-20 minutes until warm. This method helps keep the crust crisp and the filling creamy. Enjoy your pie warm with a scoop of ice cream or whipped cream! You can tell the pie is done when the center is firm but not jiggly. The edges should be a nice golden brown. A toothpick inserted in the center should come out mostly clean. If you see a bit of chocolate, that’s okay! Yes, you can make this pie a day ahead. Just let it cool completely after baking. Once cool, cover it with plastic wrap and store it in the fridge. This way, the flavors will deepen. I love to serve this pie with a dollop of whipped cream or a scoop of vanilla ice cream. The cold treats balance the warm, rich pie. You could also add caramel sauce for extra sweetness. For the best Texas Chocolate Pecan Pie, try local bakeries or diners in Texas. Many places make their own versions. You can also find great recipes online to try at home. To keep the filling from being runny, make sure you bake it long enough. Let it cool completely before slicing. The cooling time is key for the filling to set properly. Also, using fresh eggs helps create a firmer filling. This blog post covered how to make a Texas Chocolate Pecan Pie from scratch. We discussed essential ingredients, detailed baking steps, and helpful tips. I also shared variations for different diets and how to store leftovers properly. In summary, making this pie is straightforward and rewarding. With the right ingredients and a few tricks, your pie will impress everyone. Enjoy every slice of this delicious dessert!

Texas Chocolate Pecan Pie Irresistible Dessert Recipe

- 2 pounds boneless, skinless chicken thighs - 1 can (15 oz) black beans, rinsed and drained - 1 can (10 oz) enchilada sauce (choose red or green based on your preference) - 1 cup corn kernels (fresh or frozen) - 1 cup diced bell peppers (any color desired) - 1 cup diced onions - 2 teaspoons ground cumin - 1 teaspoon chili powder - Salt and pepper to taste - 6-8 whole wheat tortillas - 2 cups shredded cheese (cheddar or a Mexican blend) - Fresh cilantro, for garnish - Sour cream, for serving (optional) This recipe serves six. Each serving has around 450 calories. You get about 30 grams of protein, 20 grams of fat, and 40 grams of carbs. The fiber content is around 10 grams, making it a filling choice. - You can swap chicken thighs for chicken breasts if you prefer. - Use any type of beans like pinto or kidney beans. - For a vegan option, replace chicken with tofu or jackfruit. - Try using corn tortillas for a gluten-free alternative. - If you want a spicy kick, add diced jalapeños or a dash of hot sauce. {{ingredient_image_2}} Start by placing 2 pounds of boneless, skinless chicken thighs in your slow cooker. Season them with salt and pepper. Then, add 2 teaspoons of ground cumin and 1 teaspoon of chili powder. Make sure the chicken is well coated with these spices. This step adds great flavor to the meat. Next, add 1 can of black beans, 1 cup of corn kernels, 1 cup of diced bell peppers, and 1 cup of diced onions on top of the seasoned chicken. Pour half of the 10-ounce can of enchilada sauce over these layers. Gently stir to mix everything together. This helps the flavors blend nicely. Cover the slow cooker and set it to cook on low for 6-7 hours or on high for 3-4 hours. The chicken should be tender and easy to shred with a fork when done. Once the time is up, carefully take the chicken out. Shred the chicken with two forks and return it to the pot. Stir to combine the chicken with the veggies and sauce. This mixes all the delicious flavors together. To shred chicken, first remove it from the slow cooker. Use two forks to pull the meat apart. This method works best when the chicken is hot and tender. If you find it tough, let it cool slightly, then try again. Shredded chicken can mix well with the sauce. It helps keep the flavor strong. Warm your tortillas before rolling. Heat them in the microwave for 15-20 seconds. This makes them soft and easy to roll. Place a scoop of chicken mixture in the center. Add a sprinkle of cheese on top. Tightly roll each tortilla, ensuring the filling stays inside. Place them seam-side down in the slow cooker to hold their shape. Serve your enchiladas on a bright platter. Drizzle with extra enchilada sauce for flavor. Top with fresh cilantro for a pop of color. Add lime wedges on the side for a zesty kick. You can also offer sour cream for a creamy touch. This makes your meal look appealing and inviting. Pro Tips Use Fresh Ingredients: Opt for fresh vegetables and herbs whenever possible for enhanced flavor and nutrition in your enchiladas. Customize Your Spice Level: Adjust the amount of chili powder based on your preference for heat; you can also add diced jalapeños for an extra kick. Make Ahead: Prepare the chicken and vegetable mixture a day in advance and refrigerate it. This allows the flavors to meld beautifully before cooking. Experiment with Cheese: Try using a blend of cheeses such as Monterey Jack and pepper jack for a deliciously creamy and spicy topping. {{image_4}} You can make a great vegetarian version of chicken enchiladas. Instead of chicken, use 2 cups of cooked lentils or chickpeas. Add more veggies like zucchini, mushrooms, or spinach. You can still use the same spices for flavor. The black beans and corn give it a nice texture. Just follow the same steps and enjoy a meat-free meal. If you love heat, add some diced jalapeños or a splash of hot sauce. You can also use spicy enchilada sauce instead of mild. For a smoky flavor, try adding chipotle peppers in adobo sauce. This will give your enchiladas a nice kick. Adjust the spices to your taste, and don’t forget to check for heat! You can serve your enchiladas with various sauces. Try a green tomatillo sauce for a zesty touch. A creamy avocado sauce works great too. You can even use salsa verde or pico de gallo for fresh flavors. Each sauce brings a new taste and makes the meal even more enjoyable. Get creative and mix it up! After enjoying your slow cooker chicken enchiladas, let any leftovers cool down. Place the enchiladas in an airtight container. Make sure to cover them well to prevent drying out. You can store them in the fridge for up to 3 days. If you want to keep them longer, freezing is a great option. To reheat your enchiladas, you can use the microwave or the oven. For the microwave, place one or two enchiladas on a plate and cover with a damp paper towel. Heat for 1-2 minutes or until hot. In the oven, preheat to 350°F (175°C). Place the enchiladas in a baking dish, cover with foil, and heat for about 15-20 minutes. This will keep them moist and tasty. If you want to freeze enchiladas, they freeze well. Before freezing, make sure they are cooled completely. Wrap each enchilada in plastic wrap or foil, then place them in a freezer-safe bag. They can last up to 3 months in the freezer. To enjoy, just thaw them in the fridge overnight, then reheat as mentioned above. Enjoy your delicious enchiladas later! Yes, you can use frozen chicken thighs. Just add an extra hour to the cooking time. The slow cooker will heat the chicken safely. It will still shred well and soak up the flavors. To make enchiladas gluten-free, use corn tortillas instead of wheat ones. Ensure the enchilada sauce is gluten-free. Many store brands offer gluten-free options. Always check the labels to be safe. You can serve chicken enchiladas with a few sides for a full meal. Here are some ideas: - Spanish rice or cilantro lime rice - Refried beans or black beans - A fresh garden salad - Guacamole and tortilla chips - A zesty corn salad These sides will add flavor and make your meal more fun. Enjoy your enchiladas with these tasty pairings! This blog post covered the key steps to make chicken enchiladas. We looked at the ingredients needed, including nutritional info and substitutions. Then, I shared how to prepare and layer the chicken, along with cooking times. I included tips for shredding chicken and rolling enchiladas. We explored variations like vegetarian options and spicy twists. Finally, we discussed how to store leftovers and answer common questions. With these tips, you can create delicious enchiladas that suit your taste. Happy cooking!

Savory Slow Cooker Chicken Enchiladas Easy Recipe

- 1 lb boneless, skinless chicken breast, diced - 1 cup cauliflower florets, roughly chopped - 1 cup low-sodium chicken broth - 1/2 cup plain Greek yogurt - 1 tablespoon extra virgin olive oil - 3 cloves garlic, minced - 1 teaspoon onion powder - 1 teaspoon dried thyme - Salt and freshly ground black pepper, to taste - 1 cup fresh spinach, chopped - 1 tablespoon nutritional yeast (optional) This dish is packed with nutrition. Chicken breast is a lean protein source. It helps build muscles and keep you full. Cauliflower adds fiber and vitamins like C and K. Greek yogurt provides protein and probiotics for gut health. Spinach is rich in iron and antioxidants, which boost your health. Using low-sodium chicken broth cuts down on salt. This dish is low in calories but high in taste and nutrition. When shopping for chicken, look for pink, moist meat. Avoid any that smells bad or has a slimy texture. For cauliflower, choose heads that feel heavy and have tight florets. Fresh spinach should be bright green and crisp, not wilted or yellowed. When buying Greek yogurt, opt for plain and low-fat versions for the best health benefits. Always check dates on packages for freshness. {{ingredient_image_2}} First, gather all your ingredients. You need: - 1 lb boneless, skinless chicken breast, diced into bite-sized pieces - 1 cup cauliflower florets, roughly chopped - 1 cup low-sodium chicken broth - 1/2 cup plain Greek yogurt - 1 tablespoon extra virgin olive oil - 3 cloves garlic, minced finely - 1 teaspoon onion powder - 1 teaspoon dried thyme - Salt and freshly ground black pepper - 1 cup fresh spinach, chopped - 1 tablespoon nutritional yeast (optional) Next, heat the olive oil in a large pot over medium heat. Once the oil shimmers, add the minced garlic. Sauté for about 1 minute until fragrant and lightly golden. Now, it's time to add the diced chicken. Sprinkle it with salt, pepper, onion powder, and dried thyme. Cook for 5 to 6 minutes. Stir occasionally until the chicken turns brown and cooks through. Once the chicken is ready, add the cauliflower and chicken broth to the pot. Raise the heat until it boils, then lower it to let it simmer for about 10 minutes. The cauliflower should be tender enough to pierce with a fork. After the cauliflower is soft, take the pot off the heat. Use an immersion blender to puree the mix until it's smooth. If you don’t have one, pour it into a standard blender, blend, and return it to the pot. Put the smooth mixture back on low heat. Stir in the Greek yogurt and nutritional yeast if you want a cheesy flavor. Mix until it’s all creamy. Now, fold in the chopped spinach. Cook for another 2 to 3 minutes until the spinach wilts. Taste your dish and adjust the seasoning. Add more salt or pepper if needed. Serve your creamy chicken delight in bowls and enjoy! Cooking time is key for a perfect dish. Start by heating olive oil over medium heat. Once it shimmers, add garlic and sauté for 1 minute. Next, cook the chicken for 5 to 6 minutes. Ensure it is browned and fully cooked. After adding cauliflower and broth, boil, then simmer for 10 minutes. This makes the cauliflower tender. Blend everything until smooth, then mix in Greek yogurt and spinach. Cook for another 2 to 3 minutes to wilt the spinach. Tasting is essential. After blending, taste your dish. If it feels bland, add salt or pepper. I recommend starting with a pinch, then adjust as needed. You can also add more onion powder or thyme for a flavor boost. Nutritional yeast adds a cheesy twist, but it’s optional. Always aim for a balance of creamy and savory for the best flavor. Meal prep can save time. Start by chopping all your ingredients ahead. Store them in separate containers. This makes cooking easy on busy days. You can also cook a larger batch and freeze portions. Use airtight containers for best results. When you’re ready to eat, just reheat and enjoy your creamy chicken delight! Pro Tips Perfectly Cooked Chicken: Ensure your chicken is cooked through by using a meat thermometer; it should reach an internal temperature of 165°F (75°C). Flavor Boost: For extra depth of flavor, marinate the chicken in lemon juice, garlic, and herbs for at least 30 minutes before cooking. Veggie Variations: Feel free to swap cauliflower for other veggies like broccoli or zucchini for a unique twist on this dish! Meal Prep Magic: This dish reheats well, making it perfect for meal prep. Store in airtight containers for up to 4 days in the fridge. {{image_4}} You can make this dish dairy-free. Swap the Greek yogurt for coconut yogurt. This change keeps the creaminess while cutting down on calories. You can also use cashew cream for a nutty flavor. Simply blend soaked cashews with water until smooth. Want to spice things up? Add herbs like basil or parsley for fresh notes. A pinch of red pepper flakes can also add a nice kick. Experiment with lemon juice for brightness. These flavors elevate the dish without extra calories. If you prefer plant-based options, tofu or tempeh works well. Use firm tofu and cube it like chicken. Sauté it until golden brown. Tempeh adds a nutty taste and is packed with protein. Both options keep your meal healthy and tasty. To store leftovers, let the dish cool down first. Transfer it to an airtight container. Seal it tightly and place it in the fridge. You can keep it for 3 to 4 days. When you want to enjoy it again, just take it out and reheat. For long-term storage, you can freeze the dish. Make sure it is completely cool before freezing. Use a freezer-safe container or bag. Label it with the date. It will stay fresh for up to 2 months. When you're ready to eat it, thaw it in the fridge overnight. When reheating, add a splash of chicken broth or water. This helps keep the dish creamy. Reheat it on the stove over low heat. Stir it gently to warm it evenly. If using a microwave, heat in short intervals. Stir between each interval to avoid hot spots. Enjoy your creamy chicken delight! Yes, you can make this recipe ahead of time. Prepare the creamy chicken and let it cool. Store it in a sealed container in the fridge. It stays fresh for up to three days. Reheat it on the stove over low heat. This keeps it creamy and tasty. I often make a batch on Sundays for easy weeknight dinners. To make this dish spicier, add red pepper flakes or diced jalapeños. You can also mix in hot sauce while cooking. Start with a small amount, then taste it. Adjust the heat to your liking. I enjoy adding extra garlic for a kick. It blends well with the creamy flavors. Great sides for creamy chicken include whole-grain rice or quinoa. They soak up the sauce nicely. You can also serve it with a fresh salad or steamed broccoli. Roasted vegetables add color and crunch. Try garlic bread for a comforting touch. These sides balance the dish well and make it complete. In this article, we explored key ingredients, cooking steps, and handy tips for your dish. You learned about nutritious picks and how to choose fresh ingredients. Next, we walked through the cooking steps for a creamy finish. I shared useful tricks for perfecting your flavors and meal prep. We also looked at variations and storage methods to keep meals fresh. Finally, I answered common questions to help you succeed. With this guide, you can confidently create and enjoy your dish.

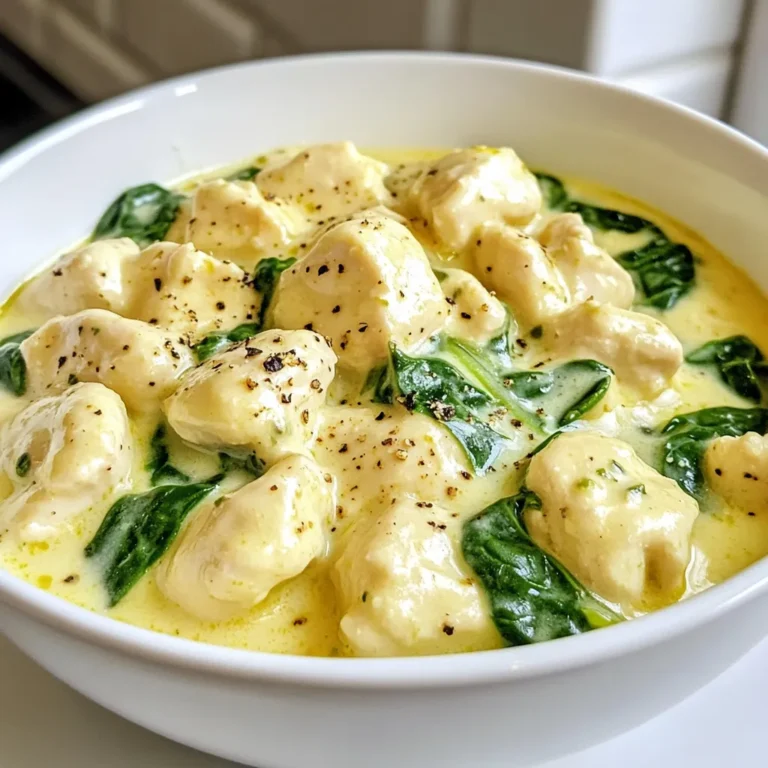
Healthy Low Calorie Creamy Chicken Delightful Dish

- 2 cups shredded cooked chicken - 1 can (15 oz) white beans, drained and rinsed - 1 can (15 oz) corn kernels, drained - 1 small red onion, finely diced - 2 cloves garlic, minced In this chili, shredded cooked chicken gives a great protein base. White beans add creaminess and fiber. Corn kernels bring sweetness and crunch. The red onion adds a nice bite, while garlic packs in flavor. - 1 teaspoon ground cumin - 1 teaspoon chili powder - ½ teaspoon smoked paprika - 1 teaspoon salt - ½ teaspoon freshly ground black pepper Spices are key in this recipe. Ground cumin gives a warm, earthy flavor. Chili powder adds heat and depth. Smoked paprika gives a subtle smokiness. Salt and black pepper enhance all the flavors. - 1 cup heavy cream - 1 cup cojita cheese, crumbled - 2 tablespoons fresh cilantro, finely chopped - Juice of 1 lime - Tortilla strips for garnish Heavy cream makes the chili rich and smooth. Cojita cheese adds a salty, crumbly texture. Fresh cilantro brings brightness. Lime juice adds a zesty kick, and tortilla strips provide a delicious crunch. Together, these ingredients create a delightful and satisfying dish. {{ingredient_image_2}} 1. Warm one tablespoon of olive oil in a large pot over medium heat. 2. Add one small diced red onion and sauté for three to four minutes. The onion should become soft and clear. 3. Next, mix in two minced garlic cloves and cook for one minute. Stir until you smell the garlic. 4. Carefully add two cups of shredded cooked chicken, one can of drained corn, and one can of drained white beans. 1. Pour in four cups of chicken broth, one teaspoon of ground cumin, one teaspoon of chili powder, half a teaspoon of smoked paprika, one teaspoon of salt, and half a teaspoon of black pepper. Stir to combine. 2. Bring the mixture to a boil. Once boiling, lower the heat and let it simmer uncovered for fifteen minutes. This helps all the flavors blend well. 3. After simmering, stir in one cup of heavy cream and the juice of one lime. Simmer for another five minutes to heat through. 4. Serve the chili in bowls. Top with crumbled cojita cheese, fresh cilantro, and crispy tortilla strips for a fun crunch. - Use homemade chicken broth. It adds depth and richness to your chili. - Adjust spice levels to taste. If you like heat, add more chili powder or fresh peppers. - This chili pairs well with crunchy tortilla chips or warm cornbread. - For a beautiful look, serve in deep bowls. Add extra lime wedges on the side. A sprinkle of fresh cilantro on top adds color and flavor. - Be careful not to overcook the cream. Add it at the end to keep it silky. - Always season properly. Taste as you cook to balance flavors. Pro Tips Use Fresh Ingredients: Always opt for fresh corn and herbs if possible. This enhances the overall flavor and texture of the chili. Adjust the Spice Level: Feel free to increase or decrease the chili powder and smoked paprika according to your heat preference. You can also add diced jalapeños for an extra kick! Make it Ahead: This chili tastes even better the next day! Prepare it in advance and store it in the fridge to allow the flavors to deepen overnight. Garnish Creatively: Experiment with different toppings like avocado slices, sour cream, or hot sauce to personalize each bowl and add more flavor dimensions. {{image_4}} You can easily change the beans in this chili. Try using black beans or pinto beans instead of white beans. Each type adds its unique touch. If you want a twist, swap the chicken for turkey. Tofu works too for a vegetarian option. Just make sure to use firm tofu for the best texture. Want to spice things up? Add jalapeños for some heat. You can chop them fine or leave them in slices for a bigger kick. Incorporating more veggies can also enhance this dish. Bell peppers or zucchini work well. They add color and nutrition, making the chili even better. If you're gluten-free, check your broth. Some brands add gluten. Use a gluten-free broth to keep this dish safe. For dairy-free options, skip the heavy cream. You can use coconut milk instead. It keeps the chili creamy while adding a nice flavor twist. To store leftovers, place your chili in an airtight container. Make sure to cool it first. You can keep it in the fridge for up to three days. When you're ready to enjoy it again, simply reheat it on the stove over medium heat. Stir often to avoid sticking. You can also microwave it in a bowl for quick reheating. Just cover the bowl to prevent splatters. If you want to keep your chili longer, freezing is a great option. Pour the cooled chili into freezer-safe bags or containers. Leave some space at the top, as liquids expand when frozen. Label the bags with the date. This way, you will know when to use it. To defrost, place it in the fridge overnight. You can also use the microwave for quicker defrosting. Just set it on low and check every few minutes. In the fridge, your chili lasts about three days. If you freeze it, it can last up to three months. For best taste, eat it sooner rather than later. Always check for any off smells or changes in texture before using. This will ensure you enjoy every bite of your delicious Mexican Street Corn White Chicken Chili. Yes, you can make this chili in a slow cooker. First, sauté the onions and garlic in olive oil on the stove. Then, add all the other ingredients to the slow cooker. Set it on low for 6 to 8 hours or high for 3 to 4 hours. This method lets the flavors blend well. This recipe is great for meal prep. You can cook the chili ahead of time and store it in the fridge. It keeps well for up to 4 days. To prep, chop the onions and garlic a day before. Measure out spices and store them in small containers. This saves time on busy days. You can easily boost the protein in this chili. Here are some ideas: - Add a can of black beans or pinto beans for more fiber and protein. - Toss in diced chicken sausage for a smoky flavor. - Use cooked lentils for a plant-based option. - If you like beef, add ground beef or turkey. These options will make your chili heartier and more filling. This blog post highlights how to make a delicious chicken chili. We covered the key ingredients, from shredded chicken to spices. I shared easy prep steps to guide your cooking. You learned flavor tips and common mistakes to avoid. We discussed variations to suit different diets. Lastly, I provided storage suggestions to keep your chili fresh. Enjoy creating this dish; it brings warmth and flavor to your table. Experiment and make it your own!

Mexican Street Corn White Chicken Chili Delight

- 2 large chicken breasts, cut into bite-sized cubes - 2 cups fresh spinach, roughly chopped - 1 cup mushrooms, sliced (cremini or button mushrooms work best) - 1 cup cream cheese, softened - 1/2 cup shredded mozzarella cheese, plus extra for topping These main ingredients create a great base for our dish. The chicken gives protein, and the spinach adds nutrients. Mushrooms bring a nice texture and flavor. Cream cheese and mozzarella make it creamy and cheesy. - 1/2 teaspoon garlic powder - 1/2 teaspoon onion powder - 1/4 teaspoon black pepper - 1/4 teaspoon red pepper flakes (optional, for some heat) These seasonings add flavor. Garlic and onion powders bring depth. Black pepper enhances the taste, while red pepper flakes give a little kick if you like heat. - 2 tablespoons olive oil - Salt to taste Olive oil is key for cooking the chicken. Salt brings out the flavors in all ingredients. Use these essentials to make your dish pop. {{ingredient_image_2}} - Preheat the Oven: Set your oven to 375°F (190°C). This gets it hot for baking. - Cook the Chicken: Heat 2 tablespoons of olive oil in a large skillet over medium heat. Add 2 large chicken breasts cut into cubes and season with salt, 1/2 teaspoon garlic powder, 1/2 teaspoon onion powder, and 1/4 teaspoon black pepper. Cook the chicken for 6-8 minutes until it is fully cooked and no longer pink. Stir it often to cook evenly. - Add the Mushrooms: Toss in 1 cup of sliced mushrooms to the skillet. Cook for 4-5 minutes until the mushrooms soften. Stir them as they cook for even heat. - Incorporate the Spinach: Add 2 cups of roughly chopped fresh spinach to the skillet. Cook for about 2 minutes until the spinach wilts. Remove the skillet from the heat when done. - Prepare the Cheese Mixture: In a bowl, mix 1 cup of softened cream cheese with 1/2 cup of shredded mozzarella cheese. Stir until the mixture is smooth and well blended. - Combine Everything: Gently fold the cheese mixture into the skillet with the chicken, mushrooms, and spinach. Make sure every piece is coated with the creamy mixture. - Transfer to Baking Dish: Pour the mixture into a baking dish. Spread it out evenly. If you want, sprinkle more mozzarella cheese on top for extra flavor. - Bake the Dish: Place the baking dish in the oven and bake for 20-25 minutes. Look for the cheese on top to bubble and turn golden. - Final Touches: Once baked, take the dish out of the oven. Let it cool for a few minutes before serving. This helps the flavors blend nicely. Choosing the Right Chicken Use fresh chicken breasts for this bake. They should be firm and pink. Cut them into bite-sized cubes. This helps them cook evenly and stay juicy. You can also use chicken thighs for more flavor if you prefer. Ensuring Even Cooking Cook the chicken in a single layer in the skillet. This way, it cooks through without steaming. Stir the chicken often to avoid burning. A good rule is to cook until no pink shows in the center. Presentation Tips Serve this dish in individual ramekins. This makes it look fancy and fun. You can also place it on a large platter for sharing. Spread it out evenly so everyone gets a good portion. Garnishing Ideas Add a sprinkle of fresh parsley on top for color. Grated Parmesan cheese can boost flavor too. These small touches make the dish even more inviting. Adding Herbs and Spices Try adding thyme or basil for extra flavor. Fresh herbs work best, but dried ones are fine too. If you like heat, toss in more red pepper flakes. Adjusting Creaminess If you want a creamier texture, add more cream cheese or mozzarella. Mixing in a bit of sour cream can also add a nice tang. Adjust the creaminess to fit your taste. Pro Tips Use Fresh Ingredients: Always opt for fresh spinach and mushrooms for the best flavor and texture. Fresh ingredients elevate the dish significantly. Customize Your Cheese: Feel free to experiment with different types of cheese, such as cream feta or gouda, to add unique flavors to your bake. Meal Prep Friendly: This dish can be made ahead of time and stored in the refrigerator for up to 2 days. Just reheat before serving. Spice It Up: Adjust the amount of red pepper flakes or add other spices like smoked paprika for a different flavor profile to suit your taste. {{image_4}} - Low-Fat Cheese Alternatives: You can use low-fat cream cheese or mozzarella. They lower calories but keep the taste. - Vegetarian Options: Swap chicken for tofu or chickpeas. This adds protein and makes the dish plant-based. - Adding Different Vegetables: Try bell peppers, zucchini, or broccoli. Each adds unique tastes and textures. - Incorporating Different Cheeses: Use gouda or cheddar for a different flavor. Mixing cheeses can change the whole dish. - Slow Cooker Version: Cook the chicken and veggies in a slow cooker. This makes the chicken tender and juicy. - Skillet Method: If you want a quick meal, use a skillet. Just sauté all ingredients until done. This method saves time. - Refrigeration Guidelines: Store your leftover chicken spinach mushroom bake in an airtight container. It can last up to 3-4 days in the fridge. Make sure it cools down before sealing to keep moisture out. - Freezing Options: You can freeze leftovers too. Place the dish in a freezer-safe container. It can last up to 2-3 months. For best results, portion it into smaller servings. This makes it easy to thaw only what you need. - Best Methods for Reheating: The best way to reheat is in the oven. Preheat your oven to 350°F (175°C) and cover the dish with foil. Heat for about 15-20 minutes or until warm. This keeps the bake creamy and delicious. - Microwave vs. Oven: You can use the microwave for quick reheating. Place a portion in a microwave-safe bowl. Heat on medium for 1-2 minutes. Stir halfway through to ensure even heating. However, the oven gives better texture. - How Long it Lasts: The chicken spinach mushroom bake lasts 3-4 days in the fridge. In the freezer, it can be safe for 2-3 months. - Signs of Spoilage: Look for changes in color or smell. If it smells sour or looks off, it is best to toss it. Always trust your nose and eyes; they rarely lie! Can I use frozen spinach? Yes, you can use frozen spinach. Just make sure to thaw and drain it well. This helps avoid extra water in your dish. Frozen spinach works great and saves time. How do I know when the chicken is cooked through? Check the chicken's color and temperature. The inside should not be pink. You can use a meat thermometer. It should read 165°F (75°C). This ensures it is safe to eat. Is this dish gluten-free? Yes, this dish is gluten-free. All the ingredients used, like chicken and cheese, contain no gluten. Always double-check labels to be sure. Calories per Serving This dish has about 380 calories per serving. It is filling and low in carbs. Macronutrient Breakdown - Protein: 32g - Fat: 25g - Carbohydrates: 6g This makes it a great option for low-carb diets. Can this be made ahead of time? Yes, you can prepare this dish ahead. Cook it and then store it in the fridge. It stays good for about three days. How to include in meal prep? You can divide it into containers. This makes it easy to grab for lunch or dinner. Pair it with a side salad for a complete meal. This dish uses simple ingredients like chicken, spinach, and cheese for a tasty meal. You learned the steps to cook it just right. Adding your favorite spices can enhance the flavor. Storing leftovers safely keeps them fresh. For variation, try different cheeses or cooking methods. I hope you feel inspired to make this dish your own. Enjoy your cooking adventure!

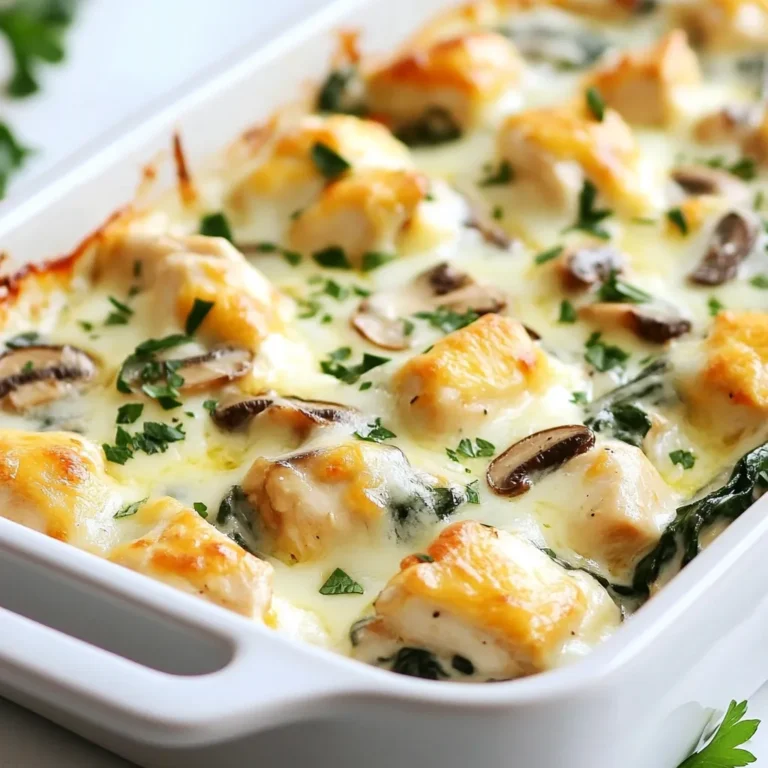
Low Carb Chicken Spinach Mushroom Bake Delight

PREV 1 … 14 15 16 17 NEXT
tastykitchentales

explore

DessertsDinnerAppetizersDrinks

Our Policies

  • Cookie Policy
  • Copyright Policy
  • Disclaimer
  • GDPR Policy
  • Terms Of Use
Back to Top
  • About
  • Contact Us
  • Privacy Policy
© 2025 tastykitchentales