FREE DINNER EBOOK! Get your copy!
  • Cookie Policy
  • GDPR Policy
  • Disclaimer
  • Terms Of Use
  • Visit my other site: Fun Cookie Recipes
tastykitchentales
  • Home
  • Dinner
  • Desserts
  • Drinks
  • Appetizers
  • Contact
  • About
  • Privacy Policy
  • Home
  • Dinner
  • Desserts
  • Drinks
  • Appetizers
  • Contact
  • About
  • Privacy Policy
  • Cookie Policy
  • GDPR Policy
  • Disclaimer
  • Terms Of Use
Visit my other site: Fun Cookie Recipes

HOME / CATEGORIES /

Latest

- 4 medium potatoes, peeled and cut into bite-sized cubes - 1 large onion, finely chopped - 3 cloves garlic, minced - 1-inch piece of ginger, freshly grated - 1 can (14 oz) coconut milk - 2 ripe tomatoes, diced - 2 tablespoons concentrated tomato paste - 2 teaspoons ground cumin - 1 teaspoon ground coriander - 1 teaspoon turmeric powder - ½ teaspoon cayenne pepper (adjust based on spice preference) - 1 tablespoon garam masala - 2 tablespoons vegetable oil - Salt to taste - Fresh cilantro leaves for garnish You can switch out ingredients based on what you have. For potatoes, sweet potatoes work great. Instead of coconut milk, try almond milk or cream. If you want protein, add chickpeas or chicken. Both fit well in this dish. For the best curry, choose waxy potatoes like Yukon Gold. They hold their shape well and add creaminess. Always use fresh spices. Look for whole spices and grind them at home if possible. This gives your curry a brighter flavor and aroma. {{ingredient_image_2}} To make the base, start by heating vegetable oil in a large pot over medium heat. Once the oil is hot, add the finely chopped onion. Sauté the onion until it turns a rich golden brown. This should take about 5 to 7 minutes. Next, add minced garlic and freshly grated ginger. Stir them in well, and let them cook for 1 to 2 minutes. You want to smell the fragrant aroma, but be careful not to burn them. Now, it’s time to build flavor. Introduce diced tomatoes and concentrated tomato paste into the pot. Cook this mixture for about 4 to 5 minutes. Stir occasionally until the tomatoes become soft and well mixed. After that, sprinkle in ground cumin, ground coriander, turmeric, cayenne pepper, and salt. Mix everything well to ensure the spices blend evenly with the onion-tomato mixture. Now, add the cubed potatoes to the pot. Mix well to coat them in the flavorful onion mixture. Let the potatoes cook for about 5 minutes, stirring occasionally. Next, pour in the coconut milk. Stir gently to combine it with the other ingredients. Increase the heat to bring the mixture to a gentle boil. Once it reaches a boil, lower the heat to let it simmer. Cover the pot and cook for 20 to 25 minutes, or until the potatoes are soft and tender. Finally, stir in the garam masala and let the curry simmer for another 5 minutes. This will help all the flavors meld beautifully together. Taste the curry and adjust salt or spice levels as needed. Serve it hot, garnished with fresh cilantro. Enjoy it over steamed basmati rice or with warm naan. You can add more depth to your Persian potato curry by using extra spices. Try these: - Cinnamon: A small pinch can add warmth. - Cardamom: This spice brings a nice sweet touch. - Fresh herbs: Add chopped mint or parsley for brightness. Mix and match these spices to suit your taste. Just remember to start small. You can always add more if needed. To get your potatoes just right, pay attention to cooking times. Start by cutting the potatoes into small cubes. This helps them cook evenly. When you add them to the pot, let them cook for about 5 minutes. Stir often to coat them with spices. Then, cover the pot and let the curry simmer for 20-25 minutes. Check the potatoes with a fork. They should be soft but not mushy. How you serve your curry can make it even more inviting. Here are some ideas: - Use a large, shallow bowl for a beautiful display. - Sprinkle a little cayenne on top for color. - Add a fresh cilantro sprig in the center for a pop of green. These small touches will impress your guests and make your meal feel special. Enjoy the beautiful colors and aromas as you serve! Pro Tips Perfect Potato Texture: To ensure the potatoes cook evenly, cut them into uniform sizes. This will help them absorb the flavors and cook through at the same time. Adjusting Spice Levels: If you prefer a milder curry, reduce the amount of cayenne pepper or omit it entirely. You can always add more spice later as needed. Thickening the Curry: For a thicker curry, let it simmer uncovered for a few minutes at the end. This will help reduce the liquid and concentrate the flavors. Flavor Enhancements: Consider adding a squeeze of lemon or lime juice just before serving to brighten the flavors and add a fresh, zesty finish. {{image_4}} You can easily make this curry vegetarian or vegan. Just skip any meat and focus on the potatoes. Use vegetable oil, which is already in the recipe. For creaminess, coconut milk works great. If you want extra protein, add chickpeas or lentils. They add texture and flavor. You can also use other veggies like carrots or bell peppers. This makes the dish colorful and healthy. If you like meat, chicken or lamb fits well in this curry. Cut the meat into bite-sized pieces. Sauté the meat with the onions until it is browned. Then follow the rest of the recipe as normal, adding the meat before you add the potatoes. This way, the meat absorbs all the tasty spices. Make sure to cook the meat fully before serving. This adds richness and makes the dish hearty. Persian cuisine has many regional flavors. In some areas, people add saffron for a floral touch. Others might include green beans or peas for more color and taste. You may also find recipes that use yogurt as a garnish. This adds a tangy flavor and cools the spice. Each region has its own twist, making this curry a fun dish to explore. You can try different spices or vegetables based on your taste. You can store the Persian potato curry in the fridge for up to three days. Make sure to let it cool completely before placing it in an airtight container. This keeps the flavors fresh and delicious. To freeze leftovers, first let the curry cool. Then, transfer it into freezer-safe bags or containers. Squeeze out as much air as possible before sealing. This helps prevent freezer burn. You can store it for up to three months. When you're ready to enjoy it again, simply thaw it in the fridge overnight. Reheat the curry on the stove for the best results. Place it in a pot over low heat. Stir often and add a splash of water or coconut milk if it looks too thick. You can also microwave it in a bowl. Cover it with a lid or a paper towel to trap moisture. Heat in short bursts, stirring in between, until hot. You can serve Persian Potato Curry with various sides. Here are some great options: - Steamed basmati rice: This rice pairs well with the curry's rich flavors. - Warm naan or pita bread: It helps scoop up the curry and adds a nice texture. - Fresh salad: A simple cucumber and tomato salad can add brightness. - Yogurt dip: A cool yogurt sauce can balance the spices in the curry. - Pickles: Persian pickles can add a tangy contrast to the dish. These sides enhance your meal and make it more satisfying. Yes, you can adjust the spice level in this curry. Here are some tips: - Cayenne pepper: Start with a small amount and add more if you like heat. - Fresh chilies: Add chopped green chilies for extra spice. - Chili powder: Consider using a spicier chili powder for a different kick. - Taste as you go: Always taste the curry while cooking. This helps you find the right spice level. Customizing the heat makes the dish yours. You can tell the potatoes are done by checking a few signs: - Tenderness: Use a fork to poke a potato cube. It should be soft and easily break apart. - Color: The potatoes will look slightly translucent when cooked. - Cooking time: If they have simmered for 20-25 minutes, they’re likely done. Perfectly cooked potatoes will soak up the flavors of the curry. In this article, we explored the key ingredients for Persian Potato Curry, including tips for substitution and quality. We walked through the step-by-step cooking process to build flavor and texture. I shared techniques to boost taste, cooking times, and presentation ideas. We also discussed variations, storage, and answered common questions. By following this guide, you can enjoy a delicious curry tailored to your tastes. Cooking should be fun and rewarding, so get creative in the kitchen!

Persian Potato Curry Flavorful and Simple Recipe

- 8 oz spaghetti - 1 lb ground turkey or beef - 1 (24 oz) jar marinara sauce These three main ingredients make up the base of our baked spaghetti casserole. The spaghetti adds texture. The ground turkey or beef provides protein. The marinara sauce ties it all together with rich flavor. - 2 cups creamy ricotta cheese - 1 cup shredded mozzarella cheese - 1/2 cup grated Parmesan cheese Cheese is essential for this dish. Ricotta adds creaminess. Mozzarella melts beautifully, while Parmesan gives a savory note. Together, they create a cheesy, gooey topping that everyone loves. - 1 medium onion, finely chopped - 2 cloves garlic, minced - 1 bell pepper (any color), diced - 1 tsp Italian seasoning - 1/2 tsp red pepper flakes (optional for heat) The vegetables and seasonings add depth. Onions and garlic provide a strong base flavor. Bell peppers add sweetness and color. Italian seasoning brings warmth, while red pepper flakes can give a kick if you like heat. {{ingredient_image_2}} - Preheat the Oven: First, set your oven to 375°F (190°C). This warms it up for baking. - Cook the Spaghetti: Boil salted water in a large pot. Add 8 oz spaghetti and cook until al dente. Drain and set aside. - Brown the Meat: Heat a large skillet over medium heat. Add 1 lb ground turkey or beef. Cook until browned, about 5-7 minutes. Drain any extra fat. - Sauté Vegetables: Add 1 chopped onion, 2 minced garlic cloves, and 1 diced bell pepper to the skillet. Sauté for 3-4 minutes until soft. - Combine Sauce and Seasoning: Stir in 24 oz marinara sauce, 1 tsp Italian seasoning, and optional 1/2 tsp red pepper flakes. Season with salt and black pepper. Simmer for 5 minutes. - Mix Spaghetti and Sauce: In a bowl, mix the spaghetti with the meat sauce. Fold in 2 cups ricotta cheese gently until evenly mixed. - Assemble the Casserole: Grease a 9x13 inch baking dish. Spread half of the spaghetti mixture in the dish. Top with half of 1 cup mozzarella and 1/2 cup Parmesan cheese. - Layer Remaining Ingredients: Add the rest of the spaghetti mixture on top. Finish with the remaining mozzarella and Parmesan cheeses. - Bake Covered: Cover the dish with aluminum foil. Bake for 20 minutes in the oven. - Bake Uncovered for Finish: Remove the foil and bake for another 15 minutes. Look for bubbling, golden cheese. - Cool and Garnish: Take the casserole out of the oven. Let it cool for a few minutes. Slice and garnish with fresh basil leaves for a nice touch. How do I cook spaghetti to al dente? To cook spaghetti to al dente, boil salted water in a pot. Add 8 oz of spaghetti and cook for about 8-10 minutes. Check the pasta a minute or two before the package time. It should be firm but not hard. What are some tips for browning meat? Use medium heat to brown your meat well. If using ground turkey or beef, break it up as it cooks. Stir it occasionally for even browning. Cook until there’s no pink left, about 5-7 minutes. Drain any excess fat before mixing with the sauce. What are some suggestions for additional seasonings? You can boost flavor with more spices. Add a pinch of garlic powder, onion powder, or oregano. Fresh herbs like parsley or thyme also work well. For a kick, try a bit of cayenne pepper or extra red pepper flakes. Why is simmer time important? Simmering is key to melding flavors. After you mix the marinara sauce with the meat and veggies, let it simmer for 5 minutes. This time helps all the tastes blend together, making every bite delicious. What are some serving tips and garnishes? For a nice touch, serve each portion with a sprinkle of extra Parmesan cheese. Add fresh basil leaves on top for color and flavor. This makes your dish look and taste even better. What are some recommended side dishes? Pair the casserole with a simple side salad or garlic bread. A light green salad balances the richness of the casserole. Garlic bread adds a crunchy texture and is perfect for scooping up sauce. Pro Tips Use Fresh Herbs: Adding fresh basil or parsley right before serving enhances the flavor and presentation of your casserole. Mix Cheese Varieties: Experiment with different cheese combinations, such as adding provolone or gouda for a unique flavor profile. Prep Ahead: This casserole can be assembled a day in advance and baked when ready, making it perfect for meal prep or entertaining. Adjust Spice Levels: Customize the heat by adjusting the red pepper flakes or adding diced jalapeños if you prefer a spicier dish. {{image_4}} You can switch up the meat in this dish. Try using chicken instead of turkey or beef. Chicken gives a lighter flavor. If you want a meatless option, use plant-based ground meat. It works well and keeps the dish hearty. Another tasty choice is to add sausage. Sausage adds a nice kick and rich flavor. If you need gluten-free options, many brands offer gluten-free pasta. It cooks just like regular pasta. You can also experiment with different shapes. Try penne, fusilli, or even ziti. These shapes hold the sauce well and add fun textures. You can use homemade marinara or store-bought. Homemade sauce tastes fresh and adds love to the dish. Store-bought is quick and easy, perfect for busy days. For a twist, consider adding pesto or Alfredo sauce. Pesto adds a fresh herb flavor, while Alfredo gives a creamy touch. After serving, let your baked spaghetti casserole cool down. You can store it in the fridge. Use an airtight container. It stays fresh for a few days. If you want to keep it longer, freeze it. Wrap it well in plastic wrap, then place it in a freezer-safe bag. This keeps it safe from freezer burn. To reheat, the best way is in the oven. Set it to 350°F (175°C). Place the casserole in an oven-safe dish. Cover it with foil to keep it moist. Heat for about 20 minutes. You may also use a microwave. If so, heat it in short bursts. Stir in between to avoid cold spots. For serving, add a sprinkle of extra cheese or fresh herbs. This adds flavor and looks great. In the fridge, your leftovers last about 3-4 days. In the freezer, they can last up to 2-3 months. Always check for any signs of spoilage before eating. If it smells off or looks strange, it’s best to throw it away. Can I make this recipe ahead of time? Yes, you can make this casserole ahead of time. Prepare it, then cover and store it in the fridge. Bake it the next day. Just add a few extra minutes to the baking time to heat it through. What can I substitute for ricotta cheese? If you need a substitute for ricotta cheese, use cottage cheese. You can also use soft cream cheese or Greek yogurt. These options work well and will keep the dish creamy. How do I know when the casserole is done? The casserole is done when the cheese is bubbling and golden brown. You can also check that the center is hot. A food thermometer can help. It should reach 165°F (74°C). Can I bake this in a smaller dish? Yes, you can use a smaller dish. Just adjust the cooking time. Keep an eye on it while it bakes to avoid overcooking. It’s important to check for that golden cheese layer. Is this recipe suitable for a gluten-free diet? To make this recipe gluten-free, use gluten-free spaghetti. Many brands offer great options. Always check the labels to ensure they are safe for your diet. How do I make a low-carb version? To create a low-carb version, swap out the spaghetti for zucchini noodles or cauliflower rice. This keeps the dish tasty without the carbs. You can still enjoy all the flavors you love! This blog post explored making a delicious casserole with spaghetti, meat, cheese, and veggies. You learned how to prepare each ingredient and assemble the dish step by step. I shared tips to ensure the perfect texture and ways to enhance flavor. Plus, I discussed tasty variations you can try. With the right ingredients and methods, your casserole will impress everyone at the table. Enjoy your cooking adventure and make it your own!

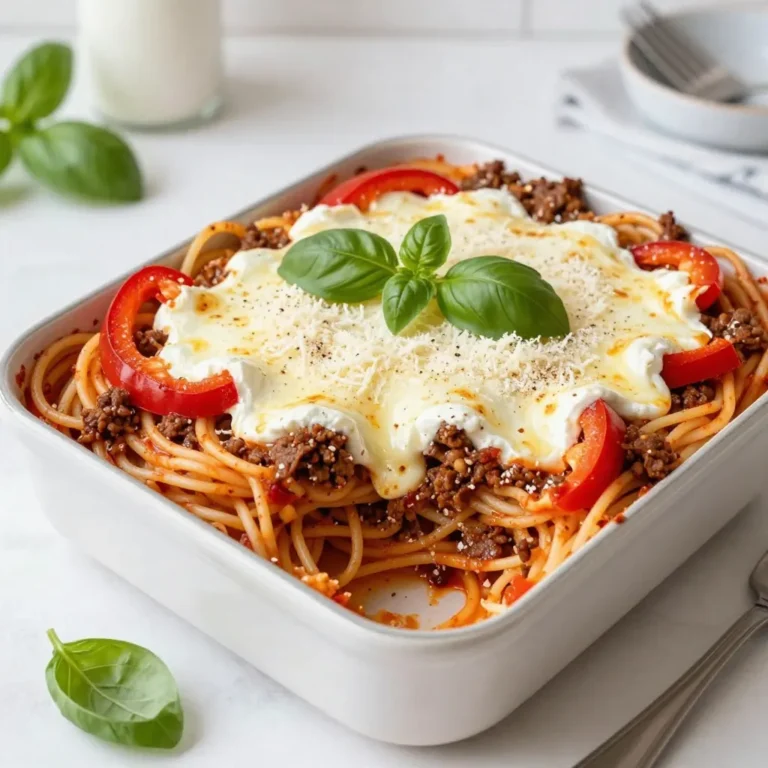
Foolproof Baked Spaghetti Casserole Simple Recipe

- 1 cup cold brewed coffee - 1 cup almond milk (or your preferred milk) - 1/2 teaspoon ground ginger - 1/2 teaspoon ground cinnamon - 1/4 teaspoon nutmeg - 1 tablespoon molasses - 1 tablespoon maple syrup - 1 teaspoon vanilla extract - Whipped cream, for a delightful topping - Crushed gingerbread cookies, for garnish You can switch almond milk for any milk, such as oat or soy. If you don't have molasses, try using honey or agave syrup. For those who want a spicier mix, use fresh ginger instead of ground ginger. You can also leave out the maple syrup if you prefer less sweetness. For coffee, I recommend using a smooth cold brew like Stumptown or Blue Bottle. For almond milk, try Califia Farms or Silk for a rich taste. For spices, McCormick offers great quality and flavor. When choosing whipped cream, look for brands like Reddi-wip or make your own for a fresh touch. {{ingredient_image_2}} Making the Creamy Gingerbread White Russian is simple and fun. It takes about 10 minutes. You will need a large mixing bowl and two glasses. Gather your ingredients first. Having everything ready makes cooking easier and more enjoyable. Start by pouring 1 cup of cold brewed coffee into the bowl. Then, add 1 cup of almond milk. You can use any milk you like. Next comes the spices: add 1/2 teaspoon of ground ginger, 1/2 teaspoon of ground cinnamon, and 1/4 teaspoon of nutmeg. These spices give the drink its warm, festive flavor. Now, add 1 tablespoon of molasses and 1 tablespoon of maple syrup for sweetness. Don’t forget 1 teaspoon of vanilla extract! This adds a nice touch. Use a whisk to mix everything well. Whisk until it is frothy and smooth. Prepare two glasses by filling them with ice cubes. This keeps the drink cold and refreshing. Carefully pour the creamy gingerbread mixture over the ice. Fill each glass, but leave a little space at the top. Top each drink with a dollop of whipped cream. Let it swirl into the drink for a lovely look. Finally, sprinkle crushed gingerbread cookies on the whipped cream. This adds crunch and flavor. For an extra treat, you can drizzle a little molasses on top. Enjoy your festive drink! To get that perfect froth, start with cold brewed coffee and almond milk. The cold temperature helps the mixture whip up nicely. When you whisk the ingredients, do it vigorously. This helps incorporate air, creating a light and creamy texture. If you want even more froth, try using a milk frother. It works wonders! Serve your creamy gingerbread white Russian in clear glasses. This shows off the beautiful layers of cream and the crushed cookies. For a fun touch, place a small gingerbread cookie on the rim of each glass. It adds a nice visual and a tasty treat! You can also serve this drink with holiday snacks like spiced nuts or a cheese platter. To boost the flavors, add a pinch of sea salt. It brings out the sweetness and spice. You can also experiment with flavored syrups. Try caramel or hazelnut for a twist. If you want a stronger ginger taste, increase the ground ginger to one teaspoon. This will make your drink even more festive and delicious! Pro Tips Chill Your Ingredients: Ensure your cold brewed coffee and almond milk are well-chilled before mixing. This will enhance the drink's refreshing quality and keep it icy longer. Adjust Sweetness to Taste: Feel free to modify the amount of maple syrup and molasses based on your personal preference for sweetness. Start with less and add more as needed. Experiment with Milk Alternatives: Try different types of milk, such as oat or coconut milk, for a unique flavor twist. Each milk offers a distinct taste that can enhance your drink. Garnish Creatively: In addition to crushed gingerbread cookies, consider adding a sprinkle of cinnamon or a drizzle of caramel sauce for extra visual appeal and flavor complexity. {{image_4}} You can easily make this drink dairy-free. Use almond milk, oat milk, or coconut milk. Each option adds a unique flavor. Almond milk keeps it light, while coconut milk gives a creamy texture. For an extra richness, try cashew milk. These choices still pair well with the spices and coffee. Want to spice it up? Add more flavor with cardamom or cloves. Just a pinch can change the drink. You can also mix in a dash of vanilla bean for that extra warmth. If you love pumpkin spice, add pumpkin pie spice to the mix. This twist makes it perfect for fall gatherings. To make this drink alcohol-free, simply leave out the vodka. The creamy gingerbread mix stands alone as a great treat. You can also add a splash of sparkling water for some fizz. This version is great for kids or anyone wanting a festive drink without alcohol. To store leftover creamy gingerbread mixture, pour it into an airtight container. Seal it tightly and place it in the fridge. The cold brewed coffee and milk stay fresh that way. Make sure to use it within three days for the best taste. When you want to enjoy it again, gently heat the mixture. You can use a small pot on low heat. Stir it often to avoid burning. If you want it cold, just pour it over ice again. This keeps the flavors bright and fresh. Each ingredient has a different shelf life. Here’s a quick guide: - Cold brewed coffee: Up to two weeks in the fridge. - Almond milk: Usually lasts about 7-10 days after opening. - Ground spices: Keep for 1-2 years if stored in a cool, dark place. - Molasses: Can last indefinitely if sealed tightly. - Maple syrup: Best used within a year for peak flavor. Storing your ingredients well helps your drinks taste great every time! A White Russian is a smooth drink that blends coffee, cream, and vodka. It has a rich taste and creamy texture. I love how it brings warmth and comfort. This drink is a twist on the classic version. We add gingerbread flavors to make it festive. Yes, you can prepare this drink ahead! Mix the coffee, milk, spices, molasses, maple syrup, and vanilla in advance. Store it in the fridge for up to two days. When ready to serve, just pour it over ice. Top with whipped cream and gingerbread cookies. It saves time during the busy holidays. You can make this drink sweeter by adding more maple syrup or molasses. A drizzle on top adds a nice touch. You could also use sweetened almond milk or flavored creamers. Just taste as you go to find your perfect sweetness level. Enjoy making it just right for you! This blog post covered how to make a delicious White Russian cocktail. We looked at the main ingredients, helpful substitutions, and trusted brands. You learned step-by-step instructions for mixing and serving the drink. I shared tips for perfect froth and festive serving ideas. Variations for different diets and preferences were also given. Finally, we discussed storage, reheating, and common questions. Enjoy experimenting with flavors and making your own twist on this classic drink!

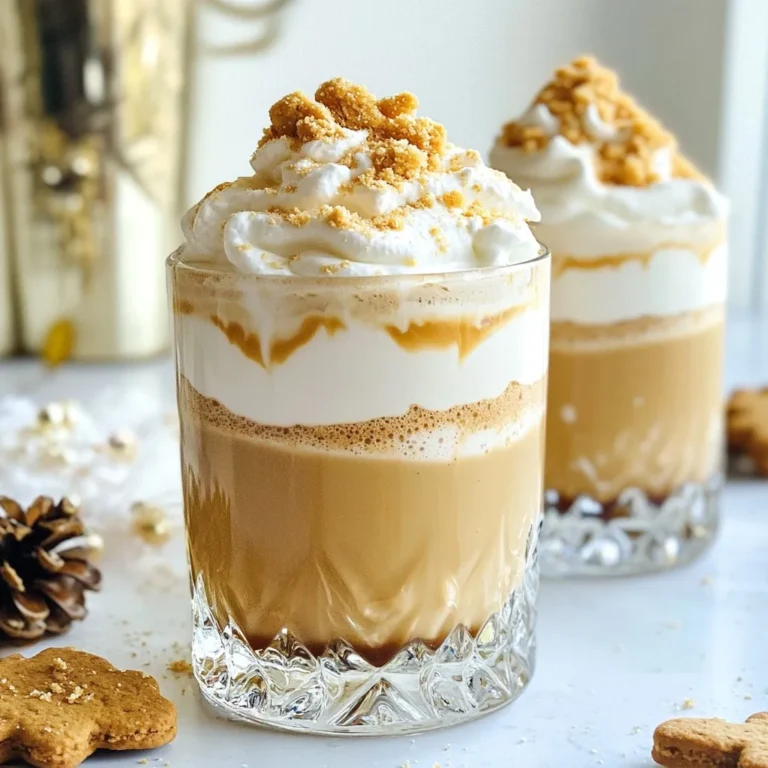
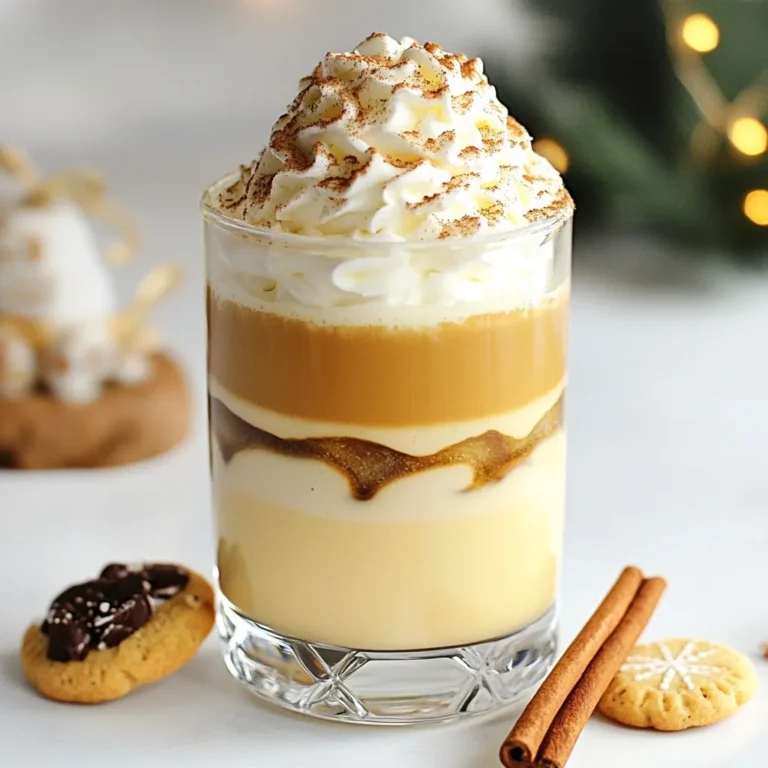
Creamy Gingerbread White Russian Festive Delight

- 1 pre-made tart shell (9-inch) - 1 cup fresh raspberries - 1/2 cup unsalted butter, softened - 1/2 cup granulated sugar - 2 large eggs - 1 teaspoon pure vanilla extract - 1 cup almond flour - 1/4 cup all-purpose flour - 1/2 teaspoon baking powder - 1/4 teaspoon salt - Powdered sugar, for dusting - Lemon zest for a citrus kick - Ground ginger for warmth - Dark chocolate chips for richness - Other berries like blueberries or blackberries - 9-inch tart pan - Baking sheet for easy handling - Mixing bowls (one large and one small) - Hand mixer or whisk for creaming - Spatula for spreading filling - Wire rack for cooling - Sifter for powdered sugar dusting Using fresh ingredients makes a big difference. The raspberries will shine in this tart. You can choose to add flavors that you love. For example, lemon zest brightens the taste. If you use chocolate, it adds a rich layer. Enjoy the process! {{ingredient_image_2}} Start by preheating your oven to 350°F (175°C). This step is key to getting a good bake. Next, take your pre-made tart shell and place it on a baking sheet. This will catch any drips from the filling. It’s a simple step that saves you from a messy oven later. In a large bowl, add 1/2 cup of softened unsalted butter and 1/2 cup of granulated sugar. Use a mixer or a whisk to cream them together. Mix until the blend is light and fluffy. This may take a few minutes. Now, add 2 large eggs, one at a time. Mix well after each egg. Then, stir in 1 teaspoon of pure vanilla extract. In a separate bowl, mix 1 cup of almond flour, 1/4 cup of all-purpose flour, 1/2 teaspoon of baking powder, and 1/4 teaspoon of salt. Gently fold this dry mix into the butter and sugar mix. Do this carefully to keep the filling light. Pour the frangipane filling into the tart shell. Use a spatula to spread it evenly. Next, take 1 cup of fresh raspberries and press them gently into the filling. Make sure they are visible and not just hidden. Slide the baking sheet into the preheated oven. Bake for 30-35 minutes. You know it’s done when the tart is golden brown and the center is set. Once baked, let the tart cool on a wire rack. This cooling step is important for the best texture. Before serving, finish with a dusting of powdered sugar for that lovely touch. To get the best results, cream the butter and sugar well. Use softened butter at room temperature. This helps it mix easily. I find that using a hand mixer makes it quick and easy. Mix until the mixture is light and fluffy. This process is key to a good texture in your tart. The sugar should dissolve into the butter, creating a smooth base. To make your frangipane light, avoid overmixing. Gently fold the dry ingredients into the wet mixture. Use a spatula for this step. Incorporate the almond flour and all-purpose flour just until you see no dry spots. This keeps the air bubbles in the batter. Those air bubbles help the tart rise and stay fluffy. Remember, a light touch goes a long way! When adding raspberries, place them gently into the frangipane. Press them in slightly so they stick, but do not squash them. Aim for a beautiful display on top. I like to arrange them in a pattern for a nice look. You can even mix in some whole raspberries with cut ones for added interest. This not only looks great but also gives bursts of flavor in every bite. Pro Tips Use Fresh Raspberries: For the best flavor, opt for fresh raspberries instead of frozen. They add a vibrant color and a burst of juicy sweetness to the tart. Don’t Overmix: When combining the dry and wet ingredients, mix just until incorporated. Overmixing can lead to a dense texture in the frangipane filling. Cool Before Dusting: Allow the tart to cool completely before dusting with powdered sugar. This prevents the sugar from melting into the tart and keeps your presentation pristine. Experiment with Flavors: Feel free to add a splash of almond extract or lemon zest to the frangipane for an extra layer of flavor that complements the raspberries beautifully. {{image_4}} You can swap raspberries for other fruits. Try peaches, apricots, or strawberries. Each fruit brings a unique taste. For a tart with a tropical twist, use mango or pineapple. These fruits pair well with almond flavor in the frangipane. To make a gluten-free tart, use all almond flour. Replace all-purpose flour with more almond flour. This keeps the texture light and nutty. You can also use gluten-free flour blends if you prefer. Just make sure they include a binding agent. Add chocolate for a rich flavor. Fold in cocoa powder into the frangipane mix. You can also add melted dark chocolate for a deeper taste. Another option is to use orange zest. This adds a fresh, citrusy note that brightens the tart. To keep your Raspberry Frangipane Tart fresh, store it in the fridge. Use an airtight container or cover it tightly with plastic wrap. This helps to keep the tart from drying out. If you have leftover slices, place them in a single layer to avoid squishing the raspberries. The tart lasts 3 to 4 days in the fridge. If you want to keep it longer, freezing is a great option. Wrap the tart tightly in plastic wrap, then place it in a freezer bag. It can stay frozen for up to 3 months. When you are ready to eat, thaw it in the fridge overnight. If you want to enjoy warm slices, preheat your oven to 350°F (175°C). Place the tart on a baking sheet and cover it with foil. Heat for about 10-15 minutes, or until it is warm throughout. You can also use a microwave, but it may make the crust a bit soggy. Enjoy your tart fresh and warm! A frangipane tart is a sweet pastry filled with frangipane. Frangipane is a creamy mixture made from butter, sugar, eggs, and almond flour. It has a rich almond flavor. This tart typically uses a pastry crust, which can be homemade or store-bought. You can top it with fruits like raspberries for a pop of color and flavor. The combination of the buttery crust and the almond filling makes it a delightful treat. Yes, you can prepare this tart in advance. You can make the tart shell and frangipane filling a day before. Store the tart shell in an airtight container. Keep the filling in the fridge. On the day you plan to serve it, assemble the tart and bake it. This helps save time and makes it easier to enjoy with friends and family. The tart is fully baked when it turns golden brown. Check the filling; it should look set and not jiggle. You can insert a toothpick in the center. If it comes out clean, the tart is ready. This usually takes about 30-35 minutes at 350°F (175°C). Allow it to cool completely on a wire rack before serving. You learned the key ingredients, steps, and tips for making a Raspberry Frangipane Tart. From creaming the butter to arranging the fruit, each part matters. Explore variations for more fun, and check how to store it safely. Keep it fresh, and enjoy it later. Baking takes practice, but with these tips, you can shine. This tart is sure to impress your friends and family. Happy baking, and remember, practice makes perfect!

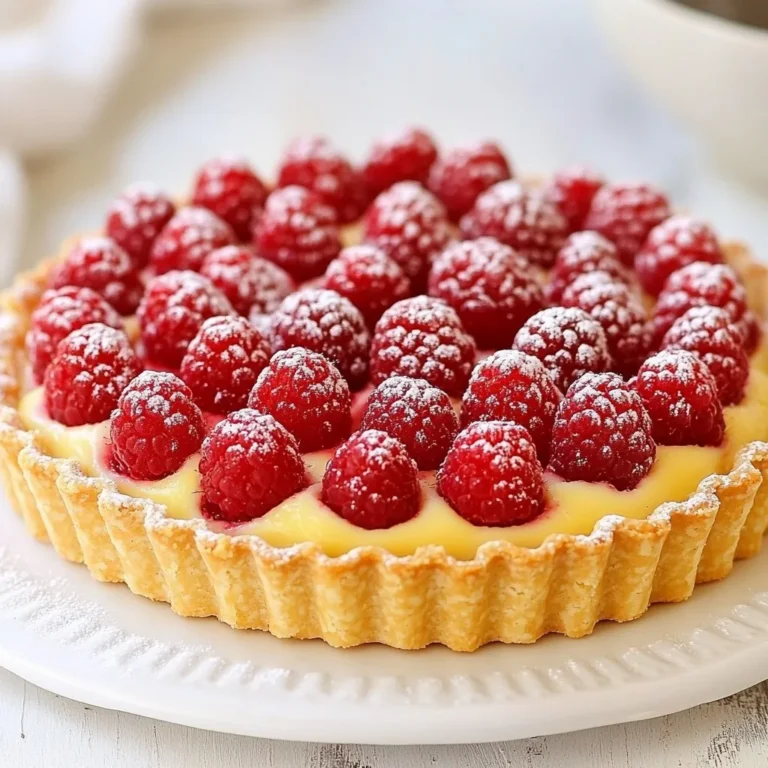
Raspberry Frangipane Tart Simple and Delicious Recipe

- 1 cup unsalted butter, melted - 1 cup packed brown sugar - 1/2 cup granulated sugar - 2 large eggs - 1 tablespoon pure vanilla extract - 2 cups all-purpose flour - 2 teaspoons ground ginger - 1 teaspoon ground cinnamon - 1/2 teaspoon ground nutmeg - 1/4 teaspoon ground cloves - 1 teaspoon baking powder - 1/2 teaspoon baking soda - 1/2 teaspoon salt - 1/2 cup white chocolate chips - 1/2 cup chopped walnuts (optional) I love using simple, quality ingredients for my gingerbread blondies. Each element plays a key role in the flavor and texture. The unsalted butter gives richness, while the brown sugar adds moisture and depth. I like to mix in granulated sugar for a slight crunch. The eggs bind everything together. They add structure and help the blondies rise. The vanilla extract brings warmth to the flavor. I sift together the all-purpose flour and spices. The combination of ground ginger, cinnamon, nutmeg, and cloves creates that classic gingerbread taste. Baking powder and baking soda help the blondies rise. Salt balances the sweetness. I often add white chocolate chips for a sweet contrast to the spices. If you want more crunch, toss in some chopped walnuts. Each ingredient matters. They work together to create a treat that is soft, chewy, and full of flavor. {{ingredient_image_2}} - Preheat the oven to 350°F (175°C). - Prepare a 9x13 inch baking pan by greasing it lightly or lining it with parchment paper. - In a large bowl, pour in the melted butter. - Add the packed brown sugar and granulated sugar. Whisk until smooth. - Crack in the eggs, one at a time, mixing well after each. - Stir in one tablespoon of pure vanilla extract until fully combined. - In another bowl, sift together two cups of all-purpose flour, two teaspoons of ground ginger, one teaspoon of ground cinnamon, half a teaspoon of ground nutmeg, and a quarter teaspoon of ground cloves. - Add one teaspoon of baking powder, half a teaspoon of baking soda, and half a teaspoon of salt. Mix well to ensure even distribution. - Gradually fold the dry mixture into the wet mixture. Stir gently until just combined. - Take care not to over-mix. This helps keep your blondies light and chewy. - Gently fold in half a cup of white chocolate chips and half a cup of chopped walnuts, if you like. - Pour your batter into the prepared pan. Use a spatula to spread it evenly. - Bake in the preheated oven for 25 to 30 minutes. - Check for doneness by inserting a toothpick into the center. If it comes out clean, they are ready. - Once done, cool the blondies in the pan for 10 minutes. - After that, transfer them to a wire rack to cool completely. - Cut them into squares or rectangles once cool. Enjoy the warm spices and sweetness! To make your gingerbread blondies soft and chewy, avoid over-mixing the batter. When you mix the wet and dry ingredients, do it gently. Over-mixing adds too much air, which makes them tough. Mix until you see no dry flour. This method keeps your blondies light and tender. You can make your blondies extra special by adding spices. Try a bit of allspice or cardamom for a warm twist. Fresh grated ginger can also boost the flavor. For chocolate lovers, always opt for high-quality chocolate chips. They melt beautifully and add a rich taste. If you can, use white chocolate made from real cocoa butter. For a touch of elegance, dust the cooled blondies with powdered sugar. Use a fine sieve to sprinkle it evenly. This small step makes a big difference! When serving, place them on a festive plate. You can add a sprig of fresh mint on top. It adds color and freshness to your holiday spread. Pro Tips Use Room Temperature Ingredients: Ensure your eggs and butter are at room temperature for better mixing and a smoother batter. Don’t Overmix: Mix the batter just until combined to keep your blondies soft and chewy rather than dense. Check for Doneness: Start checking your blondies a few minutes before the recommended bake time to avoid overbaking. Cool Completely: Let the blondies cool completely in the pan before cutting to prevent them from falling apart. {{image_4}} If you want to make this treat fit your diet, you have options. For gluten-free blondies, swap all-purpose flour with almond flour or a gluten-free blend. These alternatives help keep the taste and texture nice. For a dairy-free version, use coconut oil or a dairy-free butter substitute. You can also choose dairy-free chocolate chips. These options ensure everyone can enjoy gingerbread blondies. Play with flavors to make your blondies unique. Add different nuts like pecans or almonds for extra crunch. Dried fruits, like cranberries or apricots, bring a chewy texture and burst of flavor. You can also switch up the spices. Try adding cardamom or allspice for a new taste. Even a pinch of cayenne pepper can add a fun kick. These small changes can make a big difference. You can transform these blondies for any holiday. For Christmas, add crushed candy canes on top for a festive touch. During Thanksgiving, mix in pumpkin spice or a swirl of pumpkin puree for a seasonal twist. These themed versions not only look good but also taste great. Making seasonal treats can turn an ordinary dessert into a special one. To keep your gingerbread blondies fresh, store them at room temperature. Place them in an airtight container. They will stay soft and tasty for about three days. If you need to store them longer, use the fridge. Wrap each blondie in plastic wrap to keep them from drying out. Then, place them in a container. They’ll last for up to a week in the fridge. Freezing blondies is a great way to save any leftovers. First, let them cool completely. Then, cut them into squares. Wrap each square in plastic wrap. Place the wrapped blondies in a freezer bag or container. They can last up to three months in the freezer. When you're ready to enjoy them, take them out and let them thaw at room temperature. If you want to warm them up, preheat your oven to 350°F (175°C). Place the blondies on a baking sheet for 5-10 minutes. Enjoy the sweet smell as they heat up! Gingerbread blondies are a warm, sweet treat. They blend rich brown sugar with warm spices. The main flavors come from ginger, cinnamon, nutmeg, and cloves. You also get a soft, chewy texture thanks to the butter and eggs. The taste reminds you of holiday cookies but in a bar form. Adding white chocolate chips gives a creamy contrast to the spices. This dessert is perfect for cozy gatherings. Yes, you can prepare gingerbread blondies in advance. Bake them a day or two before your event. After baking, let them cool completely. Store them in an airtight container at room temperature. This keeps them fresh and soft. You can also freeze them for longer storage. Just wrap them tightly in plastic wrap and place them in a freezer bag. Thaw them in the fridge before serving. To check for doneness, use a toothpick. Insert it into the center of the blondies. If it comes out clean or with a few crumbs, they are ready. The edges should look golden brown. Avoid opening the oven too often, as this can affect baking time. Set a timer for 25 minutes, then check every few minutes after that. You can easily adapt this recipe for a vegan version. Replace the eggs with flax eggs. Mix one tablespoon of ground flaxseed with three tablespoons of water per egg. Use a plant-based butter for the melted butter. For the white chocolate chips, look for dairy-free options. This lets you enjoy the same gingerbread flavor without any animal products. Gingerbread blondies pair well with warm drinks. Try serving them with hot cocoa or spiced chai tea. You can also add a scoop of vanilla ice cream on top. It melts nicely over the warm blondies. For an extra touch, drizzle caramel or chocolate sauce. These additions make your dessert even more special and festive. This blog post detailed how to create gingerbread blondies, from ingredients to baking tips. We covered key steps like mixing, baking, and storing your treats. Remember to avoid over-mixing for the best texture and feel free to customize the flavors. These blondies can suit any holiday or occasion with simple tweaks. Enjoy the process and share your delicious results with friends. Homemade treats like these bring joy and warmth to any gathering. Happy baking!

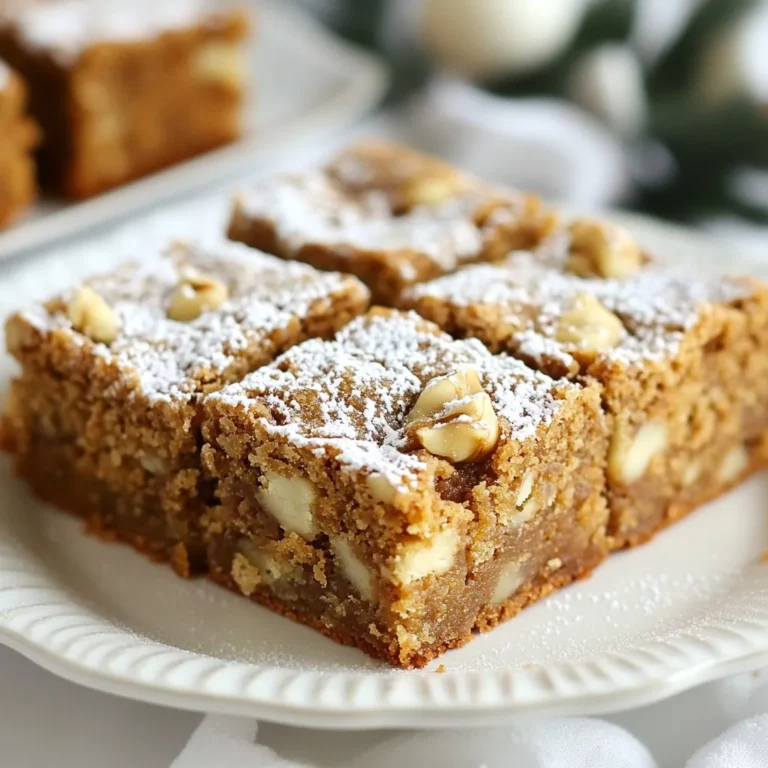
Gingerbread Blondies Irresistible Holiday Treat

To make Christmas Sugar Cookie Shots, gather these ingredients: - 2 cups all-purpose flour - 1/2 teaspoon baking soda - 1/2 teaspoon baking powder - 1/2 teaspoon fine sea salt - 1 cup unsalted butter, softened to room temperature - 1 1/2 cups granulated sugar - 1 large egg - 1 teaspoon pure vanilla extract - 1 teaspoon pure almond extract - 1 cup royal icing (store-bought or homemade) - Assorted sprinkles for decoration - Milk or cream for filling If you can't find an ingredient, here are some substitutes: - Instead of all-purpose flour, you can use gluten-free flour. - For unsalted butter, use salted butter and cut back on the salt. - If you lack royal icing, you can use melted chocolate or whipped cream. - You can swap milk with almond milk or any plant-based milk. Using good quality ingredients makes a big difference. Here’s what to look for: - Choose fresh, unsalted butter for a rich flavor. - Use pure extracts, not imitation ones; they taste better. - Look for fine sea salt; it dissolves easily in dough. - Use fresh flour; check the date on the package. These tips ensure your Christmas Sugar Cookie Shots taste festive and delicious! {{ingredient_image_2}} First, we need to gather our dry ingredients. In a medium bowl, whisk together: - 2 cups all-purpose flour - 1/2 teaspoon baking soda - 1/2 teaspoon baking powder - 1/2 teaspoon fine sea salt Mix these well until they are fully combined. This step ensures our cookies will rise and taste great. Set this bowl aside for now. Next, we will cream the butter and sugar. In a large bowl, add: - 1 cup unsalted butter, softened - 1 1/2 cups granulated sugar Using an electric mixer, beat these on medium speed. Mix until the blend is light and fluffy, which should take about 3-4 minutes. This process adds air to our mixture, making the cookies soft. Now it is time to mix in the egg and extracts. Add: - 1 large egg - 1 teaspoon pure vanilla extract - 1 teaspoon pure almond extract Beat on medium-low speed until smooth. Then, gradually add the dry mixture to the wet mixture. Stir gently until the dough starts to come together. Once mixed, divide the dough into two discs. Wrap them in plastic wrap and chill for at least 1 hour. While the dough chills, preheat your oven to 350°F (175°C). This step is key for even baking. After chilling, roll out one disc on a floured surface to about 1/4 inch thick. Use a shot glass to cut out rounds. Place these on a parchment-lined baking sheet, leaving space between them. Bake in the oven for 8-10 minutes. Watch for the edges to turn lightly golden. Once baked, let the cookies cool completely on a wire rack. To create shot glasses, press a smaller shot glass into the center of each cookie round. Be gentle to keep the edges intact. Finally, fill the wells with royal icing. Dip the edges in colorful sprinkles while the icing is wet. This adds a fun touch! Just before serving, fill each cookie shot with milk or cream. Enjoy these festive treats right away for the best taste! To get the best cookie texture, follow these steps: - Use room temperature butter. It makes mixing easier. - Cream the butter and sugar well. Aim for a light and fluffy mix. - Chill the dough for at least one hour. This helps the cookies hold their shape. - Do not overmix the dough. Stop mixing as soon as it comes together. This will help you make tender and tasty cookie shots. Decorating your cookie shot glasses can be fun. Here are some ideas: - Use royal icing to coat the rims. This adds a festive touch. - Dip the icing in colorful sprinkles. Choose red, green, and white for Christmas. - Add edible glitter for sparkle. It makes your treats stand out. - Use candy canes or chocolate sticks as stirrers. They add flavor and fun. These decorations make your cookie shots look great and taste even better! When filling and serving your cookie shots, keep these tips in mind: - Fill just before serving. This keeps the cookies from getting soggy. - Use milk or cream for classic flavor. You can also try flavored creamers. - Serve with fun straws or spoons. This makes it more interactive. - Enjoy them fresh for the best taste. The cookie should be soft and sweet. Following these practices will ensure your cookie shots are a hit at any holiday gathering! Pro Tips Chill the Dough: Make sure to chill the dough for at least 1 hour. This step is crucial for achieving the right texture and preventing the cookies from spreading too much while baking. Use Quality Extracts: Using pure vanilla and almond extracts will enhance the flavor of your cookies. Avoid imitation extracts for the best taste. Check for Doneness: Keep an eye on the cookies while baking; they should be lightly golden around the edges. Overbaking can lead to dry cookies. Fill Just Before Serving: For the best texture, fill the cookie shots with milk or cream just before serving. This will keep the cookies from getting too soggy. {{image_4}} You can change the flavor of your cookie shots to keep things fun. Try adding cocoa powder for a rich chocolate taste. Just replace 1/4 cup of flour with cocoa powder. For a warm spice flavor, mix in cinnamon and nutmeg. Just 1 teaspoon of each will do. These flavors will bring a new twist to your holiday treats. While milk or cream is great, you can get creative! Try using flavored milk like chocolate or strawberry. You could also use eggnog for a festive touch. If you want something sweet, fill them with whipped cream or pudding. The options are endless. Each filling adds a fun surprise with every bite. Garnishes can make your cookie shots extra special. Use crushed candy canes for a minty crunch. You can also sprinkle edible glitter for a festive shine. Try adding chocolate shavings for a rich taste. Fresh berries can add color and freshness. Each garnish adds a unique flair that will impress your guests. To store leftover cookie shots, place them in an airtight container. This keeps them fresh for a few days. If you fill them with milk or cream, enjoy them right away. The filling can make the cookie soggy over time. You can freeze the cookie dough for later use. After chilling, wrap each disc tightly in plastic wrap. Then, place them in a freezer-safe bag. They can last up to three months in the freezer. When ready to bake, thaw the dough in the fridge overnight. For the best taste, eat the cookie shots within a few days. Store them in a cool, dry place. If they start to feel hard, you can cover them with a damp paper towel for a few minutes. This helps soften the cookies before serving. Yes, you can make these cookie shots ahead of time. You can prepare the cookie dough and chill it in the fridge for up to 24 hours. This lets the flavors blend well. You can also bake the cookies a day before and store them in an airtight container. Just wait to fill them until you are ready to serve. This keeps the cookies from getting soggy. If you want a change from royal icing, you can use buttercream frosting. It tastes great and is easy to spread. You can also try chocolate ganache. It adds a rich flavor. Whipped cream is another fun option, but remember it will not harden like icing. You can easily make these cookie shots fit any holiday. Change the sprinkles to match the season. For Halloween, use orange and black sprinkles. For Valentine's Day, use red and pink. You can also change the flavor of the cookies. Add peppermint extract for Christmas or pumpkin spice for fall. Filling flavors can change too. Use eggnog for a winter treat or fruit-flavored milk for spring! You learned about key ingredients and their substitutes for cookie shot glasses. I shared tips for quality and texture. We discussed step-by-step baking and fun decorating ideas. Variations and storage methods were also covered. In closing, mastering cookie shots takes practice but is rewarding. Enjoy the process and get creative with flavors and fillings! Happy baking!

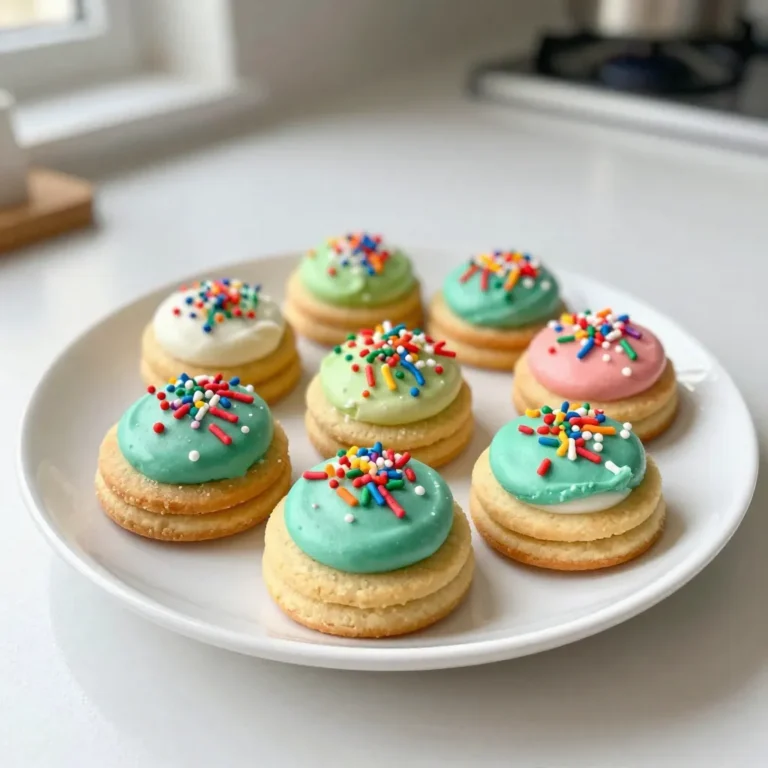
Christmas Sugar Cookie Shots Festive and Fun Treats

- 1 cup fresh strawberries, hulled and pureed - 8 oz cream cheese, softened to room temperature - 1/4 cup powdered sugar - 1 teaspoon pure vanilla extract - 1 cup graham cracker crumbs, plus extra for garnish - 1 cup white chocolate chips - 1 tablespoon coconut oil - Pinch of sea salt - Mixing bowl - Electric mixer - Cookie scoop - Parchment paper - Baking sheet - Microwave-safe bowl To make these strawberry cheesecake truffles, you need simple ingredients. Fresh strawberries bring a bright flavor. The cream cheese adds a rich, smooth base. Powdered sugar sweetens the mix perfectly. Vanilla extract gives a lovely aroma. Graham cracker crumbs create a nice texture and taste. You will need some equipment too. A mixing bowl helps you combine the ingredients well. An electric mixer makes beating easy. A cookie scoop helps with shaping the truffles. Parchment paper keeps them from sticking. A baking sheet is useful for chilling the truffles. Finally, a microwave-safe bowl is needed for melting the white chocolate. Gather everything before you start. This will make the process smooth and fun! {{ingredient_image_2}} Start with eight ounces of softened cream cheese in a mixing bowl. Add a quarter cup of powdered sugar and one teaspoon of pure vanilla extract. Beat these ingredients using an electric mixer on medium speed. Mix for about two to three minutes until smooth and creamy. Next, take one cup of fresh strawberry puree and fold it gently into the cream cheese mixture. Be careful not to deflate the mixture; you want it light and fluffy. Now, add one cup of graham cracker crumbs to the bowl. Don't forget a pinch of sea salt for balance. Mix gently until everything combines. The mixture should feel thick enough to hold its shape. This texture is key for rolling the truffles later. Use a small cookie scoop or your hands to portion out the mixture. Roll each portion into balls about one inch in diameter. Place these truffles on a baking sheet lined with parchment paper. Cover the bowl tightly and refrigerate for about 30 minutes. This step helps firm up the mixture, making it easier to shape. In a microwave-safe bowl, combine one cup of white chocolate chips and one tablespoon of coconut oil. Heat the mixture in 30-second intervals, stirring in between. Be careful not to overheat it, or the chocolate might burn. You want it completely melted and smooth before moving on. Once the truffles are firm, take them out of the freezer. Using a fork, dip each truffle into the melted white chocolate. Shake off any excess chocolate and place them back on the parchment-lined sheet. For a fun touch, sprinkle a few extra graham cracker crumbs on top before the chocolate sets. Finally, return your coated truffles to the refrigerator for about 15 minutes. This extra chilling time helps the white chocolate harden completely, making each bite a delightful treat. To make your truffles the best they can be, chilling is key. After mixing, cover the bowl and chill it for about 30 minutes. This helps the mixture firm up, making it easier to roll into balls. Overmixing can ruin the texture, so mix gently. You want a thick mix that holds its shape well. Melting chocolate can be tricky. To prevent burning, heat it in small bursts. Use 30-second intervals in the microwave and stir in between. If you don't have white chocolate, you can try using dark chocolate or milk chocolate. Both will give a different taste but still taste great. For serving, arrange your truffles in a decorative box or on a pretty tiered stand. This makes them look extra special. Garnish the truffles with fresh strawberries or mint sprigs for a pop of color. This not only looks nice but also adds freshness to your sweet treat. Pro Tips Use Fresh Strawberries: For the best flavor, opt for ripe, fresh strawberries. This will enhance the sweetness and overall taste of your truffles. Chill Before Coating: Ensure your truffles are adequately chilled before dipping them in chocolate. This helps maintain their shape and prevents them from becoming too soft. Customize Chocolate: Feel free to experiment with different types of chocolate for coating. Milk chocolate or dark chocolate can add a unique twist to the flavor profile. Presentation Matters: Elevate your truffles by presenting them on a decorative platter or in small cupcake liners. Adding garnishes like fresh mint or extra graham crumbs can make a beautiful display. {{image_4}} You can make these truffles even more fun by changing the fruit. Raspberries or blueberries work well. They both add a sweet and tart taste. You can also use flavored cream cheese. Try strawberry, vanilla, or even lemon. This will give your truffles a unique twist. Each fruit brings its own flavor and color, making them special. While white chocolate is classic, you can switch it up. Dark chocolate offers a rich taste, while milk chocolate is sweeter. These choices change the flavor and look of your truffles. For festive occasions, consider using colored chocolate. You can find bright pinks or blues to match any theme. This makes the truffles look even more inviting. You can take your truffles to the next level by adding extras. Chopped nuts add a nice crunch. They also introduce a different texture to each bite. Sprinkles are another fun option. They can brighten up the truffles and make them festive. Drizzling caramel or chocolate sauce on top can add richness. This small step makes a big impact on taste and presentation. To keep your strawberry cheesecake truffles fresh, store them in the fridge. Use an airtight container to prevent them from drying out. Layer the truffles with parchment paper to avoid sticking. For longer storage, you can freeze the truffles. Place them on a baking sheet in a single layer. Once frozen, transfer the truffles to a freezer-safe bag. Remove as much air as possible before sealing the bag. This helps prevent freezer burn. In the fridge, the truffles last about five days. If stored properly, they can remain tasty and safe to eat. If you freeze them, they last up to three months. Watch for signs of spoilage. If you see any mold or an off smell, do not eat them. A change in texture can also mean they are no longer good. Always check before enjoying your sweet treat! Yes, you can make these truffles ahead of time. They store well in the fridge. Place them in an airtight container. You can keep them for up to one week. If you want to store them longer, freeze them. Just make sure to wrap each truffle in plastic wrap. Then, place them in a freezer-safe bag. They can last up to three months in the freezer. Chocolate can seize if it gets too hot or if water gets into it. To prevent this, make sure your bowl is dry. Avoid letting any steam or water touch the chocolate. Heat in short bursts of 30 seconds. Stir in between to keep the heat even. If it does seize, you can add a little coconut oil to help smooth it out. If you want a dairy-free option, try using cashew cream. Soak cashews overnight, then blend them until creamy. You can also use vegan cream cheese. Both options give a nice flavor and texture. Just make sure the consistency is similar to cream cheese for best results. To boost strawberry flavor, use fresh strawberries when possible. You can also add a splash of strawberry extract. Another tip is to fold in some finely chopped strawberries for extra bits. This adds texture and bursts of flavor. Yes, you can adapt these truffles for special diets. Use gluten-free graham crackers to make them gluten-free. For a vegan version, swap cream cheese for a plant-based option. Check the chocolate you use as well; some brands are dairy-free. Always read labels to ensure they meet your dietary needs. You now have a tasty way to make strawberry truffles. We covered ingredients, tips, and storage ideas. Remember, chilling is key for perfect texture. You can also switch flavors and coatings for fun variations. Follow these steps for delicious results. Enjoy your creations with friends and family. The joy of making treats brings happiness, so get started today!

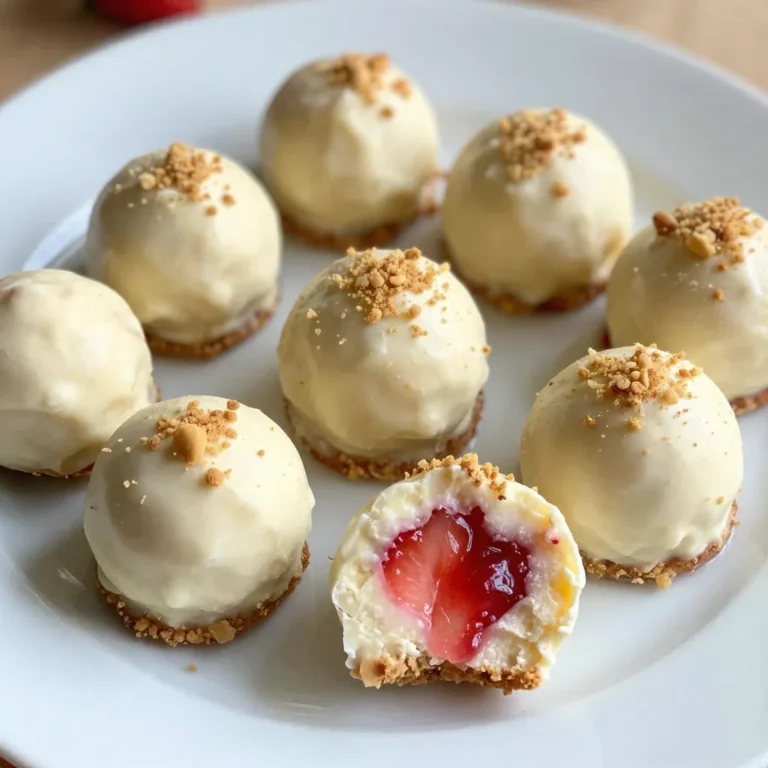
Strawberry Cheesecake Truffles Delightful Sweet Treat

- 1 cup brewed espresso, cooled to room temperature - 1 cup Baileys non-alcoholic coffee creamer - ½ cup mascarpone cheese, softened - 2 tablespoons granulated sugar - 1 teaspoon pure vanilla extract - 1 tablespoon cocoa powder - Ladyfinger cookies (1 package) - 1/4 cup chocolate shavings (for garnish) - Optional: whole coffee beans for garnish Gathering the right ingredients is key to making the perfect Baileys Tiramisu Martini. Start with freshly brewed espresso. Let it cool to room temperature. This step gives your dessert the right texture and flavor. Next, grab Baileys non-alcoholic coffee creamer. This creamy base adds a rich flavor to your drink. You will also need mascarpone cheese. Make sure it is soft for easy mixing. You’ll want granulated sugar to sweeten the mix. Pure vanilla extract adds a nice aroma. Don’t forget cocoa powder, which gives a chocolatey touch. You need ladyfinger cookies for the layering. These cookies soak up the espresso and add structure. Finally, chocolate shavings make for a lovely garnish. Whole coffee beans are optional but add a nice touch. With these ingredients ready, you can start making your dessert delight! {{ingredient_image_2}} - Combine 1 cup of cooled espresso, 1 cup of Baileys non-alcoholic coffee creamer, ½ cup of softened mascarpone cheese, 2 tablespoons of granulated sugar, 1 teaspoon of pure vanilla extract, and 1 tablespoon of cocoa powder in a bowl. - Whisk the mixture until it is smooth and creamy. This creates a rich base for your dessert. - Take each ladyfinger cookie and dip it quickly into the espresso mixture. Make sure to coat each side lightly. - Arrange the dipped ladyfingers at the bottom of your glass. This is the first layer of your delicious treat. - Using a spoon, add a generous layer of the mascarpone mixture over the ladyfingers. Smooth it out gently. - Repeat this process, adding more dipped ladyfingers followed by more mascarpone mixture until you reach the top of the glass. Leave a fluffy layer on top to make it look inviting. - Cover the glasses with plastic wrap and place them in the refrigerator. Chill for at least 2 hours. This helps the flavors mix and the dessert firm up. - Just before serving, dust the top with cocoa powder for flair. Add chocolate shavings for a finishing touch. You can even add whole coffee beans on top for extra charm. To make a great Baileys Tiramisu Martini, pick top-quality ingredients. For mascarpone, look for a creamy texture. It should not be too stiff or too runny. Freshness is key, so check the sell-by date. When it comes to espresso, use freshly brewed coffee. Let it cool to room temperature before using it. This helps blend the flavors well. Chilling your ingredients is also important. Cold ingredients mix better and keep the dessert creamy. Layering is vital for a pretty presentation. Start with a thin layer of dipped ladyfingers. Make sure they are not too soggy. A quick dip in the espresso mixture is all you need. Too long in the liquid can make them fall apart. After the ladyfingers, add a generous layer of the mascarpone mix. Smooth it out evenly with a spoon. Repeat the process for a beautiful two-layer look. Remember, the last layer should be the creamy mascarpone. This gives a fluffy finish. Choosing the right glass can enhance your dessert. Use martini glasses or fancy dessert cups. Their shape highlights the layers well. For a nice touch, pair the martini with dessert wines. Sweet dessert wines like Moscato complement the flavors. You can also serve it with a small chocolate treat. This will add extra sweetness and joy to your dessert. Pro Tips Use Fresh Espresso: For the best flavor, always use freshly brewed espresso. The rich, bold taste will elevate your Tiramisu Martini. Don’t Soak the Ladyfingers: Dip the ladyfingers quickly in the espresso mixture to prevent them from becoming too soggy. A light coating will give the right texture. Chill Well: Allow the assembled martinis to chill for at least 2 hours. This helps the flavors meld together and the dessert firm up nicely. Garnish Creatively: Get creative with garnishes! Consider using a mix of chocolate shavings and whole coffee beans for an appealing presentation. {{image_4}} You can easily change the taste of your Baileys Tiramisu Martini. - Try adding flavored liqueurs like hazelnut or vanilla for a twist. - Use different creamers, like caramel or chocolate, to enhance the flavor. These small changes can make your dessert feel brand new. You can mix and match flavors to find your favorite. Many people need non-dairy options. You can still enjoy this dessert! - For a vegan version, use almond or coconut milk instead of creamer. - Replace mascarpone with silken tofu or cashew cream for a creamy texture. These swaps keep the dessert tasty while meeting dietary needs. You won’t miss the dairy! Want to switch it up? Make it a drink instead of a dessert. - Mix the espresso mixture with ice and add vodka for a refreshing cocktail. - Experiment with different spirits like rum or whiskey for unique flavors. This fun twist brings a new level of enjoyment to the classic recipe. You can turn dessert into a fancy drink for parties! To keep your Baileys Tiramisu Martini fresh, store the assembled martinis in the fridge. Cover each glass with plastic wrap to avoid drying out. They will stay tasty for up to 3 days. After that, the flavors may fade, and the texture could change. Can you freeze Baileys Tiramisu Martini? Yes, you can freeze it, but with some care. For best results, freeze just the mascarpone mixture. Pour it into an airtight container. It can last for up to 2 months in the freezer. When ready to enjoy, thaw it overnight in the fridge. If you freeze the whole dessert, the ladyfingers may turn mushy. It’s best to layer and freeze just the creamy part. Always remember to label and date your containers! Yes, you can make this dessert ahead of time. I suggest preparing it a day in advance. This gives the flavors time to meld. Just cover it well and keep it in the fridge. When you're ready to serve, dust cocoa on top and add chocolate shavings. If you need a substitute for mascarpone cheese, try cream cheese. Mix it with a bit of sour cream for a similar texture. You can also use ricotta cheese, but it might be a bit grainy. Adjust the sweetness as needed since some substitutes can be less sweet. This recipe is not suitable for kids due to the Baileys. The alcohol content may not be safe for them. To make it kid-friendly, you can use a non-alcoholic coffee creamer instead of Baileys. This way, they can enjoy the dessert without any alcohol. To make a non-alcoholic version, simply replace Baileys with a non-alcoholic coffee creamer. You can also add a splash of flavored syrup for extra taste. This keeps the creamy texture while making it safe for everyone. Yes, you can use instant coffee. Just mix it with hot water to make a strong coffee. Use the same amount as brewed espresso. The flavor might be slightly different but still tasty. Make sure it cools down before using it in the recipe. This blog post shared how to make a Baileys Tiramisu Martini. You learned the ingredients needed and step-by-step instructions for making it. We discussed tips for selecting the best ingredients and perfecting your layers. Variations and storage info were also covered. Now, you can impress your friends with this easy and tasty dessert! Enjoy making this treat with your own unique twists and impress everyone with your skills!

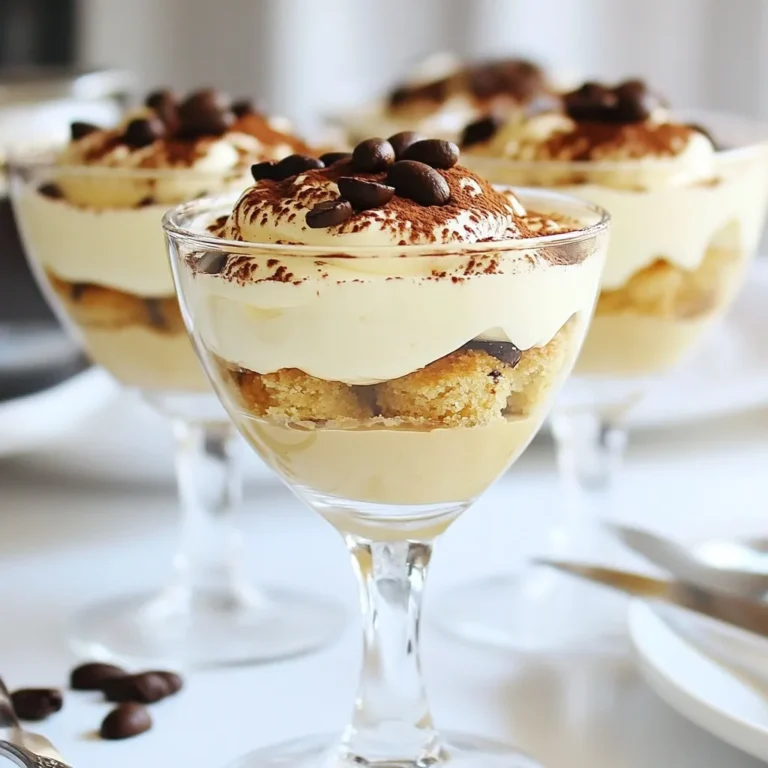
Baileys Tiramisu Martini Irresistible Dessert Delight

- 5 medium-sized apples (choose your favorite variety) - 2 cups granulated sugar - 1/2 cup unsalted butter - 1 cup heavy cream - 1 teaspoon vanilla extract - A pinch of salt - Chopped nuts (such as almonds, walnuts, or pecans) - Mini marshmallows - Crushed cookies (like Graham crackers or Oreos) - Chocolate chips (choose from milk, dark, or white) - Colorful sprinkles - Shredded coconut To start your DIY caramel apple topping bar, you need fresh apples. I suggest using medium-sized apples to ensure they hold up well when dipped. My favorites are Granny Smith for a tart bite or Fuji for sweetness. Next, gather ingredients for the homemade caramel sauce. You will need granulated sugar, unsalted butter, heavy cream, vanilla extract, and a pinch of salt. These ingredients create a rich and smooth caramel that pairs perfectly with the apples. Now, let’s talk toppings. A variety adds fun to your bar. You can use chopped nuts for crunch, mini marshmallows for sweetness, and crushed cookies for texture. Chocolate chips—whether milk, dark, or white—bring extra flavor. Colorful sprinkles and shredded coconut add visual appeal. Gather all these ingredients, and you’re ready to create your caramel apple toppings! {{ingredient_image_2}} To start, you need to wash the apples well. Rinse them under cool water to remove any dirt or wax. After washing, dry each apple with a clean towel. This helps the caramel stick better. Next, take a wooden stick and insert it into the top of each apple. Push it in gently but firmly. This stick will be your handle for dipping. Now, let’s make the caramel sauce. Grab a medium-sized saucepan. In it, combine the granulated sugar, unsalted butter, and heavy cream. Heat this mixture on medium heat. Stir it continuously until the sugar dissolves. This should take a few minutes. Once the sugar is dissolved, bring the mix to a gentle boil. Lower the heat a bit and let it simmer. Stir often for about 5 to 7 minutes. You want it to thicken up. When it coats the back of a spoon, it’s ready. When the caramel thickens, take the pan off the heat. Stir in the vanilla extract and a pinch of salt. This will make the caramel taste even better. Let it cool for a few minutes. It will thicken more as it cools. Now, it’s time to set up your topping bar! Take a large platter or a wooden board. Arrange the apples on it in a nice way. Then, get small bowls for the toppings. Fill these bowls with chopped nuts, mini marshmallows, crushed cookies, different chocolate chips, colorful sprinkles, and shredded coconut. Make sure everything looks inviting. You can even label the bowls to help guests choose their favorites. When the caramel is cool and pourable, you can drizzle it over the apples or put it in a bowl for dipping. Let everyone create their own sweet treat with the toppings. Enjoy all the tasty combinations you can make! To make the best caramel sauce, focus on the right consistency. You want it thick but pourable. Cook your mixture on medium heat, stirring all the time. When the sauce coats the back of a spoon, it’s ready. Add a pinch of salt and vanilla extract for extra flavor. This simple step makes a big difference in taste. Choosing the right apple is key. I love using tart apples like Granny Smith for a nice balance. They hold up well when dipped in caramel. To secure the sticks, push them into the top of each apple until they feel firm. This helps prevent any mishaps while dipping. For a fun look, use decorative bowls for the toppings. Arrange them nicely on a large platter with the apples. This makes it easy for everyone to see their options. Label each topping to help guests choose their favorites. Clear signs make the process fun and engaging. Pro Tips Choose the Right Apples: Select medium-sized apples that are firm and crisp, such as Granny Smith or Honeycrisp, for the best flavor and texture. Keep the Caramel Warm: If the caramel cools too much and becomes too thick, simply reheat it gently over low heat while stirring until it reaches the desired consistency. Mix and Match Toppings: Encourage guests to combine different toppings for unique flavor combinations. For example, try chocolate chips with crushed cookies or nuts with sprinkles! Presentation Matters: Use colorful bowls for the toppings and arrange them artfully on a large platter to create an inviting and visually appealing caramel apple bar. {{image_4}} You can get creative with toppings. Seasonal fruits like sliced strawberries or bananas add freshness. Candies like crushed peppermint or toffee bits bring a fun crunch. Specialty sprinkles can add a pop of color. Try chocolate drizzles for extra sweetness. - Sliced strawberries - Sliced bananas - Crushed peppermint - Toffee bits - Chocolate drizzles These options keep things exciting and tasty. Your guests will love mixing and matching their favorite flavors! You can also make themed topping bars for special events. For Halloween, add spooky candies like gummy worms or candy corn. Use dark chocolate drizzle to mimic a spooky look. For fall celebrations, try pumpkin spice sprinkles or caramel apple flavored candies. For birthday parties, offer colorful sprinkles, bright candies, and fun-shaped marshmallows. You can even match toppings to the party colors. This makes each apple special and personal for your guests. - Halloween ideas: gummy worms, candy corn, dark chocolate drizzle - Fall ideas: pumpkin spice sprinkles, caramel apple candies - Birthday ideas: colorful sprinkles, fun-shaped marshmallows Using themes helps create a festive atmosphere. It makes your caramel apple topping bar even more fun! How do you keep caramel fresh? To store leftover caramel, let it cool completely. Then, pour it into an airtight container. This helps keep moisture away. You can keep it in the fridge for up to two weeks. What are some reheating suggestions? When you want to use the caramel again, take it out of the fridge. Place it in a microwave-safe bowl. Heat it in short bursts of 15 seconds, stirring in between. This way, it warms evenly without burning. You can also heat it on the stove over low heat, stirring gently. What are the best practices for apple storage post-preparation? Once you prepare the apples, store them in the fridge. Place them in a single layer on a plate. Cover them loosely with plastic wrap. This keeps them crisp and fresh without getting soggy. It’s best to use them within two days for the best taste. You can store your homemade caramel sauce for about two weeks. Keep it in an airtight container in the fridge. Make sure to let it cool before sealing it. If the caramel hardens, just warm it up gently in the microwave or on the stove. Stir it well to get it smooth again. Yes, you can make the caramel sauce ahead of time. Just follow the recipe and let it cool completely. Pour it into a clean jar and store it in the fridge. When you're ready to use it, heat it gently. This way, you save time on the day of your caramel apple party. For the best caramel apples, choose apples that are firm and crisp. I recommend using Granny Smith for a tart bite. Fuji and Honeycrisp are also great choices for their sweetness. These apples hold up well when dipped in warm caramel, giving you a tasty treat. Yes, many toppings are gluten-free! Here are some options you can use: - Chopped nuts like almonds and pecans - Mini marshmallows - Crushed cookies made with gluten-free ingredients - Chocolate chips (check the label) - Colorful sprinkles (most are gluten-free) - Shredded coconut These toppings will add fun flavors and textures to your caramel apples! In this post, we covered how to make delicious caramel apples. We discussed the ingredients needed, from fresh apples to tasty toppings. I shared step-by-step instructions for preparing the apples and making a rich caramel sauce. You learned tips to perfect your caramel, ideas for fun presentations, and storage information. Remember, customizing toppings adds excitement to any event. With these tips, you can create a treat everyone loves. Try these ideas at your next gathering for sweet success!

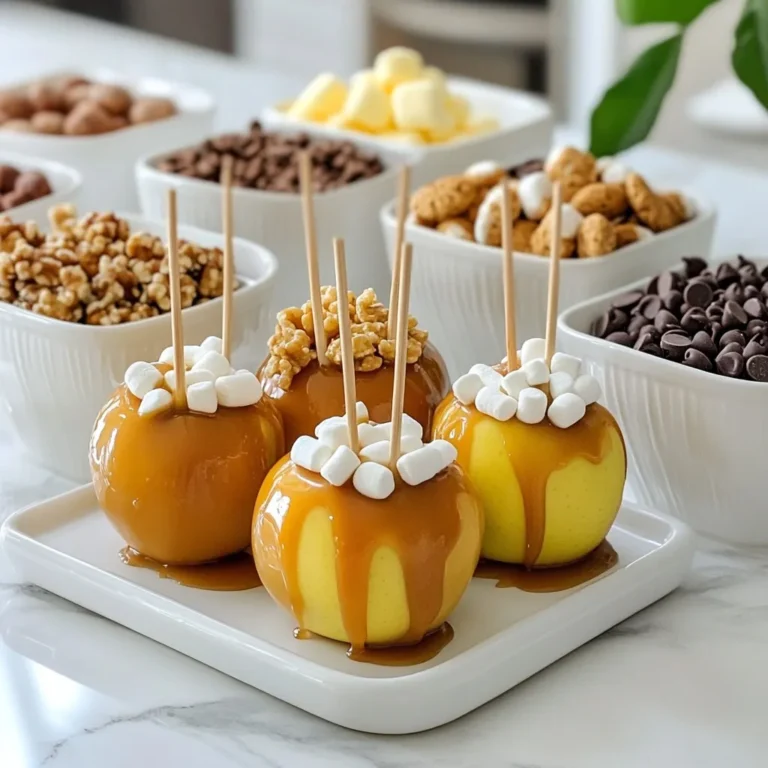
DIY Caramel Apple Topping Bar Fun and Delicious Treats

- 1 cup eggnog (homemade or store-bought) - 1 shot of freshly brewed espresso - 1 tablespoon vanilla syrup - 1 tablespoon cinnamon syrup (adjust to taste) - 1/4 teaspoon ground nutmeg (plus extra for garnish) - Ice cubes - Whipped cream (for topping) - Chocolate shavings or cocoa powder (for garnish) - Ground nutmeg - Fresh mint sprig - Cinnamon stick The Eggnog Espresso Martini needs simple yet rich ingredients. Eggnog, whether homemade or store-bought, is your base. It adds creaminess and holiday cheer. Freshly brewed espresso gives that strong coffee punch. I recommend brewing it just before mixing for the best flavor. Vanilla syrup adds sweetness and depth. Cinnamon syrup brings warmth; you can adjust it to your taste. Ground nutmeg is key for that festive aroma. Don't forget the ice cubes! They make your drink nice and cold. Top your cocktail with whipped cream for a dreamy finish. Chocolate shavings or cocoa powder make it extra special, adding visual appeal and flavor. Optional garnishes like ground nutmeg, a fresh mint sprig, or a cinnamon stick can elevate your drink. They look beautiful and add extra flavor. Enjoy creating this festive treat! {{ingredient_image_2}} To start, brew a fresh shot of espresso. I recommend using a good quality espresso machine for the best flavor. Once brewed, let the espresso cool at room temperature for a few minutes. This step is key. If you add hot espresso to the mix, it can curdle the eggnog. Now, grab your cocktail shaker. Carefully combine 1 cup of eggnog, the cooled espresso, 1 tablespoon of vanilla syrup, and 1 tablespoon of cinnamon syrup. Adjust the cinnamon syrup for your taste. Then, add 1/4 teaspoon of ground nutmeg. Mix everything well. This helps the flavors blend perfectly. Next, fill your shaker with ice cubes all the way to the rim. Secure the lid tightly. Shake vigorously for about 15-20 seconds. You want the drink to chill and get frothy. After shaking, strain the mixture into a chilled martini glass. Make sure there’s no ice in your drink. For a finishing touch, add a generous dollop of whipped cream on top. Let it overflow just a bit for a nice look. Finally, sprinkle some ground nutmeg and add chocolate shavings or cocoa powder for garnish. This not only looks great but adds extra flavor too. - Adjusting syrup quantities: Start with one tablespoon of each syrup. You can add more or less based on your taste. If you like it sweeter, add more vanilla syrup. For a spicier kick, increase the cinnamon syrup. - Choosing the right eggnog: Use quality eggnog for the best taste. If you make it at home, it can be fresher. Store-bought options can be great too. Look for brands with real ingredients. - Recommendations for shaking: Shake your cocktail for 15-20 seconds. This helps chill the drink and mix flavors well. Make sure to cover the shaker tightly to avoid spills. - Tips for a frothy finish: To get a frothy top, shake with plenty of ice. It helps create bubbles in the drink. Pour it slowly to keep the froth on top. - Creative serving ideas: Serve your Eggnog Espresso Martini with a festive cookie on the side. A cinnamon stick can be a fun stirrer. You can even add a mint sprig for color. - Best types of glasses for cocktails: Use a chilled martini glass for a classic look. You can also use a coupe glass for a stylish twist. Both options show off the drink beautifully. Pro Tips Chill Your Glass: Pre-chill your martini glass in the freezer for a few minutes before serving. This will keep your Eggnog Espresso Delight colder for longer and enhance the drinking experience. Espresso Temperature: Ensure your espresso is slightly cooled before mixing with eggnog to prevent curdling. Aim for a temperature around room temperature for the best results. Customize Sweetness: Adjust the amount of vanilla and cinnamon syrup according to your taste preference. Start with less and add more as needed to achieve the perfect balance. Garnish Creatively: Experiment with different garnishes such as crushed candy canes or a drizzle of chocolate sauce to add a festive touch and elevate the visual appeal of your drink. {{image_4}} You can easily switch up the flavor of your Eggnog Espresso Martini. One fun option is to add peppermint extract. Just a drop or two can give your drink a festive twist. This works great for holiday gatherings. You can also try using flavored syrups like hazelnut or caramel. These add unique sweetness and depth. Adjust the amount to fit your taste. If you want to mix things up, consider using different spirits. Instead of vodka, try rum or bourbon for a richer taste. Each spirit brings its own character to the drink. If you prefer a non-alcoholic version, just skip the spirits. Replace them with extra eggnog or a splash of brewed coffee. This way, everyone can enjoy a festive treat! To keep your Eggnog Espresso Martini fresh, store any leftovers in the fridge. Use an airtight container to prevent odors from other foods. It’s best to finish your cocktail within two days, as the flavors can fade. The eggnog will stay fresh for about 5-7 days if unopened. Once opened, use it within 3-5 days. Espresso should be consumed quickly for the best taste. Leftover eggnog can be used in many creative ways. Try it in pancakes or French toast for a festive twist. You can also blend it into smoothies for a rich flavor. If you have extra espresso, consider making iced coffee or coffee-flavored desserts. Mixing cocktails is another fun option. Use the eggnog with rum or bourbon for a cozy drink. An Eggnog Espresso Martini is a festive cocktail that mixes eggnog with espresso. It has a rich, creamy texture and a delightful coffee flavor. The drink includes vanilla and cinnamon for added sweetness and warmth. Topped with whipped cream and chocolate shavings, it’s perfect for holiday gatherings. Yes, you can prepare some parts in advance. Brew the espresso and cool it before mixing. You can also combine the eggnog, syrups, and spices ahead of time. Store the mixture in the fridge. Just shake it with ice when you’re ready to serve. If you don’t have espresso, you can use strong brewed coffee. Cold brew works well too. Instant coffee is another option; just mix it with hot water for a quick fix. The key is to keep the coffee strong for the best flavor. Absolutely! Use non-dairy eggnog made from almond, soy, or oat milk. You can find these at most stores. For extra creaminess, try adding coconut cream. This way, you can enjoy the flavors without dairy. In this article, I shared how to make a delicious Eggnog Espresso Martini. You learned the key ingredients, from eggnog to whipped cream. The step-by-step guide helps you prepare and serve this festive drink. Plus, I offered tips to enhance flavor and presentation. Remember, you can customize your cocktail with different syrups or spirits. Enjoy experimenting with flavors, and don't forget to share it with friends. With these ideas, your gatherings will be even more special.

Eggnog Espresso Martini Festive and Flavorful Cocktail

PREV 1 … 30 31 32 … 41 NEXT
tastykitchentales

explore

DessertsDinnerAppetizersDrinks

Our Policies

  • Cookie Policy
  • Copyright Policy
  • Disclaimer
  • GDPR Policy
  • Terms Of Use
Back to Top
  • About
  • Contact Us
  • Privacy Policy
© 2025 tastykitchentales