FREE DINNER EBOOK! Get your copy!
  • Cookie Policy
  • GDPR Policy
  • Disclaimer
  • Terms Of Use
  • Visit my other site: Fun Cookie Recipes
tastykitchentales
  • Home
  • Dinner
  • Desserts
  • Drinks
  • Appetizers
  • Contact
  • About
  • Privacy Policy
  • Home
  • Dinner
  • Desserts
  • Drinks
  • Appetizers
  • Contact
  • About
  • Privacy Policy
  • Cookie Policy
  • GDPR Policy
  • Disclaimer
  • Terms Of Use
Visit my other site: Fun Cookie Recipes

HOME / CATEGORIES /

Latest

To make Twix Inspired Cookies, you will need: - 1 cup unsalted butter, softened - 1 cup brown sugar, packed - 1/2 cup granulated sugar - 2 large eggs - 2 teaspoons pure vanilla extract - 3 cups all-purpose flour - 1 teaspoon baking soda - 1/2 teaspoon fine sea salt - 1 cup crushed shortbread cookies - 1 cup caramel sauce - 1 cup semi-sweet chocolate chips - Sea salt flakes for topping Gather these tools to help you bake your cookies: - Mixing bowls - Electric mixer - Whisk - Cookie scoop or tablespoon - Baking sheets - Parchment paper - Wire rack You can swap out some ingredients if needed: - Use margarine instead of butter for a dairy-free option. - Replace brown sugar with coconut sugar for a different flavor. - Try almond extract instead of vanilla for a nutty taste. - Use gluten-free flour for a gluten-free version. - If you prefer, butterscotch chips can replace chocolate chips. {{ingredient_image_2}} - Preheating the Oven Start by preheating your oven to 350°F (175°C). This step is key for even baking. - Creaming the Butter and Sugars In a large bowl, mix 1 cup of softened butter with 1 cup of brown sugar and 1/2 cup of white sugar. Use an electric mixer for about 3-4 minutes. The mix should be light and fluffy. - Incorporating Eggs and Vanilla Next, add 2 large eggs one at a time. Mix well after each egg. Then pour in 2 teaspoons of pure vanilla extract. Stir until all is blended well. - Whisking the Dry Components In a separate bowl, whisk together 3 cups of all-purpose flour, 1 teaspoon of baking soda, and 1/2 teaspoon of fine sea salt. This mix adds structure to your cookies. - Combining Wet and Dry Mixtures Slowly blend the dry mix into the wet mix. Stir gently until just combined. Avoid over-mixing to keep the cookies soft. - Portioning the Dough and Caramel Filling Use a cookie scoop or tablespoon to drop dough onto baking sheets. Leave space between each scoop. Then, make a small indent in the center of each dough ball. Fill each with caramel sauce, about 1 teaspoon. - Baking and Cooling Techniques Bake the cookies for 12-15 minutes. Look for a light golden edge. Once baked, let them cool on the sheets for 5 minutes. Then, transfer them to a wire rack to cool fully. Adding a sprinkle of sea salt flakes on top will make your cookies shine! To get that perfect cookie texture, start with room temperature butter. This helps it blend well with the sugars. Cream the butter and sugars for 3-4 minutes until fluffy. This adds air, making your cookies light. Make sure not to over-mix when adding the flour. Mix just until combined. Over-mixing can lead to tough cookies. Aim for a soft dough that holds its shape. One common mistake is overfilling the caramel. Use just a small dollop in the center of each cookie. Too much can cause a mess. Also, be sure to leave space between the cookies on the baking sheet. They spread as they bake. If they touch, they will stick together. Lastly, watch the baking time closely. Every oven is different. Aim for lightly golden edges and a soft center for the best results. To boost flavor, consider adding a pinch of espresso powder with the dry ingredients. This enhances the chocolate flavor without adding coffee taste. You can also switch out the semi-sweet chocolate chips for milk chocolate for a sweeter bite. For a fun twist, try adding chopped nuts or a sprinkle of sea salt on top. These small changes can make your cookies unique and even more enjoyable. Pro Tips Use Room Temperature Butter: Make sure your butter is softened to room temperature for easier creaming with sugars, resulting in a lighter cookie texture. Don’t Overmix the Dough: Mix the dry ingredients into the wet ingredients just until combined to keep your cookies tender and prevent them from becoming tough. Adjust Caramel Amount: Feel free to adjust the amount of caramel used in each cookie to suit your taste; a little less or more can change the flavor profile deliciously! Chill the Dough: For chewier cookies, chill the dough for 30 minutes before baking. This helps to enhance the flavors and control spreading. {{image_4}} You can change up your Twix inspired cookies with fun mix-ins and toppings. Try adding chopped nuts like pecans or almonds for a crunchy bite. You can also mix in mini marshmallows for a chewy texture. If you love coconut, sprinkle shredded coconut on top before baking. This will add a tropical twist! Drizzle extra caramel or chocolate sauce over the cookies after baking for an even sweeter treat. Want to switch things up? Use a different base cookie flavor! Instead of plain shortbread, try graham crackers for a unique taste. You can also use chocolate cookies to boost the chocolate flavor. Just remember to adjust the amount of flour if you change the base. This way, your cookies stay soft and chewy! Get creative with your Twix inspired cookies! You can make them into cookie sandwiches. Bake two cookies and fill them with caramel and chocolate between them. For a fun twist, use peanut butter instead of caramel for a rich flavor. You can also turn them into bars. Spread the dough in a pan, bake, and then cut into squares. These twists keep your cookie game fresh and exciting! To keep your Twix inspired cookies fresh, store them in an airtight container. This helps prevent them from drying out. Make sure the cookies are completely cool before you store them. If they are warm, they can create moisture inside the container. You can layer the cookies with parchment paper to keep them from sticking together. If you want to save some cookies for later, freezing is a great option. Place the cooled cookies in a single layer on a baking sheet. Freeze them for about an hour. Once frozen, transfer the cookies to a freezer-safe bag or container. Make sure to remove as much air as you can. They can stay good for up to three months in the freezer. These cookies stay fresh for about a week at room temperature. Keep them in a cool, dry place. If you notice any changes in texture or smell, it might be time to toss them. For the best taste, enjoy your cookies within the first few days. The caramel and chocolate flavors shine best when they are fresh! To make Twix Inspired Cookies, start by creaming butter and sugars in a bowl. Add eggs and vanilla, mixing well. Next, combine the flour, baking soda, and salt in another bowl. Gradually mix the dry ingredients into the wet mix. Fold in crushed shortbread cookies. Spoon dough onto a baking sheet, make a small dent, and fill with caramel sauce. Top with chocolate chips. Bake at 350°F for 12-15 minutes until golden. Yes, you can use milk chocolate instead of semi-sweet. Milk chocolate will make the cookies sweeter and creamier. This change may alter the overall flavor a bit but will still taste great. If you don’t have shortbread cookies, you can use graham crackers or digestive biscuits. Both will add a nice crunch and flavor to your cookie base. You can even try sugar cookies for a sweeter twist! Bake the cookies for 12-15 minutes. Keep an eye on them as they bake. The edges should be golden, and the center should look soft. Let them cool for a few minutes before moving them. This helps them set perfectly. In this article, we explored how to make delicious Twix Inspired Cookies. We covered essential ingredients, tools, and substitutions. Step-by-step, I guided you from preparation to baking. I shared tips for perfect texture and avoiding mistakes. We also looked at fun variations and best storage methods. With these insights, you now have the tools to create your own tasty treats. Enjoy baking and experimenting with flavors!

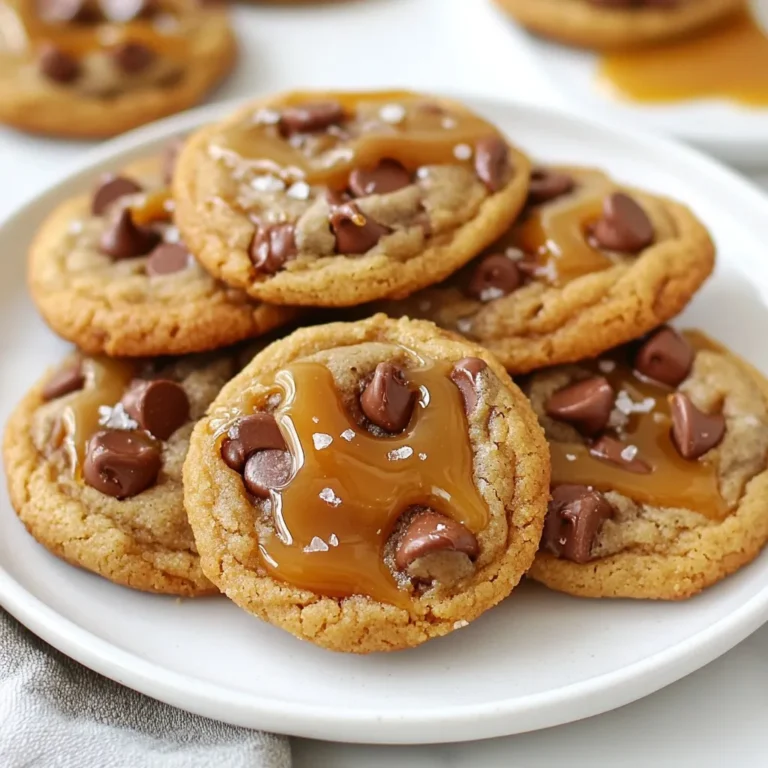
Twix Inspired Cookies Delightful and Easy Recipe

You can use either fresh or frozen cherries for this dessert. If you choose fresh cherries, make sure they are ripe and sweet. You will need 2 cups of cherries, pitted and halved. Frozen cherries are a great option too. They are easy to use and save time. If you pick frozen, allow extra time to heat them through. For sweetness, we add 1/2 cup of granulated sugar. This sugar helps the cherries create a lovely syrup. To enhance the flavor, add 1 tablespoon of freshly squeezed lemon juice and 1 teaspoon of pure vanilla extract. The lemon adds a nice zing, while the vanilla gives warmth to the dish. You will need 1 cup of heavy whipping cream. This cream is key to making the dessert light and fluffy. Whip it until it holds stiff peaks. For added sweetness, mix in 1/2 cup of powdered sugar and 1 teaspoon of almond extract. To finish, top each serving with 1/4 cup of toasted slivered almonds and a sprinkle of fluffy shredded coconut. These garnishes not only taste great but also look beautiful, mimicking snow on cherries. {{ingredient_image_2}} Start by pitting and halving your cherries. You can use fresh or frozen cherries. In a medium saucepan, mix the cherries, granulated sugar, lemon juice, and vanilla extract. Heat it on medium. Stir this mix often. Cook until the cherries soften and the mix thickens, about 8-10 minutes. If you use frozen cherries, it may take longer. Once it thickens, remove it from heat. Let it cool to room temperature. This cooling time helps the flavors blend. While the cherry mix cools, take a large mixing bowl. Pour in the heavy whipping cream. Use an electric mixer to whip the cream. Beat it until you see soft peaks form. Slowly add the powdered sugar and almond extract. Keep whipping until the cream is thick and holds its shape. This whipped cream will add a light, fluffy texture to your dessert. Grab some clear serving glasses or bowls. To start, spoon a layer of the cherry mixture into the bottom of each glass. Next, add a generous layer of whipped cream. Repeat these layers until you use all the cherry mix and cream. Make sure the top layer is whipped cream. To finish, sprinkle each dessert with toasted slivered almonds and some fluffy shredded coconut. This will make it look like snow on cherries. Finally, chill the desserts in the fridge for at least one hour. This time allows the flavors to mix well and helps the dessert firm up. To make the best whipped cream, start with cold heavy cream. Cold cream whips better. Use a clean bowl and beaters. This helps the cream whip fast. Whip until soft peaks form, then add powdered sugar and almond extract. Keep whipping until you see stiff peaks. Stiff peaks hold their shape well. This cream will top your dessert perfectly. You can boost the flavor of your cherries. Try adding a splash of orange juice for bright notes. A pinch of cinnamon can add a warm touch. If you like a bit of spice, a dash of nutmeg works well too. For a more complex flavor, consider adding a splash of cherry liqueur. This makes the dessert even more special and festive. Presentation makes a difference. Use clear glass cups to show off the layers. This makes it look beautiful. Top with slivered almonds and a sprinkle of coconut. This adds texture and a snowy look. A sprig of mint can brighten the dish. It adds color and a fresh scent. The right presentation makes your dessert shine. Pro Tips Use Fresh Cherries: For the best flavor and texture, opt for fresh cherries when in season. They will enhance the overall taste of the dessert significantly. Chill the Cream: Ensure your heavy whipping cream is very cold before whipping. This helps achieve the best volume and stiffness for your whipped cream. Layering Technique: When layering the dessert, start with cherries and finish with whipped cream to create a visually appealing presentation. Garnish Ideas: Experiment with different garnishes like crushed pistachios or a drizzle of chocolate sauce for a unique twist on the classic presentation. {{image_4}} You can switch out cherries for other fruits. Strawberries add a sweet touch. Peaches bring a nice summer flavor. Blueberries add a pop of color and taste great, too. You can even mix different fruits for a fun twist. Think about your favorite fruits and try them in this dessert. While heavy cream makes this dessert rich, you can try other creams. Coconut cream offers a dairy-free option. It adds a lovely tropical taste. Greek yogurt gives a tangy flavor and adds protein. You can also use whipped topping for a lighter version. Just ensure it holds its shape well. Serve Cherries in the Snow in clear cups to show off the layers. A sprig of mint on top adds color and freshness. You can also pair this dessert with shortbread cookies for extra crunch. Another idea is to serve it alongside vanilla ice cream for a creamy contrast. Each serving can be a bit different based on your choices! To keep your Cherries in the Snow fresh, store leftovers in an airtight container. Place it in the fridge. This helps the dessert stay cool and tasty. Make sure to consume the dessert within three days for the best flavor. If the whipped cream starts to weep, it may not taste as good. You don’t need to reheat this dessert. Cherries in the Snow is best served cold. If you want to enjoy it warm, you can gently heat the cherry mixture on the stove. Just warm it up slowly on low heat. Stir it often, so it doesn’t burn. Serve the warm cherry mix over the chilled whipped cream if you like a warm twist. Fresh cherries last about a week in the fridge. If you use frozen cherries, they can stay good for months in the freezer. Heavy cream lasts about a week after opening. Always check the date on the container. If any ingredient looks or smells off, it’s best to throw it away. Keeping an eye on your ingredients ensures that your dessert tastes its best! Yes, you can use frozen cherries. They work well and provide great flavor. Just remember to cook them a bit longer. This allows them to become tender and warm. Follow the same steps as with fresh cherries. The key is to ensure they heat through and create a nice syrup. You can store Cherries in the Snow for about three days in the fridge. Just keep it covered to prevent drying out. The flavors get better as it sits, but the whipped cream may lose some texture. If you want the best taste, serve it fresh. If you need a substitute for heavy cream, you can use coconut cream or whipped coconut milk. Both options add a rich taste. They also work well in recipes for a dairy-free option. Just make sure to whip it until you get the right consistency. In this blog post, I covered how to make a delicious cherry dessert. You learned about fresh and frozen cherries, best sweeteners, and how to whip cream. I also shared tips for perfect presentation and flavor tweaks. You can even try different fruits or creams. Remember to store leftovers properly for the best taste later. Enjoy making this treat! It’s fun, easy, and sure to impress.

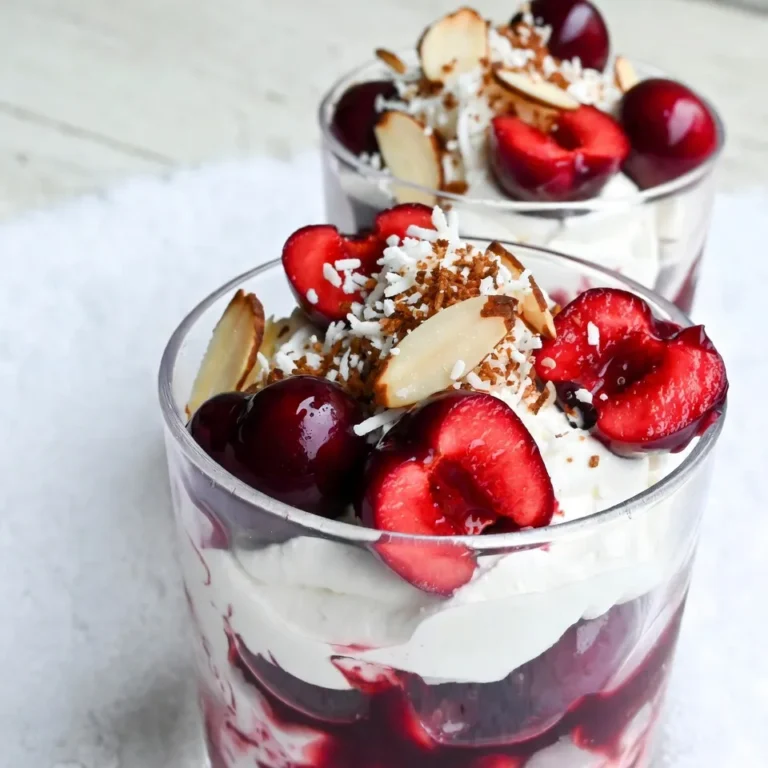
Cherries in the Snow Dessert Delightful Sweet Treat

- 12 lasagna noodles - 1 pound ground beef - 1 pound Italian sausage - 1 medium onion, finely chopped - 2 cloves garlic, minced - 28 ounces crushed tomatoes (canned) - 15 ounces ricotta cheese - 2 cups shredded mozzarella cheese - 1 cup grated Parmesan cheese - 2 tablespoons fresh basil, chopped (or 1 tablespoon dried basil) - 1 teaspoon dried oregano - Salt and black pepper to taste - 1 large egg These ingredients create a rich and tasty lasagna that delights everyone at the table. I love how the ground beef and Italian sausage add depth to the sauce. The blend of cheeses gives it that creamy texture we all crave. Fresh herbs like basil and oregano brighten the dish. Using quality ingredients makes a big difference. Always go for fresh or high-quality canned tomatoes. This way, the sauce bursts with flavor. The ricotta cheese adds a nice creaminess that balances the meat. Shredded mozzarella melts perfectly, creating that gooey topping we all love. I also recommend using a large egg in the ricotta mixture. It helps bind the ingredients together, making each slice hold its shape. When you gather these items, you set the stage for a fantastic meal. Trust me, your family and friends will love this dish. {{ingredient_image_2}} - Preheat the oven to 375°F (190°C). - Cook lasagna noodles until al dente. - Drain noodles and set aside. - Brown ground beef and Italian sausage in a skillet. - Sauté onion and garlic until translucent. - Add crushed tomatoes and seasonings, simmer for 15 minutes. - Combine ricotta cheese, egg, half of the Parmesan, salt, and pepper. - Layer ingredients in a baking dish. - Repeat layers until all ingredients are used. - Final layer should be noodles topped with meat sauce and mozzarella. - Cover with foil and bake for 25 minutes. - Remove foil and bake an additional 15 minutes. - Let the lasagna rest for 10 minutes before serving. This method keeps everything clear and simple. Each step builds the flavor and texture of your classic lasagna. The way we layer ingredients matters a lot. A good resting time helps the lasagna set, making it easier to slice. Enjoy the cooking process! Resting time is key. Let your lasagna sit for 10 minutes after baking. This helps the layers set. You can slice it easily and keep the shape. Fresh ingredients make a big difference. Use fresh basil, ripe tomatoes, and quality cheese. They boost the flavor. For the best flavor, I recommend a mix of cheeses. Use ricotta, mozzarella, and Parmesan. They each add a unique taste and texture. To get that perfect cheese melt, grate your cheese instead of using slices. Grated cheese melts evenly and looks great on top. Layering is an art. Start with meat sauce at the bottom. This keeps the noodles moist. Alternate layers of noodles, ricotta, and sauce. Always finish with noodles and sauce on top. This keeps everything from getting soggy. Make sure your noodles are al dente. Overcooked noodles can ruin the texture. Pro Tips Use Fresh Herbs: Fresh basil and oregano can elevate the flavor of your lasagna significantly compared to dried herbs. If you have access to fresh herbs, use them for a more vibrant taste. Layering Technique: Make sure to spread the sauces and cheeses evenly across the noodles to ensure each slice has a balanced flavor profile. It helps to use a spatula to smooth out each layer. Let it Rest: Allow the lasagna to cool for at least 10 minutes before slicing. This resting period allows the layers to set, making it easier to cut and serve without falling apart. Cheese Variations: Feel free to experiment with cheese! Adding a blend of cheeses like provolone or fontina can introduce new flavors and textures to your lasagna. {{image_4}} You can easily make a tasty vegetarian lasagna. Start by substituting meat with fresh vegetables. Use zucchini, spinach, or mushrooms to add flavor. You can also try eggplant or bell peppers for a nice twist. Another great option is using lentils or beans as protein. Lentils cook quickly and pack a punch. Black beans or chickpeas also work well to add texture and taste. This way, your lasagna remains hearty while being meat-free. If you need a gluten-free version, choose gluten-free noodles. Many brands offer lasagna noodles made from rice or corn. They work just like regular noodles, so you won’t miss out. For sauces, you can use cornstarch or arrowroot as a thickener. This keeps your sauce rich and smooth without gluten. Just mix these with a little water before adding them to your sauce. To make your lasagna even more exciting, try adding different herbs and spices. Fresh basil and oregano are classic, but you can also add thyme or rosemary for new flavors. Consider using creamy sauces or white sauces too. A béchamel sauce can add a rich, smooth layer. Mixing ricotta with spinach and nutmeg can also bring a delightful twist to your dish. Experiment with these ideas to find your perfect blend! To keep leftover lasagna fresh, store it in an airtight container. This method prevents moisture loss. You can also wrap it tightly with plastic wrap or aluminum foil. Lasagna stays fresh in the fridge for about 3 to 5 days. If you want it to last longer, consider freezing it. For freezing lasagna, let it cool completely. Cut it into portions for easier thawing. Wrap each piece in plastic wrap, then foil. This helps to avoid freezer burn. Lasagna can last in the freezer for up to 3 months. When you’re ready to eat it, thaw it overnight in the fridge. Reheat individual portions in the oven at 350°F (175°C) for about 20-25 minutes. Make sure it’s heated all the way through. Lasagna pairs well with a fresh side salad. A simple green salad with a light vinaigrette works great. Garlic bread is also a classic side that complements the meal. For a nice touch, garnish each slice of lasagna with fresh basil. This adds color and flavor. Serving your lasagna with these sides makes for a complete meal. Can I make lasagna ahead of time? Yes, you can make lasagna ahead. Prepare it, then cover and refrigerate. It can stay fresh for two days. When ready to bake, add extra time to heat through. What can I substitute for ricotta cheese? You can use cottage cheese or cream cheese. Both provide a nice texture. Blend them for a smoother finish. How do I avoid watery lasagna? To avoid watery lasagna, drain excess liquid from the meat sauce. Also, use fresh noodles and let the lasagna rest after baking. This helps the layers set. Can I bake lasagna without boiling the noodles first? Yes, you can use no-boil noodles. They absorb moisture while baking. Just ensure you add enough sauce. How do I know when my lasagna is done? Check for bubbling cheese and a golden top. Insert a knife; it should slide through easily. Let it rest before cutting for neat slices. In this post, we covered how to make a classic lasagna. We listed all needed ingredients and shared step-by-step instructions. I also provided tips on perfecting your dish, some tasty variations, and storage info. By following these guidelines, you can create a delicious lasagna full of flavor. Enjoy your cooking and share this recipe with friends!

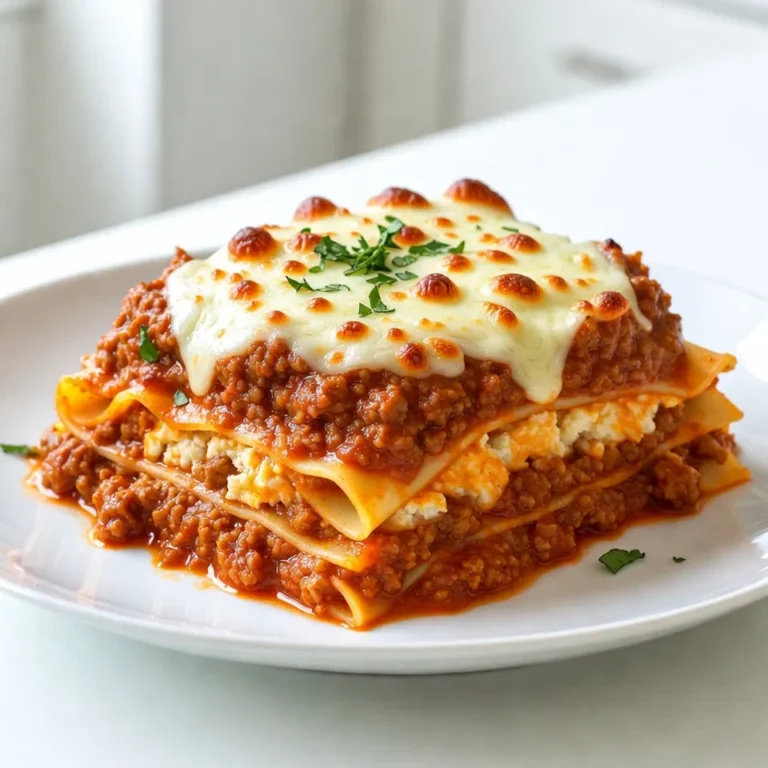
Ultimate Classic Lasagna Flavorful and Hearty Dish

To make Loaded Outback Potato Soup, gather these key items: - 4 large russet potatoes, peeled and diced into uniform cubes - 1 medium onion, finely chopped - 3 cloves garlic, minced - 4 cups chicken broth (or vegetable broth for a vegetarian option) - 1 cup heavy cream - 1/2 cup sour cream - 1 cup shredded sharp cheddar cheese (reserve some for garnish) - 1/2 cup cooked and crumbled turkey bacon (or vegetarian bacon) - 1/4 cup finely chopped green onions (plus extra for garnish) - 1 teaspoon smoked paprika - Salt and freshly cracked black pepper to taste - 2 tablespoons extra virgin olive oil These ingredients form the backbone of our soup. The russet potatoes provide the creamy texture. The onion and garlic add depth. The broth gives it a rich base. You can make this soup your own by adding some optional ingredients: - Cooked ham or sausage for added protein - A splash of hot sauce for heat - Different cheeses like mozzarella or gouda - Fresh herbs like thyme or rosemary These additions can change the flavor and make the soup unique to your taste. If you need vegetarian or vegan options, here are some swaps: - Use vegetable broth instead of chicken broth - Replace heavy cream with coconut cream or cashew cream - Swap sour cream for vegan sour cream or yogurt - Use plant-based bacon alternatives These swaps keep the soup creamy and delicious while catering to different diets. {{ingredient_image_2}} Start by heating 2 tablespoons of olive oil in a large pot over medium heat. Once the oil is warm, add 1 medium, finely chopped onion. Sauté the onion for about 5 minutes. You want it soft and clear but not brown. Next, add 3 minced garlic cloves. Stir for about a minute until you smell the garlic. Be careful not to burn it. This mix gives your soup a great base flavor. Now, add 4 large russet potatoes, peeled and diced into uniform cubes. Stir them well to coat with the oil and onion mix. Pour in 4 cups of chicken broth, making sure the potatoes are covered. Raise the heat to high until it boils. Once boiling, lower the heat to let it simmer. Cook uncovered for 15 to 20 minutes, until the potatoes are fork-tender. This step is key for a creamy soup. After the potatoes are cooked, use an immersion blender to puree the soup. Blend until it reaches your preferred smoothness. If you like some chunks, blend just half and mix it back in. This gives you a nice texture in your soup while keeping it creamy. Once blended, stir in 1 cup of heavy cream, 1/2 cup of sour cream, and 1 cup of shredded sharp cheddar cheese. Also, add 1 teaspoon of smoked paprika, plus salt and pepper to taste. Mix until the cheese melts and everything is creamy. Finally, fold in 1/2 cup of crumbled turkey bacon and 1/4 cup of finely chopped green onions. Heat through on low for about 5 minutes. Garnish with extra cheddar and green onions before serving. Enjoy your loaded outback potato soup! To make your soup super creamy, follow these tips: - Use a good pot: A heavy-bottomed pot helps with even cooking. - Blend carefully: For a creamy texture, blend until smooth. If you like some chunks, blend half. - Add cream slowly: Stir in the cream gradually for the best texture. - Monitor heat: Keep the heat low after adding cream to avoid curdling. - Taste often: Adjust salt and pepper as you go for the best flavor. Here are some mistakes to steer clear of: - Overcooking the garlic: It can turn bitter if cooked too long. Sauté just until fragrant. - Not salting enough: Salt enhances flavors, so season well from the start. - Skipping the blending step: Blending gives the soup its creamy character. - Using cold cream: Room temperature cream mixes in better than cold cream. - Ignoring the toppings: Garnishes add flavor and make the soup look great. Use these tools for the best results: - Heavy-bottomed pot: This helps prevent burning and ensures even cooking. - Immersion blender: It’s easy to use and saves time on cleanup. - Wooden spoon: Great for stirring without scratching your pot. - Measuring cups and spoons: Precision is key for consistent results. - Cutting board and knife: A sturdy board and sharp knife make prep easy. Pro Tips Choose the Right Potatoes: Russet potatoes are ideal for this recipe due to their high starch content, which creates a creamy texture when cooked and blended. Blend for Texture: Use an immersion blender to achieve your preferred consistency. For a heartier soup, blend only half of it to keep some potato chunks intact. Season Gradually: Taste your soup as you go, adding salt and pepper incrementally. This allows you to control the flavor profile and avoid over-seasoning. Garnish Creatively: Elevate your soup's presentation by garnishing with extra cheese, green onions, and a sprinkle of smoked paprika for a pop of color and flavor. {{image_4}} You can easily make Loaded Outback Potato Soup vegetarian or vegan. For a vegetarian option, simply swap chicken broth with vegetable broth. You can also replace heavy cream and sour cream with coconut cream or cashew cream. These alternatives add a nice richness without the dairy. If you want a vegan version, substitute turkey bacon with a plant-based bacon alternative. This way, you keep the soup creamy and tasty. To boost the flavor, consider adding fresh herbs like thyme or rosemary. These herbs brighten the soup and add depth. You can also try spices such as cayenne pepper for heat or cumin for warmth. A squeeze of fresh lemon juice at the end gives a burst of freshness. Experiment with smoked paprika to give the soup a nice, smoky flavor. Feel free to get creative with your add-ins. Adding vegetables can make your soup more colorful and nutritious. Chopped carrots, celery, or bell peppers blend well with potatoes. For protein, consider adding cooked chicken or beans. These options make your soup heartier. You can even toss in some corn for sweetness. Just remember to adjust the cooking time, so all ingredients cook evenly. After enjoying your Loaded Outback Potato Soup, let it cool down. Pour the leftover soup into an airtight container. Make sure to leave some space at the top for expansion. Seal it tightly and store it in the fridge. This method keeps the soup fresh and tasty for later. You can freeze the soup if you want to save it for a longer time. Use a freezer-safe container or a zip-top bag. Make sure to label it with the date. It will stay good for up to three months. When you're ready to eat, thaw the soup in the fridge overnight. Reheat it on the stove over low heat, stirring often. You can also use a microwave, but do it in short bursts, stirring in between. In the fridge, your Loaded Outback Potato Soup lasts about 3 to 4 days. Always check for any signs of spoilage before eating. If it smells off or has changed color, it's best to discard it. To keep the soup tasting great, avoid adding toppings before storing. Add those fresh garnishes right before serving. Storing the soup properly helps maintain its creamy texture and rich flavor. Loaded Outback Potato Soup is a creamy, hearty soup. It has diced russet potatoes, onions, garlic, and rich broth. We blend it until smooth and add heavy cream, sour cream, and cheddar cheese. Then, we mix in crispy turkey bacon and green onions for extra flavor. It's a warm, comforting dish perfect for chilly days. Yes, you can make this soup ahead of time. Cook the soup and let it cool. Store it in the fridge for up to three days. When ready to eat, reheat it on the stove. You may need to add a splash of broth or cream to restore its creamy texture. To make this soup gluten-free, use gluten-free broth. Many store-bought broths are gluten-free, but always check the label. The other ingredients are naturally gluten-free, so you’re good to go! Yes, you can substitute heavy cream. Use half-and-half for a lighter option. Coconut milk works too if you want a dairy-free choice. Each option will change the flavor a bit, but they still make a tasty soup. This soup pairs well with crusty bread or soft dinner rolls. A simple garden salad also complements it nicely. For a fun twist, serve it with crispy tortilla chips for crunch! This blog post covered how to make Loaded Outback Potato Soup. You learned about essential and optional ingredients. I shared step-by-step instructions to guide you through the cooking process. You now have tips to avoid common mistakes and ensure creamy soup. We also explored variations for different diets and how to store leftovers effectively. In closing, this soup is easy to customize, fun to make, and delicious. Enjoy your cooking adventure and share your soup with friends!

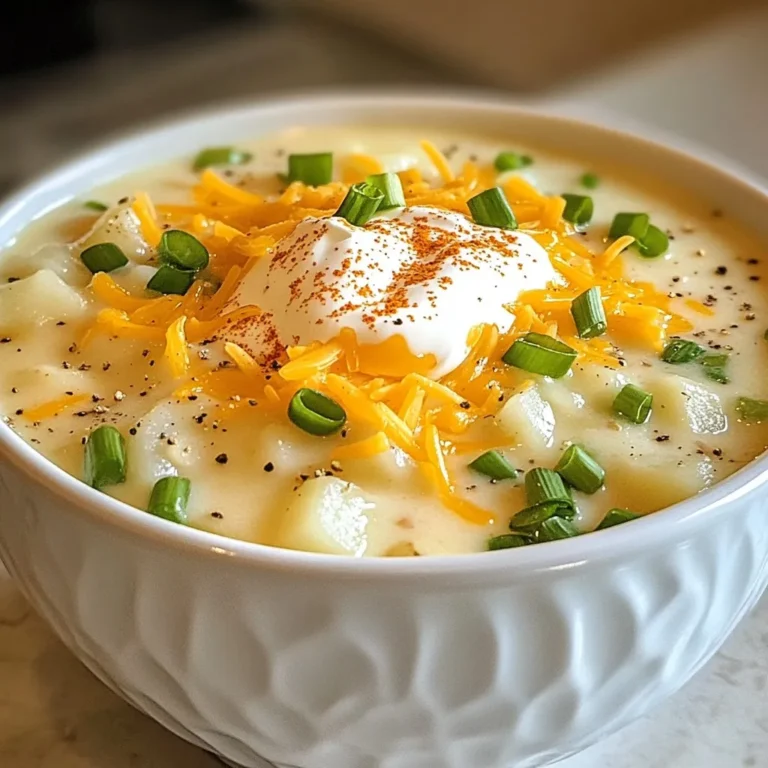
Loaded Outback Potato Soup Delicious Comfort Recipe

- 2 cups ready-made eggnog - 1 cup whole milk - 1/2 cup unsweetened cocoa powder - 2 tablespoons pure maple syrup - 1 teaspoon vanilla extract - 1/4 teaspoon freshly grated nutmeg - 1/4 teaspoon ground cinnamon - Whipped cream, for generous topping - Chocolate shavings, for garnish You can easily swap some ingredients for different needs. Here are a few ideas: - Dairy-free alternatives: Use almond milk or coconut milk instead of whole milk. This keeps the drink creamy but dairy-free. - Sweeteners options: If you prefer, replace pure maple syrup with honey or agave syrup. Both add a nice touch of sweetness. - Non-alcoholic variations: For a festive drink without alcohol, skip any spirits. You can still enjoy all the rich flavors of eggnog. This recipe allows for flexibility, so feel free to make it your own! {{ingredient_image_2}} To make the perfect Eggnog Brandy Alexander, start by heating the eggnog mixture. In a medium-sized saucepan, combine 2 cups of ready-made eggnog and 1 cup of whole milk. Place the saucepan over medium heat. Stir often to keep the mixture from burning. Next, incorporate the cocoa powder smoothly. Carefully sift in 1/2 cup of unsweetened cocoa powder. Whisk continuously until it blends well. This step ensures a rich and creamy texture without lumps. Now, let's add flavor enhancers. Stir in 2 tablespoons of pure maple syrup, 1 teaspoon of vanilla extract, 1/4 teaspoon of freshly grated nutmeg, and 1/4 teaspoon of ground cinnamon. Mix well to combine all the flavors. Achieving the right temperature is key. Continue to heat the mixture, stirring occasionally. You want it warm but not boiling, about 5 to 7 minutes. Look for steam rising to know it’s ready. Pouring into mugs comes next. After heating, remove the saucepan from the stove. Let it cool for a couple of minutes. Gently pour the warm mixture into individual mugs or festive cups. Now for the fun part: topping and garnishing techniques. Add a generous dollop of whipped cream on each mug. This creates a fluffy cloud. Finish off by sprinkling chocolate shavings on top. This elegant touch makes your Eggnog Brandy Alexander a feast for the eyes. To make the best Eggnog Brandy Alexander, focus on flavor balance. The rich eggnog and cocoa create a creamy base. Maple syrup adds sweetness. Nutmeg and cinnamon give warmth. Taste as you mix to find what works for you. For a smooth texture, whisk the cocoa powder carefully. Sifting it first helps avoid lumps. Stir the mixture gently as it heats. This keeps it creamy without burning. Use a good whisk for best results. For serving, use festive mugs or cups. A clear glass highlights the beautiful layers of your drink. Arrange them on a tray with holiday decorations. Add a cinnamon stick or a sprinkle of nutmeg for flair. Create a festive atmosphere with music and lights. Use soft lighting for warmth. Consider a holiday-themed table setup. This makes your guests feel special and welcome. Pro Tips Use Fresh Nutmeg: Freshly grated nutmeg significantly enhances the flavor profile of your eggnog delight. Consider investing in a small nutmeg grater for the best results. Chill Your Mugs: For an extra refreshing experience, chill your mugs in the freezer for about 10 minutes before serving. This will keep your eggnog delight colder for longer. Experiment with Spices: Feel free to enhance the flavor by adding other spices like cardamom or cloves. They can add an exciting twist to your festive drink. Whipped Cream Variations: Try flavored whipped cream, such as peppermint or vanilla, for an interesting and delicious variation on the classic topping. {{image_4}} You can make this drink both with and without alcohol. For the alcoholic version, use a splash of brandy. This adds a warm flavor that pairs well with eggnog. You can also try rum or whiskey for a unique twist. If you want a family-friendly drink, skip the alcohol completely. Use the same ingredients but keep it fun and festive. Kids will love the chocolatey taste. They won’t miss the spirits at all! Add extra spices to make it more special. Consider using ground ginger or cloves. These spices bring warmth and depth to the drink. You can also sprinkle some extra nutmeg on top for a fragrant finish. Another fun idea is to use flavored liquors. Try adding a splash of hazelnut or peppermint liqueur. This gives a new twist to the classic taste. It’s a great way to surprise your guests! To keep your Eggnog Brandy Alexander fresh, store it in the fridge. Use an airtight container. This keeps out air and odors. You should drink it within 3 to 5 days. Always check for any off smells before serving. Best practices for short-term use include stirring well before serving. This helps mix any settled ingredients. If you notice a change in texture, it’s best to toss it out. If you want to save your eggnog mixture longer, freezing is a great choice. Use a freezer-safe container. Leave some space at the top for expansion. You can freeze it for up to 3 months. To maintain quality over time, thaw it in the fridge overnight. When ready to serve, stir well to get the right consistency. If needed, add a splash of milk or cream to revive it. This keeps your drink creamy and delicious! Can I use homemade eggnog? Yes, you can use homemade eggnog. It adds a personal touch to your drink. Just make sure it’s thick and creamy for the best taste. How long can eggnog be stored? Eggnog can last in the fridge for about 3 to 5 days. Always check for freshness before using it. Can I make this recipe in advance? Yes, you can make it ahead of time. Store it in the fridge, and just heat it up before serving. What is the origin of the Eggnog Brandy Alexander? The Eggnog Brandy Alexander combines the classic Brandy Alexander drink with eggnog. It gained popularity in the United States in the 20th century. Can I omit the alcohol? Absolutely! You can skip the brandy and still enjoy a tasty drink. Just keep the other flavors. What are good food pairings with this cocktail? This drink pairs well with cookies, pies, and rich desserts. Try it with gingerbread or chocolate treats for a festive touch. This blog post covers how to make a delicious Eggnog Brandy Alexander. We discussed key ingredients like eggnog, cocoa powder, and spices. I shared steps for heating, mixing, and serving your drink perfectly. We also explored ingredient swaps and variations for all tastes. Remember, whether you choose non-alcoholic or try new flavors, you can personalize this recipe. Enjoy your festive drink, and impress your guests with your skills!

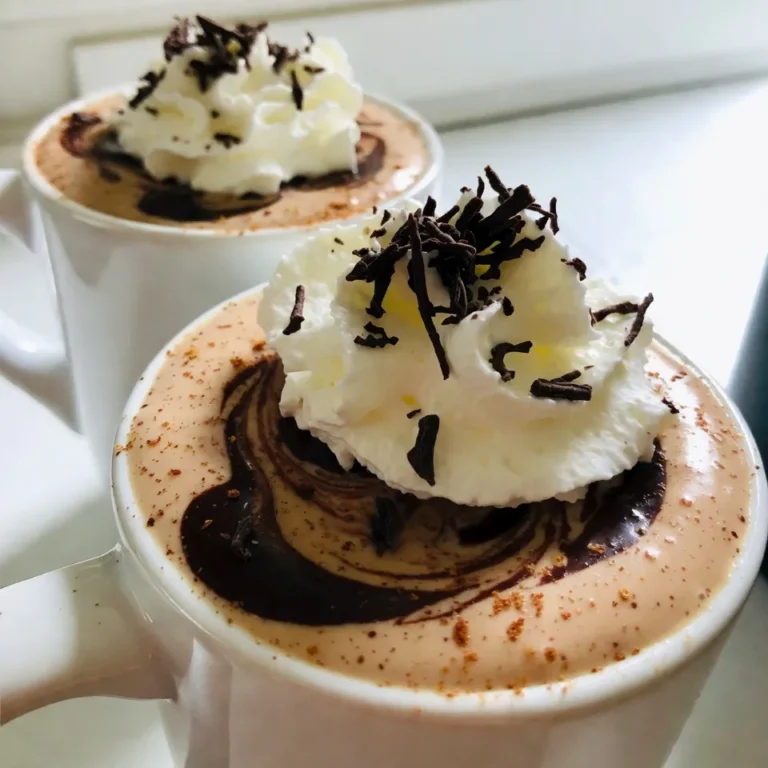
Eggnog Brandy Alexander Irresistible Holiday Treat

For this Chicken Alfredo Bake, you need a few key items. Here are the main ingredients: - 2 cups cooked penne pasta - 1 pound boneless, skinless chicken breasts, diced into bite-sized pieces - 3 tablespoons olive oil - 3 cloves garlic, finely minced - 2 cups heavy cream - 1 cup freshly grated Parmesan cheese - 1 cup shredded mozzarella cheese - 1 teaspoon Italian seasoning - Salt and freshly cracked black pepper to taste These ingredients work together to create a rich and creamy dish. The right seasonings make your bake shine. I use Italian seasoning for that classic flavor. Salt and cracked black pepper add depth to the dish. You can adjust these to fit your taste. If you love garlic, add more minced garlic for a stronger kick. Garnishes can elevate your dish. I like to sprinkle freshly chopped parsley on top. It adds color and a fresh taste. You might also consider more Parmesan cheese as a finishing touch. These small additions can make your Chicken Alfredo Bake look and taste even better. {{ingredient_image_2}} Start by preheating your oven to 375°F (190°C). This heat is perfect for baking. While it warms up, gather your ingredients. You’ll need cooked penne pasta, chicken, garlic, and cream. Having everything ready will make the process smooth and easy. Next, heat 3 tablespoons of olive oil in a large skillet. Use medium heat. Add 1 pound of diced chicken. Sprinkle it with salt, pepper, and 1 teaspoon of Italian seasoning. Cook the chicken for about 5-7 minutes. Stir it often to ensure it cooks evenly. When the chicken is browned and cooked through, add 3 cloves of finely minced garlic. Stir and sauté for 1-2 minutes. This will make your kitchen smell amazing. Now, lower the heat to a gentle simmer. Gradually pour in 2 cups of heavy cream. Stir it well to mix. Then, slowly add 1 cup of freshly grated Parmesan cheese. Keep whisking until the sauce is creamy and smooth. Avoid boiling the sauce. In a large mixing bowl, combine the cooked penne pasta with the creamy chicken Alfredo sauce. Stir gently until all the pasta is coated in that rich sauce. Transfer the pasta mixture into a greased 9x13 inch baking dish. Spread it out evenly. Top it with 1 cup of shredded mozzarella cheese. Place the dish in your preheated oven. Bake for 20-25 minutes. Keep an eye on it until the cheese is bubbly and golden brown. After baking, remove it from the oven and let it cool for a few moments. Before serving, sprinkle freshly chopped parsley on top for a touch of color. To get that creamy sauce, start with heavy cream. Heat it gently to avoid boiling. Stir in the Parmesan cheese slowly. This helps it melt smoothly. If the sauce is too thick, add a splash of chicken broth. This keeps it creamy and flavorful. Set your oven to 375°F (190°C) for the best results. Bake for 20-25 minutes. The cheese should be bubbly and golden. If it browns too fast, cover it with foil. This way, everything cooks evenly. Use deep bowls for serving. This keeps the dish warm longer. Sprinkle more Parmesan on top for a nice touch. Add a sprig of parsley for color. Pair it with a fresh side salad to complete your meal. Pro Tips Use Quality Ingredients: Opt for high-quality chicken and fresh cheeses for a richer flavor in your Alfredo bake. Don’t Overcook the Pasta: Cook the penne al dente as it will continue to cook in the oven, preventing it from becoming mushy. Mix in Vegetables: For added nutrition and flavor, consider incorporating steamed broccoli or spinach into the bake. Let it Rest: Allow the dish to cool for a few minutes after baking; this helps the sauce thicken and makes it easier to serve. {{image_4}} You can boost the health of your Chicken Alfredo Bake by adding veggies. Start with some fresh spinach or broccoli. Just chop them up and mix them in with the pasta. You can also use frozen peas or bell peppers. These veggies add color and flavor, and they provide extra vitamins. You will love how they brighten the dish. If you want a twist, try different proteins. Cooked shrimp makes a great swap. Sauté them just like the chicken. You can also use turkey or even tofu for a vegetarian option. If you like beef, diced steak works too! Each protein gives a unique taste and keeps the dish interesting. For a gluten-free version, choose gluten-free pasta. Many brands offer penne that tastes great. Just follow the cooking instructions on the package. You can use rice or quinoa pasta for a different texture. This way, everyone can enjoy the creamy goodness of Chicken Alfredo Bake. After enjoying your Chicken Alfredo Bake, you may have some leftovers. To store them, let the dish cool to room temperature. Transfer the leftovers into an airtight container. This will keep the moisture in and the dish fresh. You can store it in the fridge for up to three days. Make sure to label the container with the date. This way, you won’t forget about your tasty meal. When it's time to reheat, use the oven for the best quality. Preheat your oven to 350°F (175°C). Place the Chicken Alfredo Bake in an oven-safe dish. Cover it with foil to keep it moist. Heat for about 15-20 minutes or until it is warmed through. You can also microwave it, but the oven keeps the texture better. If microwaving, use a microwave-safe dish and heat in 1-minute intervals. Stir between each interval to heat evenly. Want to save some for later? Freezing is a great option. First, let the dish cool completely. Cut it into individual portions for easy reheating. Wrap each portion tightly in plastic wrap, then place them in a freezer-safe bag. Be sure to label them with the date. You can freeze them for up to two months. When you're ready to eat, thaw it overnight in the fridge. Then, reheat it in the oven for the best taste and texture. Yes, you can make Chicken Alfredo Bake ahead of time. First, prepare the dish as usual, but stop before baking it. Cover the dish with plastic wrap or foil. You can store it in the fridge for up to 24 hours. When ready to bake, remove the cover and add a few extra minutes to the baking time. This way, you can enjoy a warm meal without much fuss. If you need a substitute for heavy cream, try using whole milk mixed with butter. Combine 3/4 cup of whole milk with 1/4 cup of melted butter. This mix will give you a similar creaminess. You can also use half-and-half. It will make the sauce slightly lighter but still tasty. For a dairy-free option, try coconut cream or cashew cream. Both options add a rich flavor without dairy. To make the Chicken Alfredo Bake lighter, consider these easy swaps: - Use whole wheat penne for added fiber. - Replace heavy cream with Greek yogurt or low-fat milk. - Add more vegetables like spinach or broccoli for extra nutrition. - Use less cheese or opt for a reduced-fat version. These changes can help you enjoy the dish without feeling too heavy. This blog post covered the key steps to make a Chicken Alfredo Bake. We discussed main ingredients, cooking methods, and useful tips. You now have clear ways to store leftovers and a few fun variations to try. In the end, this dish is not just simple to make; it’s also flexible. You can change it up to fit your taste or needs. Enjoy your cooking journey!

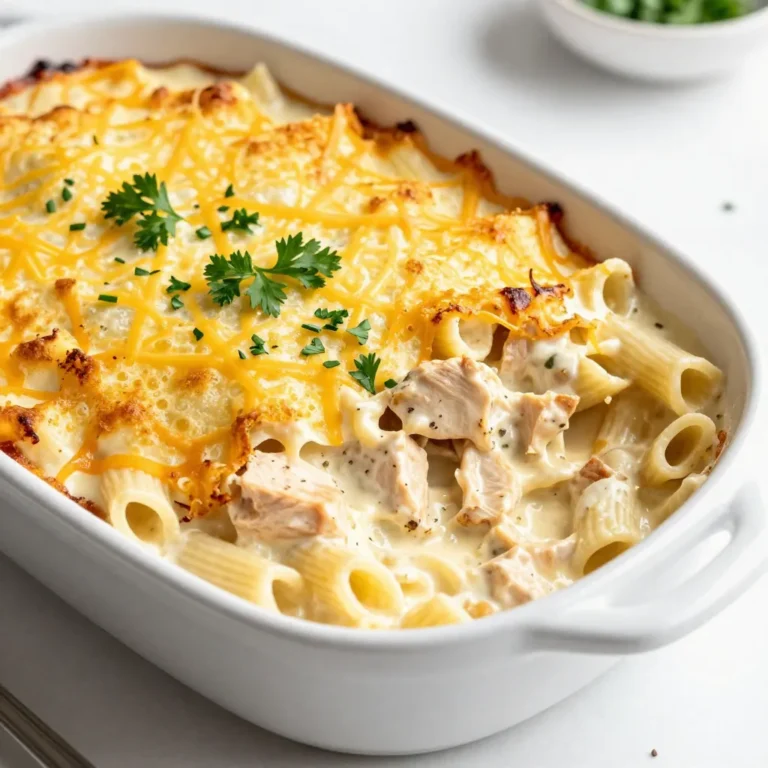
Chicken Alfredo Bake Comforting and Simple Recipe

- 4 bone-in chicken thighs with skin - 1/4 cup soy sauce (preferably low-sodium) - 2 tablespoons honey (or maple syrup) - 4 cloves of garlic, finely minced - 1-inch piece of fresh ginger, grated - 1 tablespoon sesame oil - 1 tablespoon rice vinegar - 1 teaspoon freshly ground black pepper - Chopped green onions and toasted sesame seeds for garnish The main ingredients are simple yet pack a punch. I always use bone-in chicken thighs for juicy, tender meat. The soy sauce adds a rich umami flavor while keeping the dish savory. Honey balances the saltiness and adds a touch of sweetness. Fresh garlic and ginger bring warmth and depth to the marinade. I prefer low-sodium soy sauce. It allows me to control the saltiness of my dish better. Minced garlic and grated ginger are key to creating that aromatic base. They work together to enhance the overall taste. The additional ingredients are just as important. Sesame oil adds a nutty flavor, while rice vinegar gives a slight tang. Freshly ground black pepper adds a warm kick. Finally, I always garnish with chopped green onions and toasted sesame seeds. They add color and a crunchy texture that elevates the dish. This combination of flavors creates a perfect balance. Each bite is a delightful mix of savory, sweet, and aromatic. Whether you're cooking for family or a special occasion, this dish always impresses. {{ingredient_image_2}} To start, gather the ingredients for your marinade. You need: - 1/4 cup soy sauce - 2 tablespoons honey - 4 cloves of garlic, finely minced - 1-inch piece of fresh ginger, grated - 1 tablespoon sesame oil - 1 tablespoon rice vinegar - 1 teaspoon freshly ground black pepper Next, combine all these ingredients in a mixing bowl. Use a whisk to mix them well. You want a smooth and blended marinade that smells amazing. Take your chicken thighs and place them in a large resealable bag or a mixing bowl. Pour the marinade over the chicken. Make sure each thigh is coated evenly. Seal the bag or cover the bowl tightly. Let it sit in the fridge for at least 1 hour. For the best flavor, marinate overnight. The longer you let it sit, the more the flavors will soak in. Now it’s time to cook! Preheat your air fryer to 375°F (190°C). This step is key for even cooking. After marinating, take the chicken out and drain the excess marinade. Arrange the chicken thighs skin-side down in the air fryer basket. Cook them for 10 minutes. After 10 minutes, flip the chicken over. Cook skin-side up for another 10 minutes. You want the skin to be crispy and the chicken to reach an internal temperature of 165°F (74°C). Use an instant-read thermometer for the best results. Once the chicken is done, remove it from the air fryer. Let it rest for 5 minutes. This helps keep the juices inside, which makes the chicken juicy and tender. Before serving, sprinkle chopped green onions and toasted sesame seeds on top. This adds a nice pop of color and flavor. Enjoy your delicious Air Fryer Soy Garlic Chicken Thighs! To make your chicken thighs burst with flavor, follow these marinating tips. First, use a big resealable bag or a bowl. This helps the marinade coat every piece well. The best time to marinate is at least 1 hour, but overnight is even better. It allows the flavors to really seep in. For even cooking in the air fryer, make sure to preheat it to 375°F (190°C) for about 5 minutes. This step helps cook the chicken evenly. When cooking, always check for doneness. Use an instant-read thermometer to ensure the thickest part hits 165°F (74°C). This guarantees juicy, safe-to-eat chicken. For serving, place the chicken on a large plate. Drizzle some cooking juices over it for added flavor. You can pair your chicken with steamed rice or a fresh salad. These sides balance the savory taste of the chicken and create a lovely meal. Pro Tips Marinate Longer for Best Flavor: For the most flavorful chicken, marinate the thighs overnight. This allows the ingredients to fully penetrate the meat, enhancing the overall taste. Use a Meat Thermometer: To ensure perfectly cooked chicken, use an instant-read meat thermometer. The internal temperature should reach 165°F (74°C) for safe consumption. Don’t Skip the Resting Time: Allow the chicken to rest for about 5 minutes after cooking. This helps the juices redistribute, resulting in a juicier and more tender bite. Garnish for Presentation: Enhance the visual appeal and flavor by garnishing with chopped green onions and toasted sesame seeds just before serving. This adds freshness and crunch to your dish. {{image_4}} You can easily change up the spice in your marinade. For heat, add chili flakes. This brings a nice kick to the dish. If you like sweetness, try using agave or brown sugar instead of honey. Each option adds a unique flavor twist. You can cook soy garlic chicken thighs in an oven too. Preheat your oven to 375°F. Bake the chicken for about 30-35 minutes. Make sure to flip them halfway through for even cooking. For stovetop cooking, heat a skillet on medium. Add a bit of oil, then place the chicken thighs skin-side down. Cook for about 10 minutes, then flip and cook for another 10-15 minutes until done. Always check the internal temp for safety. The marinade can change based on what you have. Try teriyaki or hoisin sauce for a different flavor. You can also make a citrus-based marinade. Use orange or lime juice for a fresh, tangy taste. This can brighten up the dish and add a new twist. To store leftover chicken, place it in an airtight container. This keeps it fresh and tasty. Leftover chicken stays good in the fridge for up to 3 days. Be sure to check for any off odors before eating. For freezing cooked chicken thighs, wrap each piece in plastic wrap. Place the wrapped chicken in a freezer bag. Remove as much air as possible to avoid freezer burn. To enjoy later, thaw the chicken overnight in the fridge. This helps keep the texture and taste nice. The best methods to reheat leftovers are using an air fryer, oven, or microwave. For the air fryer, set it to 350°F and heat for about 5-7 minutes. This keeps the skin crispy. If using the oven, reheat at 350°F for about 15 minutes. In the microwave, heat in short bursts for 1-2 minutes, checking often. This method can make the skin soft, so use it if you need a quick meal. You should marinate the chicken for at least 1 hour. However, I recommend marinating overnight for the best flavor. The longer it sits, the more the chicken absorbs the tasty soy and garlic notes. It will turn out juicier and full of flavor. Chicken thighs should reach a safe internal temperature of 165°F or 74°C. Use an instant-read thermometer to check the temperature. This ensures the chicken is safe to eat and perfectly cooked. Yes, you can use boneless chicken thighs. They will cook faster than bone-in thighs. Check them after about 15 minutes in the air fryer. Make sure they still reach 165°F for safety. Pair your chicken with steamed rice or a fresh salad. Both options balance the rich flavors of the dish. You could also serve it with roasted vegetables or a light cucumber salad for a refreshing twist. This post covered how to make delicious soy garlic chicken thighs. I shared ingredients, easy steps, and tips for flavor. Marinate the chicken well for the best taste. You can also try different spices and cooking methods for variety. Store leftovers properly to enjoy later. With simple care, you can create a meal that impresses. Enjoy making this tasty dish!

Air Fryer Soy Garlic Chicken Thighs Flavorful Delight

- 1 pound ground beef - 1/2 cup yellow onion, finely chopped - 1 cup sharp cheddar cheese, shredded - 1/2 cup dill pickles, finely chopped The main ingredients set the stage for our cheeseburger egg rolls. First, the ground beef gives a rich, savory flavor. The yellow onion adds sweetness when cooked. Sharp cheddar cheese brings a creamy texture and tangy taste. Dill pickles give a nice crunch and a touch of acidity. - 1 tablespoon ketchup - 1 tablespoon yellow mustard - 1 teaspoon garlic powder - Salt and black pepper, to taste Seasoning enhances the filling. Ketchup and mustard bring classic cheeseburger flavors. Garlic powder adds depth. Don't forget salt and black pepper to bring everything together. These small touches make a big taste difference. - 12 egg roll wrappers - Oil for frying (canola or vegetable recommended) Egg roll wrappers hold everything inside. They crisp up nicely when fried. Use canola or vegetable oil for the best results. This oil has a high smoke point, which means it will fry your rolls perfectly. Make sure the oil is hot enough before adding the rolls. This way, you get that perfect golden-brown color. {{ingredient_image_2}} 1. Start by heating a large skillet over medium heat. Add 1 pound of ground beef. Cook it until it turns brown. Use a spatula to break it apart as it cooks. 2. After the beef is browned, drain any extra grease. This keeps the filling from being too greasy. 3. Next, add 1/2 cup of finely chopped yellow onion. Sauté the onions for 3 to 4 minutes. They should become soft and clear. 4. Now, mix in 1 cup of shredded sharp cheddar cheese, 1/2 cup of chopped dill pickles, 1 tablespoon of ketchup, and 1 tablespoon of yellow mustard. Add 1 teaspoon of garlic powder, salt, and black pepper to taste. Stir everything well until the cheese melts. Remove the skillet from heat and let the filling cool for a few minutes. 1. Find a clean, dry surface. Lay an egg roll wrapper flat. Make sure one corner is facing you. 2. Spoon 2 to 3 tablespoons of the cheeseburger filling into the center of the wrapper. 3. Fold the bottom corner of the wrapper over the filling. Next, fold in the two side corners. 4. Carefully roll the wrapper away from you toward the top corner. Keep the filling secure inside. 5. To seal the edge, use a dab of water on the wrapper. Repeat this with the rest of the wrappers and filling until you finish. 1. In a large pot or deep skillet, heat oil over medium-high heat. Aim for a temperature of 350°F. 2. Once the oil is hot, gently place the egg rolls in batches into the oil. Don’t overcrowd the pan. 3. Fry each egg roll for about 3 to 4 minutes on each side. They should turn golden brown and crispy. 4. Use a slotted spoon to transfer the fried egg rolls to a plate lined with paper towels. This will soak up any extra oil. 5. Serve the cheeseburger egg rolls while hot. Add extra ketchup and mustard for dipping! - Check oil temperature for crispy results: Heat your oil to about 350°F. This gives you that golden, crispy outside. Use a thermometer if you can. This step is key. - Avoid overcrowding the pan: Fry in small batches. Too many at once cools the oil and makes soggy rolls. Keep them separate for the best crunch. - Experiment with additional seasonings: Try adding some smoked paprika or chili powder. These spices can add a nice kick to your filling. You can also mix in some onion powder for more depth. - Try different types of cheese: While sharp cheddar is great, consider pepper jack for heat or mozzarella for a more stretchy texture. Each cheese brings its unique taste. - Arrange on a platter with dipping sauces: Place the egg rolls on a nice platter. Use small bowls for ketchup and mustard. This makes it look inviting and fun. - Garnish with parsley or pickle slices: A sprinkle of parsley adds color. You can also lay a few pickle slices next to the rolls. It adds a fresh touch that pairs well with the flavors inside. Pro Tips Keep the Filling Cool: Allow the cheeseburger mixture to cool slightly before filling the wrappers. This prevents the wrappers from becoming soggy and helps maintain their crispiness during frying. Fry in Batches: Fry the egg rolls in small batches to ensure even cooking. Overcrowding the pan can lower the oil temperature, resulting in greasy egg rolls. Use a Thermometer: For perfectly fried egg rolls, use a kitchen thermometer to monitor the oil temperature, aiming for around 350°F. This ensures a golden brown and crispy exterior. Experiment with Fillings: Feel free to customize the filling! Add cooked bacon, sautéed mushrooms, or even jalapeños for a spicy twist on your cheeseburger egg rolls. {{image_4}} You can easily make cheeseburger egg rolls vegetarian. Simply swap ground beef for plant-based protein. This change keeps the taste while making it meat-free. You can use crumbled tofu or lentils as good alternatives. To add more color and crunch, mix in veggies like bell peppers or mushrooms. Chopped spinach also works well here. These additions bring more flavor and nutrients to your dish. For a fun twist, try different types of cheese. Creamy mozzarella or spicy pepper jack can change the taste. You can also add jalapeños for a spicy kick. This adds heat that many people love. Other ingredients like bacon bits or caramelized onions can also make great fillings. Get creative with options to find your favorite mix! Using an air fryer is a great way to cook cheeseburger egg rolls. It gives them a crispy texture without deep frying. Preheat your air fryer to 375°F. Spray the egg rolls lightly with cooking spray. Place them in the fryer basket in a single layer. Cook for about 10-12 minutes, flipping halfway through. Keep an eye on them to avoid burning. This method makes it easy to enjoy a healthier version of this snack! To keep your cheeseburger egg rolls fresh, cool them to room temperature first. Place them in an airtight container. This helps prevent sogginess. In the fridge, they last up to three days. For the best results, reheat egg rolls in an oven. Preheat your oven to 350°F. Place the egg rolls on a baking sheet. Heat for 10-15 minutes until they are warm and crispy. You can also use an air fryer at 350°F for about 5-7 minutes. Want a quick bite? Try microwaving them, but they won't stay as crispy. You can freeze both uncooked and cooked egg rolls. For uncooked, wrap them tightly in plastic wrap and place them in a freezer bag. They last up to three months. To cook from frozen, do not thaw. Fry them directly from the freezer for about 4-5 minutes longer than usual. Cooked egg rolls can also be frozen. Just let them cool first, then store similarly. Reheat directly from the freezer using the oven or air fryer. Yes, you can prep cheeseburger egg rolls ahead. Cook the filling and cool it first. Then, wrap the egg rolls. Store them in the fridge for up to one day. For longer storage, freeze them. Lay them on a baking sheet and freeze until firm. Then, place them in a bag for easy access later. I love serving these egg rolls with ketchup and yellow mustard. You can also try ranch dressing for a creamy touch. BBQ sauce adds a sweet twist, while spicy mustard gives it a kick. Don’t forget about sriracha for those who enjoy heat! Leftover cheeseburger egg rolls last for about three days in the fridge. Make sure to store them in an airtight container. To keep them crisp, reheat in the oven at 375°F for about 10 minutes. Avoid microwaving as it may make them soggy. In this post, we explored how to make tasty cheeseburger egg rolls. We covered the key ingredients, step-by-step cooking, and tips for frying. You learned about variations and how to store these delicious snacks. Egg rolls are fun to make and easy to enjoy. Try adding your twists to the recipe! Whether for a party or a snack, these rolls please everyone. Get creative, and make your own special version!

Cheeseburger Egg Rolls Crispy and Flavorful Snack

- 2 cups shredded cooked chicken - 1 cup cream cheese, softened - 1 cup shredded sharp cheddar cheese - 8 small corn tortillas - 1 cup green enchilada sauce - 1 cup canned black beans, rinsed - 1 cup corn kernels - 1 teaspoon garlic powder - 1 teaspoon ground cumin - 1/2 cup diced red onion - Fresh cilantro leaves - Sliced jalapeños (optional) The main ingredients are the heart of the dish. I love using shredded cooked chicken from a rotisserie for quick prep. Cream cheese adds rich creaminess, while sharp cheddar gives a nice bite. The tortillas hold everything together, and the enchilada sauce ties it all up with flavor. Next, I add black beans and corn for extra texture and taste. Garlic powder and cumin bring warmth and depth. Finally, the diced red onion adds a little crunch. For garnishes, fresh cilantro brightens the dish. If you like spice, sliced jalapeños make a great topping. These ingredients work together to create a cheesy, flavorful meal everyone will enjoy. {{ingredient_image_2}} First, grab a large bowl. Combine the shredded chicken, cream cheese, and cheddar cheese. Mix in the garlic powder and cumin for flavor. Then add the black beans and corn. Stir well until everything blends together nicely. You want a creamy, tasty filling for your enchiladas. Next, warm the tortillas. Use a dry skillet over medium heat for about 30 seconds on each side. This makes them soft and easy to roll. Take one warm tortilla and spoon some of your chicken mixture into the center. Roll it tightly and place it seam-side down in a greased baking dish. Do this for all tortillas. Once all tortillas are filled, pour the remaining green enchilada sauce over them. Sprinkle any leftover cheese and diced red onion on top. Cover the baking dish with aluminum foil to keep moisture in. Bake in the oven at 375°F (190°C) for 20 minutes. After that, remove the foil and bake for another 10-15 minutes. Look for melted cheese that is bubbly and golden brown. Let them cool for a few minutes before serving. Enjoy the cheesy goodness! To avoid tearing your tortillas, warm them first. Heat them in a dry skillet for about 30 seconds on each side. This makes the tortillas soft and easy to roll. If they are warm, they bend without breaking. For even baking and melting cheese, cover your dish with foil for the first part of baking. This keeps moisture in and helps the cheese melt nicely. Remove the foil in the last 10 to 15 minutes. This allows the cheese to get golden and bubbly. To enhance flavor, serve your cheesy chicken enchiladas with fresh sides. A dollop of sour cream or guacamole adds creaminess. You can also try serving with a side of Mexican rice or a fresh salad. For presentation, use a bright platter to showcase your enchiladas. Garnish with extra cilantro and a lime wedge on the side. This not only looks nice but adds a zesty kick. You can prep these enchiladas in advance. Fill and roll the tortillas, then place them in the baking dish. Cover and store them in the fridge for up to a day before baking. When ready to bake, just add extra time to the cooking. If they are cold, they will need a few more minutes in the oven. To reheat leftovers, use the oven for the best texture. Bake them at 350°F (175°C) until heated through. This keeps them moist and cheesy. Pro Tips Warm the Tortillas: Warming the corn tortillas before filling makes them more pliable and helps prevent them from tearing during the rolling process. Customize Your Fillings: Feel free to add other ingredients like diced bell peppers, spinach, or different types of cheese for a personalized twist on the classic recipe. Make Ahead: Assemble the enchiladas a day in advance and refrigerate them. When ready to bake, just pour the sauce and cheese on top and bake as directed. Garnish Creatively: Add toppings like avocado slices, sour cream, or pico de gallo for extra flavor and a beautiful presentation. {{image_4}} You can switch up the protein in these enchiladas. If you don’t have chicken, try shredded beef or turkey. These meats add a different taste while keeping the dish hearty. For a vegetarian twist, use sautéed mushrooms or jackfruit. Both options give a meaty feel. You can change the sauce from green to red. Red sauce brings a rich, bold taste. If you want a creamier dish, try using white sauce. As for cheese, feel free to mix it up! Use pepper jack for a spicy kick or mozzarella for a gooey texture. Add veggies to boost flavor and nutrition. Bell peppers, spinach, or zucchini work great. You can also sprinkle in spices like chili powder or smoked paprika. For a fun twist, add quinoa or lentils instead of rice. These changes create exciting new flavors while keeping it simple. To store your cheesy chicken enchiladas, let them cool first. Place the leftovers in an airtight container. You can keep them in the fridge for up to four days. This keeps them fresh and tasty. If you want to freeze enchiladas, wrap them tightly in plastic wrap. Then, place them in a freezer-safe bag. They can last for up to three months in the freezer. When you're ready to eat, thaw them in the fridge overnight. To reheat, use an oven for the best results. Set the oven to 350°F (175°C). Cover the enchiladas with foil to keep them moist. Bake for about 20 minutes. This helps avoid dry enchiladas. If you prefer the microwave, heat them in short bursts. Add a splash of water to keep them from drying out. You can use several alternatives for creaminess. Here are some options: - Greek yogurt - Sour cream - Silken tofu - Cashew cream These choices still provide that rich texture. Each option offers a unique flavor. For example, Greek yogurt adds a slight tang, while cashew cream brings a nutty depth. Yes, you can easily make these enchiladas vegetarian. Try these substitutions: - Replace chicken with cooked lentils or black beans. - Use additional veggies like bell peppers or zucchini. - Swap cream cheese with tofu or vegan cream cheese. These changes keep the dish hearty and flavorful without meat. Baking the enchiladas typically takes about 30 to 35 minutes. Preheat your oven to 375°F (190°C). Cover the dish with foil for the first 20 minutes. Then, uncover it to let the cheese get bubbly and golden. Yes, you can prepare these enchiladas in advance. Here’s how: - Assemble the enchiladas and place them in the baking dish. - Cover tightly and store in the fridge for up to 24 hours. - When ready, bake as usual, adding a few extra minutes if cold. This method saves time and makes meal prep easy! In this blog post, we explored making delicious enchiladas with simple steps. You learned about the main ingredients and how to prepare them. We shared tips for perfecting your dish and suggested fun variations. Remember, you can customize your enchiladas to fit your taste. Store leftovers well to keep them fresh. Enjoy your cooking and the flavors that come with it!

Cheesy Chicken Enchiladas Simple and Flavorful Dish

- 1 cup cooked white rice - 1 pound ground beef (or turkey) - 1 packet taco seasoning - 1 can (15 oz) black beans, drained and rinsed - 1 cup corn (frozen or canned) - 1 cup diced tomatoes (fresh or canned) - 1 cup shredded cheddar cheese - 1 cup lettuce, shredded - 1/2 cup sour cream - 1 cup Doritos (crushed, your choice of flavor) - 1 jalapeño, sliced (optional) - Fresh cilantro, for garnish This recipe serves four people. You can adjust the amounts for more or fewer servings. Each bowl includes a layer of rice, meat, cheese, and toppings. You can switch ground beef for turkey or even use plant-based meat. If you want less spice, skip the jalapeños. For a creamier texture, try Greek yogurt instead of sour cream. You can also use any cheese you like. If you want to add more veggies, consider bell peppers or avocado. {{ingredient_image_2}} First, grab a large skillet. Place your ground beef or turkey in it over medium heat. Cook until the meat is brown. Use a spatula to break it apart as it cooks. If there is too much fat, drain it carefully. Once browned, sprinkle the taco seasoning over the meat. Add 2/3 cup of water and stir well. Let this simmer for about 5 minutes. This step thickens the mixture and adds great flavor. While the meat simmers, take a large mixing bowl. Add the cooked white rice, drained black beans, corn, and diced tomatoes to the bowl. Mix everything together well. You want to make sure that each ingredient is evenly spread. This mixture will be the base for your taco rice bowl. Now it’s time to build your taco rice bowl! Start by layering the rice mixture at the bottom of your serving bowls. Next, spoon the seasoned meat over the rice, creating a nice second layer. Then, sprinkle shredded cheddar cheese on top. The heat from the meat will help it melt just a bit. After that, add a layer of shredded lettuce. Top it off with dollops of sour cream. If you enjoy a kick, add sliced jalapeños. Finally, finish with a handful of crushed Doritos for that crunchy touch. Garnish with fresh cilantro for color and flavor. Enjoy your delicious creation! To get the best meat for your Doritos Taco Rice Bowl, use fresh ground beef or turkey. Brown it well in a skillet over medium heat. Make sure to break it up with a spatula. This helps it cook evenly. Drain any extra fat to keep it lean. After that, add the taco seasoning and water. Let it simmer for five minutes to blend the flavors. This step makes the meat juicy and tasty. Flavor is key in a Taco Rice Bowl. To boost it, mix in the black beans, corn, and diced tomatoes with your cooked rice. This gives a nice base for your dish. You can also add spices like cumin or chili powder for extra kick. Fresh lime juice adds brightness. Don't forget to sprinkle fresh cilantro on top for a fresh touch. If you like heat, sliced jalapeños work great too. A great presentation makes your dish pop! Use clear bowls to show off the colorful layers. Start with the rice mixture as a base. Add the seasoned meat next. Top with cheddar cheese, lettuce, and sour cream. For crunch, finish with crushed Doritos. Garnish with cilantro for a nice look. Serve with a lime wedge on the side for a burst of flavor. This makes your Taco Rice Bowl not just tasty, but also beautiful! Pro Tips Use Leftover Rice: If you have leftover rice from a previous meal, this recipe is a great way to use it up, saving time and reducing waste. Customize Your Toppings: Feel free to add your favorite toppings like avocado, salsa, or different types of cheese to make the dish your own. Make it Vegetarian: Substitute the ground beef or turkey with a plant-based protein or mushrooms for a delicious vegetarian version. Adjust the Spice Level: Control the heat by adding more or fewer jalapeños, or by opting for a milder cheese if you're serving kids or those sensitive to spice. {{image_4}} You can easily make this dish vegetarian or vegan. Swap the ground beef for plant-based meat or sautéed mushrooms. Use black beans and corn as your protein source. For vegan cheese, try a nut-based option or skip it altogether. Instead of sour cream, use a vegan alternative like cashew cream or a dollop of guacamole. This way, you still get all the fun flavors without meat or dairy. If you want a different meat, you have options! Ground turkey or chicken works well in this dish. You can also use shredded rotisserie chicken for a quick fix. For a spicier kick, try chorizo or seasoned pork. Each meat brings its own flavor, making your Taco Rice Bowl unique every time. The toppings can change the whole vibe of the bowl. Top with diced avocado for creaminess. Use fresh salsa or pico de gallo for added zest. You can even add black olives or sliced radishes for crunch. If you love heat, consider jalapeños or hot sauce. The more toppings you add, the more fun your bowl becomes! After enjoying your Doritos Taco Rice Bowl, you can keep leftovers. Place the extra food in an airtight container. This helps keep it fresh. Store the container in the fridge. Your leftovers will last for about three to four days. Make sure to let the food cool down before sealing it. To reheat your leftovers, use the microwave. Place the bowl in the microwave for about one to two minutes. Stir halfway through to heat evenly. You can also use a skillet on low heat. This method keeps the texture nice. Add a splash of water if the rice seems dry. Heat until warm, stirring often. If you want to freeze your Taco Rice Bowl, start by cooling it first. Use freezer-safe containers for storage. Divide the food into portions to make it easy later. It can stay in the freezer for up to three months. When ready to eat it, thaw overnight in the fridge. Reheat it as mentioned above, and enjoy! Yes, you can use brown rice. Brown rice adds more fiber and nutrients. It will take longer to cook, so adjust your time. Cook it well before adding it to the bowl. The flavor is a bit nuttier than white rice. Many enjoy the added health benefits. I recommend serving this dish with: - Fresh guacamole - Salsa or pico de gallo - Corn tortilla chips - A light salad with lime dressing These sides pair well and add more flavor. They also bring a nice crunch and freshness to the meal. Yes, you can make it ahead. Prepare the meat and rice mixture in advance. Store them in separate containers in the fridge. This keeps the crunch of the Doritos fresh. You can assemble the bowls right before serving. This makes for an easy and quick meal. In this article, we explored how to make a delicious taco rice bowl. I covered the key ingredients, step-by-step cooking instructions, and some great tips to enhance your meal. You learned about variations for vegetarian options and different meat choices. Remember to store leftovers properly and follow the reheating tips for the best taste. This recipe is flexible and easy to adapt. Enjoy creating your perfect taco rice bowl that fits your taste!

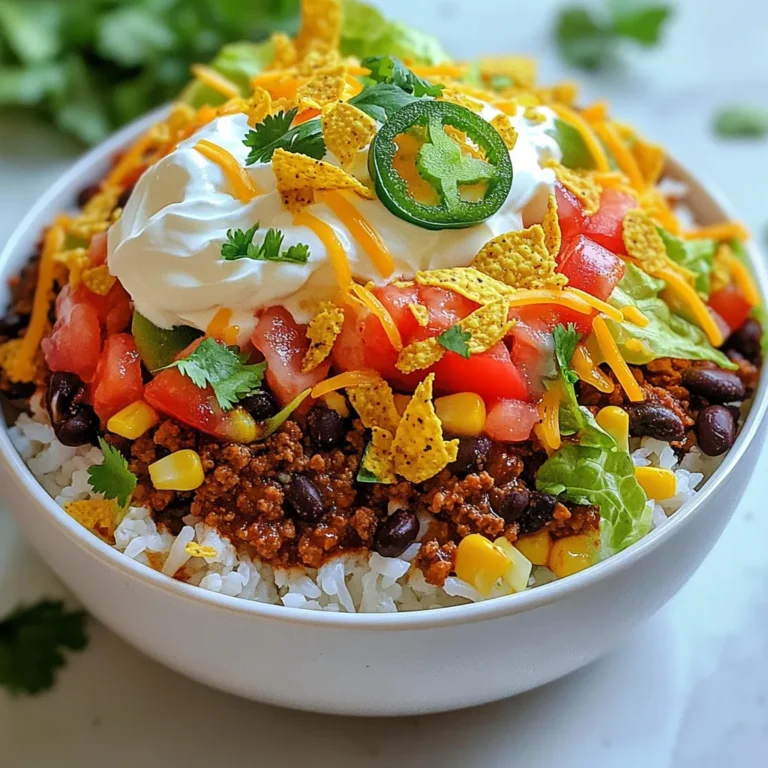
Doritos Taco Rice Bowl Flavorful and Easy Recipe

PREV 1 … 31 32 33 … 41 NEXT
tastykitchentales

explore

DessertsDinnerAppetizersDrinks

Our Policies

  • Cookie Policy
  • Copyright Policy
  • Disclaimer
  • GDPR Policy
  • Terms Of Use
Back to Top
  • About
  • Contact Us
  • Privacy Policy
© 2025 tastykitchentales