FREE DINNER EBOOK! Get your copy!
  • Cookie Policy
  • GDPR Policy
  • Disclaimer
  • Terms Of Use
  • Visit my other site: Fun Cookie Recipes
tastykitchentales
  • Home
  • Dinner
  • Desserts
  • Drinks
  • Appetizers
  • Contact
  • About
  • Privacy Policy
  • Home
  • Dinner
  • Desserts
  • Drinks
  • Appetizers
  • Contact
  • About
  • Privacy Policy
  • Cookie Policy
  • GDPR Policy
  • Disclaimer
  • Terms Of Use
Visit my other site: Fun Cookie Recipes

HOME / CATEGORIES /

Latest

- 2 cups heavy cream - 1 cup pure pumpkin puree - ½ cup granulated sugar - 4 large egg yolks - 1 teaspoon vanilla extract The main ingredients form the base of your crème brûlée. Heavy cream gives it a rich texture. Pure pumpkin puree adds flavor and color. Granulated sugar sweetens it perfectly. Egg yolks create a creamy custard, and vanilla extract brings warmth to the dish. - ½ teaspoon ground cinnamon - ¼ teaspoon ground nutmeg - ¼ teaspoon salt These spices elevate the dish. Ground cinnamon gives warmth, while nutmeg adds depth. A little salt balances the sweetness and enhances the flavors. - Granulated sugar for caramelizing This sugar creates a crunchy top. It adds a delightful contrast to the smooth custard. When you caramelize it, it turns golden brown and crispy. This step is key for that classic crème brûlée finish. {{ingredient_image_2}} - Preheat your oven to 325°F (160°C). This step is key for even baking. - In a medium saucepan over medium heat, pour in 2 cups of heavy cream. - Add 1 cup of pure pumpkin puree, ½ cup of granulated sugar, ½ teaspoon of ground cinnamon, ¼ teaspoon of ground nutmeg, and ¼ teaspoon of salt. - Whisk this mixture constantly. Keep it smooth and avoid simmering. - Heat until it feels hot and the sugar dissolves. Then, remove the pan from heat. - In a separate bowl, whisk 4 large egg yolks and 1 teaspoon of vanilla extract together. - Gradually pour the warm cream mixture into the egg yolks. Keep whisking as you pour. This helps prevent scrambling. - Strain the custard. Pour it through a fine-mesh sieve into a large bowl. This removes lumps and gives you silky custard. - Evenly fill 4 to 6 ramekins with the custard. - Place the ramekins in a baking dish. Add hot water to the dish until it reaches halfway up the sides of the ramekins. - Carefully put the baking dish into the preheated oven. Bake for 30-35 minutes. - Check for doneness. The edges should be set, but the centers will be a bit jiggly. To get the best custard, mix slowly. If you whisk too fast, the eggs may scramble. You want a creamy blend that feels rich. Straining the mixture is also key. Use a fine-mesh sieve to catch any lumps. This makes your custard smooth and velvety. You can use a kitchen torch or an oven broiler. I prefer the torch for more control. Move the flame in small circles. This helps avoid burnt sugar. If using the broiler, keep a close watch. Just a minute or two can turn sugar from white to burnt. Presentation matters! Serve the crème brûlée in the ramekins. Add a fresh mint leaf on top for color. It looks fancy and inviting. Don’t forget a small spoon for your guests. They will love cracking through the crispy sugar layer. Pro Tips Use Fresh Pumpkin Purée: For the best flavor and texture, roast and purée fresh pumpkin instead of using canned. This will elevate your dessert with a more vibrant taste. Perfect the Caramelization: When caramelizing the sugar, ensure that the sugar is evenly spread for consistent melting. Move the torch or broiler in small circles to avoid burning. Chill Thoroughly: Allow the crème brûlée to chill for at least 4 hours, but overnight is ideal. This resting time helps the flavors to meld and the custard to set perfectly. Experiment with Flavors: Feel free to add spices like ginger or cloves, or even a splash of maple syrup to the custard for a unique twist on the classic pumpkin flavor. {{image_4}} You can make your pumpkin crème brûlée even more exciting! Add spices like ginger for a warm kick. You can also mix in chocolate or caramel to create a rich twist. A touch of ginger adds a nice zing. Chocolate gives it that classic dessert feel. Caramel adds a sweet layer that melts in your mouth. Not everyone can enjoy the same dessert. You can make this recipe gluten-free by ensuring all ingredients are certified gluten-free. For a dairy-free option, use coconut cream instead of heavy cream. This keeps the flavor rich and creamy while catering to different diets. This dessert shines during the holidays! You can spice it up with flavors like nutmeg or cloves. Pair it with seasonal fruits like apples or pears for a fresh touch. These fruits add a nice contrast to the creamy texture of the crème brûlée. Enjoying this dessert with seasonal fruits makes it even more special for your gatherings. Store your pumpkin crème brûlée in the fridge. Cover each ramekin with plastic wrap. This keeps the custard fresh and prevents it from absorbing other smells. Keep them upright to avoid spills. Avoid stacking them to protect the crispy sugar layer on top. Can you freeze crème brûlée? Yes, but it’s not ideal. Freezing can change the texture. If you must freeze, wrap each ramekin tightly in plastic wrap, then place in a freezer bag. When you're ready to eat, thaw them in the fridge overnight before serving. In the fridge, your crème brûlée lasts about four days. Look for signs of spoilage, like an off smell or a watery texture. If the sugar layer is sticky or soft, it’s best to toss it. Always trust your senses to judge freshness. How do you know when crème brûlée is done? You can tell crème brûlée is done when the edges are set. The center should still jiggle a bit. This means it is creamy inside. Check it after baking for 30-35 minutes. Can I use pumpkin pie filling instead of puree? You can use pumpkin pie filling. However, it has added spices and sugar. This may change the taste of your dessert. Pure pumpkin puree gives a cleaner flavor. Can I use half-and-half instead of heavy cream? Yes, you can use half-and-half. It will make a lighter custard. Heavy cream gives a richer texture. If you want a creamier taste, stick with heavy cream. What can I use to caramelize sugar if I don't have a torch? If you don’t have a torch, use an oven broiler. Place the ramekins under the broiler for a minute. Watch closely to avoid burning. You want a nice amber color on the sugar. What to serve with crème brûlée? Crème brûlée pairs well with fresh fruit. Berries are a great choice. A dollop of whipped cream also adds a nice touch. Best drinks to pair with pumpkin crème brûlée? Coffee and dessert wines work well. A warm chai or spiced cider adds warmth. These drinks enhance the pumpkin flavor and spices. To make a delicious pumpkin crème brûlée, you need key ingredients like heavy cream and pumpkin puree. Follow step-by-step instructions for a creamy custard, then add tips to perfect the texture and achieve a caramelized sugar crust. Explore variations for flavor and dietary needs, plus learn how to store or freeze it. This dessert shines at any gathering. Enjoy making it, and impress everyone with your skills!

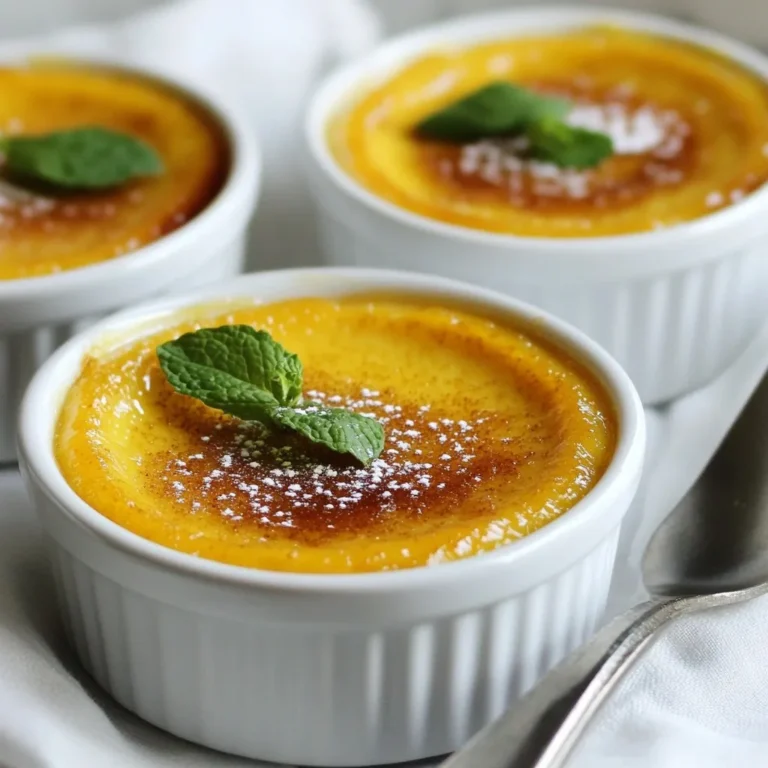
Pumpkin Crème Brûlée Irresistible Dessert Recipe

- 1 cup whole milk - 1 cup eggnog - 1/2 cup heavy whipping cream - 1/4 cup granulated sugar - 1 teaspoon pure vanilla extract - 1/2 teaspoon freshly grated nutmeg - 1/4 teaspoon ground cinnamon - 1/2 cup crushed sugar cookies (plus extra for garnish) - Whipped cream for serving The Sugar Cookie Eggnog Cocktail blends classic holiday flavors. Each ingredient plays an important role. Whole milk gives a creamy base. Eggnog adds rich flavor. Heavy whipping cream makes it extra smooth. Granulated sugar sweetens the drink. Pure vanilla extract brings warmth. Freshly grated nutmeg adds spice. Ground cinnamon gives a cozy touch. Crushed sugar cookies add crunch and sweetness. When you combine these ingredients, the magic happens. You create a festive drink that brings joy. Each sip reminds you of holiday treats. The crushed sugar cookies on top are fun and delicious. They make this cocktail even more special. This drink is perfect for gatherings. It brings people together with its delightful taste. You can enjoy it as a treat with friends or family. {{ingredient_image_2}} To start, combine 1 cup of whole milk, 1 cup of eggnog, and 1/2 cup of heavy whipping cream in a medium saucepan. Place this on medium heat. Stir gently until the mix is warm but not boiling. Heating it carefully keeps the flavors intact. Once the mixture is warm, add 1/4 cup of granulated sugar, 1 teaspoon of pure vanilla extract, 1/2 teaspoon of freshly grated nutmeg, and 1/4 teaspoon of ground cinnamon. Stir continuously until the sugar dissolves completely. This step is key for a smooth and tasty drink. While the mixture cools for about 10 minutes, prepare your glasses. Dip the rim of each glass in a bit of milk, then roll it in crushed sugar cookies. This gives a sweet touch to each sip. Pour the cooled eggnog mixture into the glasses, filling them about three-quarters full. For the finishing touch, add a generous dollop of whipped cream on top and sprinkle with more crushed sugar cookies. If you want to impress, you can also dust a bit of nutmeg or place a cinnamon stick in each glass. This cocktail is festive and fun, perfect for gatherings! To make the best Sugar Cookie Eggnog Cocktail, avoid boiling the mixture. Boiling can change the flavors and make it less creamy. Heat the milk, eggnog, and cream just until warm. After heating, let the mixture cool for about 10 minutes. This cooling time helps the flavors blend together. It’s a key step for a smooth taste. Garnishing makes your drink more fun and festive. Use whipped cream generously on top. This adds a rich and creamy layer. Next, sprinkle some nutmeg on the whipped cream. It gives a nice aroma and taste. You can also add a cinnamon stick for style. It looks great and adds flavor too. For extra sweetness, finish with some crushed sugar cookies on top. This adds a nice crunch and ties in the cookie flavor. Pro Tips Chill the Ingredients: For an extra refreshing drink, chill the milk and eggnog before combining them. This will help maintain the drink's cold temperature longer. Nutmeg Freshness: Always use freshly grated nutmeg for the best flavor. Pre-ground nutmeg can lose its potency over time. Whipped Cream Alternatives: Experiment with flavored whipped creams, like cinnamon or vanilla, to add a unique twist to your Sugar Cookie Eggnog Delight. Garnish Elegantly: Consider garnishing with a sprinkle of edible glitter or festive sprinkles for a visually appealing and celebratory touch. {{image_4}} You can make your Sugar Cookie Eggnog Cocktail even more festive by adding spirits. Rum is a classic choice, giving your drink warmth. Bourbon also works great, adding a rich, sweet flavor. Start with 1 to 2 ounces of your chosen spirit. Mix it into the warm eggnog base before pouring it into your glasses. This simple step turns a sweet treat into a cozy adult drink. If you prefer a non-dairy option, you can easily swap out the milk and cream. Almond milk is a great substitute that brings a nutty flavor. Coconut cream adds richness and a tropical twist. Use 1 cup of almond milk and 1/2 cup of coconut cream in place of whole milk and heavy cream. This keeps the drink creamy while catering to different dietary needs. Want to make your cocktail stand out? Consider adding extra flavorings. A few drops of peppermint extract can give your drink a cool kick. You can also play with spices. A pinch of ginger adds warmth, while orange zest brings a citrusy note. Just a little can elevate the taste and make your drink unique. Experiment and find your favorite combination! To store any leftover Sugar Cookie Eggnog mixture, follow these tips: - Cool the mixture: Let the eggnog cool to room temperature before storing. - Use airtight containers: Pour the mixture into clean, airtight containers. This helps keep it fresh. - Refrigerate immediately: Place the containers in the fridge as soon as possible. Make sure to label the containers with the date. This way, you’ll know when you made it! The shelf life of your stored eggnog depends on the ingredients: - Homemade eggnog mixture: Generally lasts about 3 to 5 days in the fridge. - Whole milk and cream: These typically stay fresh for about a week after opening. - Eggnog: If you use store-bought eggnog, check the label for specific dates. It usually lasts longer due to preservatives. Always trust your senses. If it smells off or looks strange, it’s best to toss it. Enjoy your festive drink while it’s fresh! The Sugar Cookie Eggnog Cocktail is a fun drink for the holidays. It mixes sweet eggnog with rich flavors from sugar cookies. This festive drink is perfect for parties or cozy nights at home. You get a creamy texture from milk and heavy cream, plus a hint of spice from nutmeg and cinnamon. Each sip tastes like a holiday treat. Yes, you can make this cocktail ahead of time! Prepare the eggnog mixture and store it in the fridge. Just make sure to keep it in a sealed container. When you are ready to serve, rim your glasses with crushed sugar cookies. Pour in the chilled drink and top with whipped cream. It’s a great way to save time during busy holiday gatherings. You can find pre-made Sugar Cookie Eggnog mix in many grocery stores. Look for brands like Southern Comfort or Evan Williams. Check the holiday beverage section for these mixes. Some local stores may even have their own versions. If you want a special treat, ask your local store if they carry any unique flavors. Yes, store-bought eggnog works great in this recipe! It saves time and still tastes good. Just pick a brand you enjoy. Some brands are thicker and creamier than others, so choose one that fits your taste. Feel free to add more spices if you want to boost the flavor! This blog highlighted how to make a delightful Sugar Cookie Eggnog cocktail. You learned about key ingredients like whole milk and eggnog, and I shared steps for mixing flavors and garnishing. The tips ensure a perfect drink every time, whether you prefer it alcoholic or non-dairy. With these simple instructions and ideas, you can impress your friends and family. Enjoy experimenting and make this festive drink your own!

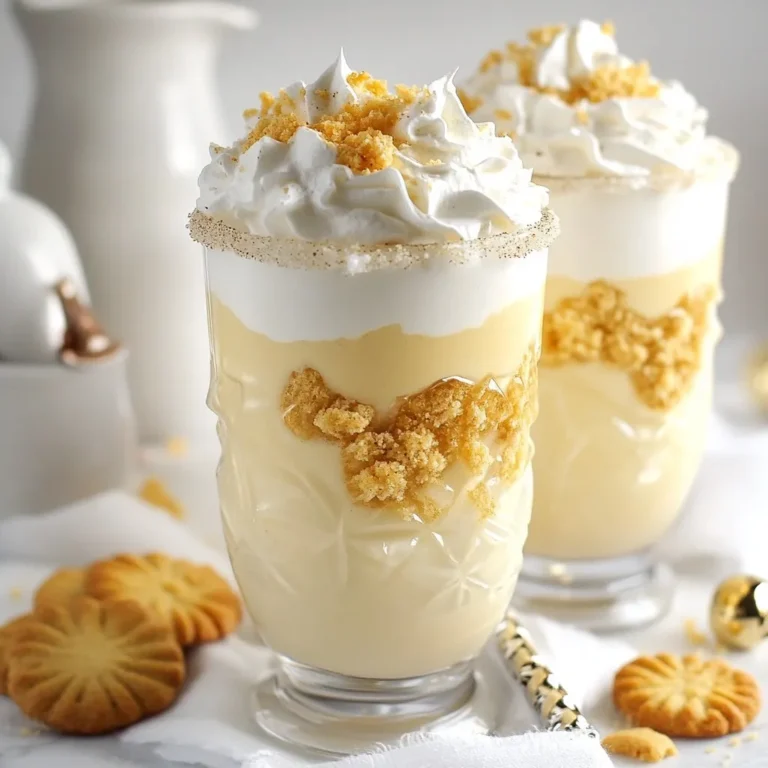
Sugar Cookie Eggnog Cocktail Festive and Flavorful Delight

To make this tasty Roasted Tomato Basil Soup, you need a few key ingredients. Here’s what you should gather: - 2 pounds ripe tomatoes, a mix of varieties for a more complex flavor profile, halved - 1 medium onion, chopped into small pieces - 4 cloves garlic, unpeeled - 2 tablespoons extra virgin olive oil - Salt and freshly ground black pepper, to taste - 1 teaspoon granulated sugar (to balance the acidity of the tomatoes) - 2 cups vegetable broth - 1 cup fresh basil leaves, tightly packed - ½ cup heavy cream (optional for added creaminess) Using ripe tomatoes is crucial. They add the rich taste you want. The mix of varieties brings depth to the soup. Don't skip the onion and garlic; they add sweet and savory notes. Olive oil helps to roast the veggies and adds flavor. Seasonings like salt, pepper, and sugar balance the soup and enhance the flavors. Vegetable broth gives it a nice base. Fresh basil is a must for that bright, herbal note. If you like a creamier texture, add the heavy cream. Now that you have your ingredients, you are ready to dive into the cooking process! {{ingredient_image_2}} Set your oven to 400°F (200°C). This high heat helps the veggies roast well. Roasting brings out deeper flavors in the tomatoes and onions. On a large baking sheet, lay out the halved tomatoes, chopped onion, and unpeeled garlic. Drizzle the olive oil evenly over them. Sprinkle salt, pepper, and sugar on top. This helps balance the tomato's acidity and brings out their sweetness. Put the baking sheet in the oven. Roast for 30 to 35 minutes. The tomatoes should collapse and get a nice caramel color. Make sure to turn them halfway through. This ensures they cook evenly. After roasting, let the garlic cool for a few minutes. Squeeze the soft garlic from the skins right into your pot. It should slide out easily. Carefully transfer the roasted tomatoes and onion into the pot with the garlic. Add the vegetable broth and bring everything to a gentle simmer over medium heat. This helps the flavors mix well. Let the mixture simmer for about 10 minutes. This melds the flavors. When ready, remove from heat and use an immersion blender to blend until smooth. If you want it chunkier, blend less. Toss in the fresh basil leaves and blend again until fully mixed. The basil adds a fresh, bright flavor that lifts the soup. If you like a creamy soup, stir in the heavy cream now. Heat gently, but do not boil. This keeps the cream smooth. Taste your soup and adjust as needed. You can add more salt, pepper, or sugar to get the flavor just right. Roasting brings out deep flavors in tomatoes. It caramelizes their natural sugars. A hot oven helps achieve this. Set your oven to 400°F (200°C). This temperature allows the tomatoes to soften. Roast for 30-35 minutes until they are tender. Turn the tomatoes halfway to ensure even cooking. Watch for a slight browning; that’s where the magic happens. To get a smooth soup, use an immersion blender. This tool blends the soup right in the pot. Blend until you reach your desired smoothness. If you like a chunkier soup, blend less. You can even leave some pieces whole for texture. This lets you enjoy bits of tomato and onion. To spice things up, try adding herbs or spices. A pinch of red pepper flakes gives heat. You can also mix in proteins like cooked chicken or beans. For garnishing, add a dollop of cream or a drizzle of olive oil. Fresh basil leaves on top add a pop of color and flavor. Enjoy experimenting with your soup! Pro Tips Choose the Right Tomatoes: Opt for a mix of heirloom, Roma, and cherry tomatoes for a rich and varied flavor profile that enhances your soup. Don’t Rush the Roasting: Allow the tomatoes and garlic to caramelize properly for deeper, sweeter flavors; this can take up to 40 minutes depending on your oven. Use Fresh Basil: Always add fresh basil at the end of the cooking process to preserve its vibrant color and aromatic qualities, making your soup fragrant and appealing. Adjust Consistency: If you prefer a thicker soup, you can simmer it longer to reduce the liquid, or add a bit of cooked rice or potatoes to thicken it up. {{image_4}} You can make this soup vegan by swapping out the heavy cream and broth. Use coconut milk for creaminess. For broth, choose vegetable broth or make your own. This keeps the rich taste without dairy. You can add more veggies to boost flavor. Carrots or bell peppers work well. Even zucchini can add a nice texture. Feel free to toss in some fresh herbs like thyme or oregano for extra flavor. Cheese can also enhance the soup. Adding parmesan or crumbled feta gives a nice touch. Stir it in just before serving for a creamy finish. Pair this soup with crusty bread or a grilled cheese sandwich. The bread soaks up the flavors and adds crunch. For a lovely touch, serve the soup in wide bowls and drizzle olive oil on top. You can also garnish with fresh basil leaves to make it look pretty. Enjoy! After enjoying your roasted tomato basil soup, let it cool to room temperature. - Refrigeration: Store the soup in the fridge. Use an airtight container to keep it fresh. - Container Recommendations: Glass jars work well. They do not stain and are easy to clean. If you want to save some soup for later, freezing is a great option. 1. Steps to Freeze: First, let the soup cool completely. Pour it into freezer-safe bags or containers. Leave some space for expansion. 2. Reheat Properly: To reheat, thaw the soup overnight in the fridge. Heat it gently on the stove, stirring often. How long does your soup stay fresh? - Refrigerated Soup: It lasts about 3-5 days in the fridge. - Frozen Soup: It can stay good for up to 3 months in the freezer. Make sure to label your containers with dates for easy tracking! It takes about 50 minutes in total. The prep time is just 10 minutes. You will roast the veggies for 30-35 minutes. Then, simmer and blend the soup for about 10 minutes. Yes, you can use canned tomatoes. They save time and are easy to find. Just choose good-quality canned tomatoes. They can give a rich flavor but may lack the fresh taste of roasted ones. For a dairy-free option, use coconut milk or almond milk. These give creaminess without dairy. If you want lower calories, try cashew cream or blended silken tofu. Both add a nice texture. Yes, this soup is quite healthy. It is low in calories and high in vitamins. Tomatoes are rich in antioxidants. Basil provides anti-inflammatory benefits. Using broth instead of cream keeps it light and nutritious. Absolutely! You can try thyme or oregano for a different taste. Chives or parsley can also add freshness. Feel free to mix and match herbs to find your favorite flavor. In this article, I covered how to make delicious Roasted Tomato Basil Soup. We discussed the key ingredients needed, like ripe tomatoes and fresh basil. I explained each step, from preheating your oven to blending the soup for that perfect texture. You learned tips for roasting and seasoning to enhance flavor. Remember, this soup can be made vegan or customized with extra veggies. Enjoy your cooking adventure, and savor the rich tastes of your homemade soup. Each bowl holds comfort and warmth.

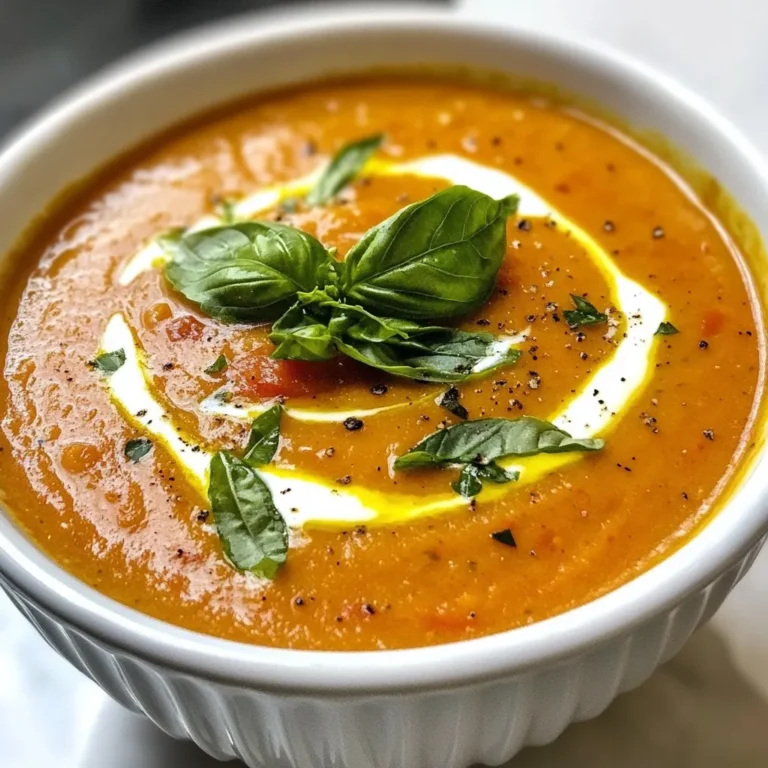
Roasted Tomato Basil Soup Flavorful and Simple Recipe

Here is what you need for Texas Chocolate Pecan Pie: - 1 pre-made pie crust (9 inches) - 1 cup pecans, toasted and chopped - 1 cup semi-sweet chocolate chips - 3/4 cup granulated sugar - 1/4 cup packed brown sugar - 1/2 cup light corn syrup - 3 large eggs - 1/4 cup unsalted butter, melted - 1 teaspoon vanilla extract - 1/4 teaspoon salt - Additional chocolate chips and pecans for topping Each ingredient plays a key role. The pre-made crust saves time and gives a nice base. The pecans add a crunchy texture. The chocolate chips bring rich sweetness. Both sugars enhance the flavor and sweetness of the filling. The corn syrup binds everything together. Eggs provide structure and creaminess. Butter adds richness, while vanilla boosts the pie's aroma. Finally, the salt balances all the flavors. Feel free to adjust the amount of chocolate chips and pecans on top. This customization makes the pie your own. The result? A dessert that is hard to resist! Enjoy making this pie and tasting every bite. {{ingredient_image_2}} First, preheat your oven to 350°F (175°C). This step is key for a perfect bake. Next, take your pre-made pie crust and fit it into a 9-inch pie pan. Use a fork to poke small holes in the bottom. This helps the crust not bubble during baking. In a large mixing bowl, add 3/4 cup granulated sugar, 1/4 cup brown sugar, and 1/2 cup light corn syrup. Pour in 1/4 cup melted unsalted butter and 1 teaspoon vanilla extract. Whisk it all together until smooth. The mixture should look glossy and well combined. Now, crack 3 large eggs into the bowl, adding them one at a time. Mix well after each egg. This helps the filling become creamy. Don't forget to add 1/4 teaspoon salt for flavor balance. Gently fold in 1 cup of toasted, chopped pecans and 1 cup of semi-sweet chocolate chips. Be careful not to overmix. You want the pecans and chocolate evenly spread in the filling. Carefully pour your chocolate pecan filling into the prepared pie crust. For a pretty finish, sprinkle some extra chocolate chips and chopped pecans on top. This adds a nice touch! Place the pie in the center of the preheated oven. Bake it for 50 to 55 minutes. The pie is done when the filling is firm in the center and the edges are golden brown. Once baked, take the pie out of the oven and set it on a wire rack. Let it cool for at least 1 hour. This cooling time helps the filling set, making it easier to slice. Enjoy your delicious Texas Chocolate Pecan Pie! When making Texas Chocolate Pecan Pie, some mistakes can spoil the fun. Here are a few to watch for: - Overbaking: This can dry out your pie. Check it at 50 minutes. - Not cooling properly: Let it cool for at least an hour. This helps the filling set. - Skipping the fork holes: Poking holes in the crust stops bubbles. Don't skip this step! A great crust makes the pie shine. Here are tips for a tasty, flaky crust: - Use a pre-made crust: It saves time and still tastes good. - Poke holes: As mentioned, this prevents bubbles. Use a fork to poke several holes. - Chill the crust: If you have time, chill it for 30 minutes. This helps keep it flaky. Serve your pie with flair! Here are some tasty ideas: - Whipped cream: A dollop on each slice adds creaminess. - Ice cream: Vanilla ice cream balances the rich chocolate. - Extra toppings: Sprinkle chocolate chips or pecans on top for a nice touch. These simple tips will help you enjoy Texas Chocolate Pecan Pie to the fullest! Pro Tips Use Fresh Pecans: For the best flavor, toast your pecans just before using them. This enhances their nuttiness and adds a wonderful crunch to your pie. Don't Overbake: Keep a close eye on your pie as it bakes. Overbaking can lead to a dry filling. The pie should be set but still slightly jiggly in the center when you take it out. Cool Completely: Allow the pie to cool completely before slicing. This helps the filling to set properly, making it easier to cut clean slices. Serve with a Twist: Elevate your pie by serving it with a scoop of vanilla ice cream or a dollop of whipped cream, providing a delightful contrast to the rich chocolate filling. {{image_4}} You can switch things up with dark chocolate. Use one cup of dark chocolate chips instead of semi-sweet. This change adds a rich flavor that pairs well with pecans. Another fun twist is to add bourbon. Mix in two tablespoons of bourbon with the filling. This ingredient boosts the pie's complexity and gives it a warm, inviting taste. If you need a gluten-free pie, look for a gluten-free crust. Many stores sell ready-made gluten-free options. Check the label to ensure it fits your needs. The filling remains the same and tastes just as great. To make this pie vegan, swap the eggs for flax eggs. Mix one tablespoon of ground flaxseed with three tablespoons of water for each egg. Let it sit for a few minutes until it thickens. Use vegan butter in place of unsalted butter for a creamy texture. You can also choose dairy-free chocolate chips for a fully vegan treat. Store leftover Texas chocolate pecan pie in an airtight container. Keep it in the fridge for up to four days. Make sure to cover it well to prevent it from drying out. If you want to enjoy it later, refrigerating it is your best bet. To freeze the pie, let it cool completely first. Wrap it tightly in plastic wrap, then place it in a freezer-safe bag. This method helps keep the flavors fresh. You can freeze it for up to three months. When you're ready to eat, just thaw it in the fridge overnight. Reheat your pie in the oven for the best taste. Preheat the oven to 350°F (175°C). Place the pie on a baking sheet and cover it with foil. Heat for about 15-20 minutes until warm. This method helps keep the crust crisp and the filling creamy. Enjoy your pie warm with a scoop of ice cream or whipped cream! You can tell the pie is done when the center is firm but not jiggly. The edges should be a nice golden brown. A toothpick inserted in the center should come out mostly clean. If you see a bit of chocolate, that’s okay! Yes, you can make this pie a day ahead. Just let it cool completely after baking. Once cool, cover it with plastic wrap and store it in the fridge. This way, the flavors will deepen. I love to serve this pie with a dollop of whipped cream or a scoop of vanilla ice cream. The cold treats balance the warm, rich pie. You could also add caramel sauce for extra sweetness. For the best Texas Chocolate Pecan Pie, try local bakeries or diners in Texas. Many places make their own versions. You can also find great recipes online to try at home. To keep the filling from being runny, make sure you bake it long enough. Let it cool completely before slicing. The cooling time is key for the filling to set properly. Also, using fresh eggs helps create a firmer filling. This blog post covered how to make a Texas Chocolate Pecan Pie from scratch. We discussed essential ingredients, detailed baking steps, and helpful tips. I also shared variations for different diets and how to store leftovers properly. In summary, making this pie is straightforward and rewarding. With the right ingredients and a few tricks, your pie will impress everyone. Enjoy every slice of this delicious dessert!

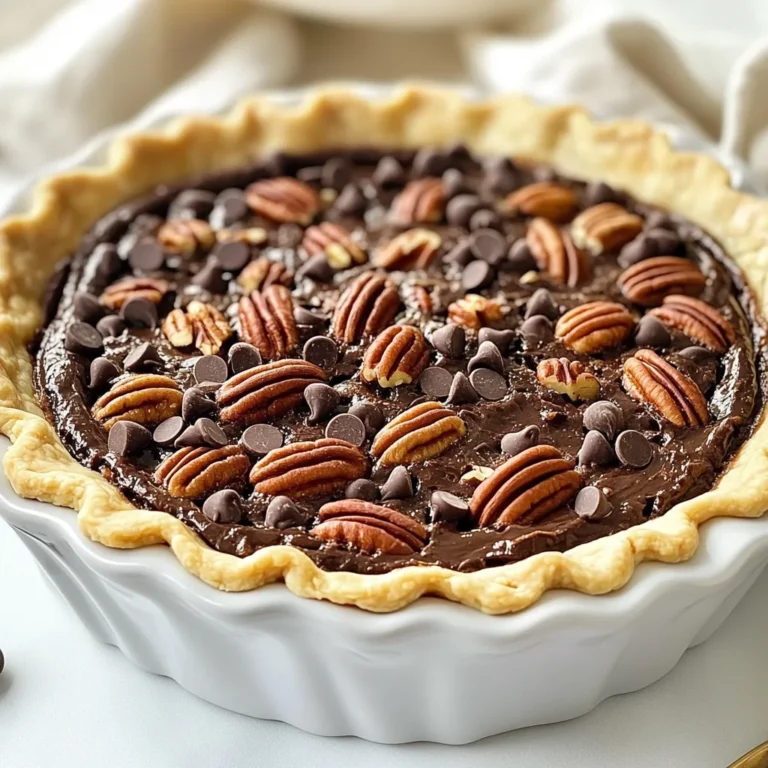
Texas Chocolate Pecan Pie Irresistible Dessert Recipe

To make a Brown Butter Latte, you need a few key ingredients. Each one adds to the rich and creamy flavor. Here’s what you need: - 1 tablespoon unsalted butter - 1 cup whole milk (or your choice of non-dairy alternative) - 1 shot of espresso (or 1/2 cup of robust brewed coffee) - 1 tablespoon brown sugar (adjust to your sweetness preference) - 1/4 teaspoon ground cinnamon - A pinch of flaky sea salt These ingredients work together to create a cozy drink that warms your soul. The browned butter gives it a nutty taste, while the espresso brings strength. If you prefer non-dairy options, there are many choices. Almond milk, oat milk, or coconut milk make great substitutes for whole milk. Each type adds its unique flavor. For a creamier texture, try using barista versions of these milks. They froth well and blend beautifully with the espresso. Enhance your Brown Butter Latte with some fun toppings. Here are a few ideas: - Whipped cream (for an indulgent topping) - Cocoa powder (for a chocolatey touch) - Additional cinnamon (for extra warmth) Feel free to experiment! A sprinkle of flaky sea salt adds a nice contrast to the sweetness. These choices let you personalize your drink and make it your own. Enjoy crafting your perfect Brown Butter Latte! {{ingredient_image_2}} Start by adding 1 tablespoon of unsalted butter to a small saucepan. Set the heat to medium. Swirl the pan as the butter melts. Keep a close eye on it. In about 5-7 minutes, the butter will turn a golden brown. You will smell its nutty aroma. This is the point where it becomes brown butter. Be careful, as burnt butter tastes bitter. If you see dark bits, strain the butter through a fine mesh sieve. This will give you a smooth texture. While the butter cools, make your coffee. You can use a shot of espresso or 1/2 cup of strong brewed coffee. If you have an espresso machine, use it for the best flavor. If not, brew your favorite strong coffee. The key is to have a rich base for your latte. Once brewed, set it aside. Now it’s time to froth the milk. Use 1 cup of whole milk or your favorite non-dairy alternative. Heat the milk in another saucepan over medium heat. Watch for steam but don’t let it boil. If you have a milk frother, use it to create a thick foam. If you don’t, put the warm milk in a jar. Shake it vigorously with the lid on until frothy. This will give your latte that creamy texture we all love. To make perfect browned butter, start with unsalted butter. This choice lets you control the salt level. Use a small, light-colored saucepan. This will help you see the color change. Melt the butter over medium heat. Stir it gently but often. Keep a close watch; it can go from brown to burnt quickly. Look for a nutty smell and a golden hue. Remove it from heat right away. If needed, strain it to get rid of dark bits. This step gives you a smooth finish. For creamy foam, heat your milk slowly. Use a saucepan or microwave. Watch for steam but don’t let it boil. If you have a milk frother, use it! Froth the milk until it’s thick and fluffy. If you don't have one, shake warm milk in a jar with a lid. This method works too! Pour the frothed milk over your coffee mix gently. This way, you create lovely layers. Use a spoon to hold back the foam until the last. This helps you get that café-style look right at home. You can adjust the sweetness to fit your taste. Start with one tablespoon of brown sugar. If you want it sweeter, add more. Try adding a pinch of ground cinnamon for warmth. Other spices like nutmeg or cardamom can add a fun twist too. If you enjoy flavored lattes, add vanilla extract or a splash of hazelnut syrup. Don't be shy to experiment! Each change can make your Brown Butter Latte unique. Pro Tips Watch the Butter Closely: As the butter melts, keep a close eye on it to ensure it doesn’t burn. The ideal brown butter should have a nutty aroma and a rich golden color. Choose Your Coffee Wisely: For the best flavor, use a high-quality espresso or a strong brewed coffee. The coffee’s robust nature will complement the nutty brown butter beautifully. Experiment with Milk Alternatives: Feel free to use non-dairy milk such as oat milk or almond milk for a different flavor profile. Each alternative will lend a unique taste to your latte. Presentation Matters: Serve your latte in a clear glass mug to showcase the beautiful layers. A sprinkle of cocoa or cinnamon on top adds a delightful finishing touch. {{image_4}} You can enhance your Brown Butter Latte with many fun flavors. Adding a splash of vanilla extract gives a sweet twist. Hazelnut syrup also pairs well, making the drink nutty and rich. For a bold kick, try mixing in some chocolate syrup. You could even add a dash of pumpkin spice to bring in warmth and comfort. Choosing the right milk can change your latte experience. For a nutty flavor, almond milk works great. Oat milk is creamy and frothy, perfect for lattes. Coconut milk adds a tropical touch, making each sip feel like a vacation. Each option provides a unique taste while keeping it smooth and delicious. Seasonal flavors can make your Brown Butter Latte special. In fall, go for apple spice or maple syrup. Winter calls for peppermint or gingerbread flavors. During spring, try adding a splash of lavender or lemon zest for freshness. In summer, a scoop of ice cream can turn this latte into a fun treat. Exploring these variations keeps your drink exciting all year round! Storing leftover browned butter is easy. First, let it cool to room temperature. Then pour it into a clean, airtight container. You can keep it in the fridge for up to two weeks. If you want to store it longer, freeze it in small portions. This way, you can use it whenever you need that nutty flavor. Storing a prepared latte can be tricky. It’s best enjoyed fresh, but if you have leftovers, store it in the fridge. Use a sealed jar or container. It will stay good for up to 24 hours. However, the foam will lose its charm. If you can, drink it right away for the best taste. To reheat your latte, avoid using the microwave if possible. Instead, pour it into a small saucepan. Heat it gently over low heat while stirring. This helps keep the flavors intact. If you want some foam again, froth a bit of milk separately and add it on top. Enjoy your warm, rich latte just like the first sip! A Brown Butter Latte is a rich coffee drink. It blends espresso with nutty brown butter and creamy milk. The added brown sugar and cinnamon give it a sweet kick. This latte is perfect for cozy mornings or afternoon treats. The brown butter adds a unique depth to the drink. You get a warm, toasty flavor that delights your senses. Yes, you can make a Brown Butter Latte dairy-free. Simply replace whole milk with a plant-based option. Almond, oat, or coconut milk all work well. Each gives a different taste and texture. Oat milk froths nicely and adds creaminess. Almond milk brings a light, nutty flavor. You can enjoy this latte without dairy and still love it! A Brown Butter Latte has some health perks. It contains antioxidants from coffee, which help fight free radicals. Cinnamon may support healthy blood sugar levels. The healthy fats in butter can provide energy and fullness. Using whole or non-dairy milk adds calcium and vitamins. Just remember, enjoy it in moderation for the best benefits! This post showed you how to make a tasty brown butter latte step by step. We explored the essential ingredients, like brown butter and coffee. You learned about helpful tips and tricks to get the best flavors and foam. We also discussed cool variations, storage tips, and common questions about the drink. Now you can impress anyone with your new skills. Enjoy making this latte your own, and have fun experimenting with flavors!

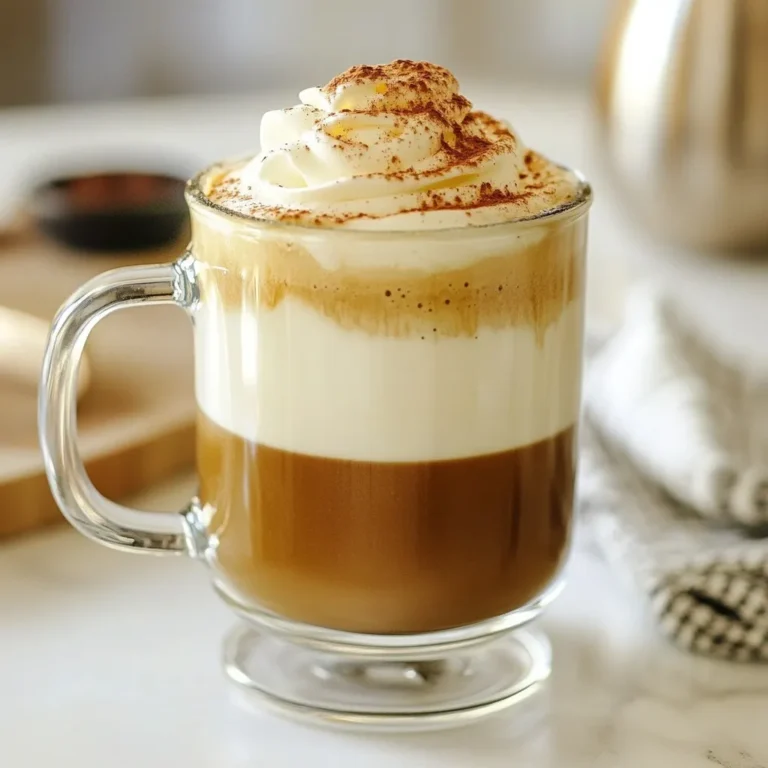
Brown Butter Latte Rich and Creamy Coffee Delight

- 1 cup all-purpose flour - 1/2 cup unsweetened cocoa powder - 1/2 cup packed brown sugar - 1/4 teaspoon salt - 1/2 cup unsalted butter, softened - 1 cup pecans, coarsely chopped - 1 cup chocolate chips (semi-sweet or dark) - 3 large eggs - 3/4 cup corn syrup - 1/2 cup granulated sugar - 1 teaspoon pure vanilla extract - 1/4 teaspoon ground cinnamon To create these bars, I focus on quality and balance. The all-purpose flour gives the crust its structure. The unsweetened cocoa powder adds a rich chocolate flavor. I use both brown sugar and granulated sugar for a nice blend of sweetness. Corn syrup adds that classic sticky texture we love in pecan pie. The eggs help bind everything together, making the filling creamy and rich. - Pecan types (English, Southern) - Chocolate chips preferences (semi-sweet or dark) - Flavor enhancers (vanilla extract, ground cinnamon) For the pecans, I recommend using either English or Southern types. English pecans are softer, while Southern ones provide a crunchier bite. When it comes to chocolate chips, semi-sweet or dark can change the flavor profile. Use what you like best! Adding a splash of vanilla extract enhances the flavor. A sprinkle of ground cinnamon can bring warmth and depth. These optional ingredients let you personalize your bars for your taste. {{ingredient_image_2}} Preheat your oven to 350°F (175°C). This step is key to a great crust. In a medium bowl, mix together: - 1 cup all-purpose flour - 1/2 cup unsweetened cocoa powder - 1/2 cup packed brown sugar - 1/4 teaspoon salt Use a whisk to blend these dry ingredients well. Next, add in 1/2 cup of softened unsalted butter. Mix it with a fork or pastry cutter until it looks like coarse crumbs. Press this mixture evenly into the bottom of a greased 9x9-inch baking dish. Bake this crust for 15 minutes, then remove it and let it cool slightly. In a large bowl, crack 3 large eggs. Add in: - 3/4 cup corn syrup - 1/2 cup granulated sugar - 1 teaspoon pure vanilla extract - 1/4 teaspoon ground cinnamon Whisk these ingredients together until the mixture is smooth and well combined. This creates a rich base for your filling. Next, gently fold in: - 1 cup pecans, coarsely chopped - 1 cup chocolate chips Make sure the nuts and chocolate are evenly mixed in. This adds a delightful crunch and sweetness. Once your crust is ready, pour the filling over the warm crust. Use a spatula to spread it evenly. This ensures every bite has a perfect balance of flavors. Return the baking dish to the oven and bake for about 25-30 minutes. You know it's done when the filling is set and puffs slightly. A toothpick inserted in the center should come out with a few moist crumbs, not liquid batter. After baking, allow the bars to cool completely in the pan on a wire rack for about 1 hour. This cooling time is important. It helps the bars set and makes cutting easier. Once cooled, use a sharp knife to cut into squares or bars. Clean the knife between cuts for neat edges. Enjoy your delicious creation! To get a great texture, focus on the crust first. Make sure the butter is soft. Mix your dry ingredients well before adding butter. You want a crumbly mix, not a paste. Press the mixture firmly into your baking dish. This helps the crust hold together. Bake it for just 15 minutes. This gives it a nice base for the filling. Now, for the filling, whisk the eggs until smooth. Mix in the corn syrup and sugars. This will ensure an even blend. When you fold in the pecans and chocolate, be gentle. You want them spread out, not mashed. After baking, let the bars cool completely. If you cut them too soon, they may crumble. To make your bars look fancy, dust them with powdered sugar. This simple touch makes a big difference. You can also serve them with vanilla ice cream. The creaminess balances the sweet and rich flavors. Pair these bars with a warm cup of coffee. The bitterness of coffee complements the sweetness of the pie. If you prefer something sweeter, try dessert wine. This pairing makes for a delightful treat. Pro Tips Chill the Dough: If your dough is too soft to press into the pan, chill it in the refrigerator for about 15-20 minutes. This will make it easier to handle and help it hold its shape while baking. Use Quality Chocolate: Choose high-quality chocolate chips for the best flavor. Dark chocolate can add a rich depth to the bars, while semi-sweet offers a nice balance of sweetness. Don’t Overbake: Keep an eye on the bars while baking. Overbaking can lead to a dry filling. The edges should be set, but the center can have a slight jiggle when you take them out of the oven. Store Properly: To keep your bars fresh, store them in an airtight container at room temperature for up to a week. You can also freeze them for longer storage—just make sure to wrap them well! {{image_4}} You can have fun with different nuts in your Chocolate Bourbon Pecan Pie Bars. Try using walnuts or hazelnuts instead of pecans. Each nut adds its own unique flavor and texture. Walnuts give a slightly bitter taste, while hazelnuts add a sweet, nutty flavor. You can mix and match to find your favorite nut combo! Another way to change the flavor is by adding different liqueurs. While bourbon is the classic choice, you can use rum or even brandy. Each liqueur brings a new depth to the bars. Just be careful not to add too much; a little goes a long way! If you want to make these bars gluten-free, you can swap the all-purpose flour for a gluten-free blend. Many brands offer blends that work well in baked goods. This change keeps the texture and taste similar to the original recipe. For those watching their sugar, you can use a sugar substitute. Options like stevia or erythritol can reduce sugar without losing sweetness. Always check the package for the right amount to use since these substitutes can vary in sweetness. Enjoy your delicious treat while sticking to your dietary goals! To keep your Chocolate Bourbon Pecan Pie Bars fresh, use airtight containers. Glass or plastic containers work well. Make sure they seal tightly. If you plan to keep them at room temperature, place them in a cool, dry spot. Avoid sunlight to prevent melting chocolate. For longer storage, refrigeration is best. Place the bars in the fridge for added freshness. Just remember to let them sit at room temperature for a few minutes before serving. Chocolate Bourbon Pecan Pie Bars can stay fresh for up to one week when stored properly. If you want to keep them longer, freezing is a great option. Wrap the bars in plastic wrap and then in aluminum foil. This helps prevent freezer burn. You can freeze them for up to three months. When you're ready to enjoy, thaw them in the fridge overnight. Then, let them sit out for about 30 minutes before serving. This way, they regain their delicious texture and flavor. Can I make these bars ahead of time? Yes, you can make these bars ahead of time. They taste even better after a day in the fridge. Just store them in an airtight container. This keeps them fresh and moist. What’s the best way to reheat leftovers? To reheat leftovers, set your oven to 350°F (175°C). Place the bars on a baking sheet. Heat them for about 10 minutes. This warms them up without making them dry. You can also use the microwave for a quick heat-up. Just heat for about 15-20 seconds. Can I make these without bourbon? You can definitely make these without bourbon. Just leave it out and add a bit more vanilla extract. This will keep the flavor rich and sweet. You won’t miss the bourbon at all! Now you know how to make Chocolate Bourbon Pecan Pie Bars. We covered all the great ingredients, easy steps, and fun tips. You learned about crust, filling, and variations to try. Don’t forget storage tips for freshness. Each bar is a blend of flavors you can share and enjoy. Explore your creativity in the kitchen. With this recipe, you can impress friends and family. Enjoy your baking adventure and savor every bite!

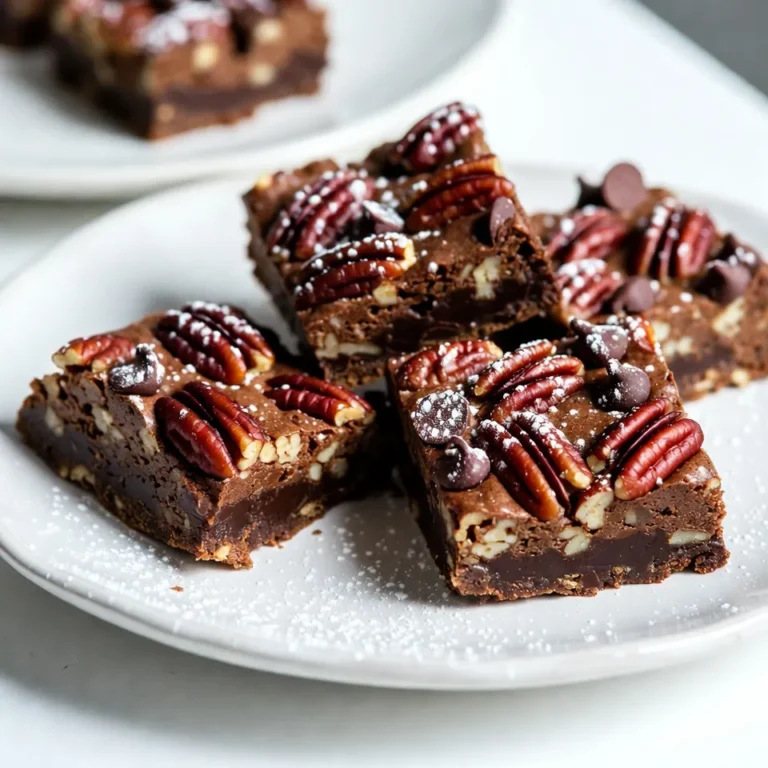
Chocolate Bourbon Pecan Pie Bars Delicious Sweet Treat

- 2 pounds boneless, skinless chicken thighs - 1 can (15 oz) black beans, rinsed and drained - 1 can (10 oz) enchilada sauce (choose red or green based on your preference) - 1 cup corn kernels (fresh or frozen) - 1 cup diced bell peppers (any color desired) - 1 cup diced onions - 2 teaspoons ground cumin - 1 teaspoon chili powder - Salt and pepper to taste - 6-8 whole wheat tortillas - 2 cups shredded cheese (cheddar or a Mexican blend) - Fresh cilantro, for garnish - Sour cream, for serving (optional) This recipe serves six. Each serving has around 450 calories. You get about 30 grams of protein, 20 grams of fat, and 40 grams of carbs. The fiber content is around 10 grams, making it a filling choice. - You can swap chicken thighs for chicken breasts if you prefer. - Use any type of beans like pinto or kidney beans. - For a vegan option, replace chicken with tofu or jackfruit. - Try using corn tortillas for a gluten-free alternative. - If you want a spicy kick, add diced jalapeños or a dash of hot sauce. {{ingredient_image_2}} Start by placing 2 pounds of boneless, skinless chicken thighs in your slow cooker. Season them with salt and pepper. Then, add 2 teaspoons of ground cumin and 1 teaspoon of chili powder. Make sure the chicken is well coated with these spices. This step adds great flavor to the meat. Next, add 1 can of black beans, 1 cup of corn kernels, 1 cup of diced bell peppers, and 1 cup of diced onions on top of the seasoned chicken. Pour half of the 10-ounce can of enchilada sauce over these layers. Gently stir to mix everything together. This helps the flavors blend nicely. Cover the slow cooker and set it to cook on low for 6-7 hours or on high for 3-4 hours. The chicken should be tender and easy to shred with a fork when done. Once the time is up, carefully take the chicken out. Shred the chicken with two forks and return it to the pot. Stir to combine the chicken with the veggies and sauce. This mixes all the delicious flavors together. To shred chicken, first remove it from the slow cooker. Use two forks to pull the meat apart. This method works best when the chicken is hot and tender. If you find it tough, let it cool slightly, then try again. Shredded chicken can mix well with the sauce. It helps keep the flavor strong. Warm your tortillas before rolling. Heat them in the microwave for 15-20 seconds. This makes them soft and easy to roll. Place a scoop of chicken mixture in the center. Add a sprinkle of cheese on top. Tightly roll each tortilla, ensuring the filling stays inside. Place them seam-side down in the slow cooker to hold their shape. Serve your enchiladas on a bright platter. Drizzle with extra enchilada sauce for flavor. Top with fresh cilantro for a pop of color. Add lime wedges on the side for a zesty kick. You can also offer sour cream for a creamy touch. This makes your meal look appealing and inviting. Pro Tips Use Fresh Ingredients: Opt for fresh vegetables and herbs whenever possible for enhanced flavor and nutrition in your enchiladas. Customize Your Spice Level: Adjust the amount of chili powder based on your preference for heat; you can also add diced jalapeños for an extra kick. Make Ahead: Prepare the chicken and vegetable mixture a day in advance and refrigerate it. This allows the flavors to meld beautifully before cooking. Experiment with Cheese: Try using a blend of cheeses such as Monterey Jack and pepper jack for a deliciously creamy and spicy topping. {{image_4}} You can make a great vegetarian version of chicken enchiladas. Instead of chicken, use 2 cups of cooked lentils or chickpeas. Add more veggies like zucchini, mushrooms, or spinach. You can still use the same spices for flavor. The black beans and corn give it a nice texture. Just follow the same steps and enjoy a meat-free meal. If you love heat, add some diced jalapeños or a splash of hot sauce. You can also use spicy enchilada sauce instead of mild. For a smoky flavor, try adding chipotle peppers in adobo sauce. This will give your enchiladas a nice kick. Adjust the spices to your taste, and don’t forget to check for heat! You can serve your enchiladas with various sauces. Try a green tomatillo sauce for a zesty touch. A creamy avocado sauce works great too. You can even use salsa verde or pico de gallo for fresh flavors. Each sauce brings a new taste and makes the meal even more enjoyable. Get creative and mix it up! After enjoying your slow cooker chicken enchiladas, let any leftovers cool down. Place the enchiladas in an airtight container. Make sure to cover them well to prevent drying out. You can store them in the fridge for up to 3 days. If you want to keep them longer, freezing is a great option. To reheat your enchiladas, you can use the microwave or the oven. For the microwave, place one or two enchiladas on a plate and cover with a damp paper towel. Heat for 1-2 minutes or until hot. In the oven, preheat to 350°F (175°C). Place the enchiladas in a baking dish, cover with foil, and heat for about 15-20 minutes. This will keep them moist and tasty. If you want to freeze enchiladas, they freeze well. Before freezing, make sure they are cooled completely. Wrap each enchilada in plastic wrap or foil, then place them in a freezer-safe bag. They can last up to 3 months in the freezer. To enjoy, just thaw them in the fridge overnight, then reheat as mentioned above. Enjoy your delicious enchiladas later! Yes, you can use frozen chicken thighs. Just add an extra hour to the cooking time. The slow cooker will heat the chicken safely. It will still shred well and soak up the flavors. To make enchiladas gluten-free, use corn tortillas instead of wheat ones. Ensure the enchilada sauce is gluten-free. Many store brands offer gluten-free options. Always check the labels to be safe. You can serve chicken enchiladas with a few sides for a full meal. Here are some ideas: - Spanish rice or cilantro lime rice - Refried beans or black beans - A fresh garden salad - Guacamole and tortilla chips - A zesty corn salad These sides will add flavor and make your meal more fun. Enjoy your enchiladas with these tasty pairings! This blog post covered the key steps to make chicken enchiladas. We looked at the ingredients needed, including nutritional info and substitutions. Then, I shared how to prepare and layer the chicken, along with cooking times. I included tips for shredding chicken and rolling enchiladas. We explored variations like vegetarian options and spicy twists. Finally, we discussed how to store leftovers and answer common questions. With these tips, you can create delicious enchiladas that suit your taste. Happy cooking!

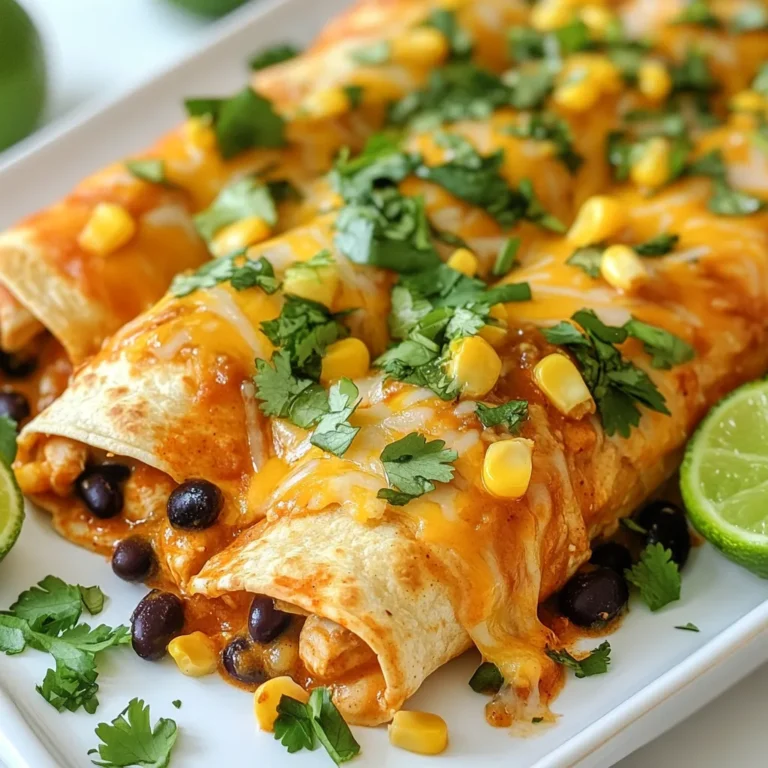
Savory Slow Cooker Chicken Enchiladas Easy Recipe

You can use fresh corn or canned corn in this chowder. I love using fresh corn for its sweet, juicy flavor. If you pick fresh corn, you need about 4 cups of kernels. If fresh corn is not available, you can use 2 cans of sweet corn. Just drain them before adding to the chowder. This chowder needs a few fresh veggies to make it hearty. You will need: - 1 medium onion, finely chopped - 2 medium potatoes, peeled and diced - 1 red bell pepper, diced - 3 cloves garlic, minced These vegetables add flavor and texture. The onion brings sweetness. The potatoes make it filling. The bell pepper adds color, and the garlic gives it a nice kick. Herbs and spices bring the chowder to life. For this recipe, you will need: - 1 teaspoon smoked paprika for a deep flavor - 1 tablespoon fresh thyme, chopped (or 1 teaspoon dried thyme) - Salt and freshly ground black pepper to taste Smoked paprika adds a warm, rich taste. Thyme gives it a fresh, earthy note. Be sure to adjust the salt and pepper to match your taste. {{ingredient_image_2}} Start by heating the olive oil in a large pot over medium heat. Once the oil is hot, add the finely chopped onion and sauté for about 3-4 minutes. You want the onion to become soft and clear. This step builds a great flavor base for your chowder. Next, stir in the minced garlic and diced red bell pepper. Cook this mix for 2 minutes until the garlic gives off a nice smell and the bell pepper starts to soften. Then, add the diced potatoes and fresh corn kernels to the pot. Mix everything well to spread the veggies evenly. Pour in the vegetable broth and bring the pot to a boil. Once boiling, lower the heat and let it simmer for 15-20 minutes. You want the potatoes to be soft enough to poke with a fork. After the potatoes are tender, it’s time to blend. Use an immersion blender to puree about half of the soup. This gives a creamy feel while keeping some chunks of corn and potatoes intact. If you don’t have an immersion blender, carefully transfer half to a regular blender. Blend until smooth, then put it back into the pot. After blending, stir in the heavy cream and smoked paprika. Season with salt, pepper, and chopped thyme. Cook for another 5 minutes to let the flavors mix. Enjoy the warm, hearty chowder! You can change the flavor of your chowder easily. To add more depth, try using smoked paprika. It gives a warm, rich taste. If you like spice, a pinch of cayenne pepper works well. Fresh herbs like thyme brighten the dish. You can also use dried thyme if fresh isn’t available. Always taste before serving. Adjust salt and pepper to your liking. The texture of your chowder is key. Use an immersion blender to blend half the soup. This keeps some corn and potato chunks. If you want it creamier, blend more. Make sure to leave some pieces for heartiness. If you prefer a thicker chowder, let it simmer longer. This helps it reduce and thicken naturally. Don’t worry if you don’t have all the ingredients. Canned corn works fine if fresh isn't available. For a dairy-free option, use coconut cream instead of heavy cream. You can swap potatoes for sweet potatoes for a different flavor. If you lack fresh herbs, dried ones work too. Just use less since dried herbs are stronger. Pro Tips Fresh Corn Matters: Using fresh corn kernels will enhance the sweetness and flavor of your chowder compared to canned corn. Texture Variations: For a creamier texture, blend more of the soup, but be sure to leave some chunks for added heartiness. Seasoning Adjustments: Always taste and adjust the seasoning before serving; a pinch of salt can really elevate the flavors. Garnish for Freshness: Fresh herbs like chives or parsley not only add color but also a burst of freshness that complements the chowder beautifully. {{image_4}} To make a vegan version, swap heavy cream for coconut cream. Use vegetable broth to keep it plant-based. This change gives a rich and creamy taste without dairy. You can also add more veggies like carrots or zucchini for extra flavor. For spice, add cayenne pepper to heat things up! This chowder is naturally gluten-free. Just ensure that your vegetable broth has no gluten. You can enjoy this hearty meal without worry. If you want more texture, try adding quinoa or rice. They blend well and make it even more filling. Want to boost protein in your chowder? You can add cooked beans like cannellini or chickpeas. They blend nicely and add a creamy texture. Another option is to add shredded chicken or cooked bacon for a savory kick. These additions make this chowder heartier and more satisfying. After you make creamy corn chowder, let it cool first. Then, store it in an airtight container. Place it in the fridge. It will last for about 3 to 4 days. If you want to keep it longer, consider freezing it. To freeze corn chowder, use a freezer-safe container. Leave some space at the top for expansion. The chowder can stay frozen for 2 to 3 months. When ready to eat, thaw it in the fridge overnight before reheating. When reheating, pour the chowder into a pot. Heat it over medium-low heat, stirring often. This helps prevent sticking and ensures even heating. If the chowder seems thick, add a splash of vegetable broth or water. Heat until it’s hot throughout, and then enjoy! Creamy corn chowder stays fresh in the fridge for about 3 to 4 days. Store it in an airtight container. Always let it cool before sealing. If you notice changes in color or smell, it’s best to toss it out. Yes, you can use frozen corn. In fact, frozen corn is a great option. It’s often picked and frozen at peak sweetness. Just add it straight to the pot without thawing. This makes it easy and quick to prepare your chowder. Corn chowder pairs well with many sides. Here are a few ideas: - Fresh crusty bread for dipping - Grilled cheese sandwiches for a classic combo - A simple green salad for a light touch - Crackers for added crunch These sides enhance the meal and make it even more enjoyable. This blog post covered many tasty tips to make creamy corn chowder. We explored fresh versus canned corn, essential veggies, and key herbs and spices. I shared easy steps to prepare the base, cook the vegetables, and blend it all together for creaminess. You learned how to adjust flavors, perfect the texture, and try different variations. Lastly, I provided storage info and answered common questions. Enjoy cooking this chowder! It’s simple and full of flavor. Feel free to explore and add your own twist. Happy cooking!

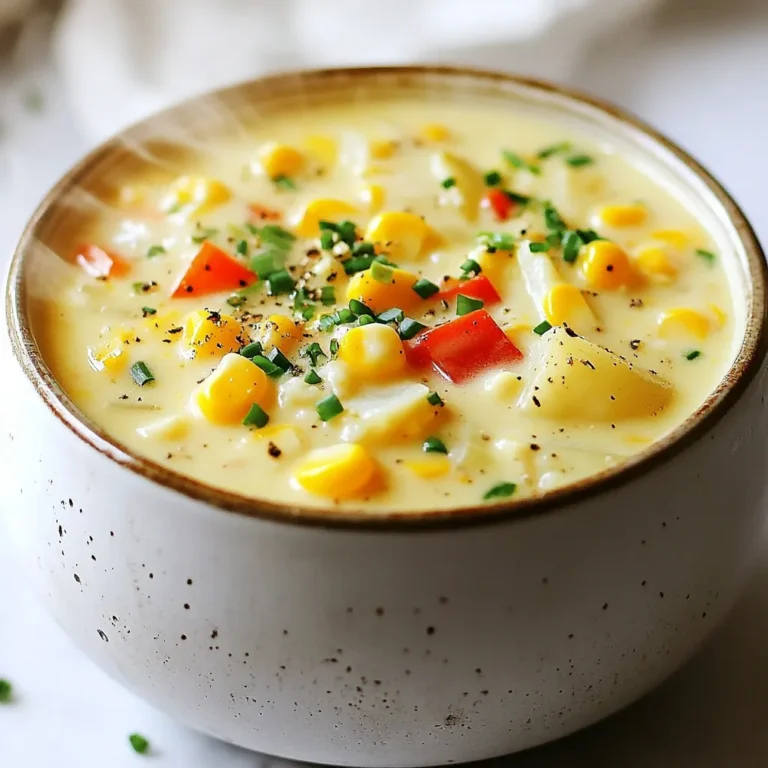
Creamy Corn Chowder Hearty and Flavorful Delight

To make Watermelon Mochi Bites, you need a few key ingredients: - 2 cups sweet rice flour (mochi flour) - 1 cup water - 1/4 cup granulated sugar - 1/2 teaspoon salt - 1 cup watermelon juice (freshly blended and strained) - Cornstarch or potato starch (for dusting) - Small pieces of fresh watermelon (for filling) These ingredients work together to create a soft, chewy, and flavorful treat. If you can't find sweet rice flour, you have options. You can use: - Glutinous rice flour: This is very similar and often used in mochi. - Tapioca flour: It gives a chewy texture but may change the flavor slightly. Both options can work well, but sweet rice flour gives the best taste and texture. You can also add some extra flair to your mochi bites. Consider these options: - Shredded coconut: Roll the mochi bites in coconut for a tropical twist. - A hint of vanilla extract: Add this to the batter for a sweet aroma. - Matcha powder: Mixing this in can give a nice green color and unique flavor. These optional ingredients let you customize your mochi bites and make them even more delightful! {{ingredient_image_2}} To make fresh watermelon juice, start by cutting a ripe watermelon into small chunks. Place these chunks in a blender. Blend until it is completely smooth. Next, use a fine mesh sieve to strain the juice. This gives you one cup of clear watermelon juice. Discard any pulp left in the sieve. Set this juice aside for later. In a large mixing bowl, combine two cups of sweet rice flour, a quarter cup of granulated sugar, and half a teaspoon of salt. Gradually add in one cup of water and the freshly strained watermelon juice. Stir this mixture continuously. Keep mixing until it becomes a smooth, lump-free batter. Once your batter is ready, transfer it to a heatproof dish. Spread it out evenly in the dish. Cover the top with parchment paper to keep moisture in during steaming. Place the dish in a steamer over medium heat. Steam the mixture for 20 to 25 minutes. It should turn into a translucent, slightly sticky dough. After steaming, carefully remove the dish from the steamer. Let the mochi cool for about 10 minutes. This cooling time makes the dough easier to handle. Once cool, generously dust your work surface with cornstarch. Transfer the mochi dough to this surface and cut it into 2-inch squares using a sharp knife. Take a square of mochi dough in your hand. Gently flatten it using your palm. Place a small piece of fresh watermelon in the center of the square. Bring the edges of the mochi up around the filling. Pinch the edges to seal the watermelon inside the dough. Roll each sealed mochi bite in cornstarch or potato starch. This helps prevent them from sticking together. If you want, you can also roll them in shredded coconut. To store, place the mochi bites in an airtight container. You can enjoy them right away or chill them in the refrigerator for a refreshing dessert. When making watermelon mochi bites, avoid these common mistakes: - Using Too Much Water: Too much water makes the dough too sticky. Stick to the recipe for best results. - Not Straining Watermelon Juice: Always strain the juice. Pulp can ruin the mochi's smooth texture. - Oversteaming the Dough: Keep an eye on the steaming time. Overcooked mochi can become tough. To get the best mochi texture: - Use Sweet Rice Flour: This flour is key for a chewy bite. Regular flour won't work. - Mix Well: Stir the batter until it’s completely smooth. This helps the dough cook evenly. - Steam Just Right: Steam until it’s translucent. This shows the mochi is ready. Dusting and storing are important for keeping mochi fresh: - Dust Generously: Use cornstarch or potato starch to dust the work surface and the mochi. This helps prevent sticking. - Use Airtight Containers: Store mochi bites in airtight containers. This keeps them soft and fresh. - Chill for Refreshing Treats: Refrigerate mochi bites for a cool dessert. They taste great when chilled. Pro Tips Choose Ripe Watermelon: Select a watermelon that is ripe and sweet for the best flavor in your mochi. Look for a uniform shape and a yellow spot where it rested on the ground, indicating ripeness. Adjust Sweetness: If you prefer a sweeter mochi, feel free to increase the amount of sugar slightly. Taste the watermelon juice before adding sugar to ensure it meets your preference. Dust Generously: Always use enough cornstarch or potato starch when handling mochi to prevent sticking. It makes shaping and storing the bites much easier. Experiment with Fillings: While fresh watermelon is delicious, consider trying other fillings like red bean paste or fresh fruit combinations for a creative twist on these mochi bites. {{image_4}} You can add fun flavors to your mochi bites. Try mixing in some matcha powder for a green tea twist. You can also add cocoa powder for a chocolatey taste. Another great option is to use fruit purees like mango or strawberry. These flavors pair well with the watermelon juice. Each variation brings a new taste to your bites. While fresh watermelon is delightful, you can explore other fillings. Add a dollop of sweet red bean paste for a classic Asian treat. Creamy coconut filling can also add a tropical vibe. For a surprise, include a small piece of dark chocolate inside. The melting chocolate will complement the chewy mochi well. Mix and match to find your favorite combo! Making mochi bites gluten-free is easy. Sweet rice flour is naturally gluten-free, so you’re already set! For a vegan version, ensure you use plant-based sugar. Avoid any animal-based fillings, like dairy. You can use almond or coconut milk for added flavor. These options let everyone enjoy these tasty bites without worry. To keep your watermelon mochi bites fresh, place them in an airtight container. This will help prevent them from drying out. Make sure to layer parchment paper between the bites. This will stop them from sticking together. You can store them in the fridge for up to three days. If you want to enjoy them later, freezing is a great option. To maintain the best texture, avoid leaving mochi at room temperature for too long. The heat can make them too soft. If you notice them getting sticky, dust with cornstarch or potato starch. This will keep them from clumping. For extra freshness, try to consume them within a day or two. For long-term storage, freeze your watermelon mochi bites. First, place them on a baking sheet in a single layer. Freeze them for about two hours until solid. Then, transfer the bites to a freezer bag or container. This method keeps them fresh for up to three months. When you're ready to eat them, let them thaw in the fridge or at room temperature. Yes, you can. If you cannot find sweet rice flour, use all-purpose flour or glutinous rice flour. You can also swap watermelon juice with other fruit juices like strawberry or mango. Just make sure the juice is fresh and sweet. Watermelon Mochi Bites last about three days when stored properly. Keep them in an airtight container. If you want to keep them longer, refrigerate them. They taste great cold! You can find ready-made Watermelon Mochi Bites at Asian grocery stores or specialty dessert shops. Some online retailers may also sell them. Check your local markets for fresh options. Yes, mochi is often gluten-free. It uses sweet rice flour, which does not contain gluten. Always check labels to ensure no gluten is present, especially in pre-made options. Watermelon Mochi Bites pair well with green tea or coconut milk. You can also enjoy them with sweet sauces like chocolate or caramel. Fresh fruits like berries or mangoes make great sides too. Making watermelon mochi is fun and easy. We covered the key ingredients and their alternatives. You learned the step-by-step process, from making fresh watermelon juice to shaping your mochi bites. I shared tips to avoid mistakes and achieve the right texture. Exploring different flavors and fillings adds creativity. Finally, storage tips ensure your mochi stays fresh. Now, you can enjoy delicious watermelon mochi at home. With practice, you'll perfect your technique. Enjoy sharing your tasty treats with friends and family.

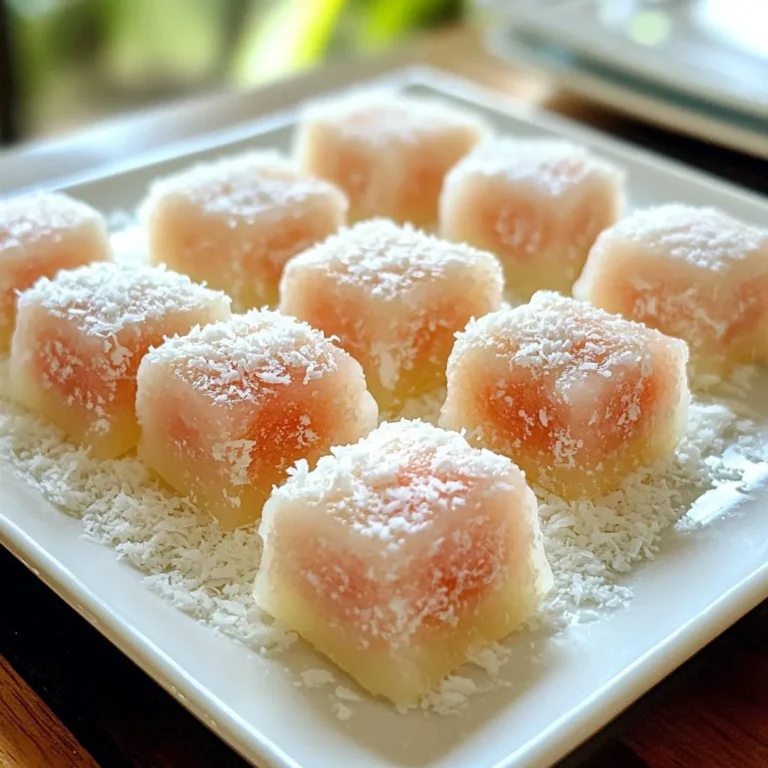
Watermelon Mochi Bites Delightful and Refreshing Treat

To make these tasty air fryer apple fritters, you need the following items: - 2 large apples, peeled, cored, and finely diced - 1 cup all-purpose flour - 1/2 cup granulated sugar - 1/2 teaspoon baking powder - 1/2 teaspoon ground cinnamon - 1/4 teaspoon ground nutmeg - 1/4 teaspoon salt - 1/2 cup milk - 1 large egg - 1 teaspoon pure vanilla extract - 1 tablespoon unsalted butter, melted - Powdered sugar, for dusting You can swap some ingredients if needed. For a gluten-free option, use gluten-free flour. If you need a dairy-free choice, almond milk or oat milk works great. You can also use honey or maple syrup in place of granulated sugar. Each serving of these apple fritters has about: - Calories: 150 - Fat: 5g - Carbohydrates: 25g - Protein: 2g These fritters are a fun treat! Enjoy them without too much guilt. {{ingredient_image_2}} Start by preparing a large mixing bowl. Add the two large apples, peeled, cored, and finely diced. Next, toss in 1 cup of all-purpose flour, 1/2 cup of granulated sugar, 1/2 teaspoon of baking powder, 1/2 teaspoon of ground cinnamon, 1/4 teaspoon of ground nutmeg, and 1/4 teaspoon of salt. Stir these dry ingredients until the apples are well coated. This helps the apples soak up all the yummy flavors. In another bowl, whisk together 1/2 cup of milk, 1 large egg, 1 teaspoon of pure vanilla extract, and 1 tablespoon of melted unsalted butter. Mix until smooth. Now, pour this wet mix into your bowl of dry ingredients. Gently fold them together just until combined. Don't worry about lumps; they help keep the fritters light and fluffy. Before you cook, preheat your air fryer to 350°F (175°C). Preheating is key. It helps the fritters cook evenly and get that nice, crispy texture. If you skip this step, your fritters might not turn out as great. They could be soggy or unevenly cooked. So, make sure your air fryer is hot and ready! Now it's time to cook! Use a spoon or cookie scoop to drop tablespoons of batter into the air fryer basket. Leave space between each fritter so they can puff up while cooking. Air fry the fritters for 10 to 12 minutes. Halfway through, flip each fritter carefully. This ensures they turn golden brown and crisp on both sides. Once they are done, take them out and let them cool on a wire rack for a few minutes. Finally, dust them with powdered sugar for a sweet finish before serving. Enjoy your tasty apple fritters! To make the best fritters, focus on the batter's texture. You want it to be thick, but not too dry. Here are some steps to ensure success: - Use fresh apples: Choose crisp apples like Granny Smith for a nice bite. - Dicing apples: Cut them finely. This allows the pieces to blend well with the batter. - Don’t overmix: Mix just until combined. A few lumps in the batter are fine. This keeps the fritters light and fluffy. Certain errors can ruin your fritters. Here are some common pitfalls to watch out for: - Overmixing the batter: This can make your fritters dense. Remember, gentle mixing is key. - Crowding the air fryer: Give each fritter space. They need room to cook evenly and expand. - Wrong temperature settings: Always preheat your air fryer to 350°F. This helps achieve that perfect golden color. Serving your fritters can elevate the experience. Here are some great ideas: - Dipping sauces: Serve with caramel or chocolate sauce for added sweetness. - Garnish: Dust the fritters with powdered sugar for a nice touch. - Presentation: Arrange them on a nice platter. A sprinkle of cinnamon adds charm and flavor. Pro Tips Choose the Right Apples: For the best flavor and texture, use a mix of sweet and tart apples, such as Granny Smith and Honeycrisp. Don’t Overmix: Gently fold the wet and dry ingredients to keep the fritters light and fluffy. Overmixing can lead to dense fritters. Adjust Cooking Time: Different air fryers may have slightly different cooking times, so keep an eye on the fritters to avoid overcooking. Experiment with Toppings: Try adding a drizzle of caramel sauce or a sprinkle of chopped nuts for added flavor and texture. {{image_4}} You can make your fritters even better! Try adding nuts, like walnuts or pecans. They give a nice crunch. You can also mix in chocolate chips for a sweet surprise. For a warm, cozy flavor, add more spices, like ginger or cloves. These simple changes can bring new life to your fritters and keep things exciting! Fritters are not just for apples! You can use other fruits, too. Pears work great and add a juicy texture. For fall, try pumpkin instead of apples. Just make sure to adjust the spices to match. You can use cinnamon and nutmeg to keep that warm flavor. These variations make your fritters perfect for any season! Want a plant-based fritter? Just swap a few ingredients. Use almond milk or oat milk instead of regular milk. Replace the egg with a flax egg or applesauce. This keeps the fritters moist. You can also find vegan butter to use in the recipe. These small changes keep the fritters tasty and friendly for everyone! To keep your fritters fresh, place them in an airtight container. Line the container with paper towels. This will help absorb moisture. Store the fritters in the fridge for up to three days. If you want to keep them longer, freeze them. Place them in a freezer-safe bag after cooling. Make sure to remove as much air as possible. To reheat your fritters, I recommend using an air fryer. Preheat the air fryer to 350°F (175°C). Place the fritters in the basket in a single layer. Heat them for about 5 minutes. This will keep them crispy. You can also use an oven for reheating. Place them on a baking sheet and heat at the same temperature for about 7 minutes. If stored properly, fritters can last about 3 days in the fridge. In the freezer, they can last up to 2 months. After that, they may lose their taste and texture. Always check for any signs of spoilage before eating. Yes, you can use whole wheat flour. It adds a nutty flavor and makes the fritters heartier. However, the fritters may become denser than those made with all-purpose flour. You might want to mix half whole wheat and half all-purpose for a lighter texture. Look for a golden-brown color on the fritters. They should feel firm to the touch and not doughy inside. If you cut one open, the inside should not be wet. This means they are cooked through. You can prepare the batter in advance and store it in the fridge for a day. Just mix it again before cooking. You can also cook the fritters and keep them in the fridge. Just reheat them in the air fryer for a few minutes to restore their crispiness. In this article, we covered how to make delicious apple fritters. We explored key ingredients, easy substitutions, and their nutritional facts. I shared step-by-step instructions for mixing batter and cooking fritters in an air fryer. You learned helpful tips for perfect fritters, common mistakes to avoid, and fun serving ideas. We also discussed variations, storage tips, and answered common questions. With these insights, you can create tasty apple fritters that suit your taste and dietary needs. Enjoy experimenting in your kitchen!

Air Fryer Apple Fritters Easy and Delicious Recipe

PREV 1 … 32 33 34 … 41 NEXT
tastykitchentales

explore

DessertsDinnerAppetizersDrinks

Our Policies

  • Cookie Policy
  • Copyright Policy
  • Disclaimer
  • GDPR Policy
  • Terms Of Use
Back to Top
  • About
  • Contact Us
  • Privacy Policy
© 2025 tastykitchentales