FREE DINNER EBOOK! Get your copy!
  • Cookie Policy
  • GDPR Policy
  • Disclaimer
  • Terms Of Use
  • Visit my other site: Fun Cookie Recipes
tastykitchentales
  • Home
  • Dinner
  • Desserts
  • Drinks
  • Appetizers
  • Contact
  • About
  • Privacy Policy
  • Home
  • Dinner
  • Desserts
  • Drinks
  • Appetizers
  • Contact
  • About
  • Privacy Policy
  • Cookie Policy
  • GDPR Policy
  • Disclaimer
  • Terms Of Use
Visit my other site: Fun Cookie Recipes

HOME / CATEGORIES /

Latest

- 4 boneless, skinless chicken breasts - 1 cup fresh mozzarella cheese, diced into small cubes - 1 cup cherry tomatoes, halved - 1 cup fresh basil leaves, chopped finely The main ingredients create a classic Caprese flavor. You will taste the freshness in every bite. The chicken is the perfect vessel to hold the cheese, tomatoes, and basil. - 2 tablespoons balsamic glaze (store-bought or homemade) - 2 tablespoons olive oil - 1 teaspoon garlic powder - Salt and black pepper to taste The balsamic glaze adds a sweet tang. Olive oil helps to keep the chicken moist. Garlic powder enhances the overall flavor. Salt and pepper bring everything together, making it savory. - Fresh basil leaves for garnish - Arugula or spinach for presentation Garnishes are key for a beautiful dish. Fresh basil adds color and aroma, while arugula or spinach gives a nice base. These simple touches make your meal look and taste gourmet. {{ingredient_image_2}} - Preheat your oven to 375°F (190°C). This helps cook the chicken evenly. - Carefully slice a pocket into each chicken breast. Be sure not to cut all the way through. - Combine mozzarella, cherry tomatoes, and basil in a bowl. Use fresh ingredients for bright flavors. - Add olive oil, salt, and pepper to the mixture. Stir gently until everything is mixed well. - Generously fill the chicken pockets with the mixture. Make sure you pack it in well. - Secure the openings with toothpicks to keep the filling inside. This step is important. - Sear each side in an oven-safe skillet for about 3-4 minutes. This gives the chicken a nice golden color. - Sprinkle garlic powder over the chicken. Drizzle with balsamic glaze for a tangy kick. - Transfer the skillet to the oven. Bake until the internal temperature is 165°F (75°C). - Let the chicken rest for a few minutes after baking. This helps keep it juicy. - Garnish with fresh basil leaves before serving. This adds a nice touch and flavor. - Use fresh ingredients for the best taste. Fresh mozzarella and ripe tomatoes bring full flavor. - Allow the mixture to sit for a few minutes. This helps the flavors blend well together. - Perfectly sear chicken for a golden crust. Searing adds a nice texture and locks in moisture. - Monitor internal temperature for safety. Cook until the chicken reaches 165°F (75°C). This ensures it’s safe to eat. - Serve on a bed of greens. Arugula or spinach adds a nice touch and color. - Drizzle additional balsamic glaze for flair. This not only looks great but adds extra flavor to your dish. Pro Tips Use Fresh Ingredients: Always opt for fresh mozzarella, ripe cherry tomatoes, and fragrant basil to elevate the flavors of your dish. Perfectly Sear the Chicken: Ensure your skillet is hot enough before adding the chicken to achieve a golden brown crust that locks in moisture. Let it Rest: Allowing the chicken to rest for a few minutes after baking redistributes the juices, resulting in a juicier bite. Experiment with Flavors: Feel free to add other ingredients like sun-dried tomatoes or pesto to the filling for a unique twist on this classic recipe. {{image_4}} You can easily switch up the cheese. Feta or goat cheese tastes great too. These cheeses add a nice tang. For presentation, try using arugula instead of spinach. Arugula has a peppery flavor that pairs well with the chicken. Want more flavor? Add sun-dried tomatoes to the filling. They bring a rich, sweet taste. You can also stir in some pesto for a fresh twist. It enhances the dish with herbal notes and depth. If you need a gluten-free meal, make sure to avoid cross-contamination. Check all labels to ensure your ingredients are safe. You can also try plant-based chicken. It works well for a vegetarian option that is still tasty. Store any leftovers in an airtight container. This keeps the chicken fresh and safe. Enjoy the chicken within 3-4 days for the best taste. You can freeze cooked chicken for up to 2-3 months. Make sure it cools completely before you freeze it. When you are ready to eat, reheat it thoroughly before serving. This ensures the chicken is hot and safe to eat. For even reheating, use the oven or a skillet. Preheat the oven to 350°F (175°C) and bake until warm. Using a skillet allows for good heat distribution. Avoid microwaving, as it may dry out the chicken. You can pair Caprese stuffed chicken with many sides. Here are some tasty options: - Garlic bread for a crunchy bite. - Roasted vegetables like zucchini or bell peppers. - A simple green salad with vinaigrette. - Creamy mashed potatoes for comfort. - Quinoa or couscous for a healthy grain. These sides balance well with the chicken's flavors. Yes, you can prep this dish ahead of time. Here’s how: - Stuff the chicken breasts a day early. - Store them in the fridge in an airtight container. - You can also make the filling a day before. This saves time when you cook. Just bake the chicken when ready. To check if the chicken is done, use a meat thermometer. - Insert it into the thickest part of the breast. - The temperature should read 165°F (75°C). This ensures the chicken is safe to eat. Juices should run clear, not pink. Reheating can dry out the chicken, so be careful. - Use the oven at 350°F (175°C) for even heating. - Place the chicken in a covered dish with a splash of broth. - You can also reheat in a skillet over low heat. These methods keep the chicken moist and tasty. This blog post shared a simple recipe for Caprese Stuffed Chicken. We explored the main and additional ingredients that create amazing flavors. You learned how to prep, stuff, and bake the chicken for a perfect meal. I also shared helpful tips for flavor and presentation, along with variations and storage options. Enjoy making this dish for family or friends. It’s tasty, healthy, and easy. Your cooking skills will shine with this recipe!

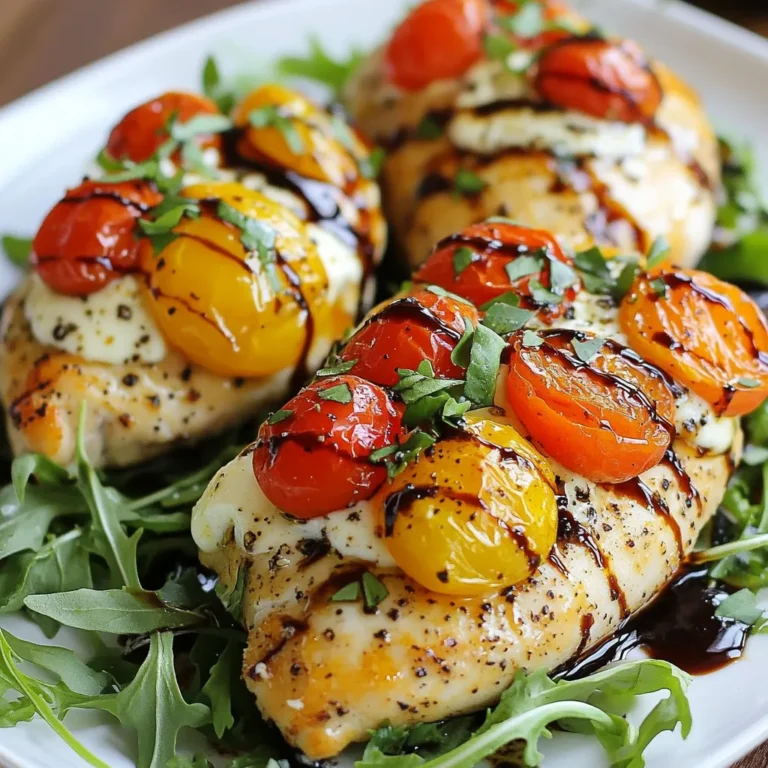
Caprese Stuffed Chicken Flavorful and Easy Recipe

- 1 cup heavy cream - 1/2 cup powdered sugar - 1 teaspoon vanilla extract - 1 cup cookies and cream ice cream, softened - 1 cup chocolate sandwich cookies, finely crushed - 1/2 cup mini chocolate chips - 1/4 cup chocolate syrup, for drizzling - Crushed chocolate sandwich cookies - Mini chocolate chips - Fresh mint sprigs - Electric mixer - Mixing bowl - Spatula - Serving glasses or parfait cups - Plastic wrap {{ingredient_image_2}} To start, grab a mixing bowl. Pour in 1 cup of heavy cream. Use an electric mixer on medium speed. Whip until soft peaks form. This means the cream will hold its shape. Next, add in 1/2 cup of powdered sugar. Also, include 1 teaspoon of vanilla extract. Keep whipping until you see stiff peaks. This means the cream is firm and ready for the next step. Now, take out 1 cup of cookies and cream ice cream. Make sure it’s softened at room temperature. Carefully fold this ice cream into the whipped cream. Use a spatula and be gentle. You want a smooth mixture with swirls of ice cream. Don’t rush this step; keep the air in the whipped cream. Get your serving glasses or parfait cups ready. Start with a spoonful of the whipped mixture. Spread it evenly at the bottom of each glass. Next, sprinkle a layer of crushed chocolate sandwich cookies. This adds a nice crunch. Drizzle some chocolate syrup over this layer. Repeat this process. Add more whipped mixture, then more crushed cookies, and more syrup. Keep layering until the glasses are full. End with the whipped cream on top. Finish by adding mini chocolate chips for extra sweetness. You can also add more crushed cookies and drizzle more chocolate syrup if you like. Cover the parfaits with plastic wrap. Place them in the fridge for at least 30 minutes. This helps the flavors mix and makes the parfaits firm. Enjoy the fun and tasty treat! To make great whipped cream, start with cold heavy cream. Use a clean bowl and beaters. Whip on medium speed until soft peaks form. Soft peaks look like little waves. Gradually add powdered sugar and vanilla. Continue to whip until you see stiff peaks. This means the cream holds its shape well. Avoid overwhipping, or it may turn grainy. Layering makes this treat look stunning. Start with the whipped cookies and cream mixture. Add it to the bottom of your glass first. Make it smooth with a spatula. Then sprinkle a layer of crushed cookies on top. Drizzle some chocolate syrup for extra flavor. Repeat this process. Each time, make sure to end with the whipped cream mixture. This creates a beautiful top layer. You can add mini chocolate chips or extra cookie crumbs on top for a fun finish. You can prepare these parfaits ahead of time. After layering, cover them with plastic wrap. Chill in the fridge for at least 30 minutes. This lets the flavors mix and the dessert firm up. You can even make them a day in advance. Just keep them covered. This way, you can serve them fresh and cool. Enjoying a delightful dessert has never been easier! Pro Tips Whip It Right: Ensure your heavy cream is cold before whipping; this helps achieve the stiff peaks necessary for a fluffy parfait. Layer It Up: For the best presentation, use clear glasses to showcase the beautiful layers of the parfait. Chill Out: Allow the parfaits to chill for at least 30 minutes in the fridge; this helps the flavors meld and improves the texture. Customize Your Crunch: Feel free to mix different types of crushed cookies or add nuts for added texture and flavor variations. {{image_4}} You can change up the ice cream for fun. Try using vanilla, chocolate, or mint chocolate chip. Each flavor gives a new twist to the parfaits. Vanilla adds a classic taste, while chocolate boosts the richness. Mint chocolate chip adds a refreshing feel. Feel free to experiment and find your favorite! While chocolate sandwich cookies are great, you can use other cookies too. Think about using Oreos, chocolate chip, or graham crackers. Each type adds its own flavor and texture. For a fruity kick, try crushed fruit-flavored cookies. The options are endless, so get creative! Toppings make your parfaits even better. Try adding nuts, sprinkles, or whipped cream. Fresh fruit like strawberries or bananas can add a burst of flavor. Consider drizzling caramel or peanut butter for extra richness. These toppings not only taste amazing, but also make your parfaits visually stunning! Store your Baileys Cookies & Cream Parfaits in the fridge. Use airtight containers or cover them with plastic wrap. This helps keep them fresh and tasty. Avoid letting air get in, as it can spoil the parfaits. Place them on a shelf in the fridge, not in the door. This keeps them cool and stable. These parfaits stay fresh for up to three days in the fridge. After three days, the whipped cream may start to lose its texture. If you want the best taste, try to eat them within two days. They are best enjoyed when fresh and creamy. You can freeze these parfaits for later. To freeze, place them in freezer-safe containers. Make sure to leave space at the top for expansion. When you're ready to eat, let them thaw overnight in the fridge. Avoid refreezing once they are thawed. This helps maintain the creamy texture and flavor. Yes, you can use whipping cream instead of heavy cream. Whipping cream has less fat, which means it may not whip as stiffly. Your parfaits will still taste great. If you want a lighter option, try using half-and-half. It won’t whip as well but will add creaminess. Absolutely! You can make these parfaits without Baileys. Just leave out the Baileys and replace it with a splash of milk or cream. You can also add a bit of vanilla extract to keep that sweet flavor. Your parfaits will still be delicious and creamy. Serve these parfaits in clear glasses to show off the layers. Add a sprig of mint on top for color. You can also use extra crushed cookies as a garnish. For a fun twist, try adding whipped cream on top before serving. Enjoy these parfaits chilled for the best taste! This blog post covered the key steps to make delicious Baileys Cookies & Cream Parfaits. We explored the main ingredients and tools you’ll need. I shared tips for perfect whipped cream and eye-catching layers. You learned about flavor variations and storage options for your treats. Try these parfaits for your next gathering. They are sure to impress! Enjoy the process, and don't be afraid to get creative with your flavors. Happy cooking!

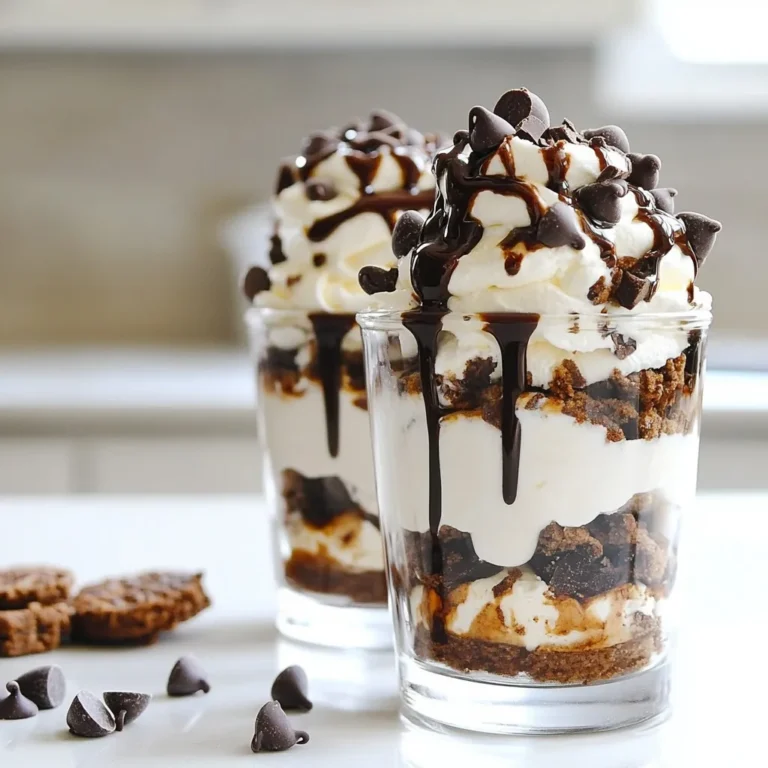
Baileys Cookies & Cream Parfaits Easy and Tasty Treat

- 8 oz cream cheese - 2 cups powdered sugar - Zest of 2 key limes (reserve some for garnish) - 3 tablespoons fresh key lime juice - 1 cup graham cracker crumbs - 8 oz dark chocolate, finely chopped - Sea salt for finishing - 1 teaspoon pure vanilla extract - Mixing bowl - Electric mixer - Cookie scoop or hands - Microwave-safe bowl When making creamy key lime truffles, the right ingredients matter. Cream cheese forms the base. It gives the truffles a rich, smooth texture. Powdered sugar adds sweetness, balancing the tangy lime. The zest and juice of key limes bring bright flavor. I always recommend using fresh key limes for the best taste. The graham cracker crumbs offer a hint of crunch, echoing classic key lime pie. For a touch of luxury, dark chocolate coats the truffles. It adds depth and richness. If you want more flavor, consider adding vanilla extract. A sprinkle of sea salt on top enhances each bite, making them even tastier. You’ll also need some tools. A mixing bowl and electric mixer help combine the ingredients smoothly. A cookie scoop or your hands shape the truffles. Finally, a microwave-safe bowl melts the chocolate for dipping. {{ingredient_image_2}} First, grab a large mixing bowl. Add the softened cream cheese, powdered sugar, key lime zest, key lime juice, and vanilla extract. Use an electric mixer and beat the mixture on medium speed. Keep mixing until it is smooth and creamy. You want to ensure there are no lumps in your mixture. Now, it's time to fold in the graham cracker crumbs. Use a spatula to gently mix them into the creamy mixture. Keep folding until you form a cohesive dough-like mixture. This step is key for the right texture in your truffles. Cover your bowl with plastic wrap. Place it in the fridge and let it chill for about 30 minutes. This will help the mixture firm up. Once chilled, take it out and shape the mixture into small balls, about one inch in diameter. Place each truffle on a baking sheet lined with parchment paper. Make sure to space them apart to prevent sticking. Next, we will melt the dark chocolate. Use a microwave-safe bowl for this. Melt the chocolate in 30-second intervals, stirring after each time. Be careful not to overheat the chocolate; it should be completely smooth when done. Once melted, carefully dip each chilled truffle into the chocolate. Use a fork to lift them out, allowing any excess chocolate to drip off. Return the coated truffles to the baking sheet. While the chocolate is still wet, sprinkle a tiny pinch of sea salt on each truffle. This will enhance the flavor. Place the truffles back in the fridge and let them chill until the chocolate sets completely. Enjoy the process of making these delightful treats! - Ensure cream cheese is at room temperature. This helps it blend smoothly. - Don’t skip the chilling step. Chilling firms the mixture, making it easier to shape. - Use a double boiler if preferred. This method helps control the heat. - Stir frequently to prevent overheating. Stirring ensures even melting and a smooth finish. - Use fresh key limes for zest and juice. Fresh limes give the best flavor. - Add more zest for extra zing. More zest brightens the taste and aroma. Pro Tips Chill Your Mixture: Allowing the truffle mixture to chill for a sufficient amount of time not only makes it easier to shape but also enhances the flavors as they meld together. Perfect Chocolate Coating: Make sure to melt the chocolate slowly and stir frequently to achieve a smooth, glossy finish when coating the truffles. Experiment with Zest: For an extra burst of flavor, consider mixing different citrus zests such as lime and orange for a unique twist on the classic key lime flavor. Seal in Freshness: Store the truffles in an airtight container in the refrigerator to keep them fresh and maintain their creamy texture. {{image_4}} You can switch up the flavor of your truffles easily. - White chocolate coating: Instead of dark chocolate, try using white chocolate. It adds sweetness and a creamy taste. - Add coconut for a tropical twist: Mix in shredded coconut for a fun texture and taste. This gives each bite a taste of the tropics. Many people have special diets. You can still enjoy these truffles! - Gluten-free graham cracker options: Use gluten-free graham crackers to make this treat safe for gluten-sensitive friends. - Vegan substitutions for cream cheese: Swap cream cheese for a vegan version. Look for brands that mimic the creamy texture. Make your truffles look as good as they taste! - Use colored sprinkles or edible flowers: Add a sprinkle of color on top. Edible flowers also bring a touch of elegance. - Serve in mini cupcake liners for a festive look: These liners can make your truffles pop on any table. They also make serving easy and fun. To keep your truffles fresh, place them in an airtight container. This helps lock in their flavor and texture. Make sure to layer parchment paper between truffles to prevent sticking. Store them in the fridge for the best results. The cool temperature keeps the chocolate firm and the creamy filling just right. You can freeze truffles for longer storage. First, place them on a baking sheet and freeze for about one hour. Once firm, transfer them to an airtight container. This method prevents them from sticking together. When you want to enjoy a truffle, take it out of the freezer. Let it thaw in the fridge for a few hours. This keeps the chocolate and filling tasty. In the fridge, these truffles stay fresh for about one week. Look for signs of spoilage like an off smell or a change in texture. If they feel dry or hard, it’s best to toss them. Always trust your senses when it comes to food safety. Yes, you can use regular limes. Key limes are smaller and have a unique taste. They are sweeter and less bitter than regular limes. Key limes also offer a more fragrant aroma. If you use regular limes, the flavor will be more tart and sharp. The texture will remain similar, but the taste will not be as rich or creamy. To avoid cracking, ensure you melt the chocolate gently. Use a microwave in short bursts, stirring often. This keeps the chocolate smooth and warm. After dipping the truffles, allow the excess chocolate to drip off gently. Also, let the truffles chill completely before serving. A room-temperature truffle may crack when cold chocolate touches it. Key lime truffles pair well with many treats. You can serve them with a cup of tea or coffee. Fresh fruit, like strawberries or raspberries, also works. For a fun twist, try them with whipped cream or coconut. They look great on a decorative plate with lime zest on top too. Yes, you can make these truffles ahead of time. They store well in the fridge for up to a week. Just keep them in an airtight container. You can also freeze them for longer storage. If you freeze them, let them thaw in the fridge before serving. This keeps the texture and flavor just right. These key lime truffles combine creamy textures and zesty flavors. By using simple ingredients, you can create delightful treats with just a few steps. Remember to chill the mixture for the best results. You can also explore various flavors and modifications for personal taste. Enjoy these truffles fresh, and don't forget to experiment with garnishes and pairings. With these tips, you'll impress everyone with your sweet creations!

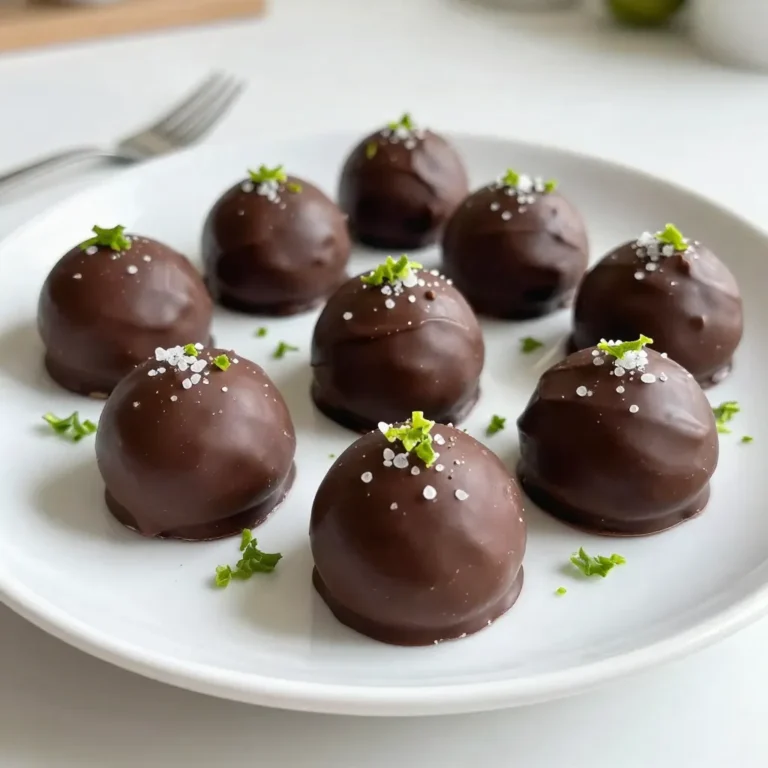
Creamy Key Lime Truffles Irresistible Treat Delicacy

- 1 cup brewed espresso, cooled to room temperature - 1 cup Baileys Irish Cream (or non-alcoholic alternative) - 1/2 cup mascarpone cheese - 1/2 cup heavy cream - 2 tablespoons granulated sugar - 1 teaspoon pure vanilla extract - Unsweetened cocoa powder (for dusting) - Ladyfinger cookies (for garnish) - Dark chocolate shavings (for garnish) Gather these ingredients before you start. The espresso gives a rich coffee flavor. Baileys adds a creamy, sweet touch. Mascarpone cheese brings that classic tiramisu taste. Heavy cream makes the mixture light and fluffy. Sugar sweetens it all up, while vanilla adds depth. Cocoa powder on top makes it look fancy. Ladyfingers and chocolate shavings are the final touches. These ingredients are easy to find at any grocery store. You can swap Baileys for chocolate milk if you want a non-alcoholic drink. Each ingredient plays an important role in making this dessert drink a hit. {{ingredient_image_2}} - First, grab a medium bowl. - Combine 1/2 cup of mascarpone cheese, 1/2 cup of heavy cream, 2 tablespoons of sugar, and 1 teaspoon of vanilla extract. - Use a hand mixer and beat the mixture on medium speed. - Keep mixing until soft peaks form. The mixture should look thick and creamy. - In a separate bowl, take 1 cup of cooled espresso. - Add in 1 cup of Baileys Irish Cream (or your non-alcoholic choice). - Stir gently until the two are fully mixed. This creates a smooth espresso blend. - Prepare your serving glasses. - Pour about 1-2 ounces of the espresso mixture into each glass. - Next, take the mascarpone cream mixture and spoon it over the espresso. Fill each glass halfway. - Repeat the layers: add more espresso followed by another layer of mascarpone cream. - Keep layering until the glasses are nearly full. Leave a bit of space at the top for decoration. - Finally, dust the top layer with cocoa powder. Garnish with a ladyfinger cookie and sprinkle dark chocolate shavings on top. This layered treat is not only delicious but also a feast for the eyes. Enjoy! To get that perfect creamy texture, start with cold ingredients. I usually chill the mascarpone and heavy cream before mixing. - Use a hand mixer to beat the mascarpone and cream. - Beat on medium speed until soft peaks form. The mixture should be thick and smooth, like whipped cream. Be careful not to overmix! If you mix too long, your cream can turn grainy. Stop mixing once you see those soft peaks. A beautiful presentation makes your drink even more special. Here are some ideas to make it shine: - Dust the top layer with unsweetened cocoa powder. This adds flavor and a nice look. - Use dark chocolate shavings for a touch of elegance. For glassware, I recommend using clear martini glasses. This way, guests can see the lovely layers inside. When serving these delightful drinks, I like to use small spoons. This makes it easy for guests to enjoy every layer. - Place a spoon beside each glass for easy access. - Add a fresh mint leaf on top for a pop of color. This not only looks good but also adds a hint of freshness to each sip. Pro Tips Chill Your Ingredients: Make sure your espresso and Baileys are at room temperature before mixing. Cold ingredients can affect the texture of your cream mixture. Layer for Visual Appeal: To create stunning layers, use a piping bag to add your mascarpone mixture. This ensures clean, defined layers that look beautiful in the glass. Adjust Sweetness to Taste: The granulated sugar can be adjusted based on your preference. Taste your mascarpone mixture before adding all the sugar to ensure it’s to your liking. Garnish Creatively: In addition to cocoa powder and chocolate shavings, consider using crushed espresso beans or a sprinkle of cinnamon for extra flavor and decoration. {{image_4}} If you want a tasty drink without alcohol, try rich chocolate milk. It gives a sweet and creamy flavor similar to Baileys. Just swap the Baileys for one cup of chocolate milk. You still get a delicious drink that everyone can enjoy. You can have fun with flavors! Add flavored syrups like caramel or hazelnut. Just one tablespoon can change your drink. If you want more options, try different liqueurs or creams. Amaretto or coffee liqueur can add a unique twist. Get creative and make a drink that suits your taste. For those who need lactose-free or dairy-free options, there are great choices. Use lactose-free cream and mascarpone. Almond or coconut milk can also work well. This way, you can enjoy the martini without worrying about dairy. Everyone should be able to savor this treat! How long can the prepared martini be stored in the fridge? You can keep your Creamy Baileys Tiramisu Martini in the fridge for up to two days. It tastes best when fresh, but it can hold up well for that time. Best practices for storing layers separately are key. If you want to keep your drink fresh longer, store the espresso and mascarpone layers in separate containers. This way, the textures stay nice, and the flavors remain bright. Can you freeze the preparation? I do not recommend freezing this martini. The creamy layers may separate or become icy. Freezing can ruin the smooth, rich texture. Tips on thawing and serving are important. If you do freeze it, let it thaw in the fridge overnight. Stir well before serving to bring back some creaminess. However, it is best to enjoy it fresh! You can swap Baileys for rich chocolate milk. This keeps the taste sweet and creamy. Here’s what you need: - 1 cup brewed espresso, cooled to room temperature - 1 cup rich chocolate milk - 1/2 cup mascarpone cheese - 1/2 cup heavy cream - 2 tablespoons granulated sugar (adjust to taste) - 1 teaspoon pure vanilla extract - Unsweetened cocoa powder (for dusting) - Ladyfinger cookies (for garnish) - Dark chocolate shavings (for garnish) Preparation Steps: 1. Mix mascarpone cheese, heavy cream, sugar, and vanilla in a bowl. Beat until thick. 2. In another bowl, blend cooled espresso with chocolate milk until smooth. 3. Pour 1-2 ounces of the chocolate mixture into a glass. 4. Add a layer of mascarpone cream, filling halfway. 5. Repeat layers with the chocolate mix and cream. 6. Dust cocoa on top and add ladyfingers and chocolate shavings. Yes, you can prep these ahead. Make the mascarpone cream and espresso mix the day before. Store them in the fridge separately. This keeps them fresh and tasty. Layer them just before serving. It ensures the cream stays fluffy and the espresso mix remains vibrant. If you can’t find mascarpone, use cream cheese or ricotta. Mix them with a bit of heavy cream for a similar texture. You can also use Greek yogurt for a tangy twist. Each substitute gives a unique taste while keeping the creamy feel. This blog post covered how to make a delicious Creamy Baileys Tiramisu Martini. We went through the ingredients, preparation steps, tips for perfect texture, and storage advice. You now have the tools to create an impressive drink for any occasion. Remember, you can add your twist with different flavors or dairy-free options. Enjoy making this treat for yourself or your friends!

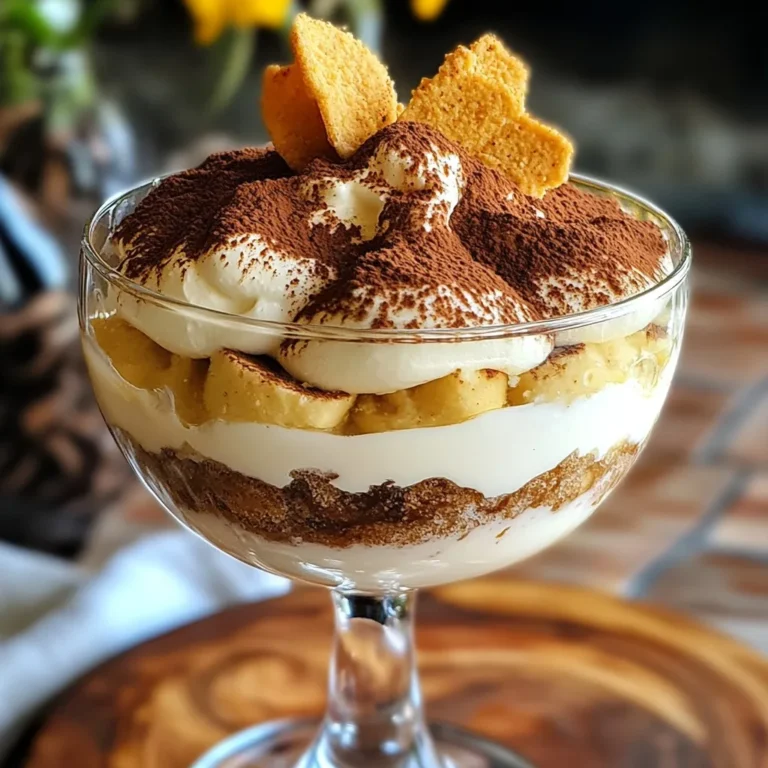
Creamy Baileys Tiramisu Martini Irresistible Delight

To make Blueberry Buttercream Chocolates, you need a few key ingredients. Each one plays a part in creating that sweet, creamy treat. Here’s what you’ll need: - 1 cup dark chocolate (70% cacao), finely chopped - 1/2 cup unsalted butter, softened to room temperature - 1 cup powdered sugar, sifted - 1/4 cup fresh blueberries, mashed into a puree - 1 teaspoon pure vanilla extract - Pinch of sea salt - Extra fresh blueberries for garnishing These ingredients blend well together to make a rich and fruity flavor. The dark chocolate gives a nice bittersweet taste that balances the sweetness of the buttercream. Fresh blueberries add a burst of flavor and color. Using high-quality chocolate and fresh berries makes a big difference in taste. Each ingredient is important for the best result. Enjoy the process of mixing and tasting! {{ingredient_image_2}} Start by greasing your chocolate molds. Use a non-stick spray or a bit of vegetable oil. This helps when you want to remove the chocolates later. Set the molds aside as you move to the next step. In a microwave-safe bowl, add the finely chopped dark chocolate. Heat it for 30 seconds, then stir. Repeat until the chocolate is smooth. Be careful not to overheat it; this can cause burning. Use a small edible brush or a teaspoon to coat the inside of the molds. Ensure you cover all the surfaces evenly with melted chocolate. After coating, place the molds in the fridge for about 15 minutes to set. In a mixing bowl, beat the softened butter with an electric mixer. Mix until it is creamy and light. Gradually add the sifted powdered sugar, mixing until it becomes fluffy and well combined. Take the molds from the fridge. Spoon or pipe the blueberry buttercream into each chocolate shell. Fill them to the top for a delightful surprise inside. If your leftover melted chocolate has thickened, gently reheat it. Carefully pour or spoon this chocolate over the buttercream in each mold. Use a spatula to smooth out any excess on top. Place the filled molds back into the refrigerator. Chill them for 30 minutes. This step ensures the chocolates set completely and the fillings are secure. Once set, gently pop the chocolates out of their molds. If they stick, apply gentle pressure from the bottom. This will help release them without breaking. To make them even prettier, top each chocolate with a fresh blueberry. Arrange them on a decorative platter to show off your delicious work. Enjoy sharing these treats with friends or family! To melt chocolate well, use a microwave-safe bowl. Chop the chocolate finely for even melting. Heat it in short bursts of 30 seconds, stirring in between. This method helps avoid burning. If you notice steam or a thick texture, stop heating. Let it sit. The heat will finish melting the chocolate. For smooth buttercream, start with softened butter. Use an electric mixer to beat it until creamy. Gradually add sifted powdered sugar. Mixing slowly at first helps prevent a sugar cloud. If your buttercream is too thick, add a splash of milk. This makes it easier to pipe into molds. You can enhance the flavor with fresh ingredients. Use ripe blueberries for a bright taste. Adding a pinch of sea salt balances the sweetness. A few drops of lemon juice can also brighten the flavor. Experiment with other extracts, like almond or citrus, for unique twists. Avoid overheating chocolate; it can seize and become grainy. Make sure to coat molds evenly. If buttercream feels too thin, add more powdered sugar. If it’s too thick, add milk. Always chill chocolates long enough to set. This prevents messy unmolding and keeps the shape intact. Pro Tips Use Quality Chocolate: Opt for high-quality dark chocolate for better flavor and texture. The richer the chocolate, the more luxurious your chocolates will taste. Chill Between Steps: Make sure to chill the chocolate molds after coating and filling. This helps set the layers properly and prevents any mixing of ingredients. Fresh Blueberries: Always use fresh blueberries for the best flavor and vibrant color. Frozen blueberries may release excess moisture, affecting the buttercream consistency. Experiment with Flavors: Feel free to customize the buttercream by adding other fruit purees or flavor extracts to create your unique chocolate treats. {{image_4}} You can change the dark chocolate for other types. Milk chocolate adds sweetness. White chocolate gives a creamy taste. Each type creates a different flavor with the blueberry buttercream. Try using a mix of chocolates for a layered taste. Want to switch up the flavor? Add lemon zest for a zesty kick. A dash of almond extract brings a nutty note. You can also mix in some mint or lavender for a fresh twist. Each addition makes your chocolates unique and fun. To make this recipe vegan, swap the butter with coconut oil or vegan butter. Use dark chocolate that is dairy-free. This way, you keep the delicious taste while being kind to all diets. Your friends will love these chocolates, no matter their food choices. To keep your blueberry buttercream chocolates fresh, store them in an airtight container. Place a layer of parchment paper between layers to avoid sticking. Keep the container in a cool, dry place. Avoid direct sunlight or heat sources. This method ensures the chocolates maintain their shape and flavor. Homemade blueberry buttercream chocolates can last about two weeks. For the best taste, enjoy them within the first week. After that, the flavor may fade. If you want to store them longer, place them in the fridge. Just know, chilled chocolates can lose their smooth texture. Allow them to warm slightly before eating. When gifting these chocolates, presentation is key. Use decorative boxes or clear bags tied with ribbons. Add a personal touch by including a handwritten note. You can also arrange them on a beautiful platter. This makes the chocolates look even more tempting and special for your loved ones. Homemade blueberry buttercream chocolates can last up to two weeks. Store them in an airtight container. Keep them in a cool, dry place to ensure they stay fresh. Yes, you can use frozen blueberries. Thaw them and mash them into a puree. Make sure to drain any excess liquid before mixing them into the buttercream. I recommend using dark chocolate with at least 70% cacao. This chocolate has a rich flavor that pairs well with the sweet blueberry buttercream. It also helps create a nice shell for your chocolates. Absolutely! You can switch up the flavors. Try raspberry, strawberry, or lemon for a fun twist. Just follow the same buttercream steps, and adjust the fruit puree accordingly. If your chocolate won't set, it might be too warm or not mixed well. Ensure you melt the chocolate gently and cool it slightly before pouring into molds. If it’s still soft, chill it longer in the fridge. In this post, I shared how to make delicious blueberry buttercream chocolates. We covered the key ingredients, step-by-step instructions, and helpful tips. Remember, using high-quality chocolate and fresh blueberries makes a big difference. Try different flavors to keep it fun. With a few simple tricks, you can impress anyone with these treats. Enjoy making and sharing your chocolates!

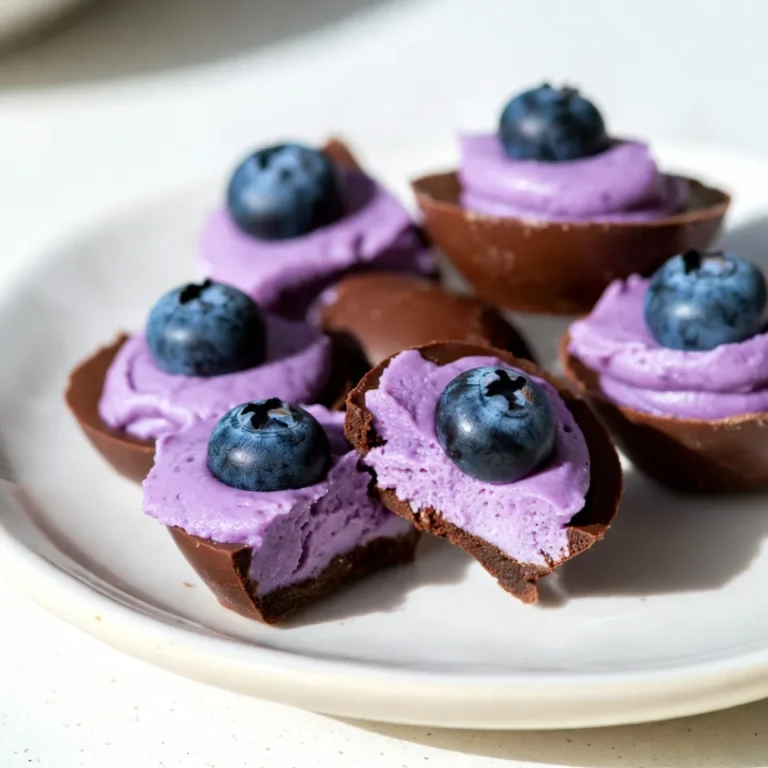
Blueberry Buttercream Chocolates Irresistible Delight

- 1 cup smooth peanut butter - 1 cup cream cheese, softened to room temperature - 1 cup powdered sugar - 1 teaspoon pure vanilla extract - 1 cup semi-sweet chocolate chips - 2 tablespoons coconut oil - Optional dippers: graham crackers, pretzels, apple slices Gather these ingredients before you start. Smooth peanut butter and cream cheese mix well. Softened cream cheese helps create a creamy dip. The powdered sugar adds sweetness. Pure vanilla extract enhances the flavor. The chocolate chips make a rich topping. Coconut oil gives the chocolate a smooth finish. You can use graham crackers, pretzels, or apple slices for dipping. Mixing these ingredients together creates a tasty treat. This dip is great for parties or snacks. You can enjoy it with family and friends. Everyone loves this sweet and creamy delight! {{ingredient_image_2}} - First, combine 1 cup of smooth peanut butter with 1 cup of softened cream cheese. - Next, beat the mixture with an electric mixer. Keep mixing until it is smooth and creamy. This should take about 2 to 3 minutes. - Gradually add 1 cup of powdered sugar to the peanut butter mix. - Then, add 1 teaspoon of pure vanilla extract. - Mix on low speed. You want the dip to be fluffy and light. - In a microwave-safe bowl, put 1 cup of semi-sweet chocolate chips and 2 tablespoons of coconut oil. - Heat these in the microwave for 30 seconds at a time. Stir well between each 30-second interval. - Keep heating until the mixture is completely melted and glossy. - Pour the melted chocolate over the peanut butter layer in your dish. Use a spatula to spread it evenly. - Now, place the dip in the refrigerator. Chill it for at least 30 minutes. This helps the dip firm up for better dipping. To get a creamy mix, use smooth peanut butter. It blends better and gives a silky feel. Choose a good brand with no added sugars. For the cream cheese, ensure it is softened. If it is too cold, it will be hard to mix. Let it sit at room temperature for 30 minutes before you start. This step helps create a smooth and fluffy dip. For a fun look, garnish the dip with crushed peanuts or chocolate shavings. This adds texture and a nice touch. You can also arrange your dippers in a circle around the dip. Use graham crackers, pretzels, or crisp apple slices. This makes it easy for guests to grab and enjoy. Buckeye Dip shines at parties and gatherings. It is great for game nights or holiday celebrations. Pair it with sweet and salty dippers. Graham crackers and pretzels work well together. Apple slices add a fresh crunch. This dip is sure to please everyone at the table! Pro Tips Use Room Temperature Ingredients: Ensuring your cream cheese is at room temperature will help achieve a smooth and creamy dip without lumps. Chocolate Melting Technique: When melting chocolate, always stir between intervals to prevent burning and achieve a smooth consistency. Chill for Best Texture: Allowing the dip to chill for at least 30 minutes will enhance its texture, making it easier to scoop with your dipping items. Customizable Dippers: Feel free to experiment with different dippers like fruit, cookies, or even potato chips for a unique flavor combination! {{image_4}} You can change the texture of your Buckeye Dip by using different kinds of peanut butter. Creamy peanut butter makes a smooth dip. Crunchy peanut butter adds fun bits. Try both to see which one you like best. For the chocolate topping, you can play around with your choices, too. Dark chocolate gives a richer flavor. White chocolate adds sweetness. Each option changes the dip's taste and look, so experiment! If you need gluten-free options, use gluten-free dippers like rice crackers or fresh veggies. They pair well with the dip's rich flavor. For those who want a vegan dip, swap the cream cheese for a plant-based version. You can find many tasty vegan cream cheeses that work great. This keeps the dip creamy while making it fit your needs. Want to make your dip pop? Add a pinch of sea salt to the mix. It brings out the sweetness and balances the flavors. You can also try adding spices like cinnamon. Just a small amount can give your dip a warm, cozy feel. This twist makes your Buckeye Dip even more special for snacks or parties. To keep your Buckeye Dip fresh, use a sealed container. This helps prevent air from getting in. If you don't have a container, cover it tightly with plastic wrap. Proper storage keeps flavors intact. You can store it in the fridge for up to five days. If you want to reheat the chocolate layer, do it gently. Use a microwave and heat in short bursts. Stir often to avoid burning. After refrigeration, the dip can become firm. To bring it back to life, let it sit at room temperature for a few minutes before serving. This helps maintain the creamy texture. Enjoy your dip as a tasty treat! Buckeye Dip is a creamy dessert dip inspired by the famous Buckeye candy. The dip mixes peanut butter, cream cheese, and powdered sugar. It has a rich, sweet taste that many love. You will find it topped with melted chocolate, giving it a nice finish. This dip's origins come from Ohio, where the Buckeye candy was created. The blend of flavors makes it a hit at parties and gatherings. Yes, you can prepare Buckeye Dip ahead of time. Make it a day before your event for the best flavor. Simply follow the recipe and chill it in the fridge. Cover the dip tightly with plastic wrap to keep it fresh. When it’s time to serve, just take it out and enjoy. The flavors will blend beautifully, making it even tastier. You can safely leave Buckeye Dip out for about two hours. After that, it should go back in the fridge. If the room is warm, consider serving it in smaller portions. This way, you can keep the rest chilled. Always keep an eye on it to ensure food safety for your guests. If you need a substitute for cream cheese, try Greek yogurt or silken tofu. Both give a creamy texture without dairy. For a nut-free option, use sunflower seed spread. Each choice will change the flavor slightly, but they work well in the dip. You can enjoy Buckeye Dip even with different dietary needs. In this article, we explored how to make a tasty Buckeye Dip. You learned about the ingredients, easy steps, and tips for the best results. We looked at fun variations to fit different diets and preferences. Remember to store it in a sealed container for freshness. Now, you can impress your friends and family with this creamy treat. Enjoy it at your next get-together! Simple to prepare and fun to eat, Buckeye Dip is always a hit.

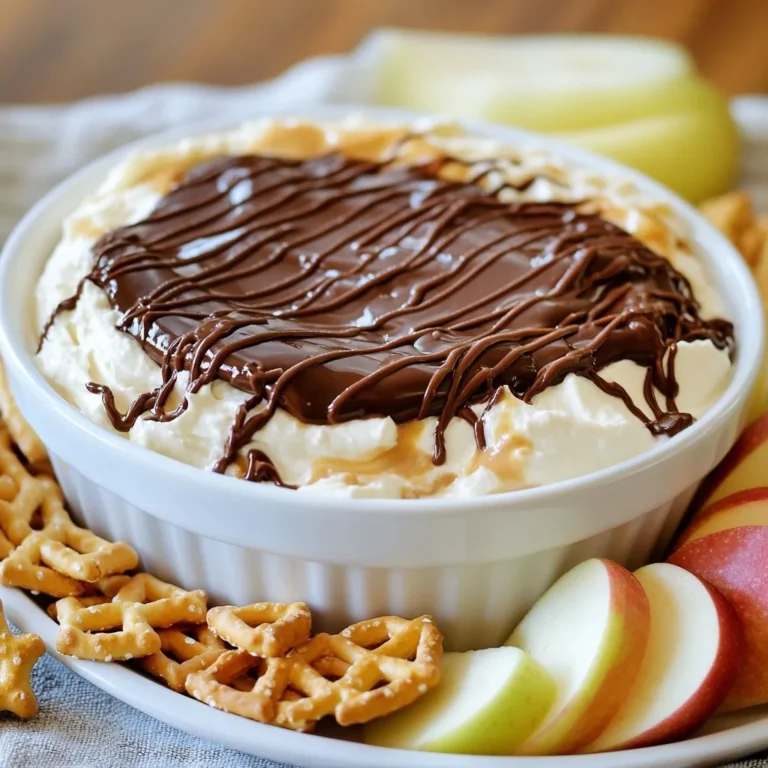
Buckeye Dip Creamy Delight for Parties and Snacks

For the One-Pot Creamy Tomato Pasta, you will need these ingredients: - 12 ounces of pasta (penne or fusilli works great) - 1 can (14 ounces) crushed tomatoes - 1 cup vegetable broth - 1 cup heavy cream (use coconut cream for dairy-free) - 1 medium onion, diced finely - 3 cloves garlic, minced - 1 tablespoon olive oil - 1 teaspoon dried basil - 1 teaspoon dried oregano - Salt and freshly ground black pepper to taste - Fresh basil leaves for garnish - Grated Parmesan cheese for serving (optional) You can easily swap some ingredients based on your needs: - Pasta: Use gluten-free pasta if needed. - Crushed tomatoes: Pureed tomatoes or tomato sauce can work too. - Vegetable broth: Chicken broth can be used for a different flavor. - Heavy cream: Coconut cream is a great dairy-free choice. - Onion: Shallots can replace onions if you prefer. To make this dish, gather these tools: - Large, heavy-bottomed pot - Wooden spoon for stirring - Measuring cups and spoons - Knife and cutting board for chopping - Ladle for serving With these ingredients and tools, you are ready to create a tasty meal! {{ingredient_image_2}} Start by gathering your ingredients. You will need: - 12 ounces of pasta (penne or fusilli works well) - 1 can (14 ounces) crushed tomatoes - 1 cup vegetable broth - 1 cup heavy cream (or coconut cream for a dairy-free option) - 1 medium onion, diced finely - 3 cloves garlic, minced - 1 tablespoon olive oil - 1 teaspoon dried basil - 1 teaspoon dried oregano - Salt and black pepper to taste - Fresh basil leaves for garnish - Grated Parmesan cheese (optional) Make sure to have everything measured and ready. This helps the cooking go smoothly. 1. Heat the olive oil in a large pot over medium heat. 2. Add the diced onion and cook for about 5 minutes. Stir it until soft and clear. 3. Add the minced garlic next. Cook this for 1 minute until you smell the garlic. 4. Pour in the crushed tomatoes, vegetable broth, and heavy cream. Stir everything together well. 5. Add in the dried basil and oregano. Season with salt and black pepper to your taste. 6. Let the sauce simmer gently. This allows the flavors to blend nicely. 7. Once the sauce simmers, add the uncooked pasta. Make sure it is fully covered with the sauce. 8. Cover the pot with a lid. Cook for about 10-12 minutes. Stir gently every few minutes. 9. Check the pasta for doneness. It should be firm but cooked. 10. Remove the pot from heat. Let it sit for a couple of minutes to thicken. 11. If the dish is too thick, add a splash of vegetable broth to adjust the texture. Serve the pasta warm. Add fresh basil leaves on top for a beautiful look. You can also sprinkle grated Parmesan cheese if you like. For a nice touch, use pasta bowls for serving. Enjoy your meal! To get a super creamy sauce, use heavy cream. If you want a dairy-free version, coconut cream works great. Both options give the sauce a rich texture. Mix the cream in slowly. This helps it blend well with the crushed tomatoes. Always taste as you go. Adjust the salt and pepper to get the best flavor. When cooking pasta, choose a shape that holds sauce well, like penne or fusilli. Add the pasta to the pot once the sauce simmers. Stir it in well so that every piece is coated. Cover the pot to trap steam. This helps the pasta cook evenly. Stir every few minutes to avoid sticking. Check for al dente doneness after about 10 minutes. You can add more flavor to your pasta by including fresh herbs. Basil adds a nice touch. You might also try a pinch of red pepper flakes for heat. If you like a savory bite, consider adding cooked sausage or mushrooms. For extra nutrition, toss in spinach or kale. These additions make the dish more colorful and tasty. Pro Tips Perfect Pasta Texture: Always cook the pasta al dente as it will continue to absorb sauce while resting, ensuring it doesn't become mushy. Flavor Enhancer: For an extra depth of flavor, consider adding a splash of balsamic vinegar or a pinch of red pepper flakes to the sauce. Cheese Alternatives: If you're avoiding dairy, nutritional yeast can be a great substitute to sprinkle on top for a cheesy flavor. Veggie Boost: Feel free to add in some sautéed vegetables like spinach, bell peppers, or zucchini for a nutritious twist! {{image_4}} You can make this dish dairy-free easily. Simply swap the heavy cream for coconut cream. Coconut cream provides a rich, creamy texture without any dairy. It adds a subtle sweetness, which pairs well with the tomatoes. This change makes the dish suitable for those who are lactose intolerant or follow a vegan diet. Want to boost the protein in your pasta? There are many options to consider. You can add cooked chicken, shrimp, or ground turkey. If you prefer plant-based proteins, try chickpeas or lentils. Simply stir in your choice of protein when you add the pasta. This way, the protein heats through while the pasta cooks. Adding vegetables is a great way to enhance nutrition. You can toss in spinach, kale, or zucchini for a pop of color and vitamins. These vegetables cook quickly and add flavor. You can also use bell peppers or mushrooms for added texture. Just chop them up and add them to the pot along with the onions. This makes the dish not only tastier but also healthier. To keep your One-Pot Creamy Tomato Pasta fresh, store it in an airtight container. Make sure the pasta cools down first. You can keep it in the fridge for up to three days. If you want to enjoy it later, this method works great. Reheat the pasta gently. You can use a microwave or a stovetop. If using the microwave, cover the dish and heat in short bursts. Stir in between to ensure even heating. For stovetop, add a splash of vegetable broth to keep it creamy. Warm it over low heat until hot. To freeze leftover pasta, let it cool completely first. Store it in freezer-safe containers. You can freeze it for up to three months. When ready to eat, thaw it overnight in the fridge. Reheat as mentioned above for the best taste. Yes, you can use any pasta shape you like. Penne, fusilli, or even spaghetti all work well. I often choose what I have on hand. Each shape brings its own charm to the dish. For example, fusilli holds more sauce in its spirals. To add some heat, try red pepper flakes or a pinch of cayenne. You can also use spicy sausage or add chopped jalapeños. Adjust the amount based on your taste. Start small and add more as you go. This way, you control the spice level perfectly. Pair this pasta with a fresh green salad or garlic bread. A simple arugula salad adds a nice crunch. You can also serve it with roasted vegetables for a colorful plate. For a lighter touch, a side of steamed broccoli works well too. You learned about making a delicious one-pot creamy tomato pasta. We covered key ingredients, useful substitutes, and the best tools for cooking. Detailed steps showed you how to prepare and serve this meal. Helpful tips ensured your pasta would turn out creamy and flavorful. You also discovered variations and storage methods for leftovers. In the end, this dish is easy to customize and fun to make. Enjoy your cooking adventure!

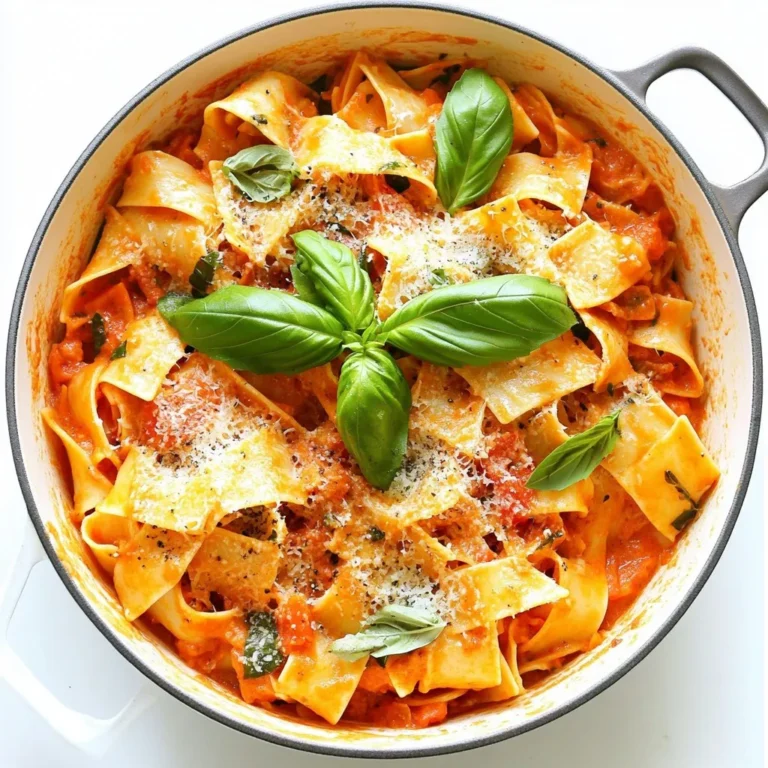
One-Pot Creamy Tomato Pasta Quick and Tasty Meal

To make Million Dollar Lasagna, gather these key ingredients: - 12 lasagna noodles - 1 pound ground beef - 1 pound Italian sausage, casings removed - 1 medium onion, finely diced - 3 garlic cloves, minced - 2 cups marinara sauce (store-bought or homemade) - 1 can (15 oz) ricotta cheese - 1 large egg - 2 cups shredded mozzarella cheese, divided - 1 cup grated Parmesan cheese - 1 tablespoon dried oregano - 1 tablespoon fresh basil, chopped (or 1 teaspoon dried basil) - Salt and pepper, to taste - 2 tablespoons olive oil These ingredients work together to create rich layers of flavor. The noodles hold everything together. The combination of meats adds depth. The cheeses give it that creamy goodness we all love. Fresh herbs and spices bring brightness to the dish. Using good-quality marinara sauce saves time and still tastes great. The egg in the ricotta mixture helps bind everything, ensuring each bite is a delight. This dish is not just about filling your stomach; it’s about enjoying a meal that brings family together. Each layer is a chance to mix flavors, textures, and colors. I always suggest using fresh herbs when possible. They make a big difference in taste. Now that you know what you need, you can start planning your Million Dollar Lasagna. Grab your ingredients and get ready for a fun cooking session! {{ingredient_image_2}} 1. Boiling the noodles: Start by boiling a large pot of salted water. Add the lasagna noodles once the water is boiling. Cook them until they are al dente. This usually takes about 8-10 minutes. Be sure to check the package for exact times. 2. Rinsing and setting aside: After boiling, drain the noodles in a colander. Rinse them under cold water. This helps stop the cooking process and prevents sticking. Set the noodles aside on a clean surface. 1. Browning the meats: Heat 2 tablespoons of olive oil in a large skillet over medium heat. Add the ground beef and Italian sausage. Break them apart with a spatula. Cook until the meat is browned, about 5-7 minutes. 2. Sautéing onions and garlic: Add the finely diced onion and minced garlic to the skillet. Stir them in with the meat. Cook until the onions are soft and see-through, which should take another 3-4 minutes. 3. Adding marinara sauce: Pour in the marinara sauce. Stir well to combine. Let this mixture simmer on low heat for about 5 minutes. This allows the flavors to meld together. 1. Layering the ingredients: In a large baking dish, spread a thin layer of the meat sauce on the bottom. Lay 4 lasagna noodles on top, placing them lengthwise. 2. Final layering instructions: Spread half of the ricotta cheese mixture over the noodles. Then, add a layer of meat sauce. Sprinkle one-third of the mozzarella cheese on top. Repeat this process. Finish with another layer of noodles, meat sauce, mozzarella, and top with grated Parmesan cheese. 1. Covering and baking times: Cover the lasagna loosely with aluminum foil. Bake it in a preheated oven at 375°F (190°C) for 25 minutes. 2. Achieving the perfect golden crust: After 25 minutes, remove the foil. Continue baking for an additional 15 minutes. You want the cheese to be bubbly and golden brown. Let the lasagna cool for about 10-15 minutes before slicing. This helps the layers stay intact. Enjoy your delicious Million Dollar Lasagna! Layering is key to great lasagna. Each layer needs to be even. If the layers are too thick, the dish can become heavy. Aim for balance. This helps each bite taste amazing. Spread sauce evenly to avoid dry spots. Use a spatula to distribute filling well. This ensures all flavors mix nicely. You can change the cheese mixture for a creamier texture. Add some cream cheese for richness. Try mixing in a bit of goat cheese for tang. Spice things up! Add a pinch of nutmeg or crushed red pepper to the cheese. These little touches can make the flavors pop. Garnishing makes your lasagna look fancy. After slicing, place fresh basil on top. A sprinkle of grated Parmesan adds a nice touch. Serve each piece on a warm plate for a polished look. You can also drizzle a little olive oil for shine. This will impress your family and friends! Pro Tips Use Fresh Ingredients: Whenever possible, opt for fresh herbs and high-quality cheeses to enhance the flavor of your lasagna. Layering is Key: Ensure you evenly distribute the layers of sauce, cheese, and noodles to avoid dry spots and to maintain a balanced taste in every bite. Let it Rest: Allow the lasagna to cool for 10-15 minutes before slicing. This helps the layers set and makes serving easier. Make Ahead: Lasagna can be assembled a day in advance and stored in the refrigerator. Just add a few extra minutes to the baking time if cooking from cold. {{image_4}} You can make a delicious vegetarian version of Million Dollar Lasagna. Start by substituting the meat with vegetables. Use diced bell peppers, zucchini, and spinach for a colorful dish. You can also add mushrooms for a hearty texture. Using seasonal produce makes this lasagna even better. Try fresh tomatoes in summer or squash in fall. This way, you keep the flavors bright and vibrant. Your family will love the taste and the colors! If you need a gluten-free option, there are many great noodle brands. Look for brands like Barilla or Tinkyada. They offer great taste and texture. You may need to adjust cooking times for gluten-free noodles. They often cook faster than regular noodles. Keep an eye on them to avoid overcooking. This will help you achieve the perfect layer of lasagna. To make your lasagna even more exciting, add some spicy elements. You can mix in crushed red pepper flakes or diced jalapeños. This adds a nice kick to each bite! Incorporating different sauces or cheeses can also elevate your dish. Try a creamy Alfredo sauce between the layers. Or, mix in some goat cheese for a tangy twist. These small changes can make your Million Dollar Lasagna shine! To store leftovers, let the lasagna cool first. Cover it tightly with plastic wrap or aluminum foil. You can also place it in an airtight container. This keeps it fresh and tasty for later meals. Use shallow containers for quicker cooling. For freezing, let the lasagna cool completely. Wrap it tightly in two layers of plastic wrap. Then, cover it with aluminum foil. This helps prevent freezer burn. When you're ready to eat, thaw it in the fridge overnight. To reheat, bake at 350°F (175°C) for about 30-40 minutes. Cover it with foil to keep it moist. In the fridge, Million Dollar Lasagna lasts about 3-5 days. For the best taste, eat it within this time frame. When frozen, it can last up to three months. To maintain freshness, always store it in airtight containers. This keeps flavors intact and prevents dryness. Yes, you can prepare Million Dollar Lasagna ahead of time. Just assemble it, then cover it tightly with plastic wrap or foil. Store it in the fridge for up to 24 hours before baking. When ready, bake it directly from the fridge. You may need to add a few extra minutes to the cooking time. If you need a substitute for ricotta cheese, try cottage cheese or cream cheese. Both options work well. For a lighter choice, use Greek yogurt. Blend it smooth for a similar texture. Each option will give your lasagna a tasty twist. To make lasagna without noodles, use thinly sliced vegetables like zucchini or eggplant. These can replace the noodles. Lay the veggie slices in between the layers. This adds flavor and keeps it low-carb. Make sure to salt the veggies beforehand to draw out moisture. Million Dollar Lasagna pairs great with a simple green salad. Garlic bread is another perfect side. You can also serve it with roasted vegetables. These options complement the rich flavors of the lasagna nicely. They add balance to your meal. Yes, you can use store-bought marinara sauce. Just choose a high-quality brand for the best flavor. Look for options with no added sugars or preservatives. This will keep your lasagna fresh and tasty. Homemade sauce is great, but store-bought works well too. This blog post covered how to make a delicious Million Dollar Lasagna. We explored key ingredients, step-by-step instructions, and useful tips. I shared variations for different diets and how to store leftovers. In the end, cooking should be fun and rewarding. You can customize your lasagna to fit your taste. With practice, you'll create a dish that impresses everyone. Enjoy the process and savor the results!

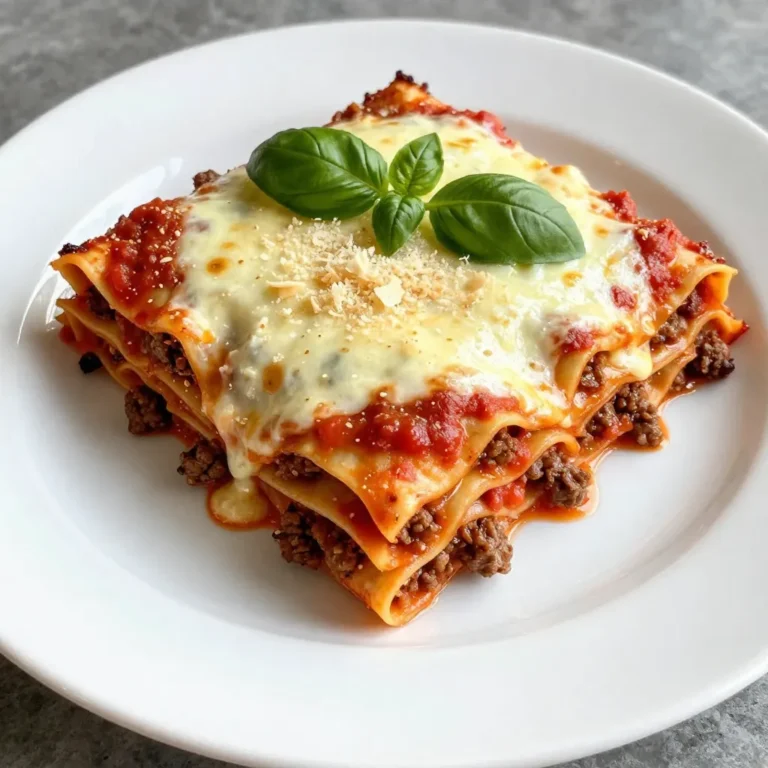
Million Dollar Lasagna Irresistible Family Meal

To make Mexican Street Corn Chowder, you will need: - 4 cups fresh corn kernels (or frozen corn if fresh is not available) - 1 medium onion, finely diced - 2 cloves garlic, minced - 1 medium red bell pepper, diced - 2 medium potatoes, peeled and cubed into bite-sized pieces - 4 cups vegetable broth - 1 cup coconut milk (for a creamy texture) or heavy cream for a richer flavor - 1 teaspoon smoked paprika - 1 teaspoon ground cumin - Salt and pepper to taste - 1/2 cup fresh cilantro, chopped (plus extra for garnish) - 1/2 cup queso fresco, crumbled (for topping) - Lime wedges (for serving) You can make swaps to fit your taste or pantry. Use: - Canned corn instead of fresh or frozen. - Any onion type, such as yellow or sweet. - Swap potatoes for sweet potatoes for a sweeter taste. - Use almond milk or oat milk instead of coconut milk for a lighter chowder. - If you want it dairy-free, skip the queso fresco or use a dairy-free cheese. Fresh ingredients make a huge difference. Here are some tips: - Visit local farmers' markets for fresh corn and herbs. - Check for seasonal produce at your grocery store. - Choose corn with bright kernels and husks that are moist. - Look for firm, unblemished potatoes and vibrant bell peppers. - Always smell your herbs; they should smell fresh and strong. These tips help you find the best ingredients for a delicious chowder. {{ingredient_image_2}} First, you need a large pot to start your chowder. Heat 1 tablespoon of olive oil over medium heat. Once the oil shimmers, add 1 medium onion that you have diced. Sauté the onion for about 5 minutes until it turns soft and clear. Then, add 2 cloves of minced garlic and 1 diced red bell pepper. Cook this mix for another 2 to 3 minutes. Stir it often until the bell pepper softens and gives off a nice scent. Next, it’s time to add the main ingredients. Toss in 4 cups of fresh corn kernels, or frozen if needed, along with 2 cubed potatoes. Season this mix with 1 teaspoon of smoked paprika and 1 teaspoon of ground cumin. Don’t forget to add a good pinch of salt and pepper. Stir everything well to combine. Now, pour in 4 cups of vegetable broth. Turn the heat up until it all comes to a boil. Once it’s bubbling, lower the heat and let it simmer for about 20 minutes. This is when the potatoes cook through. Check them with a fork; they should be tender. After the potatoes are ready, carefully take out half of the chowder and blend it until smooth. You can use a regular blender or an immersion blender for this. Once blended, put the smooth mixture back into the pot with the remaining chowder. To finish, stir in 1 cup of coconut milk for a nice creamy texture. Add 1/2 cup of chopped cilantro and let the chowder cook for another 5 minutes. This lets all the flavors mix well. Now, taste your chowder. Adjust the seasoning with more salt, pepper, or a splash of lime juice for extra flavor. When ready to serve, ladle the chowder into bowls. Top each bowl with crumbled queso fresco and extra cilantro. Don’t forget the lime wedges on the side for a fresh kick! To make Mexican street corn chowder pop, you can add more spices. Try adding cayenne pepper for some heat. It gives a nice kick to the chowder. You can also mix in chili powder for a smoky flavor. A dash of coriander can add a fresh taste as well. Don't be shy to play with spices! The way you present your chowder matters. Use colorful bowls to make the dish stand out. Top each bowl with crumbled queso fresco and fresh cilantro. This adds color and texture. You can also serve lime wedges on the side. Guests can squeeze lime juice over their chowder for added flavor. It brightens the dish and makes it more refreshing. When cooking chowder, watch out for overcooking the potatoes. They should be tender but not mushy. If you blend too much of the chowder, it can become too thick. Aim for a balance of creamy and chunky. Lastly, don’t forget to taste as you cook. This helps you adjust salt and spices. Enjoy the journey of flavor! Pro Tips Use Fresh Corn: For the best flavor, use fresh corn kernels when in season. They add a natural sweetness and vibrant texture to the chowder. Customize the Creaminess: Adjust the creaminess of the chowder to your liking by varying the amount of coconut milk or heavy cream. For a lighter version, use more vegetable broth. Add a Kick: If you enjoy a bit of heat, consider adding diced jalapeños or a pinch of cayenne pepper to the chowder for an extra kick of flavor. Leftovers Make Great Fritters: Transform any leftover chowder into delicious corn fritters by mixing it with flour and frying small patties until golden brown. {{image_4}} You can easily make this chowder vegan. Use coconut milk instead of heavy cream. It gives a rich texture without dairy. For added creaminess, blend in soaked cashews. They blend smoothly and add healthy fats. You can even skip the cheese or use a vegan cheese alternative. This way, everyone can enjoy the dish. Want to boost the nutrition? Add protein like black beans or chickpeas. They mix well and add fiber. For more veggies, toss in chopped zucchini or spinach. These options make the chowder heartier. You can also add cooked chicken or shrimp for a meatier dish. Feel free to play with flavors and textures. If you love spice, add diced jalapeños when cooking. You can also sprinkle in cayenne pepper for more heat. Start with a little, then taste it. You can always add more. For a smoky flavor, consider chipotle peppers. They give a nice kick and depth to the chowder. Adjust the heat to match your taste and enjoy! To keep your chowder fresh, let it cool first. Once cool, transfer it to an airtight container. This helps keep the flavors intact. Store the container in the fridge. You can enjoy it for up to four days. When you’re ready to eat, just reheat it on the stove or in the microwave. You can also freeze this chowder for later. Use a freezer-safe container or a zip-top bag. Be sure to leave some space for the chowder to expand. It can last up to three months in the freezer. To reheat, thaw it overnight in the fridge. Warm it gently on the stove, stirring often. This keeps it creamy and delicious. Most of the ingredients in this chowder have a good shelf life. Fresh corn lasts about a week in the fridge. Potatoes can stay fresh for weeks if stored in a cool, dark place. Coconut milk can last for a few months if unopened. Once opened, use it within a week. Always check for spoilage before using any ingredient. Mexican Street Corn Chowder takes inspiration from elote, a popular street food in Mexico. Elote features grilled corn on the cob, slathered in creamy toppings and spices. This chowder captures those flavors and transforms them into a warm, comforting dish. It combines fresh corn with spices like smoked paprika and cumin, offering a taste of Mexico in every spoonful. This chowder is perfect for chilly nights or gatherings, bringing a festive vibe to your table. Yes, you can use canned corn! Canned corn makes this dish quicker. Just drain and rinse the corn before adding it to the pot. You will need about 3 cups of canned corn to match the 4 cups of fresh corn. While fresh corn gives a sweet crunch, canned corn still works well. It will save you time and effort while still allowing you to enjoy delicious chowder. To spice up your chowder, you have a few options. Try adding diced jalapeños or serrano peppers during the sauté step. You can also mix in cayenne pepper or crushed red pepper flakes for a kick. If you prefer heat without altering the main flavors, add a dash of hot sauce when serving. Adjust to your taste, and remember, you can always start with a little heat and add more as needed. Enjoy experimenting with different spice levels! We covered a lot about making delicious chowder. You now know the best ingredients, with tips on sourcing fresh items. I showed you step-by-step instructions for a smooth cooking process. Remember to avoid common mistakes and try different variations. Storing may seem tricky, but it's easy with these guidelines. Now, it’s time to enjoy your homemade chowder. Feel free to get creative with flavors and ingredients. Cooking can be fun!

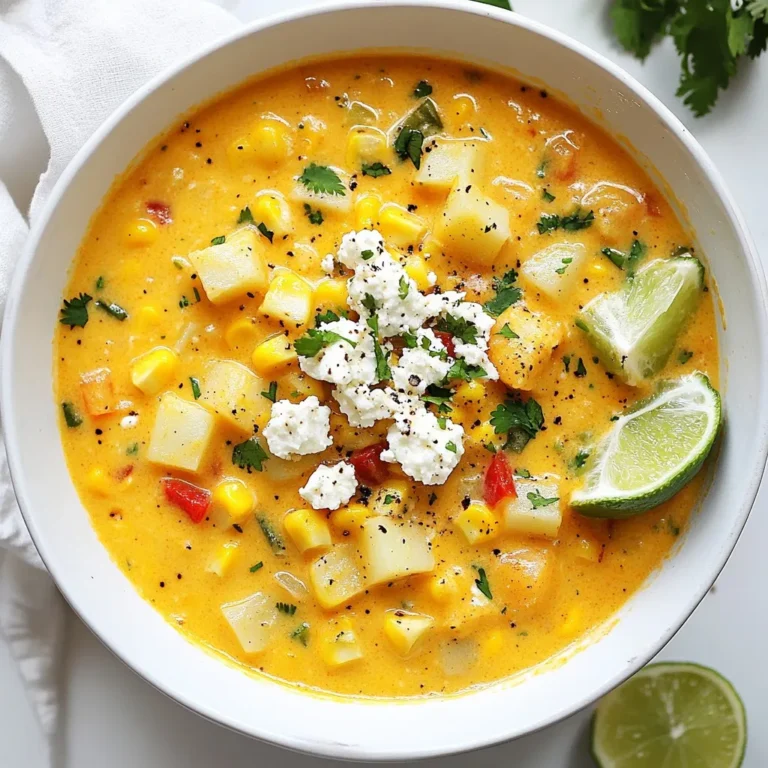
Mexican Street Corn Chowder Hearty and Flavorful Dish

- 2 cups all-purpose flour - 2 teaspoons baking powder - ½ teaspoon baking soda - ½ teaspoon salt - ½ cup unsalted butter, softened - 1 cup granulated sugar - 2 large eggs - 1 teaspoon vanilla extract - ¾ cup buttermilk - 2 cups fresh strawberries, hulled and sliced - 1 cup heavy cream - 3 tablespoons powdered sugar - 1 teaspoon vanilla extract (for whipped cream) - Fresh mint leaves for garnish (optional) To make a great strawberry shortcake cake, you need fresh ingredients. Start with the dry ingredients. You will need all-purpose flour, baking powder, baking soda, and salt. Measure these out carefully. Mixing them well helps create a light texture in the cake. Next, gather the wet ingredients. You need softened butter, granulated sugar, eggs, vanilla extract, and buttermilk. The butter makes the cake rich, while the buttermilk adds moisture and flavor. For the filling and topping, fresh strawberries are key. Use ripe strawberries for the best taste. You will also need heavy cream for the whipped cream. Add powdered sugar and vanilla extract to sweeten it. A little mint can make a lovely garnish. This mix of ingredients creates a balanced flavor. It makes the cake moist and sweet, perfect for any occasion. Enjoy the process of gathering these fresh items for a delightful treat. {{ingredient_image_2}} First, preheat your oven to 350°F (175°C). This makes sure your cakes bake evenly. Next, take two 9-inch round cake pans. Grease them with butter. Then, dust them lightly with flour. This will stop the cakes from sticking. In a medium bowl, mix the dry ingredients. Combine 2 cups of flour, 2 teaspoons of baking powder, ½ teaspoon of baking soda, and ½ teaspoon of salt. Whisk these together until no clumps remain. In a large bowl, cream ½ cup of softened butter with 1 cup of granulated sugar. Use an electric mixer on medium speed. Beat for about 3 to 5 minutes until it is light and fluffy. Now, add 2 large eggs one by one. Mix well after each one. Then stir in 1 teaspoon of vanilla extract. Gradually add the flour mixture to the wet ingredients. Alternate this with ¾ cup of buttermilk. Start and end with the flour. Mix until just combined. Don’t overmix, or your cake may be dense. Pour the batter evenly into the two prepared pans. Use a spatula to smooth the tops. Place them in the oven and bake for 25 to 30 minutes. Check if they are done by inserting a toothpick in the center. If it comes out clean, they are ready. Let the cakes cool in the pans for about 10 minutes. Then, transfer them to wire racks to cool completely. While the cakes cool, prepare the strawberry filling. Take 2 cups of fresh strawberries and slice them. In a medium bowl, mix the strawberries with 2 tablespoons of granulated sugar. Toss gently to coat them. Let this sit for about 15 minutes. This helps the strawberries release their juices. For the whipped cream, use an electric mixer again. Beat 1 cup of heavy cream in a mixing bowl until soft peaks form. Gradually sprinkle in 3 tablespoons of powdered sugar and 1 teaspoon of vanilla extract. Keep whipping until stiff peaks form. Once the cakes are completely cool, place one layer on a serving plate. Spread a generous layer of whipped cream on top. Add half of the macerated strawberries on this layer. Carefully place the second cake layer on top of the first. Spread more whipped cream over this layer. Add the remaining strawberries and finish with a dollop of whipped cream on top. If you want, garnish with fresh mint leaves for a nice touch. Measuring and mixing matter a lot. Use a kitchen scale for dry ingredients. This helps make sure you get it right every time. When mixing, start slow to avoid flour clouds. This gives you a smooth batter. Mixing by hand can also help. It keeps air in, which makes the cake light. Want more flavor? Add a splash of lemon juice or zest. This gives your cake a nice zing. You can also try almond extract instead of vanilla. For a fun twist, mix in some shredded coconut. Each option brings a new taste. Don't be afraid to get creative! To present your cake nicely, slice it into even wedges. Place each slice on a plate with a few extra strawberries. A dollop of whipped cream beside it adds charm. You can also use fresh mint leaves for color. Arrange everything neatly to impress your guests. Presentation makes the cake even more delightful! Pro Tips Use Fresh Strawberries: For the best flavor and texture, always opt for fresh strawberries. The sweetness and juiciness of ripe strawberries will elevate your shortcake. Don't Overmix the Batter: When combining the wet and dry ingredients, mix just until combined. Overmixing can lead to a dense cake, while gentle mixing keeps it light and fluffy. Chill the Whipped Cream: For the best results, chill your mixing bowl and beaters before whipping the cream. This helps it whip up faster and hold its shape longer. Let the Cake Cool Completely: Allow the cake layers to cool completely before assembling. This prevents the whipped cream from melting and keeps your cake layers intact during assembly. {{image_4}} You can change the flavor of your cake base. If you want a twist, try a chocolate cake. Use the same method but swap in chocolate cake mix instead of vanilla. A vanilla cake is a classic choice and always a hit. You can mix in some almond extract for a new flavor. This small change makes a big difference. The filling is where you can get creative. Instead of strawberries, try using chocolate ganache. This rich option adds a decadent touch. You can also use lemon curd for a zesty kick. It brings a fresh taste that pairs well with strawberries. Mix and match your fillings to keep it fun! If you need gluten-free options, use a gluten-free flour blend. Make sure it has a good mix of starches. For a dairy-free version, use coconut cream instead of heavy cream. You can also substitute almond milk for buttermilk. These adjustments keep the cake tasty for everyone! To keep your strawberry shortcake cake fresh in the refrigerator, wrap it well. I use plastic wrap or aluminum foil. This helps keep the cake moist. Place it in an airtight container if you have one. Store it in the fridge for up to three days. Make sure to keep it away from strong odors. Cakes can easily absorb smells. If you want to save some cake for later, freezing works well. First, let the cake cool completely. Then, slice the cake into pieces. Wrap each slice tightly in plastic wrap. After that, place the wrapped slices in a freezer bag. You can freeze the whole cake too. Just wrap it well and store it. The cake stays good for about two to three months in the freezer. The strawberry shortcake cake lasts about three days in the fridge. Signs of spoilage include a dry texture or off smell. If you notice mold, throw it away right away. When frozen, the cake maintains its quality for months. When you thaw it, be sure to check for any changes. Always trust your senses! Yes, you can use frozen strawberries! They work well in the filling. First, thaw them and drain excess liquid. This way, they won’t make the cake soggy. Fresh strawberries are great for flavor and texture, but frozen berries can save time. You can use several easy substitutes for buttermilk. Here are some options: - Mix ¾ cup milk with 1 tablespoon vinegar or lemon juice. Let it sit for a few minutes. - Use plain yogurt or sour cream, thinned with a little water. - Almond milk or oat milk can work too with the same vinegar trick. Testing for doneness is simple. Insert a toothpick into the center of the cake. If it comes out clean, the cake is ready. You can also gently press the top. If it springs back, it’s done! Checking at 25 minutes is a good idea. This blog post covered how to make a delicious strawberry cake. We discussed the ingredients, including dry and wet elements, filling, and topping. You learned clear step-by-step instructions for mixing, baking, and assembling your cake. We also shared tips for perfect texture and creative variations. To keep your cake fresh, we provided storage tips and answered common questions. Now, you are ready to create your own sweet strawberry masterpiece with confidence!

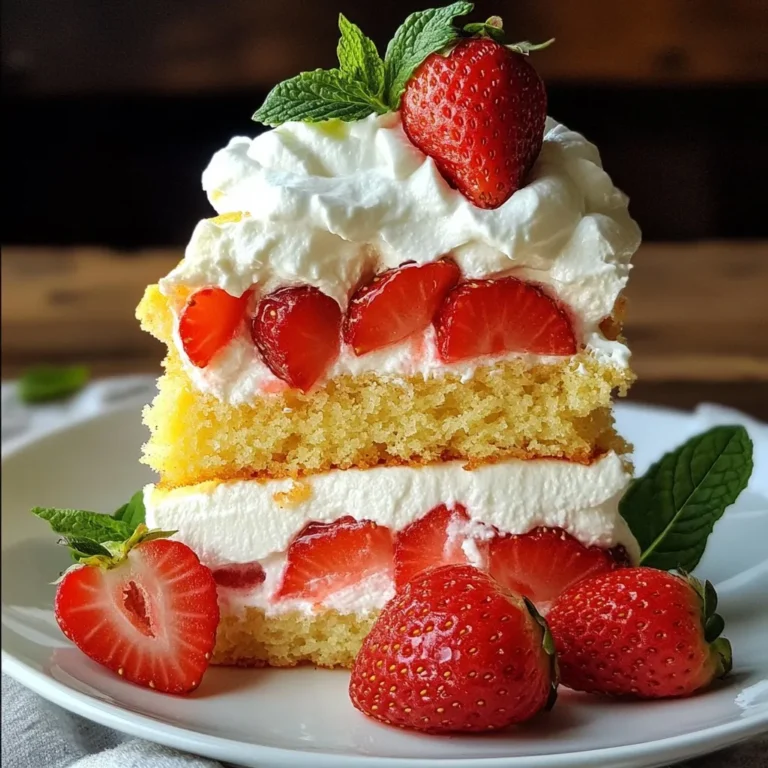
Strawberry Shortcake Cake Delightful and Easy Recipe

PREV 1 … 35 36 37 … 41 NEXT
tastykitchentales

explore

DessertsDinnerAppetizersDrinks

Our Policies

  • Cookie Policy
  • Copyright Policy
  • Disclaimer
  • GDPR Policy
  • Terms Of Use
Back to Top
  • About
  • Contact Us
  • Privacy Policy
© 2025 tastykitchentales