FREE DINNER EBOOK! Get your copy!
  • Cookie Policy
  • GDPR Policy
  • Disclaimer
  • Terms Of Use
  • Visit my other site: Fun Cookie Recipes
tastykitchentales
  • Home
  • Dinner
  • Desserts
  • Drinks
  • Appetizers
  • Contact
  • About
  • Privacy Policy
  • Home
  • Dinner
  • Desserts
  • Drinks
  • Appetizers
  • Contact
  • About
  • Privacy Policy
  • Cookie Policy
  • GDPR Policy
  • Disclaimer
  • Terms Of Use
Visit my other site: Fun Cookie Recipes

HOME / CATEGORIES /

Latest

- 4 large potatoes, peeled and cut into 1-inch cubes - 1 cup kale, stems removed and coarsely chopped - 1 cup green cabbage, finely shredded - 1 medium onion, diced - 2 cloves garlic, minced - 4 cups vegetable broth - 1 cup heavy cream (or substitute with coconut cream for a dairy-free version) - 2 tablespoons extra virgin olive oil - Sea salt and freshly ground black pepper to taste - Fresh chives, finely chopped for garnish You can easily adapt this recipe. For a dairy-free option, use coconut cream instead of heavy cream. If you are vegan, simply skip the cream or use a plant-based cream. For gluten-free needs, ensure your vegetable broth is gluten-free. If you want to add protein, consider using cooked beans or lentils. Start by measuring your ingredients. It helps to have everything ready before cooking. Peel and cube the potatoes into even sizes for uniform cooking. Chop the kale and cabbage, and set them aside. Dice the onion and mince the garlic. This prep makes cooking smooth and quick. Always taste your broth before adding salt. This ensures you don’t over-season your soup. Cooking is about balance, and every ingredient matters! {{ingredient_image_2}} Start by heating two tablespoons of extra virgin olive oil in a large pot over medium heat. Add one medium onion, diced, and sauté it for about five minutes. Stir it often until the onion becomes soft and clear. Then, add two cloves of minced garlic and cook for one more minute. Keep stirring to prevent the garlic from burning. This step builds a strong flavor base for the soup. Next, add four large potatoes, cut into 1-inch cubes, to the pot. Pour in four cups of vegetable broth and add a pinch of sea salt. Increase the heat to bring the soup to a gentle boil. Once boiling, cover the pot and lower the heat. Let it simmer for 15 to 20 minutes. The potatoes should be soft enough to pierce with a fork. After that, use an immersion blender to blend the soup until it's smooth. If you don’t have an immersion blender, transfer the soup in batches to a standard blender. After blending, return the smooth soup to low heat. Add one cup of chopped kale and one cup of finely shredded green cabbage. Cook for an additional five to seven minutes until the greens are soft. Gradually pour in one cup of heavy cream while stirring. Taste the soup, and add more salt and freshly ground black pepper if needed. Heat it up but don’t let it boil. Now, you can ladle your creamy colcannon soup into beautiful bowls. For a lovely finish, sprinkle fresh chives on top. Enjoy this hearty and comforting meal! To make creamy colcannon soup just right, focus on the blending. Use an immersion blender for the smoothest texture. If you don't have one, a regular blender works too. Just be careful when transferring hot soup. Blend until it feels velvety in your mouth. If the soup seems too thick, add a little more vegetable broth. If it’s too thin, simmer it longer to thicken. To boost flavor, try adding herbs like thyme or parsley. They give the soup a fresh taste. A squeeze of lemon juice at the end can brighten the flavors. Always taste your soup before serving. Adjust salt and pepper to make it perfect for you. Don't forget to add a bit of garlic for a warm, inviting flavor. Serve your creamy colcannon soup in deep bowls. Garnish with freshly chopped chives for color and taste. A drizzle of extra virgin olive oil adds richness. Pair the soup with crusty artisan bread for dipping. This makes a complete meal, filling and satisfying. You can also top it with crispy bacon bits for a savory crunch. Enjoy it warm for the best experience! Pro Tips Use Fresh Ingredients: For the best flavor, opt for fresh kale and cabbage. Fresh vegetables add vibrancy and enhance the overall taste of the soup. Adjust Creaminess: If you prefer a lighter soup, start with less cream and add more to taste as you stir. This allows you to control the richness to your liking. Season Gradually: Always taste and adjust the seasoning as you cook. Adding salt and pepper gradually helps to prevent over-seasoning and allows for perfect flavor balance. Garnish Creatively: Besides chives, consider adding crispy bacon bits or a drizzle of olive oil on top before serving for extra flavor and texture contrast. {{image_4}} If you want a dairy-free option, use coconut cream instead of heavy cream. It keeps the soup rich and creamy. You can also try almond milk for a lighter touch. Both options work well with the potatoes and greens. You can add proteins for a heartier meal. Cooked bacon or ham adds a nice flavor. For a plant-based twist, try adding chickpeas or lentils. You can also mix in other veggies like carrots or leeks for extra nutrients and color. To spice things up, add red pepper flakes or a dash of hot sauce. This gives the soup a warm kick. You can also stir in some diced jalapeños for extra heat. This twist brings new life to the classic colcannon flavors. After enjoying your creamy colcannon soup, store the leftovers. Let the soup cool down first. Use an airtight container to keep the soup fresh. Make sure it is sealed well. You can keep it in the fridge for 3 to 4 days. This way, you can enjoy it again soon! When you are ready to eat the soup again, reheating it right is key. Pour the soup into a pot. Heat it on low to medium heat. Stir it often to avoid it sticking to the bottom. This will help keep the flavors fresh. If the soup seems thick, add a splash of vegetable broth or water. This will bring it back to the right creaminess. Freezing creamy soups can be tricky, but it works! Use a freezer-safe container. Leave some space at the top for the soup to expand. You can freeze the soup for up to 3 months. When you want to eat it, thaw it overnight in the fridge. Reheat it slowly on the stove, just like before. This will help keep the taste and texture nice. Colcannon is a classic Irish dish made from mashed potatoes mixed with greens. It often includes cabbage or kale, adding color and nutrition. The name “colcannon” comes from the Irish word "cál," meaning "cabbage." This dish has roots in Irish history, often served during the harvest season. People enjoyed it as a filling meal, especially in colder months. Today, colcannon has become a loved comfort food worldwide, with many variations. It’s cozy, creamy, and perfect for sharing. Yes, you can make this soup ahead. It tastes even better after resting. Prepare the soup and let it cool. Store it in the fridge for up to three days. When you're ready to eat, just reheat it on the stove. Stir gently to keep it creamy. You may need to add a splash of broth or cream to restore its texture. This method saves time and makes meal prep easy. Your future self will thank you! To make this soup low-carb, swap the potatoes for cauliflower. It gives a similar texture but with fewer carbs. Cut the cauliflower into small pieces and cook it as you would the potatoes. Blend it until smooth for a creamy base. You can also reduce the amount of heavy cream. Use unsweetened almond milk or coconut cream for a lighter option. Adjusting the greens helps, too. You can add more kale or spinach for more nutrients without the carbs. Enjoy your tasty, low-carb version! In this blog post, we explored how to make a creamy colcannon soup. We listed the key ingredients and offered good substitutions for different diets. You learned step-by-step instructions from preparing the base to serving suggestions. We shared tips for perfect consistency and some tasty options for variations. Finally, we discussed how to store and reheat your soup. Remember, a warm bowl of colcannon soup is not just nourishing; it's comforting. Enjoy the process and make it your own!

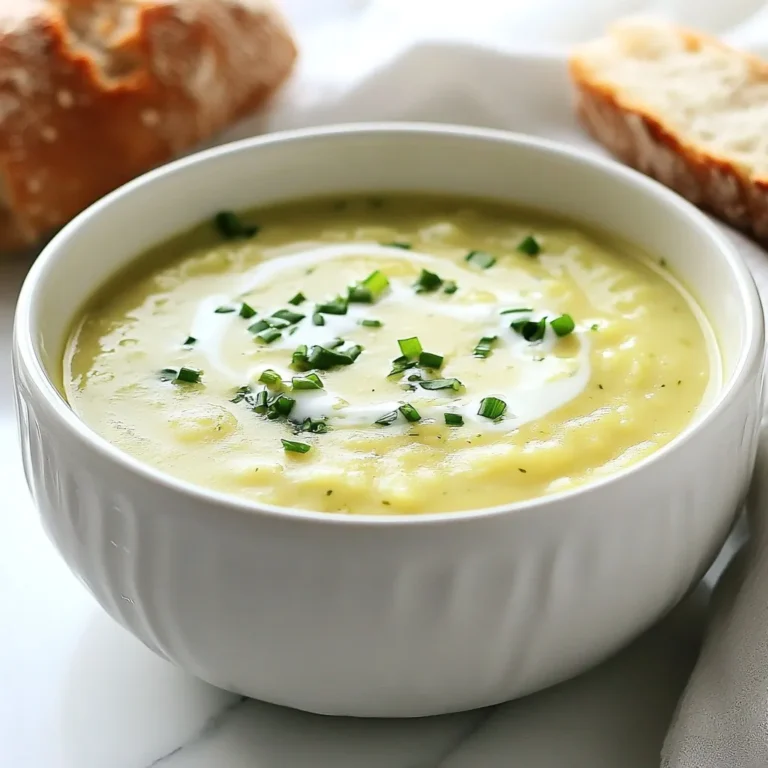
Creamy Colcannon Soup Hearty and Comforting Meal

- Ground beef and vegetable components: - 1 lb ground beef - 1 medium onion, finely chopped - 2 garlic cloves, minced - 2 carrots, diced into small cubes - 1 cup frozen peas - Seasoning and broth details: - 1 tablespoon Worcestershire sauce - 1 tablespoon tomato paste - Salt and freshly ground black pepper to taste - 2 teaspoons dried thyme - 1 teaspoon paprika - 1 cup beef broth - Dumpling preparation ingredients: - 2 cups all-purpose flour - 1 tablespoon baking powder - 1/2 teaspoon salt - 3/4 cup milk - 2 tablespoons fresh parsley, chopped finely for garnish Gather all these ingredients before you start cooking. It makes the process smooth and fun. Each item plays a key role in building rich flavors. The ground beef provides a hearty base, while vegetables add color and texture. The spices and broth bring depth to the dish. Lastly, the dumplings give that perfect comfort food touch. Enjoy the cooking journey! {{ingredient_image_2}} Browning the ground beef Start by heating your skillet over medium heat. Add 1 pound of ground beef to the pan. Use a spatula to break it apart as it cooks. Brown it well, which takes about 5 to 7 minutes. Once it’s browned, carefully drain any excess grease. This keeps the filling from being too oily. Sautéing the vegetables Next, add 1 medium onion, finely chopped, 2 minced garlic cloves, 2 diced carrots, and 1 cup of frozen peas to the skillet. Stir the mixture and sauté for about 5 to 7 minutes. You want the veggies to be tender and fragrant. Seasoning and simmering the filling Now it’s time to add flavor. Mix in 1 tablespoon of Worcestershire sauce, 1 tablespoon of tomato paste, 2 teaspoons of dried thyme, and 1 teaspoon of paprika. Season with salt and freshly ground black pepper to taste. Pour in 1 cup of beef broth and let it simmer for 5 minutes. This will thicken the filling slightly. Remove the skillet from heat and set it aside. Mixing dry ingredients In a large mixing bowl, whisk together 2 cups of all-purpose flour, 1 tablespoon of baking powder, and 1/2 teaspoon of salt. Make sure they are well combined. Adding milk and forming the dough Gradually pour in 3/4 cup of milk. Mix until just combined. The dough should be soft but not too sticky. If it feels too wet, add a little more flour to reach the right consistency. Forming dumplings and placing them in the skillet Using a spoon, scoop out portions of the dough and shape them into small balls, about the size of walnuts. Carefully drop these dumplings onto the seasoned beef filling in your skillet. Space them out evenly. Cooking the dumplings correctly Cover the skillet with a lid and reduce the heat to low. Cook for 15 to 20 minutes. This allows the dumplings to steam and expand until they are fluffy and cooked through. Enjoy the comforting aroma as they cook! To make your dumplings fluffy, start with the right dough. The dough should feel soft but not too sticky. If it is too wet, add more flour. You want it just right. When cooking the dumplings, steam is key. Cover your skillet with a lid to keep the steam in. This helps the dumplings rise and cook evenly. Keep the heat low to avoid burning them. To boost flavor, consider adding spices like garlic powder or onion powder. These spices can add a nice depth to your dish. You might also try a pinch of cayenne for heat or some Italian herbs for a twist. For broth, beef broth works great, but you can use chicken or vegetable broth. Each option adds its own taste. If you like a richer flavor, try adding a splash of red wine to the broth. It makes a big difference! Pro Tips Use Fresh Herbs: Fresh herbs can elevate the flavor of your dumplings. Consider adding a mix of parsley, chives, or thyme to the dough for an extra aromatic touch. Adjust Filling Consistency: If your beef filling seems too dry, add a splash more beef broth while it simmers. A moist filling will enhance the overall flavor and texture. Experiment with Spices: Feel free to experiment with spices like cumin or chili powder to give the beef filling a unique twist that suits your taste buds. Check Dumpling Doneness: To ensure the dumplings are cooked through, you can cut one in half before serving. It should be fluffy and not doughy in the center. {{image_4}} You can switch ground beef for ground turkey or plant-based meat. This change makes the dish lighter. Ground turkey has a milder taste, so add extra spices to boost flavor. You can also use lentils or chickpeas for a hearty vegetarian option. For dumplings, try dairy-free milk like almond or oat milk. You can use gluten-free flour instead of all-purpose flour. This way, you can enjoy this meal while meeting dietary needs. Explore regional flavors to make this dish unique. For an Asian twist, add soy sauce and ginger to the beef. You can use rice flour for dumplings. For an Italian flair, mix in some Italian herbs and use parmesan in the dumplings. Seasonal vegetables can also change the dish. In spring, add asparagus or peas. In fall, use pumpkin or squash for a warm touch. These additions keep the recipe fresh and exciting every time you make it. To store leftovers of ground beef and dumplings, let them cool first. Place them in an airtight container. For refrigeration, use a container that seals tightly to keep moisture in. Store in the fridge for up to three days. If you want to keep them longer, freezing is a great option. To freeze, place the cooled dish in a freezer-safe container. This keeps the meal fresh for up to three months. Make sure to label the container with the date. When reheating, take it from the freezer and thaw it in the fridge overnight. For best reheating results, use the oven or stove. Heat in a skillet over low heat. Add a splash of broth or water to keep it moist. If using the microwave, cover it to trap steam. Heat in short bursts, stirring in between, until hot. In the fridge, you can expect ground beef and dumplings to last about three days. If stored properly, they should remain safe to eat. In the freezer, this meal can last for up to three months. After that, the taste and texture may decline. Always check for signs of spoilage before consuming. You can tell dumplings are done when they puff up and are no longer sticky. The color will change to a light golden hue. Gently poke one with a fork. If it feels firm and springs back, it’s ready. Cooking them for 15-20 minutes ensures they steam well. Check the beef filling too; it should be bubbling. If you see steam escaping, it’s a good sign they are cooked through. Yes, you can prepare dumplings ahead of time. Make the dough and shape the dumplings. Lay them on a tray and cover with plastic wrap. Keep them in the fridge for one day. For longer storage, freeze them in a single layer. Once frozen, transfer them to a bag. When ready to cook, add them directly to the beef filling. Just add a few extra minutes to the cooking time. You can use store-bought dumplings for this dish. They save time and effort. Choose a brand that cooks quickly. Adjust the cooking time based on package directions. You may need to reduce the amount of broth used. This keeps the dish from becoming too watery. Taste the filling to ensure it pairs well with the dumplings. Store-bought options can be a great shortcut for busy nights. You learned how to make delicious ground beef and dumplings. We covered the key ingredients, step-by-step cooking methods, and tips for perfect results. You can even try fun twists and variations to suit your taste. Remember to store leftovers the right way to keep them fresh. Now, go ahead and put your skills to the test! Enjoy your meal and impress your friends and family with this classic dish.

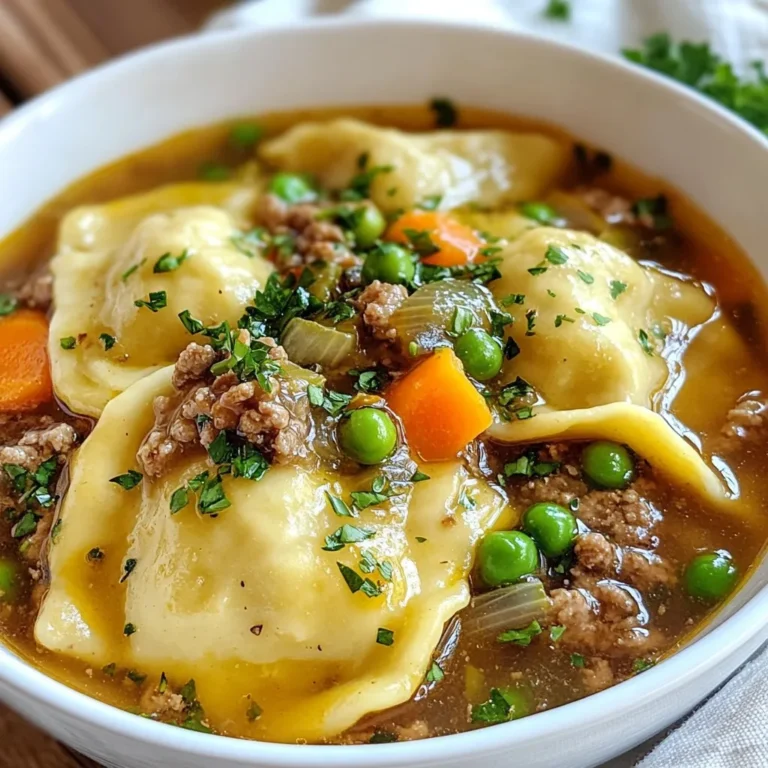
Ground Beef and Dumplings Hearty Comfort Meal

- 500g chicken breast, diced into bite-sized pieces - 200g plain yogurt - 2 tablespoons garam masala - 1 tablespoon ground cumin - 1 tablespoon ground coriander - 1 teaspoon turmeric powder - 1 teaspoon cayenne pepper (adjust for spice) - 2 tablespoons olive oil - 1 large onion, finely chopped - 3 cloves of garlic, minced - 1-inch piece of ginger, freshly grated - 2 ripe tomatoes, pureed - 200ml coconut milk - Fresh cilantro leaves, for garnish - Salt and black pepper to taste - 500g chicken breast = about 1.1 lbs - 200g yogurt = approximately 0.44 lbs or ¾ cup - 2 tablespoons = 30 ml - 1 tablespoon = 15 ml - 1 teaspoon = 5 ml - 200ml coconut milk = about 0.85 cups - For chicken, I suggest using organic brands for better quality. - Greek yogurt works best; try Fage or Oikos. - Look for high-quality garam masala from brands like Spice Islands or McCormick. - For olive oil, choose extra virgin options; I recommend California Olive Ranch. - Choose canned coconut milk from brands like Thai Kitchen or Aroy-D for richness. - Fresh cilantro can often be found from local farmers or organic sections in stores. This list gives you everything you need for Gordon Ramsay’s Chicken Tikka Masala. Each ingredient plays a key role in creating a balanced dish that is rich in flavor. {{ingredient_image_2}} Start by mixing the yogurt with spices. In a big bowl, combine: - 200g plain yogurt - 2 tablespoons garam masala - 1 tablespoon ground cumin - 1 tablespoon ground coriander - 1 teaspoon turmeric powder - 1 teaspoon cayenne pepper - Salt to taste Add the diced chicken breast to the bowl. Make sure every piece is coated well. For the best flavor, let the chicken sit in the fridge for at least 1 hour. If you have more time, marinate it overnight. Heat 2 tablespoons of olive oil in a large skillet over medium heat. Once the oil is hot, add one large, finely chopped onion. Cook it for 7-8 minutes until it turns golden brown. Stir it often to avoid burning. Next, add 3 cloves of minced garlic and 1 inch of freshly grated ginger. Cook these for 2 more minutes, stirring to release their great smells. Then, add the marinated chicken to the skillet. Cook it for about 5-6 minutes, turning the pieces until they are browned on all sides. After browning the chicken, pour in 2 ripe pureed tomatoes and the last tablespoon of garam masala. Let this cook for about 5 minutes. This step allows the flavors to mix well. Now, reduce the heat and stir in 200ml of coconut milk. Let the curry simmer for 10 minutes. This helps the chicken cook fully and makes the sauce rich and creamy. Finally, taste it! Adjust the salt and pepper if needed. For a nice touch, garnish with fresh cilantro leaves before serving. Enjoy your Chicken Tikka Masala! To make Chicken Tikka Masala shine, use fresh spices. Fresh spices boost flavor. Always taste as you cook. This helps you adjust flavors as needed. For a deeper flavor, let the sauce simmer longer. The coconut milk adds creaminess, but don’t rush it. Serve with warm naan or rice for the best meal! One big mistake is not marinating long enough. Marinate the chicken for at least one hour. If you have time, marinate overnight for more flavor. Another mistake is cooking on high heat. This can dry out the chicken. Always cook on medium heat for juicy pieces. Stir the sauce often to prevent sticking. Marinating the chicken is key. I recommend at least one hour. However, overnight gives the best results. The yogurt helps tenderize the meat. It also absorbs all those spices. For busy cooks, you can marinate in the morning and cook at night. This method saves time and ensures a tasty dish. Pro Tips Marination Magic: Letting the chicken marinate overnight intensifies the flavors and ensures a juicier texture. Onion Perfection: Cooking the onions until golden brown caramelizes their natural sugars, adding depth to the dish. Spice Control: Adjust the cayenne pepper based on your spice tolerance; start with less if you're unsure! Coconut Creaminess: For an extra creamy sauce, use full-fat coconut milk, which enhances the richness of the curry. {{image_4}} You can make a great vegetarian version of Chicken Tikka Masala. Simply swap the chicken for paneer or tofu. Both options soak up flavors well. Use the same marinade for these ingredients. You can also add mixed vegetables like bell peppers or spinach for extra color and nutrients. Just remember, cook the paneer or tofu until golden before adding the sauce. If you love heat, you can easily spice up your Chicken Tikka Masala. Add more cayenne pepper to the marinade. You can also include fresh green chilies while cooking. If you want a smoky flavor, try adding some smoked paprika. Taste as you go to ensure the spice level suits your palate. Serving Chicken Tikka Masala with the right sides makes the meal even better. I recommend fluffy basmati rice or warm naan bread. Both soak up the rich sauce perfectly. You might also consider a fresh salad or cucumber raita to cool the heat. For a special touch, garnish with fresh cilantro to add color and flavor. You can store leftover Chicken Tikka Masala in the fridge. Place it in an airtight container. This helps keep the dish fresh. It will stay good for up to three days. When you want to eat it, check the smell and look for any changes. If it seems off, throw it away. You can also freeze Chicken Tikka Masala. Put it in a freezer-safe container or bag. Make sure to remove as much air as possible. This helps prevent freezer burn. It can last for about three months in the freezer. When you are ready to eat it, thaw it in the fridge overnight. To reheat Chicken Tikka Masala, you have a few options. The best way is to use the stove. Heat it on low, stirring often. This helps it warm evenly. If you're in a rush, you can use the microwave. Place it in a microwave-safe dish, cover it, and heat in short bursts. Stir in between to avoid hot spots. Always check the temperature before eating. It should reach 165°F (74°C) to be safe. To adjust spice levels, start with less cayenne pepper. You can always add more later. If you want a milder dish, skip the cayenne altogether. Instead, add more yogurt to balance the heat. For a spicier version, increase the cayenne or add green chilies. Taste as you go to find your sweet spot. Yes, you can use different proteins in this recipe. Chicken is classic, but try shrimp or tofu for variety. If using shrimp, cook it quickly to avoid overcooking. For tofu, press it first to remove excess water. This helps it absorb flavors better. Feel free to experiment with your favorite proteins. Serve your Chicken Tikka Masala with fluffy basmati rice or warm naan bread. Both soak up the creamy sauce well. A simple cucumber salad adds freshness and crunch. You can also serve it with raita, a yogurt-based side that cools the heat. These sides create a balanced meal that everyone will enjoy. This blog post covered the main parts of making Chicken Tikka Masala. We went over the best ingredients, how to cook the chicken, and make the sauce. I shared tips to avoid common mistakes and secrets from Chef Ramsay. You also learned about fun variations and how to store leftovers. Remember, adjusting spices and picking sides can make this dish unique. Use these tips to make your Chicken Tikka Masala special and delicious. Enjoy your cooking journey!

Gordon Ramsay Chicken Tikka Masala Perfectly Balanced Meal

For the Savory Cranberry Brie Tartlets, you will need a few simple ingredients. Here’s the full list: - Phyllo pastry - Fresh cranberries - Granulated sugar - Water - Brie cheese - Fresh rosemary - Olive oil - Freshly ground black pepper - Egg (for egg wash) Each ingredient plays a vital role in creating the perfect tartlet. The phyllo pastry gives a crispy shell, while the fresh cranberries add a tart flavor. The granulated sugar balances the tartness, creating a lovely sauce. Water helps cook the cranberries down into that sauce. Brie cheese adds rich creaminess that melts beautifully in the oven. Fresh rosemary brings an earthy taste, making the dish even more special. Olive oil keeps the phyllo moist and adds flavor. Freshly ground black pepper gives a little kick to each bite. Lastly, the egg wash helps achieve that golden, crispy finish on your tartlets. Using these ingredients, you can create a dish that impresses at any gathering. Next, we will explore how to bring all these elements together into delicious tartlets. {{ingredient_image_2}} To start, grab a medium saucepan. Add 1 cup of fresh cranberries, 1/2 cup of sugar, and 1/4 cup of water. Heat it on medium. Stir gently as the cranberries cook. In about 10-15 minutes, they will burst, and the sauce will thicken. Once thick, take it off the heat and let it cool for a few minutes. This sauce adds a sweet and tart flavor to your tartlets. Now, let’s prep the phyllo dough. Lay one sheet of phyllo pastry on a flat surface. Brush it lightly with olive oil using a pastry brush. Layer two more sheets on top, brushing each with oil too. After that, cut the phyllo stack into 4x4-inch squares. This will create the base for your tartlets. Next, take each phyllo square and gently press it into the cups of a muffin tin. This forms a shell shape. Be gentle to keep the layers intact. Repeat this until all the phyllo squares are in the tin. This will give your tartlets a nice crispy texture. Now, it's time to fill the tartlets. Take a small piece of Brie cheese and place it in each phyllo cup. Then, add a generous spoonful of your cooled cranberry sauce on top. Sprinkle some chopped fresh rosemary over the sauce, and finish with a dash of black pepper. This mix of flavors is key to delicious tartlets. For a golden finish, let’s make an egg wash. In a small bowl, beat 1 egg with a splash of water until mixed. Use a pastry brush to lightly brush the edges of each phyllo cup with this egg wash. This will help the tartlets turn a lovely golden brown while baking. Now, preheat your oven to 375°F (190°C). Place the muffin tin in the oven carefully. Bake for 15-20 minutes. The phyllo should be golden brown and crispy when done. Keep an eye on them to avoid burning. After baking, remove the tartlets from the oven. Let them cool in the tin for a few minutes. Once cooled, gently transfer them to a serving platter. You can serve them warm, garnished with extra rosemary and a drizzle of olive oil for that perfect touch. Enjoy your savory cranberry brie tartlets at your next party! To make the best savory cranberry brie tartlets, follow these tips: - Use fresh cranberries for the best flavor. Frozen cranberries can work, but they may not burst as well. - Don’t skip the egg wash. It gives the tartlets a nice golden color. - Keep the phyllo pastry covered with a damp cloth while you work. This prevents it from drying out. - Avoid overfilling the cups. Too much filling can make them soggy. These tartlets shine at any gathering. Here are some ways to serve them: - Serve warm right from the oven. They taste best this way. - Pair them with a light salad for a complete meal. - Offer a selection of dips, like balsamic glaze or honey, for extra flavor. - Set them out on a buffet for guests to grab. A beautiful presentation makes your tartlets even more inviting. Try these ideas: - Arrange the tartlets on a colorful platter. - Garnish with a sprinkle of fresh rosemary for a pop of color. - Drizzle high-quality olive oil over the tartlets before serving. - Use small decorative plates for individual servings. Pro Tips Keep Phyllo Covered: Phyllo pastry dries out quickly, so keep the sheets covered with a damp cloth while you work to prevent them from becoming brittle. Choose Quality Brie: Opt for a good quality Brie cheese for the best flavor. A creamy, ripe Brie will melt beautifully and enhance the tartlets. Customize Fillings: Feel free to experiment with different fillings! Add caramelized onions, nuts, or even a hint of spice to the cranberry sauce for unique flavor profiles. Make Ahead: You can prepare the phyllo cups in advance and store them in an airtight container. Just fill and bake them right before serving for optimal crispiness. {{image_4}} Brie cheese shines in these tartlets, but you can mix it up! Try goat cheese for a tangy twist. Creamy camembert adds depth and richness. For a bolder flavor, use aged cheddar or blue cheese. Each cheese brings its unique taste to the tartlets. Experiment with your favorites to find your perfect match. While cranberries are tasty, seasonal fruits can enhance your tartlets. In spring, use fresh strawberries or raspberries. Summer peaches or figs work wonders, too. In fall, think apples or pears for a sweet touch. Each fruit adds color and flavor. Combine fruits with cranberries for a fun mix! Herbs and spices can change the game in your tartlets. Besides rosemary, consider thyme or sage for a warm flavor. A pinch of cinnamon or nutmeg can add a hint of spice. For a kick, try red pepper flakes or a dash of cayenne. These additions make your tartlets even more exciting! To keep your leftover tartlets fresh, place them in an airtight container. This helps preserve their taste and texture. Store them in the fridge for up to three days. Before serving, you can add a little olive oil for extra flavor. If you want to save tartlets for later, freezing works well. First, let them cool completely. Then, wrap each tartlet in plastic wrap and place them in a freezer bag. They can last for up to two months in the freezer. Label the bag with the date for easy tracking. To reheat your tartlets, preheat your oven to 350°F (175°C). Place the tartlets on a baking sheet and heat for about 10-15 minutes. This will restore their crispiness. You can also microwave them, but the crust may not stay crispy. Enjoy your tasty snack! Yes, you can use frozen cranberries. Just thaw them before cooking. Frozen cranberries may take longer to cook. They can also yield more liquid than fresh ones. Adjust the sugar and water as needed. To keep phyllo pastry fresh, cover it with a damp cloth. This prevents it from drying out while you work. Make sure to work quickly. If you leave it uncovered, the sheets will become brittle and hard to use. Yes, you can prep the tartlets ahead of time. Assemble them and store in the fridge. Bake them just before serving. This ensures they stay crispy and warm. These tartlets are great for holiday gatherings and parties. They work well for casual get-togethers too. Their rich flavor makes them a hit at any event. Absolutely! You can use Camembert or goat cheese. Both options provide a creamy texture. They also pair well with cranberry sauce. Just choose a cheese you enjoy. You learned how to make savory cranberry brie tartlets using simple ingredients. We discussed key steps, from making the cranberry sauce to baking the tartlets. Remember to keep phyllo dough covered to avoid drying out. Try different cheeses or fruits for fun twists. These tartlets are perfect for parties or snack time. Store leftovers correctly to enjoy later. Get creative and enjoy your cooking journey with these tasty treats!

Savory Cranberry Brie Tartlets Perfect for Parties

- 1 lb boneless, skinless chicken breasts, diced into bite-sized pieces - 1 tablespoon Cajun seasoning - 2 tablespoons olive oil - 1 medium onion, finely chopped - 2 cloves garlic, minced - 1 bell pepper (choose red or green), diced - 1 cup orzo pasta - 4 cups chicken broth (low-sodium recommended) - 1 can (14 oz) diced tomatoes, including juice The main ingredients in this dish are simple yet full of flavor. The boneless, skinless chicken breasts form a tender base. Cajun seasoning gives it a spicy kick, while olive oil keeps everything moist and adds richness. In the vegetable section, we have onion, garlic, and bell pepper. These ingredients add depth to the dish. The onion and bell pepper provide sweetness, while garlic gives it an aromatic touch. For the pasta and broth, orzo is the star. This small pasta cooks fast and absorbs flavors well. Chicken broth adds a savory base, while diced tomatoes bring in some acidity and sweetness. Together, these ingredients create a well-rounded meal that is perfect for any weeknight. {{ingredient_image_2}} 1. Start with the diced chicken in a bowl. 2. Sprinkle the Cajun seasoning on the chicken. 3. Toss the chicken until all pieces are coated. 4. Heat olive oil in a large skillet over medium-high heat. 5. Once the oil shimmers, add the seasoned chicken. 6. Sauté for 5-7 minutes. 7. The chicken should turn brown and cook through. 8. Remove the chicken and set it aside on a plate. 1. In the same skillet, add the chopped onion and diced bell pepper. 2. Sauté for 3-4 minutes until they become tender. 3. Add minced garlic and cook for one more minute. 4. The garlic should smell fragrant, adding depth to the dish. 1. Stir in the orzo pasta and toast it for 2 minutes. 2. Stir often to get a light golden color. 3. Pour in the chicken broth and diced tomatoes with juice. 4. Raise the heat until the mixture boils. 5. Lower the heat to a gentle simmer. 1. Return the cooked chicken to the skillet. 2. Add frozen peas and smoked paprika. 3. Cover the skillet with a lid. 4. Let it cook for 12-15 minutes until the orzo is al dente. 5. Stir occasionally, adding broth if it looks dry. 1. After cooking, season with salt and black pepper to your taste. 2. Remove the skillet from heat. 3. Top with freshly chopped parsley for color and flavor. 4. Serve warm and enjoy the meal! - Choosing the right Cajun seasoning: Look for a blend with paprika, cayenne, and herbs. This mix brings heat and depth. You can make your own by mixing equal parts paprika and cayenne with garlic powder and dried herbs. Adjust the heat to your taste. - Balancing flavors with salt and pepper: Always taste your dish before serving. The right amount of salt enhances all the flavors. Add black pepper for a warm bite. A pinch can elevate the dish without overwhelming it. - Tips for adding cheese or cream: For a creamy touch, stir in some cream or cheese at the end. Cream cheese or cheddar works well. Add cheese slowly and stir until it melts. This gives the dish a rich texture. You can also use a splash of heavy cream for a smooth finish. - Adjusting for different stovetop settings: Stovetops can vary in heat. If your dish is cooking too fast, lower the heat. If it’s too slow, raise it slightly. Keep an eye on the orzo as it absorbs liquid. - Ensuring the right texture for orzo: Orzo should be tender but not mushy. Stir it often and check for doneness after 12 minutes. If it looks dry, add a little broth. Remember, the pasta will continue to cook off the heat. This gives you a perfect bite every time. Pro Tips Perfectly Seasoned Chicken: Ensure that the chicken is thoroughly coated with Cajun seasoning for maximum flavor. Allow it to marinate for 15-30 minutes if time permits. Customizing Spice Level: Adjust the amount of Cajun seasoning according to your spice preference. For a milder dish, start with half the amount and add more to taste. Choosing the Right Broth: Using homemade or high-quality chicken broth will enhance the overall flavor of the dish, making it richer and more satisfying. Adding Freshness: Consider adding a squeeze of lemon juice just before serving to brighten up the flavors and add a refreshing finish to the dish. {{image_4}} You can easily swap the chicken for shrimp or sausage. Each option brings a unique taste. Shrimp cooks quickly and adds a nice seafood flavor. Sausage gives a hearty, smoky touch. For a vegetarian twist, try using chickpeas or mushrooms. Both options add protein without meat. Want more kick? Add cayenne pepper or oregano. These spices enhance the Cajun flavor and give it a deeper taste. You can also mix in different veggies. Try zucchini, spinach, or corn for added color and nutrition. This keeps the dish fresh and exciting. Pair your Cajun Chicken Orzo Skillet with cornbread or a crisp salad. Cornbread adds a sweet touch and complements the spices. A salad gives a refreshing contrast. For plating, serve it in the skillet for a rustic feel. Or plate individual servings with extra parsley and a lemon wedge. This adds a pop of color and a burst of flavor. To store leftovers, use an airtight container. Make sure the dish cools down first. You can keep it in the fridge for up to 3 days. If you want to keep it longer, freezing is a great option. For reheating, I suggest using the stovetop. Add a splash of chicken broth to keep it moist. Heat it over medium-low heat and stir often. This way, you avoid sogginess in the orzo. Microwaving is quick but may not give the best results. To freeze, let the dish cool completely. Place it in a freezer-safe container. It can last up to 3 months in the freezer. When you’re ready to eat, thaw it overnight in the fridge. Reheat it on the stovetop with a bit of broth for the best texture. Yes, you can prepare parts of this dish ahead of time. You can marinate the chicken with Cajun seasoning a day before. Store it in the fridge to let the flavors deepen. You can also chop the onion, bell pepper, and garlic in advance. Keep them in an airtight container. When you're ready to cook, it will save you time. If you don’t have orzo, you can use other small pasta. Examples include ditalini, rice-shaped pasta, or even couscous. If you want a gluten-free option, try quinoa or rice. These alternatives still soak up the flavors well. To make the dish milder, use less Cajun seasoning. You can also add more cream or cheese afterward. If you want it spicier, add cayenne pepper or extra Cajun seasoning. Always taste as you go, so it’s just right for your palate. In this blog post, we explored a delicious Cajun Chicken Orzo Skillet. We discussed key ingredients, like chicken, veggies, orzo, and broth. I provided step-by-step instructions to simplify your cooking. You learned tips on perfecting flavors and making variations with protein or spices. Lastly, we covered storage and reheating options. Remember, this dish is flexible and can fit your taste. Enjoy creating your own versions and impressing family and friends!

Cajun Chicken Orzo Skillet Tasty Weeknight Meal

- 3-4 lbs chuck roast - 1/4 cup soy sauce - 1/4 cup gochujang - 2 tablespoons sesame oil - 2 tablespoons brown sugar The chuck roast is the star of this dish. It’s tender and full of flavor. Soy sauce adds depth, while gochujang brings heat. Sesame oil gives a nutty note, and brown sugar balances everything with sweetness. - 1 tablespoon minced ginger - 4 cloves garlic, finely minced - 1 large onion, thinly sliced - 2 carrots, chopped into bite-sized pieces - 2 cups beef broth Ginger and garlic add warmth and spice. The onion brings sweetness as it cooks. Carrots add color and texture, while beef broth provides a rich base for the sauce. - 1 tablespoon cornstarch for thickening - Sliced green onions and sesame seeds for garnishing Cornstarch helps thicken the sauce if you want it richer. Green onions and sesame seeds are great for garnishing. They add a fresh look and a bit of crunch. {{ingredient_image_2}} - Preheat the oven: Start by preheating your oven to 350°F (175°C). This heat helps slow-roast the beef well. - Combine marinade ingredients: In a large bowl, mix soy sauce, gochujang, sesame oil, brown sugar, minced ginger, and garlic. Whisk until smooth. - Rub marinade on the roast: Generously rub the marinade all over the chuck roast. Make sure it coats every side. - Let it marinate: Allow the roast to marinate at room temperature for at least 30 minutes. For more flavor, marinate overnight in the fridge. - Sear the roast: Heat sesame oil in a large Dutch oven over medium-high heat. Sear the roast for 3-4 minutes on each side. This browning seals in juices. - Sauté the vegetables: Remove the roast and set it aside. In the same pot, add sliced onions. Sauté for about 3 minutes until they soften. - Combine and roast in the oven: Add chopped carrots and beef broth to the pot. Return the roast to the pot, nestling it among the veggies. Cover the pot and place it in the oven. Roast for 3-4 hours until fork-tender. - Thicken the sauce if desired: If you like a thicker sauce, mix cornstarch with cold water to make a slurry. Heat the pot juices and stir in the slurry until it thickens. - Slice and serve: After resting the roast for 15 minutes, slice it against the grain into thick pieces. Serve with the rich sauce drizzled on top. Enjoy! For the best taste, marinate the roast for at least 30 minutes. If you can, let it sit overnight in the refrigerator. This lets the flavors seep deep into the meat. If you are in a rush, room temperature marinating works too but will not be as rich. Searing is a crucial step. It locks in juices and adds a deep flavor. Heat a Dutch oven over medium-high heat. Use sesame oil to coat the bottom. Sear each side of the roast for about 3-4 minutes. This creates a nice crust that enhances the dish. Korean pot roast pairs well with rice or hearty noodles. Serve the roast over a bed of fluffy rice for a comforting meal. Add a sprinkle of sliced green onions and sesame seeds on top. This not only boosts flavor but also makes the dish look beautiful. Pro Tips Marination Matters: Allow the chuck roast to marinate overnight for the best flavor infusion. The longer it sits, the more the flavors will penetrate the meat. Perfect Searing: Ensure your Dutch oven is adequately heated before adding the roast. A good sear locks in juices and enhances the overall flavor profile. Check for Tenderness: Use a fork to test the roast's tenderness towards the end of the cooking time. It should easily shred apart when done, indicating it's perfectly cooked. Enhance the Sauce: For an extra layer of flavor, consider adding a splash of rice vinegar or a touch of honey to the sauce after thickening for balance. {{image_4}} You can easily change the heat and sweetness of your Korean pot roast. If you like it spicy, add more gochujang. This Korean chili paste brings a nice kick. Start with one extra tablespoon and taste. If you want it sweeter, add more brown sugar. Adjust it by one or two tablespoons to your liking. Balancing these flavors makes the dish your own. You can cook this pot roast in different ways. A slow cooker works great for a hands-off meal. Just follow the same steps for marinating and searing. Then, place everything in the slow cooker. Set it on low for 8 hours or high for 4 hours. An Instant Pot is another option. After searing the meat, add the vegetables and broth. Lock the lid and cook on high pressure for about 60 minutes. Both methods still give you a tender, flavorful roast. Feel free to swap ingredients to fit your diet. For a gluten-free option, use tamari instead of soy sauce. You can also replace the chuck roast with brisket or pork shoulder. If you have veggie lovers, add mushrooms or bell peppers. They add great flavor and color. Adjust the cooking time as needed. This allows you to enjoy this dish no matter your dietary needs. To keep your Korean pot roast fresh, cool it quickly. You can let it sit at room temperature for about 30 minutes. After that, transfer it to the fridge. Use airtight containers to store the leftovers. This helps keep the flavors strong. If you have a lot, divide it into smaller portions. This makes it easy to reheat later. When it's time to enjoy your leftovers, the best way to reheat is in the oven. Preheat your oven to 300°F (150°C). Place the pot roast in a baking dish and cover it with foil. This keeps the meat moist. Heat for about 20-30 minutes. You can also reheat in the microwave. Use a microwave-safe dish and cover it. Heat in intervals of 1 minute, stirring in between. This helps maintain flavor and texture. You can freeze your Korean pot roast for later use. Let the roast cool completely before freezing. Wrap it tightly in plastic wrap and then in foil. This helps prevent freezer burn. Label it with the date. To thaw, place it in the fridge overnight. You can also use the microwave for quicker thawing. Just be careful not to cook it while thawing. Can I use a different cut of meat? Yes, you can choose other cuts. Brisket or round can work well too. Just remember, tougher cuts give better flavor after slow cooking. They also become tender and juicy. How do I know when the roast is done? The roast is done when it is fork-tender. You should be able to shred it easily with a fork. It usually takes about 3-4 hours in the oven at 350°F. Use a meat thermometer if you're unsure; it should reach 195°F to 205°F for best results. What if I don’t have gochujang? If you don’t have gochujang, you can use a mix of miso and chili paste. This gives a similar heat and depth. Another option is to mix red pepper flakes with a bit of honey. It won't be exactly the same, but it will still add great flavor. What if I have a smaller or larger roast? If your roast is smaller, reduce cooking time by about 30 minutes. For larger roasts, increase cooking time by about 30 minutes to an hour. Always check tenderness to know when it's ready. Cooking times can differ based on your oven and meat size. In this article, we covered the key ingredients for Korean pot roast, like chuck roast and gochujang. I shared step-by-step instructions, including marinating and searing techniques. We discussed tips for flavor, serving suggestions, and variations to suit your taste. Korean pot roast is flexible and fun to make. With practice, you can adjust it to your liking. Enjoy the cooking journey and make it your own!

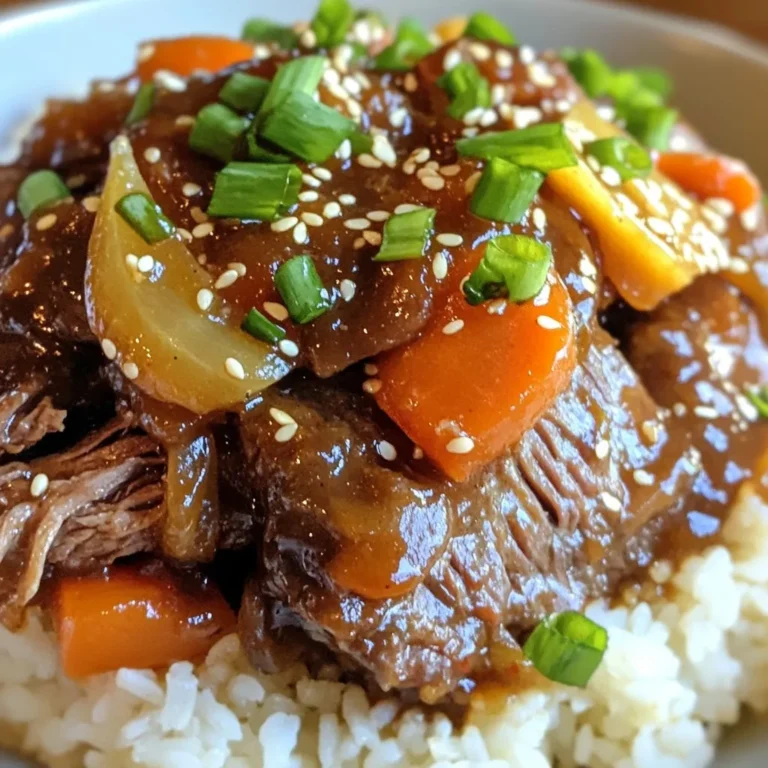
Korean Pot Roast Flavorful and Hearty Recipe Guide

To make these delicious cinnamon roll cookies, gather the following ingredients: - 2 cups all-purpose flour - 1 teaspoon baking powder - 1/2 teaspoon baking soda - 1/2 teaspoon salt - 1 tablespoon ground cinnamon - 3/4 cup unsalted butter, softened - 1 cup packed brown sugar - 1/4 cup granulated sugar - 1 large egg - 1 teaspoon vanilla extract - 1/2 cup chopped pecans or walnuts (optional) - 1 cup powdered sugar (for icing) - 2 tablespoons milk (for icing) If you need to convert measurements, here's a quick guide: - 1 cup = 16 tablespoons - 1 tablespoon = 3 teaspoons - 1/2 cup = 8 tablespoons - 1 teaspoon = 5 milliliters These conversions help ensure your baking is accurate. You can make these cookies even better with some fun add-ins. Try: - 1/2 cup chocolate chips for a sweet twist - 1/2 cup dried cranberries for a tangy flavor - A sprinkle of nutmeg for extra spice These options let you customize your cookies to your taste. Enjoy experimenting! {{ingredient_image_2}} Start by preheating your oven to 350°F (175°C). While the oven heats, line a baking sheet with parchment paper. This step helps prevent the cookies from sticking and makes cleanup easy. In a medium bowl, whisk together the following dry ingredients: - 2 cups all-purpose flour - 1 teaspoon baking powder - 1/2 teaspoon baking soda - 1/2 teaspoon salt - 1 tablespoon ground cinnamon Mix these until they are well combined. Set this dry mix aside for later. In a large bowl, cream together: - 3/4 cup unsalted butter, softened - 1 cup packed brown sugar - 1/4 cup granulated sugar Beat these together for about 2-3 minutes. The mixture should be light and fluffy. This step is key for a soft cookie. Add one large egg and 1 teaspoon of vanilla extract to the creamed butter and sugars. Mix until everything is smooth. Next, slowly add the dry mix to the wet mix. Stir gently until they are just combined. Be careful not to overmix, or the cookies will be tough. If you want some crunch, fold in 1/2 cup of chopped pecans or walnuts now. Using a tablespoon or cookie scoop, portion out the dough. Roll each piece into a ball and place them on the baking sheet about 2 inches apart. Bake for 10-12 minutes. Watch for lightly golden edges while keeping the centers soft. While the cookies cool, make the icing. In a small bowl, whisk together: - 1 cup powdered sugar - 2 tablespoons milk Keep whisking until the icing is smooth. If it’s too thick, add a bit more milk. Once the cookies are cool, drizzle or spread the icing on top. Let it set for a few minutes before serving. Enjoy your homemade cinnamon roll cookies! To make soft and chewy cinnamon roll cookies, follow these tips: - Use room temperature butter. This helps the butter mix well and keeps cookies soft. - Do not overmix. Mix the wet and dry ingredients just until combined. - Chill the dough. If you have time, chill the dough for 30 minutes. This step helps the cookies keep their shape. - Bake until golden. Look for lightly golden edges and soft centers. This keeps them chewy. Serving these cookies can be fun! Here are some ideas: - Use a decorative plate. Place the cookies on a colorful or themed plate. - Dust with cinnamon. Lightly sprinkle extra cinnamon on top for a pretty touch. - Add fresh mint. A sprig of mint adds color and freshness. - Pair with coffee or tea. These cookies go well with warm drinks for a cozy treat. Sometimes, things don’t go as planned. Here’s how to fix common problems: - Cookies are too hard. You may have baked them too long. Keep an eye on the time. - Dough is too sticky. If the dough sticks to your hands, try chilling it for a bit. - Cookies spread too much. Make sure your butter is not too soft. Room temperature is best. - Icing is too thick. Add a little more milk to thin out the icing. Mix well until smooth. Pro Tips Chill the Dough: For a firmer texture and easier handling, consider chilling the cookie dough for 30 minutes before baking. This will help prevent spreading and enhance the cookie's overall shape. Use Fresh Spices: For the best flavor, use freshly ground cinnamon instead of pre-ground. Freshly ground spices offer a more vibrant taste that greatly enhances the cookies. Experiment with Nuts: If you're not a fan of pecans or walnuts, try different nuts like hazelnuts or almonds for a unique twist. You can also omit nuts altogether for a nut-free version. Store Properly: To keep the cookies fresh, store them in an airtight container at room temperature. If you want to keep them longer, consider freezing them, and they can last up to three months. {{image_4}} You can change the flavor of your cinnamon roll cookies easily. Here are some fun ideas: - Pumpkin Spice: Add 1/2 cup of pumpkin puree and 1 teaspoon of pumpkin pie spice. This adds warmth and a festive touch. - Chocolate Chip: Fold in 1 cup of chocolate chips for a sweet twist. The chocolate melts and pairs well with cinnamon. - Nutty Banana: Mix in 1 ripe mashed banana and 1/2 cup of chopped walnuts. This gives a delightful fruit flavor. These flavors bring new life to your cookies. They make baking exciting and fun, perfect for any occasion. Do you need alternatives for dietary needs? No problem! Here are some options: - Gluten-Free: Substitute all-purpose flour with a 1:1 gluten-free flour blend. This keeps the texture nice. - Vegan: Use vegan butter and replace the egg with 1/4 cup of applesauce. This keeps cookies moist and tasty. - Dairy-Free: Choose a non-dairy milk for the icing and use dairy-free butter. You won’t miss the dairy at all. These swaps help you enjoy cinnamon roll cookies no matter your diet. They still taste amazing and satisfy your sweet tooth. The icing is a key part of these cookies. You can try different toppings for variety: - Cream Cheese Icing: Mix 4 oz of cream cheese with 1 cup of powdered sugar and 2 tablespoons of milk. This adds a rich, tangy flavor. - Maple Icing: Combine 1 cup of powdered sugar with 2 tablespoons of maple syrup and 1 tablespoon of milk. This gives a sweet, unique touch. - Cinnamon Sugar Dusting: Instead of icing, sprinkle a mix of sugar and cinnamon on top. This is simple but delicious. Try these icing options to find your favorite. They change the whole taste and look of your cookies. You can keep your cinnamon roll cookies at room temperature. Place them in an airtight container. This helps keep them soft and fresh. Enjoy the cookies within a week for the best taste. If you stack them, add parchment paper between layers. This prevents sticking. To freeze the cookies, let them cool completely first. Then, place them in a single layer on a baking sheet. Freeze for about an hour until firm. After that, transfer the cookies to a freezer-safe bag. Remove as much air as possible. They can last up to three months in the freezer. When you want to enjoy a cookie, reheat it for a soft bite. Preheat your oven to 350°F (175°C). Place the cookie on a baking sheet. Heat for about 5-7 minutes. This warms it up and revives the flavor. You can also microwave it for about 10-15 seconds. Enjoy your warm, gooey treat! Yes, you can make cinnamon roll cookies ahead of time. Prepare the dough, then wrap it in plastic. You can store it in the fridge for up to three days. This way, you can bake fresh cookies whenever you want. If you need to store the dough longer, freeze it. Just let it thaw in the fridge before baking. To make the cookies less sweet, reduce the brown sugar. You can cut the amount by a third. Using less icing also helps. If you like, add a pinch of salt to balance the sweet taste. This will give the cookies a nice flavor without being too sugary. You can use many tasty options instead of nuts. Try adding chocolate chips, dried fruits, or shredded coconut for extra flavor. If you want more crunch, choose sunflower seeds or pumpkin seeds. These swaps keep the cookies delicious and fun. If your cookies are overbaked, there is a simple fix. You can try soaking them in milk for a few seconds. This will help reduce dryness. Another option is to store them in an airtight container with a slice of bread. The bread will add moisture and soften the cookies. You now have all the tools to bake delicious cinnamon roll cookies. We covered the key ingredients, helpful steps, and fun variations. You learned best practices for soft, chewy cookies and how to store them well. Remember, cookie-making is about having fun. Experiment with flavors and share your treats. Trust your instincts, and don’t be afraid to try new things. Happy baking!

Cinnamon Roll Cookies Delightful Homemade Treat

- 12 ounces cheese tortellini (fresh or frozen) - 2 boneless, skinless chicken breasts - 1 cup heavy cream - 3 tablespoons extra virgin olive oil - 4 cloves garlic, finely minced - 1 cup freshly grated Parmesan cheese - 1 teaspoon Italian seasoning - Fresh parsley, chopped, for garnish - Red pepper flakes - Salt and black pepper To make Garlic Parmesan Tortellini with Chicken, gather all the ingredients. It's important to have fresh cheese tortellini for the best taste. You can use frozen tortellini if that’s what you have. For the chicken, boneless, skinless breasts work great. They cook evenly and stay juicy. Heavy cream adds a rich flavor. It makes the sauce creamy and smooth. You will also need some olive oil to cook the chicken and garlic. Garlic is key for flavor and aroma. Parmesan cheese brings a salty taste that pairs perfectly with the cream. Italian seasoning adds a nice herbal note. Lastly, fresh parsley makes a lovely garnish. It adds color and freshness. If you like a bit of heat, red pepper flakes are a fun addition. Adjust salt and black pepper to your taste. With these ingredients, you can create a delightful meal that everyone will love! {{ingredient_image_2}} - Boiling Method: Fill a large pot with water. Add a good pinch of salt. Bring the water to a boil. Once boiling, add the cheese tortellini. Cook them until they float. This shows they are done. - Drain and Set Aside: Carefully drain the tortellini in a colander. Set them aside while you cook the chicken. - Seasoning the Chicken Breasts: Take the chicken breasts. Sprinkle salt, pepper, and Italian seasoning on both sides. This adds great flavor. - Cooking Time and Temperature: Heat 2 tablespoons of olive oil in a skillet over medium heat. Add the chicken. Cook for about 6-7 minutes on each side. The chicken should be golden brown and reach 165°F inside. - Sautéing Garlic: In the same skillet, add 1 tablespoon of olive oil. Once hot, add minced garlic. Sauté for about 1 minute. Stir often to avoid burning. - Mixing Cream and Parmesan: Reduce the heat to low. Pour in the heavy cream while stirring. Slowly add the grated Parmesan cheese. Stir until smooth and creamy. - Incorporating Tortellini and Chicken: Add the drained tortellini to the sauce. Toss gently to coat them well. Then fold in the sliced chicken. - Adjusting Seasoning for Flavor: Taste the dish. Add more salt, pepper, or red pepper flakes for heat if you like. - Plate Presentation: Spoon the Garlic Parmesan Chicken Tortellini onto plates or a serving dish. - Optional Garnishes: Garnish with fresh chopped parsley. For extra flair, drizzle olive oil and sprinkle more Parmesan on top. Enjoy your delicious meal! - Cooking Time Recommendations: To cook tortellini perfectly, boil them for 3-5 minutes. They are ready when they float. Keep an eye on them to avoid overcooking. - Troubleshooting Undercooked Tortellini: If your tortellini is still firm, return it to boiling water. Cook for an extra minute and check again. - Seasoning Best Practices: Use salt, pepper, and Italian seasoning on both sides of the chicken. This enhances the flavor and makes every bite tasty. - Searing Techniques for Juicy Chicken: Heat olive oil until hot. Cook chicken for 6-7 minutes on each side. This creates a golden crust while keeping the inside juicy. Always check that the chicken reaches 165°F. - Additional Flavor Boosts: For a richer taste, add a pinch of red pepper flakes or fresh herbs. These can elevate your dish and add unique flavors. - Avoiding Clumps in Cheese Sauce: To prevent clumps, add cheese slowly while stirring. Keeping the heat low helps the cheese melt smoothly into the sauce. Pro Tips Use Fresh Ingredients: Fresh garlic and good-quality Parmesan cheese will elevate the flavor of your dish significantly. Don’t Overcook the Chicken: To maintain moisture, ensure you check the internal temperature and avoid cooking beyond 165°F. Adjust Cream for Thickness: If you prefer a thicker sauce, let it simmer a bit longer to reduce, or add more Parmesan for a richer texture. Garnish for Flavor: Fresh parsley not only adds color but also enhances the overall flavor profile of the dish. {{image_4}} You can change the protein in this dish to suit your taste. - Shrimp or Salmon Alternatives: If you love seafood, try shrimp or salmon. Both cook fast and add a nice flavor. For shrimp, sauté them in the pan for about 3-4 minutes until they turn pink. For salmon, cook it for about 5-6 minutes on each side until it flakes easily. - Vegetarian Options: For a meat-free meal, use mushrooms or tofu instead. Mushrooms add rich umami, while tofu absorbs all the sauce flavors. Just sauté them until golden and add them to the dish. Adding vegetables can make the dish more colorful and healthy. - Spinach or Kale: Toss in fresh spinach or kale at the end of cooking. They wilt quickly and add great nutrition. Just stir them in for a minute until they soften. - Peas or Asparagus: Sweet peas or crunchy asparagus also work well. For peas, add them in the last few minutes of cooking. For asparagus, chop it into bite-sized pieces and cook it with the chicken. You can make this dish even more exciting with some flavor tweaks. - Spicy Variations with Chili: If you like spice, add red pepper flakes or diced fresh chili to the sauce. This gives a nice kick that balances the creamy sauce. - Zesty Lemon or Herb Additions: Brighten the dish with fresh lemon juice or zest. You can also add herbs like basil or thyme for an aromatic touch. Just sprinkle them in when mixing the sauce for a fresh twist. To store leftovers, let the dish cool first. Place it in an airtight container. It keeps well in the fridge for up to three days. Always reheat gently to keep the flavors fresh. For best practices, cover the dish tightly. This helps prevent the pasta from drying out. Stir before serving to mix in any separated sauce. If you want to freeze prepped ingredients, cook the tortellini and chicken first. Let them cool completely. Then, pack them into freezer-safe bags or containers. This way, you can enjoy the dish later. For thawing and reheating, move the frozen meal to the fridge overnight. Reheat in a skillet on low heat. Add a splash of cream to loosen the sauce. In the fridge, Garlic Parmesan Tortellini with Chicken lasts about three days. In the freezer, it can stay fresh for up to three months. Signs of spoilage include an off smell and a change in color. If you see mold or if it feels slimy, it's best to discard it. Yes, you can use frozen tortellini. Just follow these steps: - Boil the water with salt. - Add the frozen tortellini directly to the boiling water. - Cook for an extra minute or two. They might take longer than fresh ones. - Once they float, they are done. Using frozen tortellini saves time. It also keeps well in your freezer for a quick meal. If you need a substitute for heavy cream, try these options: - Half-and-half works well for a lighter sauce. - Full-fat coconut milk gives a creamy texture and is dairy-free. - Greek yogurt can add richness with less fat, but mix it in off the heat. These substitutes keep the dish creamy and delicious, even if you're avoiding heavy cream. To make this recipe gluten-free, use gluten-free tortellini. Many brands offer options made from rice, corn, or quinoa. Here are some tips: - Check the package for cooking times. They may differ from regular tortellini. - Ensure that all your other ingredients, like the chicken and spices, are gluten-free. This way, you enjoy the same great flavors without gluten. Yes, you can prep this dish ahead of time. Here’s how: - Cook the tortellini as directed and cool them completely. - Cook the chicken and slice it. Store it in the fridge. - Keep the sauce separate until you're ready to serve. When you’re ready to eat: - Reheat the chicken and tortellini. - Warm the sauce on low heat, then combine everything. This makes for a quick and tasty meal when you're short on time! In this blog post, we explored a delicious Garlic Parmesan Tortellini with Chicken recipe. We covered key ingredients, cooking steps, and tips to perfect the dish. I highlighted ways to customize it with different proteins or veggies. You learned how to store leftovers for freshness and answers to common questions. Cooking is fun and rewarding. This recipe makes a tasty meal that is easy to modify. Enjoy creating your version of this creamy dish!

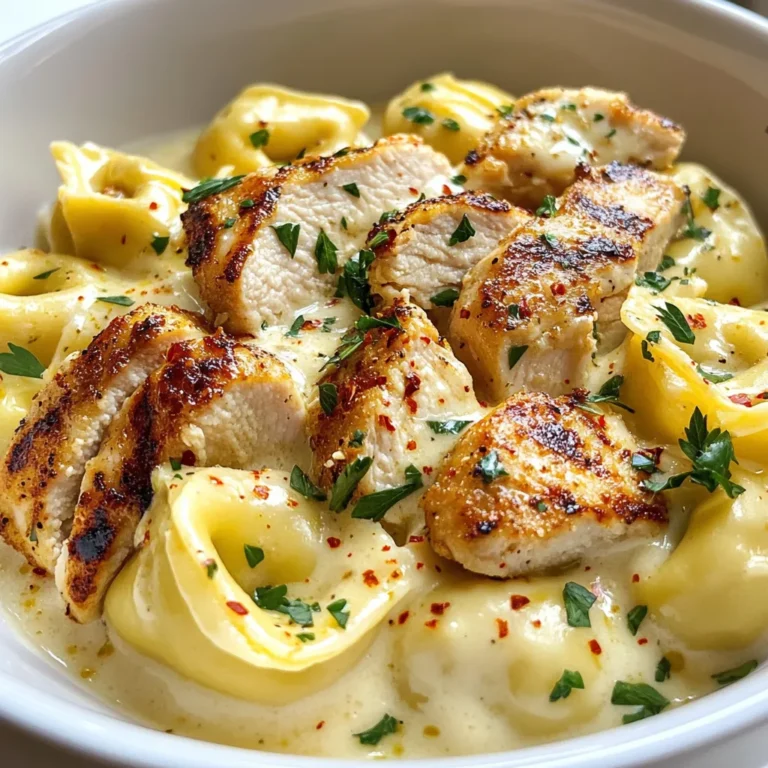
Garlic Parmesan Tortellini with Chicken Recipe Delight

For this dish, I use 1 pound of ground beef. I prefer 80/20 beef for great taste and fat. This blend keeps the meat juicy and flavorful. You need 2 cups of broccoli florets. Fresh or frozen both work well. I also add 1 medium onion, finely diced, to give depth. Two cloves of minced garlic add a nice kick. These aromatics make the dish fragrant and tasty. For spices, I use 1 teaspoon of smoked paprika and 1 teaspoon of garlic powder. These add warmth and flavor. I also add ½ teaspoon of onion powder, salt, and pepper to taste. For cheese, I use ½ cup of shredded cheddar cheese, preferably aged. It adds a robust taste. Lastly, I mix in 2 tablespoons of softened cream cheese, which gives a creamy texture. Fresh chopped parsley is great for garnish, adding color and freshness. {{ingredient_image_2}} First, grab a large skillet. Set it on medium heat and add one tablespoon of olive oil. Let the oil warm up for a minute. Chop a medium onion into small pieces. Once the oil is hot, toss in the diced onion. Sauté it for about 3-4 minutes. You want the onion to turn soft and a little golden. Then, mince two cloves of garlic. Add the garlic to the skillet and stir for one more minute. This step helps to release the garlic's great smell. Now it’s time for the ground beef. Use one pound of beef, preferably 80/20 for best flavor. Increase the heat to medium-high and add the beef to the skillet. Break the meat apart with a wooden spoon. Cook it for about 6-8 minutes. You want the beef to brown evenly. If there is extra fat, drain it carefully from the pan. Next, let’s spice things up! Add one teaspoon of smoked paprika, one teaspoon of garlic powder, and half a teaspoon of onion powder. Season with salt and pepper to taste. Mix it all well so the beef is coated in spices. Now, add two cups of broccoli florets. If your broccoli is frozen, that’s fine too. Add a few tablespoons of water to help steam the broccoli. Cover the skillet with a lid and cook for about 5 minutes. The broccoli should be tender but still crisp. After the broccoli cooks, lower the heat to low. Mix in two tablespoons of softened cream cheese. Stir until it melts and combines with the meat and broccoli. Finally, sprinkle half a cup of shredded cheddar cheese over the top. Cover the skillet again for 2-3 minutes until the cheese melts. When it's ready, take the skillet off the heat and garnish with chopped parsley for a fresh finish. Enjoy this quick and tasty meal! Select ground beef with a blend of 80% lean meat and 20% fat. This mix gives great flavor and keeps the dish juicy. The fat helps to enhance the taste and texture. Avoid very lean beef, as it may dry out during cooking. For tender-crisp broccoli, cook it slowly. Add the florets to the skillet with a bit of water. Cover the skillet to steam the broccoli. This method keeps the bright green color and crunch. Cook for about five minutes. Check for doneness by piercing with a fork. It should be tender but not mushy. Cheese adds richness and depth to this dish. Use aged cheddar for a sharper taste. Adding cream cheese gives a creamy texture. Stir it in when the heat is low. Let the cheese melt completely for a smooth blend. For extra flavor, consider adding Parmesan or mozzarella. Pro Tips Choose the Right Beef: Opt for ground beef with a higher fat content (like 80/20) for more flavor and juiciness, especially in skillet dishes. Prepping Broccoli: If using frozen broccoli, thaw and drain it first to avoid excess water in your dish, ensuring a better texture. Layering Cheese: For an even melt, sprinkle cheddar cheese in layers rather than all at once, allowing it to evenly coat the dish. Seasoning to Taste: Always taste and adjust seasoning as you cook, especially after adding spices and cream cheese, to achieve your preferred flavor. {{image_4}} You can change up this dish with other low-carb veggies. Try zucchini, bell peppers, or cauliflower. These veggies add color and nutrition. Just chop them into small pieces. Add them when you cook the beef for even cooking. If you want a dairy-free meal, swap out the cream cheese and cheddar. Use a dairy-free cream cheese made from nuts or coconut. Nutritional yeast can give a cheesy flavor without dairy. It's a great option for added nutrients. Spices can transform your dish. If you like it spicy, add red pepper flakes or cayenne. For a more earthy flavor, try cumin or coriander. You can also experiment with herbs like oregano or thyme to change the taste. Adjust the spices to fit your flavor preferences. You can store your Keto Hamburger Broccoli Skillet in the fridge. Place it in an airtight container. This keeps it fresh for up to three days. Make sure to let it cool before sealing. This helps avoid extra moisture inside the container. If you want to store it longer, freezing is a good option. Allow the dish to cool completely. Then, transfer it to a freezer-safe container. Wrap it tightly with plastic wrap or aluminum foil. It can last up to three months in the freezer. When ready to eat, thaw it overnight in the fridge. To reheat, you can use the microwave or the stove. If using a microwave, heat in short bursts. Stir in between to ensure even heating. If using the stove, place it in a skillet over low heat. Add a splash of water or broth to prevent sticking. Heat until warm throughout. Enjoy your meal! Yes, you can use frozen broccoli. It saves time and is easy to find. Just toss it in the skillet with the ground beef and spices. Cook it a bit longer if needed. Frozen broccoli is quick and still tasty. To make this dish dairy-free, skip the cream cheese and cheddar. You can use nutritional yeast for a cheesy flavor. Coconut cream can also replace the cream cheese. Adjust the spices to enhance the taste. This dish is great on its own, but you can add a side salad. Cauliflower rice is also a good choice. It pairs well with the beef and broccoli. You might enjoy some sliced avocado for extra creaminess. This blog post covered all you need for a tasty Keto Hamburger Broccoli Skillet. We explored the key ingredients like ground beef, broccoli, and spices. You learned how to prepare and cook this dish step-by-step. We shared tips to choose the best beef and cook broccoli just right. Plus, I gave you ideas for variations and storage. In the end, this dish is easy to make and enjoy. It fits into your healthy eating plan. Now, you can cook this meal and impress everyone with your skills!

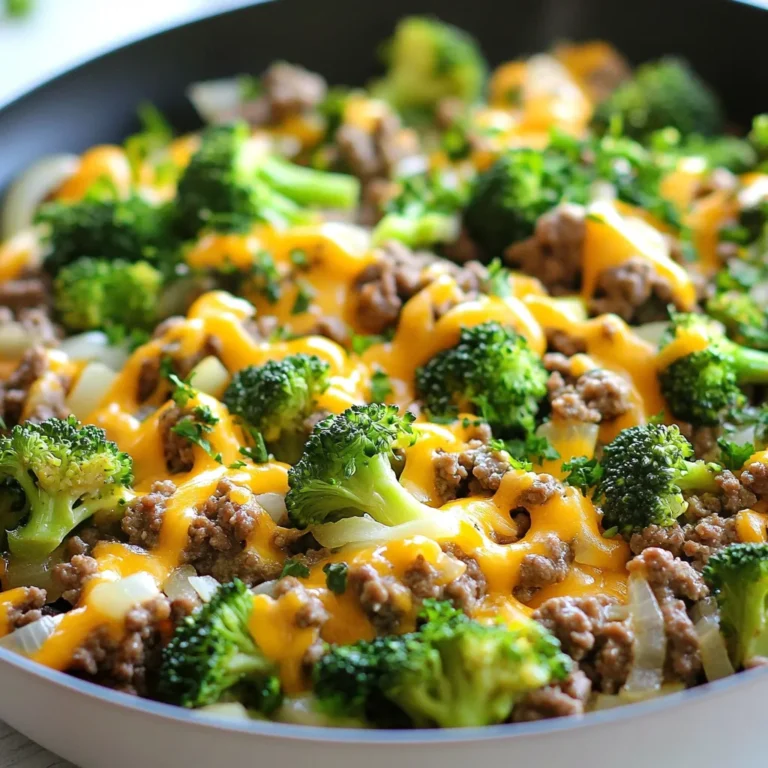
Keto Hamburger Broccoli Skillet Quick and Tasty Meal

- 2 pounds beef chuck, cut into bite-sized cubes - 1/4 cup soy sauce or tamari - 1/4 cup packed brown sugar - 2 tablespoons sesame oil - 2 tablespoons minced garlic, about 6 cloves - 1 tablespoon fresh ginger, grated - 2 cups broccoli florets - Garnishes: green onions and sesame seeds Using quality ingredients is key to great flavor. Start with beef chuck. It has the right fat and tenderness. Soy sauce or tamari adds a salty umami taste. Brown sugar gives the dish a sweet touch that balances the saltiness. Flavoring ingredients elevate the dish further. Sesame oil adds richness. Garlic brings a strong aroma. Fresh ginger adds a warm, spicy note. Together, these ingredients create a flavor bomb that will impress anyone. Optional ingredients can enhance this dish. Broccoli florets add color and nutrition. They also soak up the sauce. For garnishing, use green onions for freshness. A sprinkle of sesame seeds adds crunch and visual appeal. These ingredients work together to make your Slow Cooker Korean Beef Bites delicious and appealing. {{ingredient_image_2}} To start, grab a large mixing bowl. You will whisk together the soy sauce, brown sugar, sesame oil, minced garlic, grated ginger, black pepper, and red pepper flakes. Make sure all these ingredients blend well. You want the sugar to dissolve fully in the mixture. This step is key for a balanced flavor. Next, add the beef cubes into the marinade. It’s important to coat each piece well. This ensures that every bite bursts with flavor. Cover the bowl tightly with plastic wrap. Let the beef marinate at room temperature for at least 30 minutes. For a richer taste, refrigerate it for up to 2 hours. After marinating, transfer the beef and all the marinade into the slow cooker. If you want, you can add broccoli florets on top for extra nutrition. Cover the slow cooker and set it to cook. Use the low setting for 6-8 hours or the high setting for 3-4 hours. The beef is ready when it becomes tender and easy to shred with a fork. Once cooking is done, gently stir the mixture. Break the beef into smaller pieces if you'd like. Taste it and adjust the seasoning as needed. You can add more soy sauce or spices to suit your taste. To get tender beef, marinate it well. Use a mix of soy sauce, brown sugar, sesame oil, garlic, ginger, pepper, and red pepper flakes. Let the beef cubes soak in this mixture for at least 30 minutes. If you have time, refrigerate it for 2 hours. This deepens the flavors. For cooking, use low heat for 6-8 hours or high heat for 3-4 hours. The beef will be tender when it easily falls apart with a fork. Adjust the cooking time based on the size of your beef cubes. Smaller cubes may need less time. To boost flavor, consider adding more garlic or ginger. You can also stir in a touch of hoisin sauce for sweetness. If you like heat, tweak the red pepper flakes. Start with 1/2 teaspoon and add more if you want it spicier. Taste as you go to find your perfect balance. Serve your Korean beef bites over warm rice or fluffy quinoa. This adds a nice base and makes it filling. For a colorful touch, add steamed broccoli. Garnish with green onions and sesame seeds for a nice crunch and extra flair. A good presentation makes your dish more appealing and fun to eat! Pro Tips Marinate Longer for Depth: For a more intense flavor, marinate the beef overnight in the refrigerator. This allows the flavors to penetrate deeply into the meat. Choose the Right Cut: Using beef chuck is ideal for slow cooking due to its marbling. It becomes tender and flavorful, making it perfect for this dish. Customize Your Heat: Adjust the crushed red pepper flakes according to your spice preference. Start with less if you're unsure, and add more as needed. Garnish for Appeal: Don't skip the garnish! Fresh green onions and sesame seeds add not only flavor but also visual appeal to your dish. {{image_4}} You can swap beef for chicken or tofu. Chicken thighs work great in this recipe. They keep moist and tender during cooking. For a plant-based twist, use firm tofu. Press the tofu first to remove excess water. Cut it into bite-sized cubes. Then, marinate it just like the beef. Each option brings a unique flavor to the dish. Adding vegetables boosts nutrition and flavor. Broccoli florets are a perfect choice. They cook well and soak up the sauce. You can also try bell peppers, carrots, or snap peas. Just add them to the slow cooker during the last hour of cooking. This way, they stay crisp and colorful. To make this dish gluten-free, use tamari instead of soy sauce. It has a similar taste without gluten. Always check labels for hidden gluten in sauces or seasonings. You can also serve over rice or quinoa for a gluten-free meal. This ensures everyone can enjoy the Korean beef bites without worry. To keep your Slow Cooker Korean Beef Bites fresh, store them in an airtight container. This method helps maintain flavor and texture. Your leftovers will last up to four days in the fridge. Make sure to cool the beef bites to room temperature before sealing the container. If you want to save some for later, freezing is a great option. First, let the beef bites cool completely. Then, place them in a freezer-safe bag or container. Remove as much air as possible before sealing. They can stay good in the freezer for up to three months. When you're ready to enjoy them, thaw in the fridge overnight. Reheat in the microwave or on the stove until heated through. Leftovers can be more than just a repeat meal. Try serving them over rice or noodles for a quick lunch. You can also fold them into a wrap with fresh veggies for a tasty twist. Another fun idea is to make Korean beef tacos using small tortillas, topped with slaw and sauce. These creative options will keep your meals exciting! You can serve this dish with several tasty sides. Here are some great options: - Fluffy steamed rice - Quinoa for a healthy twist - Noodles, like rice or soba - A fresh salad with crunchy veggies - Steamed broccoli or other greens These sides will balance the rich flavors of the beef bites. They also add color to your plate. Yes, you can use other methods. Here are some alternatives: - Stovetop: Cook the beef in a large pot. Brown the beef, add the marinade, and let it simmer on low for about 1.5 to 2 hours. - Instant Pot: Use the sauté mode to brown the beef. Then, add the marinade and cook on high pressure for about 30 minutes. - Oven: Preheat your oven to 300°F (150°C). Place the beef and marinade in a covered oven-safe dish. Cook for 2 to 3 hours. These methods may change the texture but will still create delicious flavors. If you want more heat, try these tips: - Add more crushed red pepper flakes. Start with a teaspoon and taste as you go. - Include sliced fresh chili peppers in the marinade or during cooking. - Use a spicy soy sauce or hot sauce for extra kick. Adjusting the heat level is easy and lets you customize the dish to your taste. This blog post covers making Slow Cooker Korean Beef Bites, including key ingredients, tips, and variations. You learned about the main ingredients like beef chuck, soy sauce, and brown sugar, as well as optional items that boost flavor. I shared step-by-step cooking instructions and storage tips to keep leftovers fresh. Finally, I provided answers to common questions about serving and cooking methods. I hope this recipe inspires you to create a delicious meal with ease!

Slow Cooker Korean Beef Bites Flavorful and Easy Recipe

PREV 1 … 38 39 40 NEXT
tastykitchentales

explore

DessertsDinnerAppetizersDrinks

Our Policies

  • Cookie Policy
  • Copyright Policy
  • Disclaimer
  • GDPR Policy
  • Terms Of Use
Back to Top
  • About
  • Contact Us
  • Privacy Policy
© 2025 tastykitchentales