FREE DINNER EBOOK! Get your copy!
  • Cookie Policy
  • GDPR Policy
  • Disclaimer
  • Terms Of Use
  • Visit my other site: Fun Cookie Recipes
tastykitchentales
  • Home
  • Dinner
  • Desserts
  • Drinks
  • Appetizers
  • Contact
  • About
  • Privacy Policy
  • Home
  • Dinner
  • Desserts
  • Drinks
  • Appetizers
  • Contact
  • About
  • Privacy Policy
  • Cookie Policy
  • GDPR Policy
  • Disclaimer
  • Terms Of Use
Visit my other site: Fun Cookie Recipes

HOME / CATEGORIES /

Latest

To make a tasty Chicken Fajita Casserole, you will need: - 2 cups cooked chicken, shredded - 1 red bell pepper, thinly sliced - 1 green bell pepper, thinly sliced - 1 large onion, thinly sliced - 1 can (15 oz) black beans, drained and rinsed - 1 cup corn kernels (can be fresh, frozen, or canned) - 1 teaspoon chili powder - 1 teaspoon ground cumin - 1 teaspoon smoked paprika - 1/2 teaspoon garlic powder - 1/2 teaspoon onion powder - 1/4 teaspoon freshly ground black pepper - 1 cup salsa (choose mild or hot based on your preference) - 2 cups shredded cheese (cheddar or a Mexican blend) - 6 small tortillas, cut into wedges - Fresh cilantro, chopped (for garnish, optional) If you can't find an ingredient, here are some substitutes: - Chicken: Use shredded rotisserie chicken or leftover cooked chicken. - Bell Peppers: Swap with any color bell pepper you like. - Black Beans: Pinto beans or kidney beans work well too. - Corn: Use frozen corn for convenience or fresh corn when in season. - Salsa: Homemade salsa or your favorite brand will work. - Cheese: Try pepper jack for a spicy kick or a dairy-free cheese for a vegan option. - Tortillas: Use corn tortillas for a gluten-free option. Here are some brands I trust for these ingredients: - Chicken: Look for organic, free-range chicken for better flavor. - Bell Peppers: Choose firm, bright peppers for the best taste. - Black Beans: I recommend Goya for canned beans; they have good flavor. - Salsa: Pace or Newman’s Own offer tasty options. - Cheese: Cabot or Tillamook for sharp cheddar; both melt well. - Tortillas: Mission or La Banderita tortillas are reliable choices. With these ingredients, your Chicken Fajita Casserole will be hearty and full of flavor! Enjoy the cooking process and feel free to mix in your favorite flavors. {{ingredient_image_2}} Start by preheating your oven to 375°F (190°C). This step is key for even baking. In a large bowl, mix the cooked, shredded chicken with the sliced red and green bell peppers, onion, black beans, and corn. Add the spices: chili powder, cumin, smoked paprika, garlic powder, onion powder, and black pepper. Stir well to combine all the flavors. Grab a 9x13-inch baking dish. Place half of the tortilla wedges evenly at the bottom. This creates a nice base. Spread half of the chicken mixture on top of the tortillas. Next, add half of the salsa, followed by a third of the shredded cheese. Repeat the layers: more tortilla wedges, the rest of the chicken mixture, the remaining salsa, and finish with the last of the cheese. Cover the dish loosely with aluminum foil. This helps prevent the cheese from burning. Place it in the preheated oven and bake for 25 minutes. After that, remove the foil and bake for another 15 minutes. You want the cheese to be bubbly and golden. Once done, let it cool for about 5-10 minutes. This helps the layers set better. If you like, add chopped cilantro on top for some fresh flavor. To make your Chicken Fajita Casserole shine, follow these tips: - Use fresh ingredients: Fresh bell peppers and onions give great flavor. - Layer wisely: Spread the layers evenly for better cooking. - Add cheese wisely: Use a mix of cheddar and Mexican cheese for depth. - Taste as you go: Adjust spices to fit your family’s taste. - Cover for the first part: Use foil to keep the cheese from burning. Here are some mistakes that can ruin your casserole: - Overcrowding the dish: Too many ingredients can make it soggy. - Skipping the cooling time: Letting it cool helps set the layers. - Not preheating the oven: A hot oven ensures even baking. - Using stale tortillas: Fresh tortillas hold better and taste better too. Garnishing adds flair to your dish. Here are some fun ideas: - Fresh cilantro: Sprinkle it on top for a fresh touch. - Sour cream: A dollop adds creaminess and balances spice. - Avocado slices: They bring a smooth texture and rich flavor. - Lime wedges: A squeeze of lime can brighten the whole dish. Remember, these simple tips can elevate your Chicken Fajita Casserole and make it a family favorite! Pro Tips Choose the Right Cheese: Opt for a blend of cheeses like cheddar and Monterey Jack for a rich flavor and creamy texture. Layer for Flavor: Ensure even distribution of ingredients by layering them properly; this enhances the overall taste. Make It Spicy: If you enjoy heat, consider adding sliced jalapeños or a dash of hot sauce to the mixture for an extra kick. Rest Before Serving: Allow the casserole to rest for 5-10 minutes after baking to help the layers set, making it easier to serve. {{image_4}} You can easily turn this dish into a vegetarian delight. Swap the chicken for extra veggies. Use a mix of mushrooms, zucchini, and more bell peppers. For more protein, add extra black beans or chickpeas. You can also use tofu or tempeh for a hearty texture. These swaps keep the flavors bold and satisfying. If you love heat, add jalapeños or diced green chilies. Mix them into the chicken and veggie blend for a spicy kick. You can also use hot salsa instead of mild. Add a pinch of cayenne pepper to the spice mix for extra warmth. This way, you can adjust the spice level to fit your family's taste. For a different twist, try using ground turkey or beef. These proteins work well in the casserole. You can also go for shredded pork or even fish like tilapia. Each option brings a unique flavor to the dish. Adjust the cooking time if needed to ensure everything is cooked through. To store your Chicken Fajita Casserole, first let it cool. Then, cover it tightly with plastic wrap or aluminum foil. You can also use an airtight container. Store it in the fridge for up to three days. This keeps the flavors fresh and your meal safe to eat. If you want to freeze the casserole, follow these steps. First, let it cool completely. Cut it into single servings for easy thawing. Wrap each piece in plastic wrap, then place them in a freezer-safe bag. Label the bag with the date. You can freeze it for up to three months. Reheating is easy and quick. If the casserole is frozen, thaw it overnight in the fridge. To reheat, place it in the oven at 350°F (175°C) for about 20 minutes. If you prefer the microwave, heat it in short bursts, stirring in between. Make sure it’s hot all the way through before serving. Enjoy your warm and tasty meal! Yes, you can prepare this casserole ahead of time. Assemble it a day before serving. Cover it tightly with plastic wrap or foil and store it in the fridge. When you are ready to bake, remove the wrap and bake it straight from the fridge. Add a few extra minutes to the baking time. This lets the flavors meld nicely overnight. Several sides pair well with Chicken Fajita Casserole. Here are some tasty options: - Spanish rice: The flavors of rice match well with the casserole. - Guacamole: Creamy and fresh, it adds a nice touch. - Refried beans: A classic side that complements the dish. - Corn salad: A light and refreshing option. - Chips and salsa: Perfect for dipping and adds crunch. Making Chicken Fajita Casserole dairy-free is simple. Here are a few swaps: - Use dairy-free cheese shreds. Many brands offer great options. - Swap regular tortillas for dairy-free tortillas. Most corn tortillas are dairy-free. - Replace sour cream with dairy-free yogurt or avocado. This keeps it creamy without dairy. You learned about the key ingredients for a Chicken Fajita Casserole and their substitutes. I shared tips for preparing, baking, and perfecting your dish while avoiding common mistakes. I also provided ideas for variations, storage recommendations, and answered common questions. This recipe is not just easy; it is fun to make. You can enjoy it in many ways, so get cooking and share with friends. Happy casserole making!

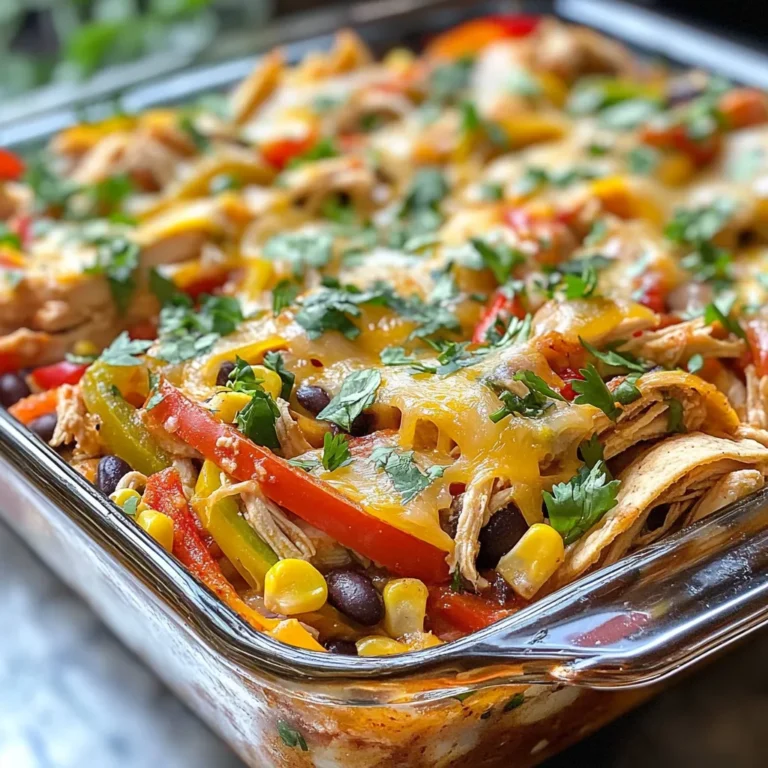
Chicken Fajita Casserole Irresistible Family Meal

You will need the following simple ingredients for your Five Minute Cornbread Casserole: - 1 cup cornmeal - 1 cup milk - 1 can (15 oz) creamed corn - 1 can (15 oz) black beans, rinsed and drained - 1 cup shredded cheddar cheese - 1 teaspoon baking powder - 1 tablespoon sugar - 1 teaspoon salt - 2 tablespoons melted butter - 2 sliced jalapeños (optional for heat) To enhance the taste of your casserole, consider these options: - Fresh herbs like cilantro or parsley for freshness. - Diced bell peppers for a crunchy texture. - A sprinkle of chili powder or cumin for extra warmth. - Sour cream or Greek yogurt for creaminess. If you want to mix things up, try these substitutions: - Use almond milk or oat milk instead of regular milk for a dairy-free option. - Swap black beans for kidney beans or pinto beans for a different flavor. - Use pepper jack cheese instead of cheddar for a spicy twist. - Replace melted butter with olive oil for a healthier fat option. These ingredient choices help you create a dish that suits your taste and dietary needs. Enjoy experimenting! {{ingredient_image_2}} Start by preheating your oven to 400°F (200°C). This helps the casserole cook evenly. In a large bowl, mix the following ingredients: - 1 cup cornmeal - 1 cup milk - 1 can (15 oz) creamed corn - 1 can (15 oz) black beans, rinsed and drained - 1 cup shredded cheddar cheese - 1 teaspoon baking powder - 1 tablespoon sugar - 1 teaspoon salt Stir these until the mixture is smooth. Then, add 2 tablespoons melted butter and mix again. If you want some heat, fold in 2 sliced jalapeños. This adds flavor and spice. Grease a 9x9-inch baking dish or an oven-safe skillet. Pour the batter into the dish and spread it out evenly. Place it in the hot oven and bake for 25-30 minutes. The top should be golden brown, and a toothpick inserted should come out clean. This shows your casserole is done. Once baked, let the casserole cool for about 5 minutes. This makes it easier to slice. Cut it into squares for serving. For a nice touch, serve warm slices on plates. Add fresh cilantro or green onions for color. A dollop of sour cream on the side makes it even better. Enjoy your quick and cozy cornbread casserole! To make the best cornbread casserole, follow these simple tips: - Use fresh ingredients. Fresh cornmeal and cheese boost the flavor. - Mix gently. Over-mixing can make the casserole tough. Stir just until combined. - Preheat well. This ensures even cooking and a nice golden top. - Watch the bake time. Ovens can vary. Check your casserole a few minutes early. Leftovers can be a treat. Here are ways to use them: - Reheat as a side. Warm slices make a great side dish for dinner. - Top with chili. Add some chili for a quick meal. It adds warmth and flavor. - Make a breakfast bake. Layer it with eggs and cheese for a hearty breakfast. You control the heat! Here’s how: - Add jalapeños. Mix in sliced jalapeños for extra spice. Remove the seeds for less heat. - Use hot sauce. Drizzle your favorite hot sauce on top before serving. - Try different peppers. Swap jalapeños for serrano or habanero for more kick. Adjust to your taste. Pro Tips Use Fresh Ingredients: Whenever possible, opt for fresh corn instead of canned for a more robust flavor and texture. Customize Your Heat Level: Adjust the number of jalapeños based on your spice tolerance; you can also substitute with milder peppers if preferred. Serve with Toppings: Enhance the dish with toppings like avocado slices, salsa, or a sprinkle of lime juice for added freshness. Storage Tips: Store any leftovers in an airtight container in the fridge for up to 3 days; reheat in the oven for the best texture. {{image_4}} You can easily make this casserole vegetarian. Just avoid using meat. The black beans offer protein and texture. You can also add more veggies. Chopped bell peppers or corn kernels work well. They add color and flavor. Consider adding spinach or zucchini for extra nutrition. Want to boost the flavor? Try adding cooked sausage or bacon. These meats give a nice smoky taste. You can also mix in diced tomatoes or sweet corn. For a cheesy twist, add feta or pepper jack cheese. If you love spice, add more jalapeños or diced green chiles. Making it gluten-free is simple. Use gluten-free cornmeal. Most cornmeal is already gluten-free, but check the label. You can also use gluten-free baking powder. This way, everyone can enjoy this dish. If you want a heartier dish, try adding quinoa or rice. These grains pair well with the cornbread. To keep your cornbread casserole fresh, let it cool first. Once cool, cover it tightly with plastic wrap or foil. Store it in the fridge for up to three days. This keeps it moist and tasty. When you're ready to eat, simply take it out and enjoy. If you want to store it longer, freeze the casserole. Let it cool, then slice the casserole into portions. Wrap each piece in plastic wrap and foil. Place the wrapped pieces in a freezer bag. You can keep it frozen for up to three months. This way, you always have a quick meal ready. To reheat, take the casserole out of the fridge or freezer. If it’s frozen, let it thaw in the fridge overnight. Preheat your oven to 350°F (175°C). Place the casserole in an oven-safe dish. Cover it with foil to keep it from drying out. Heat for about 20 minutes or until warm. If you like it extra crispy, uncover it for the last five minutes. Enjoy your warm, flavorful dish! It takes about 25 to 30 minutes to bake cornbread casserole. You want the top to be golden brown. A toothpick should come out clean when inserted in the center. This shows it’s cooked through. Yes, you can make this recipe ahead of time. Prepare the batter and pour it into your greased dish. Cover it and store in the fridge for a few hours or overnight. Just bake it when you're ready. Cornbread casserole pairs well with many dishes. You can serve it with chili or grilled meats. It also goes nicely with a fresh salad. For a fun twist, add some salsa or avocado on top. This blog post covers all you need for cornbread casserole. We discussed ingredients, cooking steps, and helpful tips. You learned about variations, storage, and answers to common questions. Understanding these topics ensures your dish turns out great every time. Use these insights to create your own delicious casserole. Enjoy sharing this dish with friends and family!

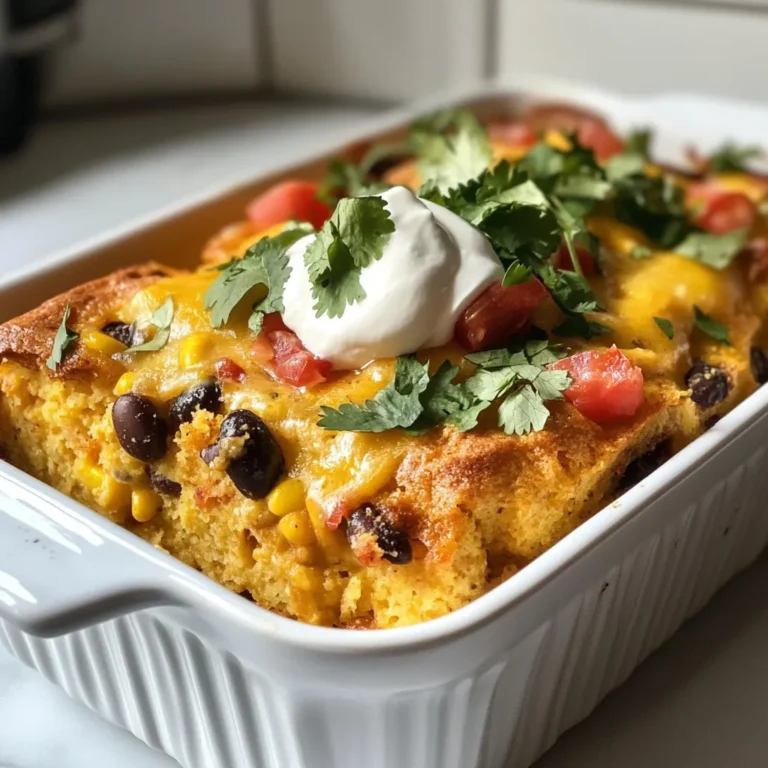
Five Minute Cornbread Casserole Easy and Flavorful Dish

To make high protein creamy beef pasta, you need the following ingredients: - Whole grain pasta (penne or fusilli) - Lean ground beef - Greek yogurt - Grated Parmesan cheese - Garlic and onion - Olive oil - Italian seasoning - Red pepper flakes - Salt and pepper - Fresh parsley for garnish These ingredients work together to create a tasty and nutritious meal. The whole grain pasta adds fiber, while the lean ground beef packs in protein. Greek yogurt gives a creamy texture, and Parmesan cheese adds a rich flavor. Fresh garlic and onion provide a nice aroma and taste. Olive oil helps with sautéing and brings healthy fats. Italian seasoning and red pepper flakes add a kick. Finally, fresh parsley makes the dish look pretty and fresh. Using these ingredients, you can create a dish that is not only satisfying but also good for you. Enjoy gathering these items before you start cooking! {{ingredient_image_2}} 1. Bring a large pot of salted water to a boil. 2. Add 250g of whole grain pasta. 3. Cook until al dente, about 8-10 minutes. 4. Once done, drain the pasta. 5. Reserve ½ cup of pasta cooking water for later. 6. Set the pasta aside. 1. In a large skillet, warm 1 tablespoon of olive oil over medium heat. 2. Add 1 finely chopped onion and 2 minced garlic cloves. 3. Sauté for 2-3 minutes until the onion is translucent. 4. Stir occasionally to prevent burning. 1. Increase the heat to medium-high. 2. Add 300g of lean ground beef to the skillet. 3. Season with salt, pepper, and 1 teaspoon of Italian seasoning. 4. If you like heat, add ½ teaspoon of red pepper flakes. 5. Cook for about 5-7 minutes, breaking the beef apart. 6. Ensure it is browned and fully cooked. 7. Drain any excess fat if needed. 1. Lower the heat to low. 2. Stir in 1 cup of Greek yogurt and ½ cup of grated Parmesan cheese. 3. Mix well until the sauce is smooth and creamy. 4. If the sauce is too thick, add reserved pasta water, one tablespoon at a time. 5. Stir until you reach your desired consistency. 1. Add the cooked pasta into the skillet with the creamy beef sauce. 2. Toss gently to coat the pasta well with the sauce. 3. Taste the dish and adjust seasoning as needed. 1. Portion the creamy beef pasta into bowls or plates. 2. Garnish with chopped fresh parsley for a vibrant touch. 3. For extra flair, add more grated Parmesan cheese on top. To boost the taste of your creamy beef pasta, consider these tips: - Seasoning Adjustments: Use fresh herbs like basil or thyme. They add bright flavors. Try adding a splash of lemon juice for a fresh twist. - Creating a Richer Sauce: Stir in a little beef broth for depth. You can also add a splash of white wine for extra richness. Perfect pasta is essential for this dish. Here’s how to cook it right: - Best Methods for Cooking Pasta: Always boil water before adding the pasta. Use a generous amount of salt in the water. This adds flavor. Cook the pasta until it's al dente, about 8-10 minutes. Check the package for exact times. - Avoiding Common Mistakes: Don't rinse the pasta after cooking. Rinsing removes the starch that helps the sauce stick. Also, remember to save some pasta water. This helps adjust the sauce's texture later. Serving your dish well makes it even more appetizing. Here are some ideas: - Serving Suggestions for an Elegant Look: Use deep bowls for a cozy feel. Top each serving with extra Parmesan and chopped parsley. This adds color and freshness. You can also drizzle olive oil on top for a glossy finish. Pro Tips Cook Pasta to Al Dente: This ensures your pasta retains a firm texture, which prevents it from becoming mushy when mixed with the sauce. Use Lean Ground Beef: Opt for lean ground beef to keep the dish healthier without sacrificing flavor. This also helps achieve a creamy texture without excess fat. Adjust Sauce Consistency: If your sauce is too thick, slowly add reserved pasta water. This helps you control the creaminess while incorporating more flavor from the pasta. Garnish for Freshness: Fresh parsley not only adds a pop of color but also enhances the flavor profile of the dish. Consider adding a squeeze of lemon juice for an extra zing! {{image_4}} You can swap beef for turkey or chicken. These meats are leaner and still tasty. Ground turkey or chicken works well in this recipe. Just cook them just like you would with beef. They will absorb the flavors of the sauce and spices. This change can make the dish lighter and healthier. For a meat-free version, use plant-based alternatives. Options like lentils or chickpeas add protein and flavor. You can also try a store-bought meat substitute. Just cook them in the same way as ground beef. The creamy sauce pairs well with these ingredients. This way, you can enjoy a rich meal without meat. Incorporating veggies boosts nutrition and color. Try adding spinach, bell peppers, or zucchini. You can sauté these with the onion and garlic. This step keeps the veggies crisp and tasty. Adding vegetables also makes the dish more filling. Feel free to mix in what you have on hand. To store leftovers, place the pasta in an airtight container. Let it cool down first. Cover it tightly to keep it fresh. You can keep it in the fridge for up to three days. When you want to eat it, simply heat it up in a pan or microwave. If you want to freeze the creamy beef pasta, use a freezer-safe container. Make sure to cool it completely before packing. It can last up to three months in the freezer. When you're ready to eat it, let it thaw overnight in the fridge. Reheat it gently on the stove with a splash of water or broth to keep it creamy. The shelf life of stored pasta and sauce depends on how you keep it. In the fridge, it lasts about three days. In the freezer, it lasts around three months. After that, the taste and texture may change. Always check for any signs of spoilage before eating. Yes, you can! While whole grain pasta is healthy, many options work well. You might try: - Regular pasta (like penne or fusilli) - Gluten-free pasta made from rice or corn - Whole wheat or chickpea pasta for extra nutrition Each pasta type will change the dish's taste and texture. Experiment to find your favorite! Making this creamy beef pasta dairy-free is easy. Here are some great substitutes: - Use coconut yogurt instead of Greek yogurt - Try nutritional yeast for a cheesy flavor - Use a dairy-free cheese option for added creaminess These swaps keep the dish tasty while fitting a dairy-free diet. This dish goes well with many sides. Here are some ideas: - A fresh green salad with lemon vinaigrette - Steamed broccoli or sautéed spinach for greens - Garlic bread for a hearty touch Choose sides that balance the meal and add freshness! This dish combines whole grain pasta, lean ground beef, and a creamy yogurt sauce. You learned step-by-step instructions for cooking perfect pasta and making a flavorful sauce. I shared tips on flavor, cooking, and presentation to help elevate your meal. You can also customize this recipe with different proteins or veggies. Remember to store your leftovers properly to enjoy later. This pasta is versatile and easy to make, perfect for any night of the week. Enjoy cooking and experimenting with this tasty meal!

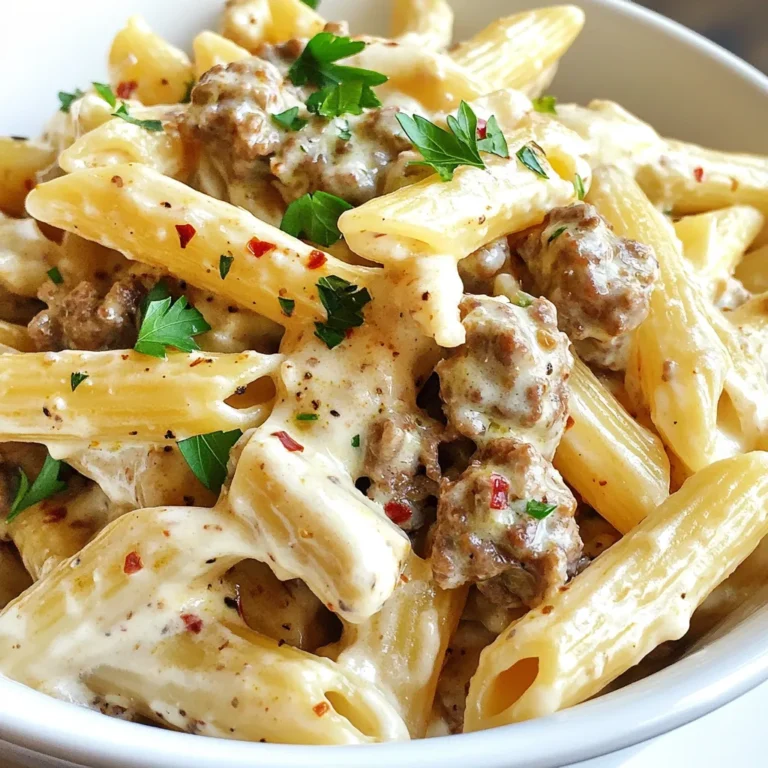
High Protein Creamy Beef Pasta Quick and Easy Recipe

PREV 1 … 39 40
tastykitchentales

explore

DessertsDinnerAppetizersDrinks

Our Policies

  • Cookie Policy
  • Copyright Policy
  • Disclaimer
  • GDPR Policy
  • Terms Of Use
Back to Top
  • About
  • Contact Us
  • Privacy Policy
© 2025 tastykitchentales