FREE DINNER EBOOK! Get your copy!
  • Cookie Policy
  • GDPR Policy
  • Disclaimer
  • Terms Of Use
  • Visit my other site: Fun Cookie Recipes
tastykitchentales
  • Home
  • Dinner
  • Desserts
  • Drinks
  • Appetizers
  • Contact
  • About
  • Privacy Policy
  • Home
  • Dinner
  • Desserts
  • Drinks
  • Appetizers
  • Contact
  • About
  • Privacy Policy
  • Cookie Policy
  • GDPR Policy
  • Disclaimer
  • Terms Of Use
Visit my other site: Fun Cookie Recipes

HOME / CATEGORIES /

Latest

To make Jiffy Cornbread Taco Bake, you will need the following ingredients: - 1 box Jiffy Cornbread Mix - 1 cup shredded sharp cheddar cheese, divided - 1 lb ground beef or turkey - 1 packet taco seasoning - 1 can black beans, drained and rinsed - 1 cup frozen sweet corn - 1 cup salsa (mild or spicy, based on preference) - 1/4 cup chopped fresh green onions - 1/2 cup sour cream (for topping) - Fresh cilantro leaves, for garnish I recommend using sharp cheddar cheese. It adds a bold flavor that pairs well with tacos. You can also try pepper jack for a spicy kick. If you want a milder option, use Monterey Jack cheese. Mixing cheeses can create a unique taste and texture. You can easily swap the ground beef or turkey for other proteins. Shredded chicken works great for this dish. If you prefer a plant-based option, try using lentils or crumbled tofu. Both options give a satisfying texture and flavor. Explore different proteins to find your favorite combination! {{ingredient_image_2}} First, set your oven to preheat at 400°F (200°C). This step is key for cooking the cornbread just right. A hot oven helps create a golden top. Next, grab a large skillet and heat it over medium. Add 1 pound of ground beef or turkey. Use a spatula to break it apart as it cooks. Cook it until it turns brown. Once done, drain any extra grease. Sprinkle in the taco seasoning. Follow the packet instructions for best flavor. Pour in 1/4 cup of water and stir. Let it simmer for about 5 minutes. This allows the spices to blend well with the meat. While the meat cooks, prepare the Jiffy Cornbread Mix. Follow the instructions on the box. In this step, fold in half of the shredded cheddar cheese. This adds a rich flavor to the cornbread. Now, lightly grease a 9x13-inch baking dish. Start by spreading the meat mixture evenly at the bottom. Next, pour salsa over the meat. Spread it out to cover the meat completely. Finally, take the cornbread batter and dollop it on top of the salsa. Carefully spread it out to cover the sauce entirely. Sprinkle the remaining shredded cheddar cheese over the cornbread batter. This will melt into a delicious cheesy layer. Place the baking dish in the oven and bake for 20 to 25 minutes. Keep an eye on it until the top is golden brown. A toothpick should come out clean when inserted in the center. Once baked, take the dish out of the oven. Let it cool for a few minutes. Before serving, add toppings. Generously spoon sour cream on each serving. Then, sprinkle with fresh green onions and cilantro. This adds color and flavor. Serve warm, and enjoy! To get the best texture for your Jiffy Cornbread Taco Bake, avoid overmixing the cornbread batter. Mix it just enough to combine the ingredients. Adding half of the cheese to the batter also makes it extra moist. When baking, watch the time. A golden top means it’s done, but check with a toothpick. If it comes out clean, you're good to go! If you want a meatless meal, swap the beef or turkey for lentils or mushrooms. For a dairy-free option, use almond milk in the cornbread mix and skip the cheese. You can also try a vegan sour cream for topping. Black beans are great, but feel free to use pinto or kidney beans if that's what you have. To spice things up, choose a hot salsa or add diced jalapeños to the meat mixture. If you prefer a milder dish, go for a mild salsa and skip the jalapeños. Adding extra cheese on top can also help cool down the heat. Adjust these ingredients to fit your taste and enjoy the perfect balance! Pro Tips Use Fresh Ingredients: Fresh green onions and cilantro elevate the dish with vibrant flavors and colors. Customize the Spice Level: Adjust the salsa and taco seasoning according to your heat preference for a personalized touch. Leftover Variation: This dish can be repurposed with leftover meats or beans for a quick and easy meal. Cheese Options: Experiment with different types of cheese like pepper jack or Monterey Jack for a unique flavor profile. {{image_4}} You can easily make a vegetarian version of Jiffy Cornbread Taco Bake. Just swap the ground beef or turkey for extra veggies or meat substitutes. For instance, use 1 cup of cooked lentils or 1 cup of crumbled tofu. Add diced bell peppers, zucchini, or mushrooms to the meat mixture. This adds texture and flavor while keeping it meat-free. You can also use a vegetarian taco seasoning. To make this dish gluten-free, simply choose a gluten-free cornbread mix. The Jiffy brand offers a gluten-free option. Make sure to check the taco seasoning for gluten as well. Use beans and corn as your base, and you still get that great taste. This way, everyone can enjoy the dish without worry. Feel free to get creative with the beans in your Jiffy Cornbread Taco Bake. Black beans work well, but you can also use pinto beans, kidney beans, or even chickpeas. Each type of bean brings its unique flavor and texture. Just remember to drain and rinse them before adding to the mix. This small step helps reduce sodium and keeps the dish fresh. After enjoying your Jiffy Cornbread Taco Bake, let it cool down. Store leftovers in an airtight container. Keep them in the fridge for up to four days. If you have a lot, divide them into smaller portions for easy meals later. To reheat, preheat your oven to 350°F (175°C). Place the taco bake in an oven-safe dish. Cover it with foil to keep it moist. Heat for about 15-20 minutes, or until warm throughout. You can also use a microwave. Heat in 30-second bursts, stirring in between, until hot. If you want to freeze it, let the taco bake cool completely. Cut it into portions and wrap each piece in plastic wrap. Place the wrapped pieces in a freezer-safe bag or container. Label it with the date. The taco bake can last up to three months in the freezer. To eat, thaw it in the fridge overnight before reheating. Jiffy Cornbread Taco Bake lasts about 3 to 4 days in the fridge. Make sure to store it in an airtight container. The longer it sits, the more the flavors blend, which can be nice. However, for the best taste, eat it within those few days. Yes, you can make Jiffy Cornbread Taco Bake ahead of time. Cook the meat and mix it with the beans and corn. Store it in the fridge. You can prepare the cornbread layer later. When you're ready, layer it up and bake. This saves time and makes dinner easy. You can serve your taco bake with many tasty sides. Try adding fresh salsa or creamy guacamole. A simple salad with lettuce, tomato, and avocado pairs well, too. You might also like some tortilla chips for crunch. Yes, you can use homemade cornbread if you prefer. Just make sure to prepare it in a way that it is soft and moist. The texture should still be fluffy to fit well with the taco flavors. We covered the key ingredients for the Jiffy Cornbread Taco Bake, including types of cheese and protein options. I provided easy step-by-step instructions to guide you through the cooking process. You also got tips for texture, substitution ideas, and ways to add spice. Variations like vegetarian and gluten-free options can expand your choices. Plus, I shared storage tips to keep your leftovers fresh. This dish is simple, tasty, and versatile. Enjoy experimenting with it!

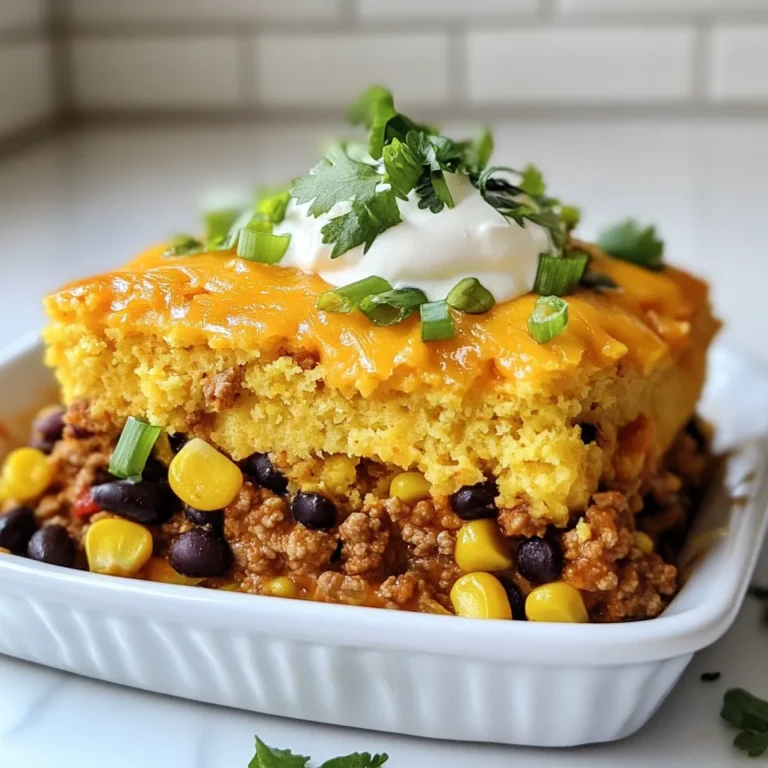
Jiffy Cornbread Taco Bake Easy and Tasty Dish

- 1 pound flank steak, thinly sliced against the grain - 2 bell peppers (1 red and 1 green), sliced into strips - 1 medium red onion, sliced into wedges - 4 cloves garlic, finely minced - 1/4 cup unsalted butter The flank steak gives a nice, tender bite. Bell peppers and onions add color and crunch. Garlic and butter bring rich flavor to the dish. - 2 tablespoons extra virgin olive oil - 2 teaspoons chili powder - 1 teaspoon ground cumin - 1 teaspoon smoked paprika - Salt and freshly cracked black pepper to taste These seasonings bring warmth and depth. Olive oil helps the flavors coat the steak and veggies well. Adding salt and pepper enhances every bite. - Fresh cilantro, chopped (for garnish) - Lime wedges (for serving) - Warm tortillas (flour or corn) Fresh cilantro adds brightness. Lime wedges offer a zesty kick. Warm tortillas are perfect for wrapping up the fajitas. Enjoy every bite! Start by preheating your oven to 400°F (200°C). This step is key for roasting the steak and veggies perfectly. A hot oven helps them get that nice caramelized look and taste. In a large bowl, mix the thinly sliced flank steak with the bell peppers and red onion. Make sure all the pieces are mixed well. This way, every bite gets the right flavor. Next, melt the unsalted butter in a small pan over medium heat. After it melts, add the minced garlic. Sauté for 1-2 minutes until it smells great. Don’t let it brown! Then, stir in chili powder, cumin, smoked paprika, salt, and pepper. This garlic butter mix is the magic for your fajitas. Drizzle the garlic butter mix over the steak and veggies in the bowl. Add the extra virgin olive oil too. Use tongs or your hands to toss everything together. Make sure each piece is coated well with the tasty spices and butter. Now, transfer the seasoned steak and vegetables to a large sheet pan. Spread them out in a single layer. Avoid crowding the pan; this helps them roast evenly and get nice and crispy. Place the sheet pan in the hot oven. Roast for about 15-20 minutes. Check for doneness halfway through and stir to ensure even cooking. Once done, take them out and let the fajitas rest for a few minutes. This helps the flavors come together. Serve them on warm tortillas, topped with fresh cilantro and lime wedges. Enjoy that burst of flavor! To make the best fajitas, avoid overcrowding the pan. When you spread the steak and veggies out, they roast better. This helps them caramelize and not steam. Stirring halfway through cooking is key. It helps everything cook evenly, so you get a nice texture. You can boost the taste by adding more spices or marinades. Try a splash of lime juice or some fresh herbs. Letting the fajitas rest for a few minutes after cooking is also smart. This resting time lets the flavors mix, making every bite more tasty. If you want to switch things up, try different cooking methods. You can grill the steak or use a stovetop skillet. High-heat roasting gives a nice char, while regular baking is more gentle. Both methods work, but high heat adds a fun crunch to the veggies. {{image_4}} You can switch up the protein in these fajitas. Chicken works great here. Just slice it thinly like the steak. Shrimp is another tasty option. Use medium-sized shrimp and cook them for a shorter time. For a vegetarian twist, try marinated tofu or tempeh. Both can soak up the garlic butter flavor well. Feel free to add more vegetables. Zucchini is a great choice. Slice it into half-moons and toss it in. Mushrooms bring a nice umami taste. You can use any type you like. Corn adds sweetness and color. Seasonal vegetables like asparagus or cherry tomatoes can also shine in this dish. Use what you find fresh at the market. Want it mild? Just skip the chili powder. You can also use sweet paprika instead. For heat, try fresh chilis. Jalapeños or serranos work well. If you love hot sauce, drizzle some on top before serving. This way, everyone can adjust the heat to their taste. To keep your fajitas fresh, store them in the fridge. Place them in airtight containers. This helps keep the flavors intact and stops them from drying out. Make sure to label the containers with the date. Use your leftovers within three days for the best taste. When it's time to enjoy leftovers, reheating is simple. You can use the microwave or a skillet. If using the microwave, heat in short bursts. Stir in between to ensure even heating. If using a skillet, add a bit of oil. Heat on medium until warm. This keeps the flavors fresh and tasty. You can also freeze your cooked fajitas. First, let them cool completely. Then, place them in freezer-safe bags or containers. Remove as much air as possible before sealing. This prevents freezer burn. When you're ready to eat, thaw them in the fridge overnight. Reheat them on the stove or in the microwave for a quick meal. Yes, you can use other cuts. Skirt steak works well too. Sirloin and ribeye are also good choices. Just slice them thinly against the grain for tenderness. Each cut adds a unique flavor to your fajitas. To spice up your fajitas, add fresh jalapeños. You can also use cayenne pepper or hot sauce. Mixing in a pinch of red pepper flakes boosts the heat, too. Experiment with spices to find your perfect kick. Steak fajitas pair great with rice or beans. A fresh salad adds crunch. Guacamole and sour cream are tasty toppings. Serve with warm tortillas for a full meal. Corn on the cob is another fun side. Check the steak's color. It should be brown on the outside. Use a meat thermometer for accuracy. Aim for 130°F for medium-rare and 145°F for medium. Let it rest for a few minutes before serving. Yes, you can make the garlic butter sauce ahead. Store it in the fridge for up to a week. Reheat it gently before using. This makes meal prep easier and saves you time! This article covered how to make delicious fajitas. You learned about the main ingredients like flank steak, bell peppers, and garlic butter. I shared steps for roasting, tips for perfect flavor, and variations to try. Remember, you can use different proteins or veggies for your own twist. Store leftovers properly and reheat for the best taste. Fajitas can easily fit your style and preferences, making them a fun meal to enjoy at home. Happy cooking!

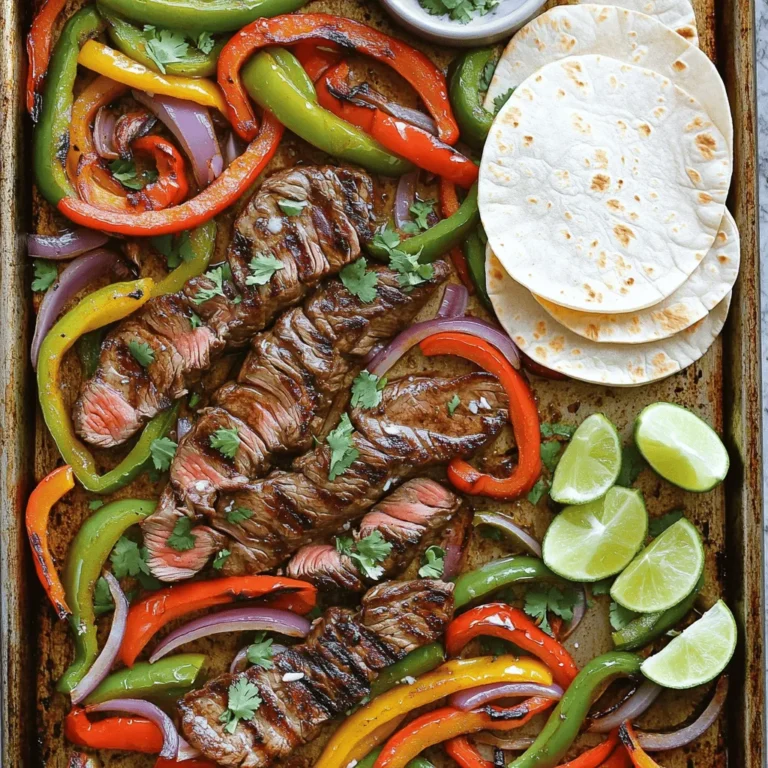
Sheet Pan Garlic Butter Steak Fajitas Delightful Meal

To make amazing teriyaki salmon bites, you need these simple ingredients: - 1 lb salmon fillet, skinless and boneless, cut into bite-sized cubes - 1/4 cup low-sodium soy sauce - 2 tablespoons honey - 2 tablespoons rice vinegar - 1 tablespoon sesame oil - 1 tablespoon freshly grated ginger - 3 cloves garlic, minced - 1 tablespoon cornstarch - 1 tablespoon sesame seeds, for garnish - Chopped green onions, for garnish Each ingredient plays a key role. The salmon is your main star, while the soy sauce adds salt and umami. Honey brings sweetness, and rice vinegar adds a bit of tang. Sesame oil gives a nutty flavor, while ginger and garlic add freshness and spice. When choosing soy sauce, consider these options: - Low-sodium soy sauce: This is the best choice for a balanced flavor without too much salt. - Tamari: A gluten-free option that offers similar taste. - Coconut aminos: A great soy-free alternative that is sweeter and milder. I prefer low-sodium soy sauce because it allows other flavors to shine. It keeps your dish tasty without being too salty. Garnishes can elevate your dish. Here are my top picks: - Sesame seeds: They add a crunchy texture and a nutty flavor. - Chopped green onions: Fresh and vibrant, they lend a nice crunch and color. - Lime wedges: A squeeze of lime can add a zesty finish. These garnishes make your teriyaki salmon bites look stunning and add layers of flavor. Enjoy experimenting with them! Start by grabbing a large mixing bowl. In this bowl, mix these ingredients: - 1/4 cup low-sodium soy sauce - 2 tablespoons honey - 2 tablespoons rice vinegar - 1 tablespoon sesame oil - 1 tablespoon freshly grated ginger - 3 cloves garlic, minced Whisk them together until well combined. This marinade is key for flavor. The soy sauce gives saltiness, while honey adds sweetness. Rice vinegar brightens the mix, and ginger plus garlic bring warmth. Next, take your salmon fillet. Cut it into bite-sized cubes. Place the salmon cubes into the bowl with the marinade. Make sure each piece is coated well. Cover the bowl and refrigerate it for at least 30 minutes. This time lets the flavors soak into the fish, making it taste amazing. After marinating, it’s time to cook! Preheat your air fryer to 400°F (200°C). This step is important for crispiness. Once preheated, take the salmon out of the marinade. Let any extra liquid drip off. Pat the salmon pieces dry with paper towels. This helps achieve that crunchy texture you want. Now, put 1 tablespoon of cornstarch in a bowl. Toss the dried salmon bites in the cornstarch until each piece is coated. This will give them a nice crunch. Then, arrange the coated salmon in a single layer in the air fryer basket. Avoid overcrowding; this helps them cook evenly. Cook for about 10 minutes. Halfway through, gently shake the basket. This helps the salmon crisp up on all sides. When done, the salmon should be golden and crispy. Carefully take the bites out and let them cool for a minute. For the final touch, sprinkle sesame seeds on top and add chopped green onions. This adds color and flavor. Enjoy your delicious air fryer crispy teriyaki salmon bites! To get your salmon bites extra crispy, start by drying them well. After marinating, use paper towels to remove moisture. This step helps the cornstarch stick better. Coat each piece evenly with cornstarch. This forms a crunchy layer when you air fry. Cook at 400°F (200°C) for the best results. Shake the basket halfway through cooking to ensure even crisping. Marinating is key for flavor. I recommend at least 30 minutes. If you have more time, marinate for up to 2 hours. This allows the teriyaki sauce to soak into the salmon. The longer you marinate, the more intense the flavor becomes. Just don’t go over 2 hours, as the fish can become too salty. Overcrowding the air fryer basket can lead to uneven cooking. Arrange the salmon bites in a single layer. Leave space between each piece so hot air can circulate. If you have too many bites, cook them in batches. This way, each piece gets enough heat to become crispy. {{image_4}} You can get creative with your marinades. If you want a twist, try using orange juice instead of rice vinegar. This gives a sweet citrus flavor. You can also add a splash of sriracha for heat. If you prefer a sweeter taste, maple syrup works great in place of honey. These changes keep the dish fresh and exciting. Not a fan of salmon? You can use other fish like cod, tilapia, or even shrimp. Cod works well and has a mild taste. Tilapia absorbs flavors nicely, making it a good choice. Shrimp cooks quickly and adds a fun texture. Just adjust cooking times based on the fish you pick. To boost flavor, consider adding fresh herbs. Chopped cilantro or basil adds brightness. You can also mix in some chili flakes for heat. For extra crunch, toss in crushed nuts like peanuts or cashews. These small changes can elevate your salmon bites and keep your meals exciting! To store your leftover salmon bites, place them in an airtight container. Make sure to let them cool first. This helps keep them fresh longer. You can store them in the fridge for up to three days. If you want to keep them longer, consider freezing. Reheating salmon bites is easy. For the best results, use your air fryer. Preheat it to 350°F (175°C). Place the salmon bites in the basket and heat for about 5 minutes. This will help them regain their crispiness. You can also use a microwave, but they might lose some crunch. If you want to freeze salmon bites, first let them cool completely. Then, arrange them in a single layer on a baking sheet. Freeze them for about an hour until firm. After that, transfer them to a freezer-safe bag. Remove as much air as possible before sealing. They can last up to three months in the freezer. When ready to eat, thaw them in the fridge overnight before reheating. Yes, you can use frozen salmon. Just make sure to thaw it first. Thawing helps the marinade soak in better. For best results, place the frozen salmon in the fridge overnight. If you're in a hurry, you can submerge it in cold water for about an hour. After thawing, cut it into bite-sized cubes and follow the recipe as usual. These teriyaki salmon bites pair well with various sides. Here are some great options: - Steamed rice - Quinoa - Fresh salad - Stir-fried vegetables - Noodles You can also drizzle some leftover marinade over the rice or salad for added flavor. Check the salmon for a few signs to know it's done. Cooked salmon should be opaque and flake easily with a fork. You can also use a meat thermometer. The internal temperature should reach 145°F (63°C). If you see a little white albumin on the surface, it’s normal. That means it’s cooking properly! In this post, we looked at making tasty teriyaki salmon bites. We covered the key ingredients, including soy sauce and garnish options. I shared step-by-step instructions for the marinade, marinating, and air frying. Tips on crispiness, marinating time, and avoiding overcrowding followed. We explored variations, storage tips, and answered common questions. Enjoy trying different flavors and tricks. You’ll find your perfect teriyaki salmon bites soon!

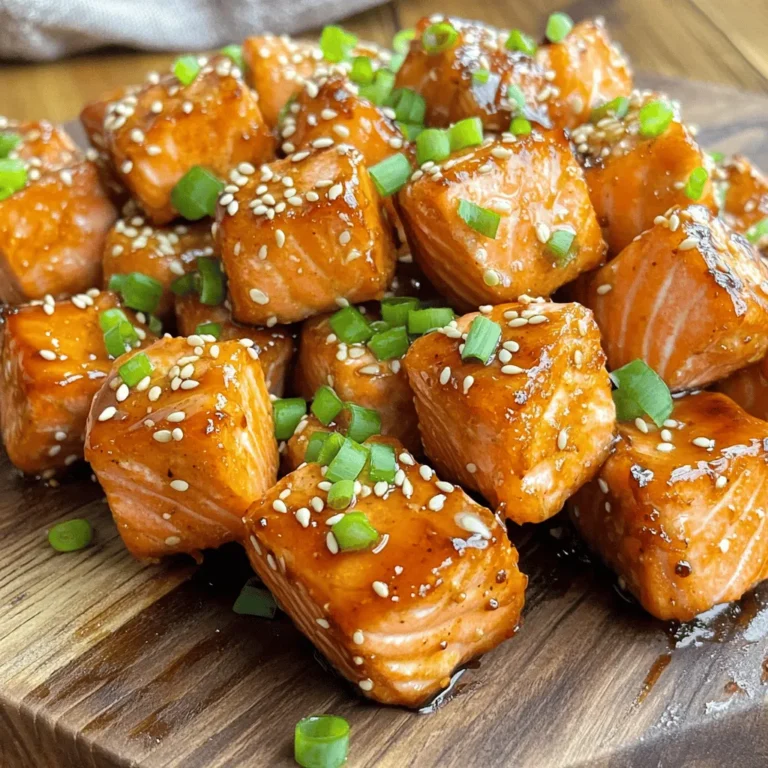
Air Fryer Crispy Teriyaki Salmon Bites Recipe Guide

- 4 boneless, skinless chicken breasts - 1 cup basil pesto (either store-bought or homemade) - 2 cups cherry tomatoes, halved - 2 cups fresh broccoli florets - 1 vibrant red bell pepper, sliced into strips - 1 medium zucchini, sliced into half-moons - 3 tablespoons extra virgin olive oil - Salt and freshly ground black pepper, to taste - Fresh basil leaves for garnish (optional) To make this dish, you need simple ingredients that pack big flavor. The chicken breasts serve as a great base. They are lean and cook well in the oven. Basil pesto adds a burst of freshness and depth. You can use store-bought or homemade pesto. Cherry tomatoes bring sweetness, while broccoli adds a nice crunch. The red bell pepper gives a pop of color and a slight sweetness. Zucchini rounds out the veggie mix, adding moisture and texture. Olive oil keeps everything tender and enhances the flavors. Seasoning with salt and pepper is key to making every bite taste great. You can also add fresh basil leaves as a finishing touch. These leaves not only look nice but also add more flavor. Gather these ingredients and get ready for a delightful meal! - Preheat your oven to 400°F (200°C). This heat cooks the chicken and veggies just right. - In a bowl, add the chicken breasts and pour the basil pesto over them. Mix well with your hands or tongs. Make sure each piece is coated. Let the chicken sit for about 15 minutes. This helps the flavors soak in. - Wash all your vegetables under cold water. Dry them with a clean towel. - Cut the cherry tomatoes in half, chop the broccoli into small florets, slice the bell pepper into strips, and cut the zucchini into half-moons. - In another bowl, toss the vegetables with olive oil, salt, and pepper. Make sure they are well coated. This makes them tasty and helps them roast evenly. - Line a large baking sheet with parchment paper. It makes cleanup easy. - Place the marinated chicken in the center of the sheet. Arrange the seasoned veggies around the chicken. Spread everything out. This helps them cook evenly. - Slide the baking sheet into the oven. Bake for 25-30 minutes. Check that the chicken reaches 165°F (75°C) inside. The veggies should be tender and bright. - For a nice finish, switch your oven to broil for the last 2-3 minutes. This adds color and crispiness. Keep an eye on it to avoid burning. - Once done, take the baking sheet out of the oven. Let it rest for about 5 minutes before serving. This helps the chicken stay juicy. - Marinating tips for deeper flavor: Marinate the chicken in pesto for at least 15 minutes. You can marinate longer for a bolder taste. Use a resealable bag for easy coating. This helps the chicken soak up all that delicious flavor. - Ensuring vegetables remain vibrant and tender: Cut your veggies into similar sizes for even cooking. Toss them in olive oil and season them well. Bake them alongside the chicken but keep an eye on them. Broiling at the end gives them a nice finish while keeping them bright. - Serving directly from the sheet pan: For a casual meal, serve right from the baking pan. It feels friendly and rustic. Just place it on the table and let everyone dig in! - Transferring to a platter with garnishes: For a more polished look, transfer the chicken and veggies to a large serving platter. Add fresh basil leaves on top. This adds color and makes your dish pop! {{image_4}} You can switch out chicken for several options. Try using tofu for a plant-based dish. You can also use turkey or pork if you prefer. Each protein brings a unique taste and texture. When it comes to veggies, the sky is the limit! Swap the broccoli for green beans or the zucchini for asparagus. You can mix in carrots or bell peppers for added color. This dish is flexible, so feel free to use what you have at home. Changing the type of pesto can really change the dish. Sun-dried tomato pesto adds a rich, tangy flavor. You might also try a spicy pesto for a kick. Adding spices can brighten the meal too. A sprinkle of garlic powder or Italian herbs can boost the taste. Fresh herbs like thyme or rosemary can add a fragrant touch. Experimenting with flavors makes cooking fun and keeps your meals fresh! To keep leftovers fresh, store them in an airtight container. Make sure the chicken and veggies cool down first. You can keep them in the fridge for up to three days. If you want to enjoy this meal later, plan to eat it within this time frame. The best way to reheat chicken and veggies is in the oven. Preheat your oven to 350°F (175°C). Place the leftovers in a baking dish. Cover it with foil to keep moisture in. Heat for about 15-20 minutes or until warm. You can use a microwave too, but it might dry out the food. If you use the microwave, cover the dish with a damp paper towel. This keeps the chicken juicy and tasty. Marinate the chicken for at least 15 minutes. This time allows the flavors of the pesto to soak into the meat. If you have more time, you can marinate it longer, even up to 2 hours. This helps create a more flavorful dish. Yes, you can use frozen vegetables. They will work well in this recipe. Just be aware that frozen veggies may release more water. This can change the texture a bit. Make sure to adjust the baking time, cooking them until they are tender. You can serve this dish with rice or pasta. A side salad also pairs well. If you want more bread, garlic bread complements it nicely. These sides add more texture and flavor to your meal. Yes, this recipe is great for meal prep! You can cook it in advance and portion it out. Store it in airtight containers in the fridge. It stays fresh for up to four days. Just reheat when you’re ready to eat. This recipe for sheet pan pesto chicken and veggies combines simple ingredients and clear steps. You learned how to prepare chicken and vegetables, bake them together, and enhance flavors. Remember to experiment with variations and store leftovers correctly. Using these tips ensures a flavorful and colorful dish each time you cook. Whether for dinner or meal prep, this dish is sure to impress. Keep it easy, fun, and enjoy your cooking adventure!

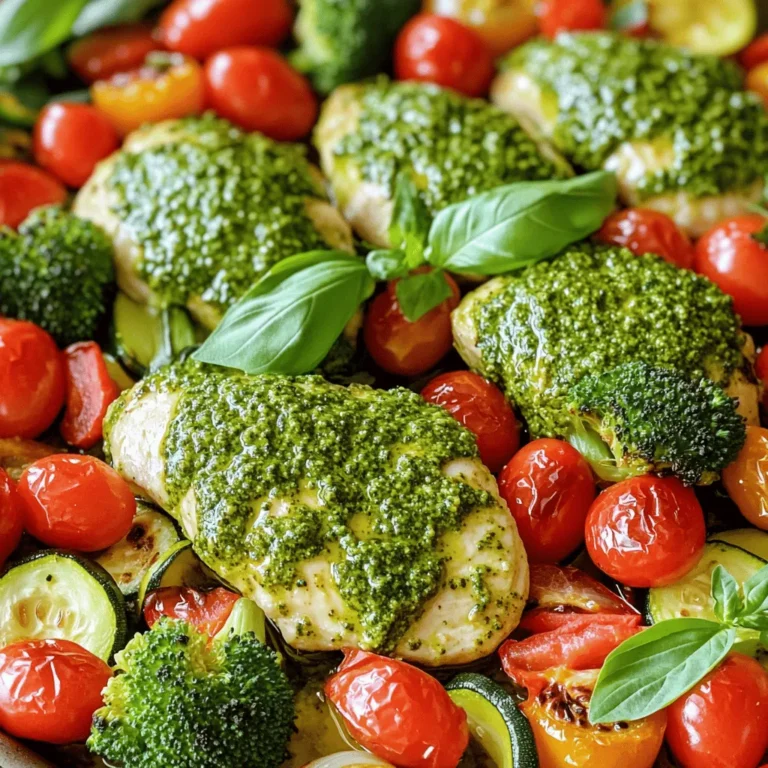
Sheet Pan Pesto Chicken Veggies Simple Dinner Delight

To make the perfect chai latte, you need a few simple ingredients. Here’s what you will need: - 1 cup milk (choose your preference: dairy, almond, oat, or soy) - 1 tablespoon chai tea blend (or substitute with 1 chai tea bag) - 1 tablespoon honey or maple syrup (feel free to adjust for desired sweetness) - 1/4 teaspoon ground ginger - 1/4 teaspoon ground cinnamon - 1/4 teaspoon ground cardamom - A pinch of black pepper (optional, for a spicy kick) Each ingredient adds a special touch. You can pick your favorite milk to make it creamy. The chai tea blend gives that classic flavor. Sweeteners like honey or maple syrup add just the right amount of sweetness. The spices bring warmth and a rich taste. If you like it spicy, a little black pepper can add a nice kick. You can mix and match based on what you have at home. This recipe is easy, fun, and quick. Enjoy customizing your cozy chai latte! Start by grabbing a small saucepan. Set your heat to medium. Pour in 1 cup of your chosen milk. I like using almond milk for its nutty taste. Heat it slowly until steam rises. Be careful—don’t let it boil. Boiling can ruin the milk's smoothness. If you see bubbles forming, lower the heat. This way, your milk warms gently. Once your milk is steaming, it's time to add flavor. Toss in 1 tablespoon of chai tea blend or your chai tea bag. Next, mix in the spices: 1/4 teaspoon of ground ginger, cinnamon, and cardamom. Add a pinch of black pepper if you like it spicy. Stir everything well. This step helps the spices blend nicely into the milk. Now, let your chai mixture steep. Set a timer for 3 to 5 minutes. Stir it occasionally to help release the flavors. You’ll know it’s ready when the milk turns a warm, golden color and smells amazing. After steeping, take it off the heat. If you used loose tea, strain it into your favorite mug. If you used a tea bag, just lift it out and toss it. Enjoy your aromatic chai latte! To get the right taste for your chai latte, you can change the spice levels. If you love spice, add more ground ginger or black pepper. If you prefer a milder drink, use less. The key is to find what you enjoy. You can also switch up the sweetener. Honey adds a nice floral note, while maple syrup gives a rich flavor. If you're looking for a lower-calorie option, try stevia or agave syrup. Just remember to stir in your sweetener well so it blends nicely. Frothing milk can take your chai latte to the next level. You can use a handheld frother, a whisk, or even shake the milk in a jar. Heat your milk first, then froth it. This helps create a nice, creamy texture. If you want to top your latte with whipped cream, use heavy cream for the best results. Chill your bowl and beaters before whipping. This helps the cream whip up faster. Once it's fluffy, spoon it on top of your chai latte and sprinkle with cinnamon for a pretty finish. {{image_4}} You can easily make a dairy-free chai latte. Here are some great plant-based milk choices: - Almond milk - Oat milk - Soy milk - Coconut milk Each option brings its own taste. Almond milk is nutty, oat milk is creamy, and soy milk has a smooth texture. Choose what you like best. Want to spice things up? You can add more flavor to your chai latte. Here are some fun ideas: - A pinch of nutmeg for warmth - A splash of vanilla extract for sweetness - A bit of clove for a unique twist These spices can create a cozy twist to your drink. Experiment to find what makes your taste buds happy. An iced chai latte is a refreshing treat. Here’s how to serve it chilled: 1. Follow the recipe to make your chai latte. 2. Let it cool for a bit after steeping. 3. Pour the latte over a glass filled with ice. This way, you enjoy the same great flavor, but with a cool twist for a hot day! If you have leftover chai latte, you can store it in the fridge. Use an airtight container to keep it fresh. It will last for up to three days. Before you store it, let it cool down to room temperature. If you added whipped cream or frothy milk, I suggest you skip it for storage. Add those toppings fresh when you are ready to enjoy your drink again. To reheat your chai latte, use a microwave or a small saucepan. If you use the microwave, heat in short bursts of 30 seconds. Stir it between each burst. This way, you keep the flavor and avoid hot spots. If you choose the saucepan, warm it over low heat. Stir gently until it is hot. Do not let it boil. Enjoy your cozy chai latte just like you made it fresh! Yes, you can! Honey and maple syrup are great choices, but other sweeteners work too. Here are some options: - Agave nectar: A mild, low-glycemic sweetener. - Stevia: A no-calorie option that is quite sweet. - Brown sugar: Adds a rich flavor, similar to molasses. - Coconut sugar: A more natural, less refined choice. Feel free to adjust sweetness to fit your taste. Start with a little, then add more if needed. You can make a chai latte using a microwave! Here’s how: 1. Heat the milk: Pour milk into a microwave-safe cup. Heat it for about 1-2 minutes. 2. Add the tea and spices: Stir in chai tea blend or tea bag, ginger, cinnamon, cardamom, and black pepper. 3. Steep: Let it sit for 3-5 minutes. Stir a couple of times to mix well. 4. Sweeten: Remove the tea bag or strain the tea. Stir in your sweetener. You can also use a French press or a milk frother for this method! Choosing the right chai tea makes a big difference. Here are some tips: - Loose leaf chai: This usually gives the best flavor. Look for blends with whole spices. - Chai tea bags: Convenient but may lack depth in flavor. Brands like Tazo or Stash are good. - Spice level: Pick a blend that matches your taste. Some are mild, while others pack a punch. - Organic options: These can offer fresher flavors and are better for the environment. Experiment with different brands to find what you love! You learned how to make a delicious chai latte with various options and tips. From dairy to plant-based milk, the choice is yours. Follow the steps to heat milk, add spices, and steep the mix for great flavor. I shared tips for balance and making foam too. Experiment with variations and store leftovers easily. Enjoy your chai latte adventure, and don’t hesitate to get creative with flavors!

Cozy 5-Min Chai Latte Simple and Tasty Recipe

- 1 pound boneless, skinless chicken thighs, diced into bite-sized pieces - 2 cups cooked jasmine rice, ideally refrigerated overnight - 1 cup mixed vegetables (peas, carrots, and corn) - 3 green onions, finely chopped - 2 cloves garlic, minced - 2 tablespoons fresh ginger, finely grated - 2 large eggs, whisked until smooth - 4 tablespoons teriyaki sauce - 2 tablespoons soy sauce - 1 tablespoon sesame oil - 1 tablespoon vegetable oil - Salt and pepper to season - Sesame seeds for garnish - Additional chopped green onions for a fresh touch When making teriyaki chicken fried rice, I always choose fresh, quality ingredients. The chicken thighs add rich flavor and stay juicy. I like using jasmine rice because it has a lovely aroma. Cooked rice should be cold; this helps it fry better. I love adding mixed vegetables for color and nutrition. Garlic and ginger give the dish a warm, fragrant kick. For the sauces, teriyaki sauce is key for that sweet and savory taste. Soy sauce adds depth and saltiness. A little sesame oil gives a nutty finish. Don't forget to season with salt and pepper, as it makes all the flavors pop. For garnishes, I use sesame seeds. They add a nice crunch. Chopped green onions brighten the dish. You can also drizzle more teriyaki sauce on top for extra flavor. Enjoy creating this tasty meal! Start by heating vegetable oil in a large skillet over medium-high heat. Once hot, add the diced chicken thighs. Season them with salt and pepper. Cook for 5 to 7 minutes. You want the chicken to turn brown and lose its pink color. This shows it is fully cooked. Once the chicken is ready, push it to one side of the skillet. This creates space for the eggs. Pour the whisked eggs into that space. Scramble them until they are fully cooked. Then mix the eggs with the chicken. Add minced garlic and grated ginger next. Sauté this mixture for about 1 minute. It should smell great! Next, stir in the mixed vegetables. Cook them for another 2 to 3 minutes until they are warm. Now, add the cold jasmine rice. Break apart any clumps with a spatula. Pour teriyaki sauce and soy sauce over the rice. Stir well so everything is coated. Allow this to cook for 3 to 4 minutes. You want the rice to get a little crispy at the bottom. Finally, fold in chopped green onions and drizzle with sesame oil. Mix everything thoroughly. Taste it and adjust seasoning if needed. When finished, garnish with sesame seeds before serving. Start with cold, cooked rice. This helps the grains stay separate. Use leftover rice if you can. Heat your skillet or wok until it's very hot. This adds a nice crispiness to the rice. Always keep the rice moving in the pan to avoid burning. For the best texture, use a mix of high heat and stirring. Stir-frying quickly helps to keep the rice dry. When you add the sauces, mix them well. This ensures that every grain gets coated. You want a slight crunch from the rice, so don’t overcook it. Avoid using fresh rice straight from the pot. It can get mushy. Don’t overcrowd the pan; this will trap moisture. Make sure to season the chicken well to boost flavor. Lastly, don’t skip the garnishes! They add flavor and color to your dish. {{image_4}} You can easily make teriyaki chicken fried rice meat-free. To do this, replace the chicken with tofu. Firm tofu works best. Cut it into small cubes and pan-fry until golden. Use vegetable broth instead of chicken broth for added flavor. You can also add a bit more teriyaki sauce for a bolder taste. For a vegan option, ensure your teriyaki sauce is free from animal products. If you want different proteins, there are many tasty choices. Shrimp, beef, or pork are great options. Just follow the same cooking steps as you would for chicken. For seafood, cook it until it turns opaque. For beef or pork, ensure it’s browned and cooked through. These variations keep the recipe exciting and flavorful. You can also customize the veggies in this dish. While peas, carrots, and corn are classic choices, feel free to get creative. Bell peppers, broccoli, or snap peas work well too. Just chop them small so they cook quickly. The key is to use fresh or frozen vegetables that you enjoy. This helps you create a dish that fits your taste buds perfectly. To store leftover fried rice, let it cool first. Place it in an airtight container. Make sure to cover it tightly. This keeps the rice fresh and helps it last longer. Store it in the fridge for up to three days. If you want to keep it longer, consider freezing it. When you're ready to eat, reheat the fried rice in a skillet. Add a splash of water or oil to help it steam. Heat it over medium-low heat, stirring often. This helps the rice warm up evenly. You can also use a microwave. Place the rice in a microwave-safe bowl and cover it. Heat for one to two minutes, checking halfway through. To freeze fried rice, divide it into smaller portions. Use freezer-safe bags or containers. Remove as much air as possible. This prevents freezer burn. Label each bag with the date. Fried rice can last for up to three months in the freezer. When you’re ready to eat, thaw the rice overnight in the fridge before reheating. Yes, you can use brown rice instead of jasmine rice. Brown rice has a nuttier flavor and a chewier texture. It also takes longer to cook. Use 1.5 cups of cooked brown rice for every 1 cup of jasmine rice. Ensure it is fully cooked and cooled before adding it to the dish. To make this dish gluten-free, choose a gluten-free teriyaki sauce. Brands like San-J and Kikkoman offer gluten-free options. Replace soy sauce with tamari, which is gluten-free. Check all ingredient labels to ensure they meet your dietary needs. The best teriyaki sauce depends on your taste. Look for sauces with natural ingredients and no added preservatives. I prefer homemade teriyaki sauce for fresh flavors. Combine soy sauce, honey, ginger, and garlic for a quick and tasty mix. To prevent mushy rice, use cold, day-old jasmine rice. Refrigerating the rice helps dry it out and firm it up. When cooking, stir gently. Avoid overcooking, and allow the rice to fry for a few minutes for a nice texture. Teriyaki chicken fried rice is easy to make with the right steps. You learned about main ingredients, essential seasonings, and tasty toppings. I shared tips for perfect texture and common mistakes to avoid. Remember, you can customize this dish with veggies or proteins you like. Store leftovers properly for later enjoyment. In the end, this dish is delicious and fun to make. Enjoy your cooking and share this recipe with friends!

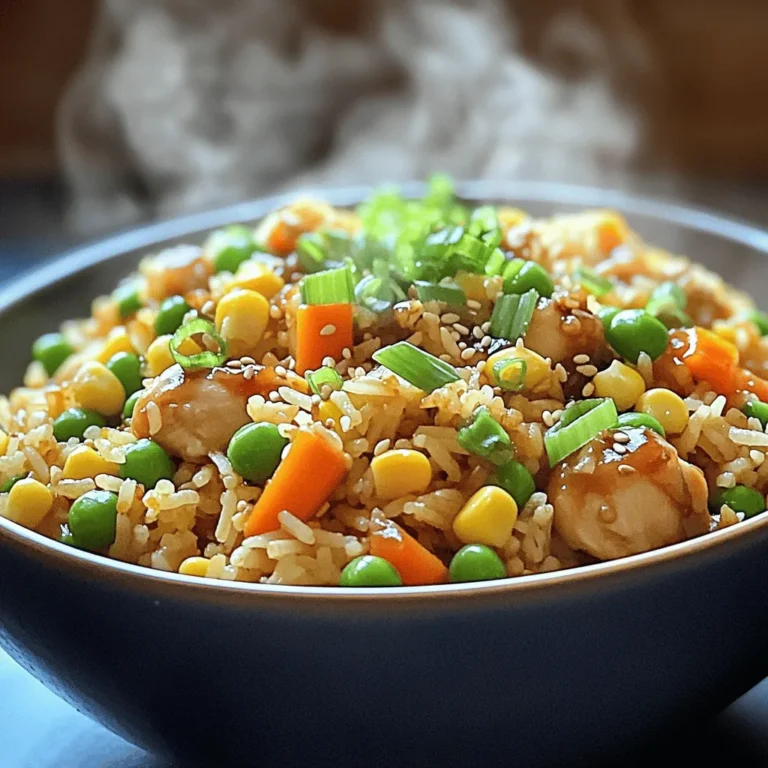
Teriyaki Chicken Fried Rice Flavorful Dinner Idea

- 2 cups all-purpose flour - 1/2 cup granulated sugar - 1 tablespoon baking powder - 1/2 teaspoon salt - 1/2 cup unsalted butter, chilled and cut into small cubes - 1 cup fresh cranberries, halved - Zest of 1 large orange - 1/2 cup heavy cream - 1 large egg, at room temperature - 1 teaspoon vanilla extract To make perfect cranberry orange scones, you need a few key items. First, use all-purpose flour, granulated sugar, baking powder, and salt. These dry items form the base of your scones. Next, chilled unsalted butter is a must. Cut it into small cubes to keep it cold. This helps create a flaky texture. Fresh cranberries add a burst of flavor and color. Halving them lets their juices mix well in the dough. Don't forget the zest of one large orange. It gives a bright taste that pairs perfectly with the cranberries. Finally, for the wet ingredients, heavy cream and a large room temperature egg help bind everything. A teaspoon of vanilla extract adds depth to the flavor. - 1 cup powdered sugar, sifted - 2 tablespoons freshly squeezed orange juice - Zest of 1/2 orange For the glaze, you need powdered sugar, freshly squeezed orange juice, and some zest from half an orange. Sifting the sugar avoids lumps, making the glaze smooth. The juice adds sweetness and tang. The extra zest boosts the flavor even more. - Fresh cranberries - Mint sprigs For a pretty presentation, consider fresh cranberries and mint sprigs. They make your scones look special and festive. Arrange them on a platter to impress your guests. First, preheat your oven to 400°F (200°C). This step is crucial for baking scones. Line a baking sheet with parchment paper. This keeps the scones from sticking and makes cleanup easy. In a large mixing bowl, combine 2 cups of all-purpose flour, 1/2 cup of granulated sugar, 1 tablespoon of baking powder, and 1/2 teaspoon of salt. Whisk these together until they are fully mixed with no lumps. Next, take 1/2 cup of chilled unsalted butter, cut into small cubes. Add this butter to the dry mix. Use your fingers or a pastry cutter to blend it in. You want the mix to look like coarse crumbs, about the size of peas. Keep the butter cold; this helps your scones be flaky. In a small bowl, combine 1/2 cup of heavy cream, 1 large egg, and 1 teaspoon of vanilla extract. Whisk this until it's smooth and combined. Now, fold in 1 cup of halved fresh cranberries and the zest of 1 large orange into the dry mix. Be gentle; you want to avoid overmixing. This keeps the scones tender. Pour your cream mixture into the bowl with the dry ingredients. Stir just until everything is moistened. The dough should look a bit rough but hold together nicely. Transfer your dough to a lightly floured surface. Pat it into a circular disk, about 1 inch thick. Using a sharp knife, cut this disk into 8 equal wedges. Place these wedges on your prepared baking sheet, leaving space between them. Bake the scones for 18 to 20 minutes. They should turn golden brown. To check if they are done, insert a toothpick into the center. It should come out clean. While the scones bake, prepare the glaze. Mix 1 cup of sifted powdered sugar, 2 tablespoons of fresh orange juice, and the zest of 1/2 orange in a small bowl. Whisk until smooth and free of lumps. Once your scones are ready, let them cool for about 5 minutes on the baking sheet. Finally, drizzle the glaze over the warm scones for a tasty finish. Keep your butter chilled. This step is key for flaky scones. If the butter warms, the scones may turn dense. Cut the butter into small cubes and work fast. Avoid overmixing the dough. Mix it until just combined. Overmixing makes the scones tough. You want a light and crumbly texture that is soft inside. Use fresh cranberries for the best taste. Fresh berries offer a tartness that shines in every bite. If you use frozen cranberries, thaw them first. This helps them mix better in the dough. Experiment with different citrus zests. The zest adds a bright flavor. Try lemon or lime for a twist. Each citrus brings its own unique taste and aroma. Achieving the right consistency for the glaze is important. It should be smooth and pourable, not too thick. Adjust with more juice or sugar as needed. Explore flavor variations for the glaze. You can add vanilla or almond extract. A dash of cinnamon can also warm up the flavor. These tweaks can make your scones even more special. {{image_4}} You can switch up the cranberries in this recipe. Blueberries or raspberries work great too. These fruits add a sweet twist. You can also mix in nuts like walnuts or pecans for a crunchy texture. Chocolate chips are another fun option. They add a rich flavor that pairs well with the orange. If you want a healthier scone, try using whole wheat flour. This adds fiber and a nutty taste. You can also cut back on sugar. This change still keeps the scones tasty while being better for you. Want to make vegan scones? Replace the butter and cream with plant-based options. Coconut oil or vegan butter are good choices. For the egg, you can use a flaxseed meal mix. Just mix one tablespoon of flaxseed meal with three tablespoons of water and let it sit. This mixture acts like an egg in the dough. Enjoy your vegan version just as much! To keep your scones fresh, place them in an airtight container. This helps prevent drying out. You can use a plastic container or a zip-top bag. Store them at room temperature for up to three days. For longer storage, put them in the fridge. Just be sure to seal them well to avoid moisture. To reheat your scones, preheat your oven to 350°F (175°C). Place the scones on a baking sheet and warm them for about 5 to 10 minutes. This method keeps them crispy. Avoid using the microwave, as it can make them soggy. If you must use the microwave, heat them for only a few seconds. You can freeze scones both before and after baking. For uncooked scones, shape the dough and place them on a baking sheet. Freeze them until solid, then transfer to a bag. To bake, just add a few extra minutes to the cooking time. If you freeze baked scones, let them cool completely first. Wrap them tightly in foil or plastic wrap. When ready to eat, thaw them in the fridge overnight, then reheat in the oven. This keeps them from getting soggy. Yes, you can use frozen cranberries! First, thaw them in the fridge overnight. This helps keep them juicy. After thawing, drain any excess liquid. Then, fold the cranberries into the dough as usual. This method ensures great flavor and texture. To tell if your scones are done, look for a few signs. The tops should turn a lovely golden brown. Insert a toothpick into the center of a scone; it should come out clean. If you see any wet batter, bake for a few more minutes. Trust your eyes and the toothpick test! Yes, you can make the dough ahead of time. Prepare the dough and shape it into a disk. Wrap it tightly in plastic wrap. Store it in the fridge for up to 24 hours. When you're ready to bake, just cut and bake as usual. This saves time and adds convenience! This blog post covered how to make delicious scones with cranberries and orange zest. You learned the key ingredients and steps to prepare, shape, and bake them perfectly. We shared tips to achieve flaky texture and glaze options, plus variations for health and flavor. Remember, the joy of baking lies in experimenting and making it your own. Enjoy your homemade scones and the smiles they bring!

Cranberry Orange Scones with Glaze Easy Recipe Guide

To make these lemon poppy seed yogurt pancakes, you will need: - 1 cup all-purpose flour - 2 tablespoons poppy seeds - 1 tablespoon baking powder - 1/2 teaspoon baking soda - 1/4 teaspoon salt - 1 cup plain yogurt (Greek or regular) - 1 large egg - 1/4 cup milk (or almond milk) - Zest of 1 fresh lemon - 2 tablespoons fresh lemon juice - 2 tablespoons honey or maple syrup (optional for sweetness) - Butter or oil for cooking These ingredients bring together a bright flavor and moist texture. Each one plays a role in creating fluffy, delicious pancakes. If you want to sweeten your pancakes, you have a few choices: - Honey: Adds a floral note and pairs well with lemon. - Maple Syrup: Gives a rich, earthy flavor. - Agave Nectar: A lighter sweetener that blends well. - Stevia: A sugar-free option for a sweet touch without calories. Feel free to adjust the sweetness to your liking. A little goes a long way! To make these pancakes, gather the following tools: - Mixing bowls: One large and one medium. - Whisk: For mixing the wet ingredients and dry ingredients. - Spatula: To gently fold the batter and flip the pancakes. - Non-stick skillet or griddle: For cooking the pancakes. - Measuring cups and spoons: To measure the ingredients accurately. Having the right equipment makes the process smooth and fun. You can enjoy cooking and create a tasty breakfast! Start with a large mixing bowl. Add 1 cup of all-purpose flour, 2 tablespoons of poppy seeds, 1 tablespoon of baking powder, 1/2 teaspoon of baking soda, and 1/4 teaspoon of salt. Use a whisk to blend these dry ingredients well. Make sure there are no lumps. This step sets the base for your pancakes. In a medium bowl, mix together 1 cup of plain yogurt, 1 large egg, and 1/4 cup of milk. You can use almond milk if you prefer. Then add the zest of 1 fresh lemon and 2 tablespoons of fresh lemon juice. If you like it sweet, add 2 tablespoons of honey or maple syrup. Whisk until the mix is smooth and creamy. Now, carefully pour the wet mix into the bowl of dry ingredients. Use a spatula to stir gently. It’s okay if the batter has a few lumps. Do not overmix! This keeps your pancakes light and fluffy. Preheat a non-stick skillet or griddle over medium heat. Add a small amount of butter or oil to coat the surface. For each pancake, pour 1/4 cup of batter onto the skillet. Cook for about 2-3 minutes. You’ll see bubbles form on the surface, and the edges should look set. Flip the pancakes with a spatula and cook for another 1-2 minutes until they are golden brown. Repeat with the rest of the batter, adding more butter or oil as needed. Serve warm with honey or maple syrup, and enjoy! For fluffy pancakes, do not overmix the batter. You want some lumps. They help keep the pancakes light. Use room temperature ingredients. This makes it easier to mix and enhances the rise. Also, try adding a little more yogurt if your batter seems too thick. If your pancakes stick to the pan, ensure it’s hot enough. You can test by dropping a bit of water; it should sizzle. If they burn quickly, lower the heat. For dense pancakes, check your baking powder. It should be fresh for the best results. Cook your pancakes on medium heat. This gives them time to rise and brown nicely. Too high and they burn. Too low and they become soggy. Use a non-stick skillet for easy flipping. Add a little butter or oil each time you cook a new pancake. This keeps them from sticking and adds flavor. {{image_4}} You can change the flour type to make these pancakes even better. Try whole wheat flour for extra fiber. It gives a nice nutty taste. You can also use almond flour for a gluten-free option. Just remember, almond flour makes the pancakes denser. If you want lighter pancakes, use oat flour. Oat flour is easy to make by blending rolled oats. Adding fruits can take these pancakes to the next level. Blueberries are a classic choice. They burst with flavor and add sweetness. You can toss in sliced bananas for a creamy texture. Or, try diced apples for a crunchy bite. If you like tropical flavors, add crushed pineapple. Just make sure to drain any extra juice to keep the batter thick. You can easily make these pancakes vegan. Replace the egg with a flax egg. To make a flax egg, mix one tablespoon of ground flaxseed with three tablespoons of water. Let it sit for a few minutes until it thickens. Use plant-based yogurt instead of regular yogurt. Almond or coconut yogurt works well. For milk, use almond milk or oat milk. This way, everyone can enjoy these tasty pancakes! To store leftover pancakes, let them cool down. Once cool, stack them on a plate. Place parchment paper between each pancake to keep them from sticking. Cover the stack with plastic wrap or foil. You can also place them in an airtight container. They will stay fresh in the fridge for about three days. To reheat your pancakes, you have a few options. The microwave is quick and easy. Place a couple of pancakes on a microwave-safe plate. Heat them for about 20-30 seconds. You can also use a skillet. Heat the skillet on medium and cook each pancake for about one minute on both sides. This method gives them a nice crisp outside. Freezing is a great way to keep pancakes for longer! Start by cooling them completely. Then, layer the pancakes with parchment paper in a freezer-safe bag. Squeeze out any extra air before sealing. You can freeze them for up to two months. To enjoy, just reheat them directly from the freezer using the microwave or skillet method. Yes, you can make these pancakes ahead of time. To do this, cook the pancakes and let them cool. Place them in an airtight container. You can store them in the fridge for up to three days. When you want to eat them, reheat in the microwave or toaster. This keeps them tasty and fresh! If you do not have yogurt, you can use buttermilk or sour cream. Both options keep the pancakes moist and tasty. You can also try dairy-free yogurt if you prefer a vegan option. Just ensure it has a similar thickness to regular yogurt for the best results. To make pancakes fluffier, try these tips: - Use fresh baking powder. This helps pancakes rise better. - Do not overmix the batter. Stir until just combined for a lighter texture. - Let the batter sit for a few minutes before cooking. This can help with fluffiness too. By following these tips, you will enjoy light and fluffy pancakes every time! You learned about making great pancakes, from ingredients to storage. We covered sweetener options, essential equipment, and step-by-step cooking. Tips to perfect texture and troubleshoot issues help you succeed. You can try variations with different flours or fruits too. Remember to store and reheat pancakes for future meals. Enjoy your pancake journey! Be creative and have fun with each batch you make.

Lemon Poppy Seed Yogurt Pancakes Delightful and Easy

To make a tasty Slow Cooker Chicken Tortilla Soup, you need a few key items: - 1 lb boneless, skinless chicken breasts - 1 medium onion, finely chopped - 2 cloves garlic, finely minced - 1 can (14.5 oz) diced tomatoes with green chilies, undrained - 1 can (15 oz) black beans, thoroughly drained and rinsed - 1 can (15 oz) sweet corn, thoroughly drained - 4 cups low-sodium chicken broth These main ingredients form the heart of your soup. The chicken provides protein, while the beans and corn add texture and sweetness. The tomatoes give a nice zing. Flavor is key in this soup. Here’s what you’ll need: - 1 tablespoon ground cumin - 1 tablespoon chili powder - 1 teaspoon smoked paprika - Salt and freshly cracked black pepper to taste - Juice of 1 lime These spices add depth and warmth. The lime juice brightens the flavors and adds a fresh taste. Garnishing makes your soup look appealing. Use these: - Fresh cilantro, chopped (for garnish) - Tortilla chips (for serving) For a great presentation, serve the soup in rustic bowls. Add lime wedges on the side and let the tortilla chips stand upright in the soup. This adds a fun and crunchy element. To start, place the boneless, skinless chicken breasts in the bottom of your slow cooker. Spread them out evenly for the best cooking. Next, layer the chopped onion and minced garlic right on top of the chicken. This helps the flavors mix well as they cook together. After that, pour the can of diced tomatoes with green chilies over the onion and garlic. Then, add the drained black beans and sweet corn. This combination adds a great mix of textures and tastes. Now, it’s time to pour in the chicken broth. Make sure you cover all the ingredients well. This step is key for a rich soup base. Next, evenly sprinkle the spices: ground cumin, chili powder, smoked paprika, salt, and freshly cracked black pepper. This will give your soup a burst of flavor. With everything in the slow cooker, secure the lid. Set your cooker to low for 6-8 hours or high for 3-4 hours. The chicken should cook until tender and fully done. About 30 minutes before serving, shred the chicken right in the pot using two forks. This makes it easy to mix the chicken into the soup. After shredding, add the juice of one fresh lime. This will brighten the flavors. Taste the soup and adjust the seasonings if needed. Serve the hot soup in bowls, garnished with chopped cilantro and a handful of tortilla chips for crunch. Enjoy your hearty meal! To keep the chicken moist and tender, use boneless, skinless chicken breasts. They cook well and stay juicy. Layer the chicken at the bottom of the slow cooker. This helps it soak up all the flavors. Cooking time can vary based on your slow cooker model. If you have a newer model, it may cook faster. Check the chicken after 6 hours on low or 3 hours on high. If it shreds easily, it’s done. To boost flavor, consider adding spices. A pinch of cayenne can add a nice kick. You could also try adding dried oregano for an earthy note. For heat preference, adjust the chili powder. Use less for mild soup. If you like it spicy, add more chili powder or some sliced jalapeños. Garnishing makes your soup look special. Add fresh cilantro on top for color. A squeeze of lime adds a fresh flavor. Serve the soup in rustic bowls. Stack some tortilla chips on the side. You can also place them upright in the soup for a fun look. This adds texture and crunch! {{image_4}} You can switch up the protein in this soup. Try using turkey or lean beef instead of chicken. If you want a vegetarian option, use tofu or tempeh. For beans, black beans work well, but pinto or kidney beans add a nice twist. You can also mix in different veggies like bell peppers or zucchini. These changes keep the soup fresh and exciting. Traditional Mexican-style ingredients bring great flavor. Consider adding fresh jalapeños or a touch of queso fresco for an authentic taste. If you want a fusion twist, add coconut milk for a creamy Thai vibe or curry spices for an Indian flair. These small changes can create a whole new soup experience. To make the soup gluten-free, use certified gluten-free tortilla chips. Many chicken broths are gluten-free, but double-check the label. For low-sodium options, choose low-sodium broth and limit added salt. If you want a low-carb version, skip the corn and serve the soup without chips. These adjustments help meet various dietary needs while keeping the taste intact. To keep your soup fresh, place leftovers in an airtight container. This helps prevent spills and keeps the soup tasty. Store it in the fridge right after it cools down. Your soup will last for about 3 to 4 days in the fridge. Freezing your soup is a great way to save it for later. I suggest using freezer-safe containers or bags. Make sure to leave some space for the soup to expand when it freezes. To reheat, simply thaw it in the fridge overnight. Then, warm it on the stove or in the microwave until hot. Stir well to mix the flavors. You can get creative with leftover soup! Try using it as a base for a rice bowl. Just add some cooked rice and veggies for a new dish. You can also use it as a sauce for enchiladas. Another idea is to mix it with scrambled eggs for a tasty breakfast. The possibilities are endless, so don’t let any soup go to waste! To add heat, use more chili powder or smoked paprika. You can also add sliced jalapeños or a dash of hot sauce. If you want an extra kick, mix in some cayenne pepper. Start with a little and taste as you go. This way, you can find the right level of spice for your taste buds. Yes, you can use fresh ingredients instead of canned. Fresh vegetables can add great flavor. Use fresh tomatoes, bell peppers, and corn. Just chop them well and add them to the slow cooker. Fresh beans are a nice touch too, but they might need more cooking time. Canned goods save time and are handy. Use what you have on hand. You can serve this soup with many side dishes. Cornbread or quesadillas are good choices. You can also add a fresh salad to balance the meal. For a crunchy touch, serve with tortilla chips on the side. They make the soup even more fun to eat. Consider lime wedges for extra zing too! This article covered how to make a tasty Slow Cooker Chicken Tortilla Soup. We started with essential ingredients, including chicken, beans, and spices. Then, I shared step-by-step cooking instructions and helpful tips for flavor and presentation. You learned about variations and storage tips to keep leftovers fresh. In summary, this soup is versatile and easy to adapt. Enjoy sharing it with family and friends for a satisfying meal.

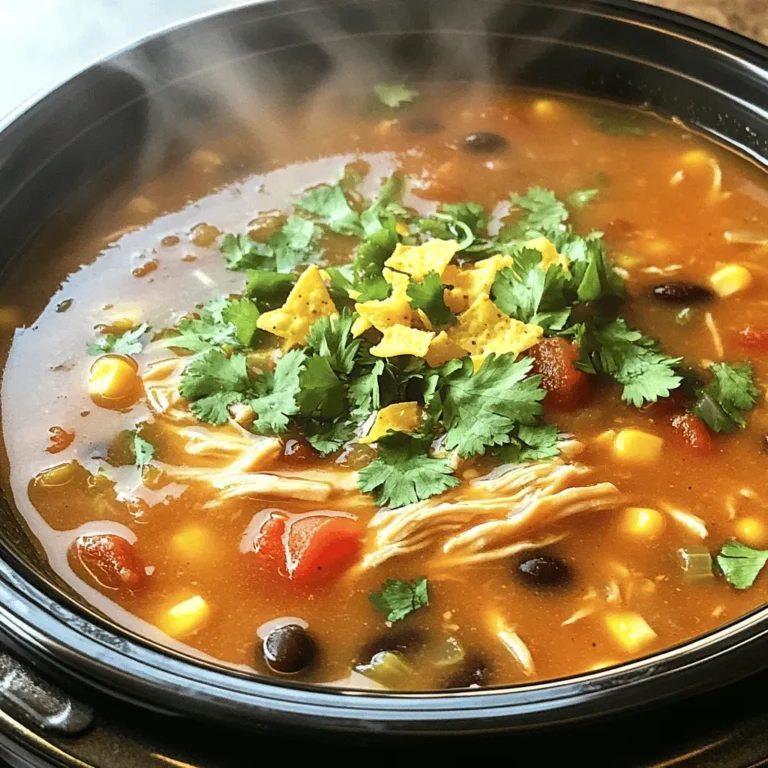
Savory Slow Cooker Chicken Tortilla Soup Recipe

- 2 lbs chicken wings - 2 tablespoons extra virgin olive oil - 2 teaspoons lemon pepper seasoning - 1 teaspoon garlic powder - 1 teaspoon onion powder - 1 teaspoon smoked paprika - 1/2 teaspoon sea salt - 1/4 teaspoon freshly cracked black pepper - Zest of 1 large lemon - Fresh parsley, finely chopped (for garnish) - Lemon wedges (for serving) For a batch of crispy air fryer lemon pepper wings, I use 2 pounds of chicken wings. This amount serves about four people. The olive oil adds richness, while two tablespoons is just right. The lemon pepper adds that zing with two teaspoons. I also include one teaspoon each of garlic powder, onion powder, and smoked paprika. These spices bring depth and warmth to the dish. To finish, I sprinkle in half a teaspoon of sea salt and a quarter teaspoon of black pepper. The zest of one large lemon brightens the flavor. Finally, I garnish with fresh parsley and serve with lemon wedges. If you're short on lemon pepper seasoning, you can mix your own. Combine equal parts black pepper and dried lemon zest with a pinch of salt. If you want to add heat, consider a dash of cayenne pepper. You can swap olive oil for avocado oil for a different flavor. For a lighter option, use skinless chicken wings. If you want a more herbaceous taste, try adding dried thyme or oregano. To start, you will need to dry the chicken wings. Use paper towels to remove all moisture. This step is key for a crispy texture. If the wings are wet, they won’t crisp up well. Next, grab a large mixing bowl. In it, mix the olive oil, lemon pepper seasoning, garlic powder, onion powder, smoked paprika, sea salt, black pepper, and lemon zest. Stir well until everything blends smoothly. This mix adds great flavor to the wings. Now, add the dried chicken wings into the bowl. Use your hands or tongs to toss them. Make sure each wing gets a good coat of the marinade. This ensures every bite bursts with flavor. Preheat your air fryer to 380°F (190°C) for about five minutes. This helps the wings cook evenly. Once hot, place the seasoned wings in the air fryer basket in a single layer. Avoid overcrowding; this keeps them crispy. If you have many wings, cook them in batches. Air fry the wings for 25 to 30 minutes. Halfway through the cooking time, shake the basket. This helps the wings crisp up on all sides. When done, they should be golden brown and crispy. Once the wings are cooked, move them to a serving platter. For a nice touch, sprinkle finely chopped parsley on top. This adds color and freshness. Serve with lemon wedges on the side. A squeeze of lemon will brighten the flavors even more. Enjoy your delicious lemon pepper wings! To get the best crispiness, dry your chicken wings well. Use paper towels to remove moisture. This step is crucial. If the wings are wet, they won’t crisp up. Also, make sure to air fry them in a single layer. Overcrowding the basket leads to steam, which ruins the crunch. For perfect lemon pepper wings, air fry them for 25 to 30 minutes. At the halfway point, shake the basket. This helps ensure even cooking. If you like extra crispy wings, leave them in for a few more minutes. Just keep an eye on them to avoid burning. You can play with the seasonings to create new flavors. Try adding a pinch of cayenne pepper for heat. If you like herb flavors, mix in dried oregano or thyme. For a smoky twist, switch smoked paprika with regular paprika. Get creative with your favorite spices to make the wings your own! {{image_4}} You can change the taste of lemon pepper wings easily. Try adding different spices to the marinade. For a spicy kick, mix in cayenne pepper or chili powder. If you like sweet flavors, add a touch of honey or brown sugar to the marinade. This will create a sweet and spicy wing. You could also experiment with other herbs. Fresh thyme or rosemary can give your wings a unique twist. If you don’t have an air fryer, you can still enjoy these wings. Bake them in a regular oven at 400°F (200°C) for about 40-45 minutes. Make sure to flip them halfway for even cooking. You can also grill the wings for a smoky flavor. Just toss them on a hot grill until they are crispy and cooked through. Serve your lemon pepper wings with a cool dipping sauce. Ranch or blue cheese dressing pairs well with the zesty flavor. You can also add celery and carrot sticks for a crunchy side. For a full meal, serve the wings with a fresh salad or some seasoned rice. This way, you get a balance of flavors and textures on your plate. To keep your leftover air fryer lemon pepper wings fresh, store them in an airtight container. Place the container in the fridge. They will last for 3 to 4 days. Make sure the wings cool down before sealing them. This step helps prevent sogginess. If you want to save your wings for later, freezing is a great option. First, let the wings cool completely. Then, place them in a freezer-safe bag or container. Remove as much air as possible from the bag. Label it with the date. They will stay good for up to 3 months in the freezer. To enjoy your wings again, reheat them in the air fryer. Set the air fryer to 350°F (175°C). Heat for about 8 to 10 minutes. This method keeps them crispy. You can also use a microwave, but it may make them less crispy. If you use a microwave, heat them in short bursts. This way, you avoid overcooking. Cook lemon pepper wings for 25 to 30 minutes in an air fryer. Set the temperature to 380°F (190°C). At the halfway point, shake the basket. This helps them cook evenly and get crispy. If you prefer extra crispiness, add a few minutes to the cook time. Yes, you can use frozen chicken wings. However, they will need more time to cook. Preheat your air fryer and cook them for about 30 to 35 minutes. Check for doneness with a meat thermometer. They should reach 165°F (74°C) to be safe to eat. Lemon pepper wings pair well with many sides. Here are some great options: - Celery sticks - Carrot sticks - Blue cheese dressing - Ranch dressing - French fries - Onion rings - A fresh garden salad These sides complement the zesty flavor of the wings and add crunch. Enjoy your meal! We explored how to make delicious lemon pepper wings in an air fryer. We covered each ingredient, their measurements, and the best substitutions. You learned the step-by-step process, from marinating to air frying. I shared tips for crispiness and seasoning, plus various flavor options. Finally, we discussed storage and reheating. Enjoy experimenting with these wings in your kitchen! They are sure to be a hit.

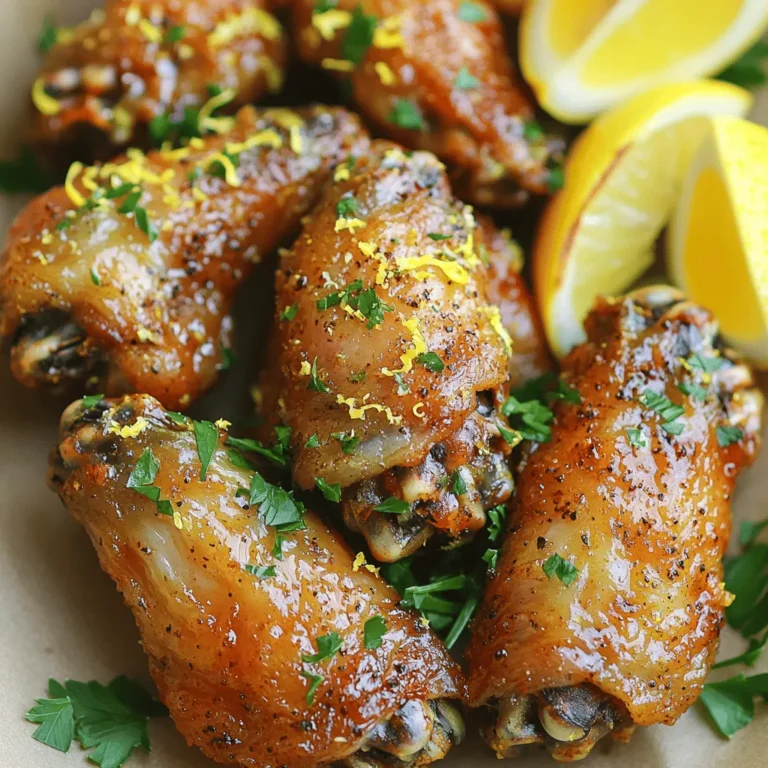
Air Fryer Lemon Pepper Wings Crispy and Flavorful Dish

PREV 1 … 4 5 6 … 17 NEXT
tastykitchentales

explore

DessertsDinnerAppetizersDrinks

Our Policies

  • Cookie Policy
  • Copyright Policy
  • Disclaimer
  • GDPR Policy
  • Terms Of Use
Back to Top
  • About
  • Contact Us
  • Privacy Policy
© 2025 tastykitchentales