FREE DINNER EBOOK! Get your copy!
  • Cookie Policy
  • GDPR Policy
  • Disclaimer
  • Terms Of Use
  • Visit my other site: Fun Cookie Recipes
tastykitchentales
  • Home
  • Dinner
  • Desserts
  • Drinks
  • Appetizers
  • Contact
  • About
  • Privacy Policy
  • Home
  • Dinner
  • Desserts
  • Drinks
  • Appetizers
  • Contact
  • About
  • Privacy Policy
  • Cookie Policy
  • GDPR Policy
  • Disclaimer
  • Terms Of Use
Visit my other site: Fun Cookie Recipes

HOME / CATEGORIES /

Latest

- 2 lbs chicken wings - 2 tablespoons extra virgin olive oil - 2 teaspoons lemon pepper seasoning - 1 teaspoon garlic powder - 1 teaspoon onion powder - 1 teaspoon smoked paprika - 1/2 teaspoon sea salt - 1/4 teaspoon freshly cracked black pepper - Zest of 1 large lemon - Fresh parsley, finely chopped (for garnish) - Lemon wedges (for serving) For a batch of crispy air fryer lemon pepper wings, I use 2 pounds of chicken wings. This amount serves about four people. The olive oil adds richness, while two tablespoons is just right. The lemon pepper adds that zing with two teaspoons. I also include one teaspoon each of garlic powder, onion powder, and smoked paprika. These spices bring depth and warmth to the dish. To finish, I sprinkle in half a teaspoon of sea salt and a quarter teaspoon of black pepper. The zest of one large lemon brightens the flavor. Finally, I garnish with fresh parsley and serve with lemon wedges. If you're short on lemon pepper seasoning, you can mix your own. Combine equal parts black pepper and dried lemon zest with a pinch of salt. If you want to add heat, consider a dash of cayenne pepper. You can swap olive oil for avocado oil for a different flavor. For a lighter option, use skinless chicken wings. If you want a more herbaceous taste, try adding dried thyme or oregano. To start, you will need to dry the chicken wings. Use paper towels to remove all moisture. This step is key for a crispy texture. If the wings are wet, they won’t crisp up well. Next, grab a large mixing bowl. In it, mix the olive oil, lemon pepper seasoning, garlic powder, onion powder, smoked paprika, sea salt, black pepper, and lemon zest. Stir well until everything blends smoothly. This mix adds great flavor to the wings. Now, add the dried chicken wings into the bowl. Use your hands or tongs to toss them. Make sure each wing gets a good coat of the marinade. This ensures every bite bursts with flavor. Preheat your air fryer to 380°F (190°C) for about five minutes. This helps the wings cook evenly. Once hot, place the seasoned wings in the air fryer basket in a single layer. Avoid overcrowding; this keeps them crispy. If you have many wings, cook them in batches. Air fry the wings for 25 to 30 minutes. Halfway through the cooking time, shake the basket. This helps the wings crisp up on all sides. When done, they should be golden brown and crispy. Once the wings are cooked, move them to a serving platter. For a nice touch, sprinkle finely chopped parsley on top. This adds color and freshness. Serve with lemon wedges on the side. A squeeze of lemon will brighten the flavors even more. Enjoy your delicious lemon pepper wings! To get the best crispiness, dry your chicken wings well. Use paper towels to remove moisture. This step is crucial. If the wings are wet, they won’t crisp up. Also, make sure to air fry them in a single layer. Overcrowding the basket leads to steam, which ruins the crunch. For perfect lemon pepper wings, air fry them for 25 to 30 minutes. At the halfway point, shake the basket. This helps ensure even cooking. If you like extra crispy wings, leave them in for a few more minutes. Just keep an eye on them to avoid burning. You can play with the seasonings to create new flavors. Try adding a pinch of cayenne pepper for heat. If you like herb flavors, mix in dried oregano or thyme. For a smoky twist, switch smoked paprika with regular paprika. Get creative with your favorite spices to make the wings your own! {{image_4}} You can change the taste of lemon pepper wings easily. Try adding different spices to the marinade. For a spicy kick, mix in cayenne pepper or chili powder. If you like sweet flavors, add a touch of honey or brown sugar to the marinade. This will create a sweet and spicy wing. You could also experiment with other herbs. Fresh thyme or rosemary can give your wings a unique twist. If you don’t have an air fryer, you can still enjoy these wings. Bake them in a regular oven at 400°F (200°C) for about 40-45 minutes. Make sure to flip them halfway for even cooking. You can also grill the wings for a smoky flavor. Just toss them on a hot grill until they are crispy and cooked through. Serve your lemon pepper wings with a cool dipping sauce. Ranch or blue cheese dressing pairs well with the zesty flavor. You can also add celery and carrot sticks for a crunchy side. For a full meal, serve the wings with a fresh salad or some seasoned rice. This way, you get a balance of flavors and textures on your plate. To keep your leftover air fryer lemon pepper wings fresh, store them in an airtight container. Place the container in the fridge. They will last for 3 to 4 days. Make sure the wings cool down before sealing them. This step helps prevent sogginess. If you want to save your wings for later, freezing is a great option. First, let the wings cool completely. Then, place them in a freezer-safe bag or container. Remove as much air as possible from the bag. Label it with the date. They will stay good for up to 3 months in the freezer. To enjoy your wings again, reheat them in the air fryer. Set the air fryer to 350°F (175°C). Heat for about 8 to 10 minutes. This method keeps them crispy. You can also use a microwave, but it may make them less crispy. If you use a microwave, heat them in short bursts. This way, you avoid overcooking. Cook lemon pepper wings for 25 to 30 minutes in an air fryer. Set the temperature to 380°F (190°C). At the halfway point, shake the basket. This helps them cook evenly and get crispy. If you prefer extra crispiness, add a few minutes to the cook time. Yes, you can use frozen chicken wings. However, they will need more time to cook. Preheat your air fryer and cook them for about 30 to 35 minutes. Check for doneness with a meat thermometer. They should reach 165°F (74°C) to be safe to eat. Lemon pepper wings pair well with many sides. Here are some great options: - Celery sticks - Carrot sticks - Blue cheese dressing - Ranch dressing - French fries - Onion rings - A fresh garden salad These sides complement the zesty flavor of the wings and add crunch. Enjoy your meal! We explored how to make delicious lemon pepper wings in an air fryer. We covered each ingredient, their measurements, and the best substitutions. You learned the step-by-step process, from marinating to air frying. I shared tips for crispiness and seasoning, plus various flavor options. Finally, we discussed storage and reheating. Enjoy experimenting with these wings in your kitchen! They are sure to be a hit.

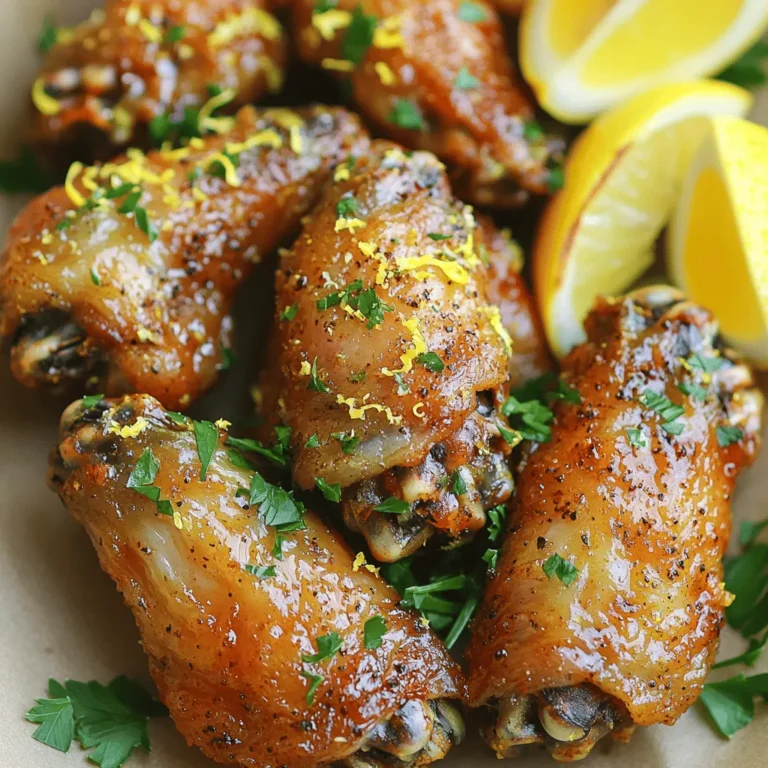
Air Fryer Lemon Pepper Wings Crispy and Flavorful Dish

- 1 cup rolled oats - 1/2 cup almond butter (or peanut butter) - 1/2 cup canned pumpkin puree - 1/4 cup honey or maple syrup - 1 teaspoon pumpkin pie spice - 1/2 teaspoon vanilla extract - 1/4 cup ground flaxseed - 1/4 cup chocolate chips or dried cranberries (optional) - A pinch of salt Pumpkin spice energy bites are both tasty and good for you. Here’s why: - Rolled oats: They give you fiber, which helps digestion and keeps you full. - Almond butter: This nut butter has healthy fats that can boost heart health. - Pumpkin puree: It’s packed with vitamins A and C, which support your immune system. - Honey or maple syrup: Both add natural sweetness and provide quick energy. - Pumpkin pie spice: This mix can help with digestion and adds a cozy flavor. - Ground flaxseed: Full of omega-3 fatty acids, flaxseed helps with heart health. You can easily swap out some ingredients to fit your taste or diet: - Nut butter: Use sunflower seed butter for a nut-free option. - Sweetener: Agave syrup works well if you want something different from honey or maple syrup. - Flaxseed: Chia seeds can replace ground flaxseed, giving a similar texture. - Mix-ins: Try dried fruit like raisins or nuts instead of chocolate chips for a twist. These changes keep the energy bites tasty while matching your needs. First, gather all your ingredients. You will need rolled oats, almond butter, pumpkin puree, and honey or maple syrup. You also need pumpkin pie spice, vanilla extract, ground flaxseed, chocolate chips or dried cranberries, and a pinch of salt. This snack is easy to make and requires just 15 minutes of prep time. In a large bowl, mix the rolled oats, almond butter, pumpkin puree, and honey. Stir well until it looks smooth. Next, add the pumpkin pie spice, vanilla extract, ground flaxseed, and salt. Mix until everything is combined. If you want extra flavor, gently fold in chocolate chips or dried cranberries. This step adds a nice touch to your energy bites. Now, chill the mixture in the fridge for about 30 minutes. This helps it firm up. After chilling, take small portions and shape them into balls that are about one inch wide. Place the bites on a parchment-lined baking sheet. You can also store them in an airtight container. For best taste, keep them in the fridge for one week, or freeze for three months. Enjoy your tasty and healthy snack! To get the right texture for your pumpkin spice energy bites, focus on balance. Use rolled oats for chewiness. Almond butter adds creaminess, while pumpkin puree gives moisture. If the mixture feels too wet, add a bit more oats or flaxseed. This will help bind the bites well. Keep your energy bites fresh by storing them in the fridge. Use an airtight container for best results. They last about a week. If you want to keep them longer, freeze them. Just make sure to divide them into portions. This way, you can grab a few whenever you need a snack. Make your energy bites look great! Roll them in shredded coconut or crushed nuts. This adds an extra layer of flavor and a nice touch. You can also arrange them on a pretty plate or in a jar. A fun touch is to place them in colorful cupcake liners. This makes them perfect for sharing! {{image_4}} You can play with flavors to make these energy bites your own. Try adding different spices, like cinnamon or nutmeg, for extra warmth. You could also use sunbutter instead of almond butter. If you like a bit of zest, mix in some orange zest. For a fun twist, swap the pumpkin puree for sweet potato or butternut squash puree. Each change gives a new taste to your energy bites. If you have dietary needs, you can still enjoy these bites. For a nut-free option, use sunflower seed butter. To make these bites vegan, replace honey with maple syrup. Use gluten-free oats to ensure they fit a gluten-free diet. These simple swaps keep the bites tasty and safe for everyone. Serve these bites as snacks at parties or gatherings. They are great for lunchboxes, too. You can roll them in shredded coconut or crushed nuts for a cool look. Pair them with fruit or yogurt for a wholesome meal. Store them in cute jars for a fun gift idea. Enjoy these bites anytime you need a quick pick-me-up! To keep your Pumpkin Spice Energy Bites fresh, store them in an airtight container. Place the container in the refrigerator. This will help them stay tasty for up to one week. If you want to keep them longer, freezing is a great option. If you need to save your energy bites for a long time, freezing works well. First, shape the bites and place them on a baking sheet. Make sure they do not touch. Freeze them for about an hour until firm. Then, transfer the bites to a freezer-safe bag or container. You can freeze them for up to three months. Just remember to label the bag with the date. Check your energy bites before eating them. If they smell off or look moldy, throw them away. If they feel sticky or have changed color, they may be bad. Always trust your senses. When in doubt, do not eat them. Pumpkin spice energy bites are small, no-bake snacks packed with flavor and nutrients. They combine oats, almond butter, and pumpkin puree. These bites are sweetened with honey or maple syrup. The mix also includes pumpkin pie spice, flaxseed, and optional chocolate chips or cranberries. They make a great snack for any time of day. Yes, you can easily make these energy bites vegan. Simply swap the honey for maple syrup. Use almond butter or any nut butter you like. This way, you keep the yummy taste without any animal products. You can find pre-made pumpkin spice energy bites at health food stores and some grocery stores. Look in the snack aisle or the section for health foods. Many brands offer these bites, but check the ingredient list to ensure they meet your needs. These energy bites last about one week in the fridge. For longer storage, you can freeze them for up to three months. Make sure to keep them in an airtight container. This helps to keep them fresh and tasty. This blog post explored how to make delicious pumpkin spice energy bites. We covered the essential ingredients, their health benefits, and even substitutions. I shared step-by-step instructions and tips to get the perfect texture. You can try different flavor combos and adapt for dietary needs. Storing and freezing methods ensure your bites last longer. Remember, these energy bites are not just tasty; they are good for you. With this guide, you can enjoy them anytime and impress your friends with your skills. Get ready to make these tasty treats!

Pumpkin Spice Energy Bites Tasty and Healthy Snack

To make Brown Butter Pecan Sea Salt Blondies, gather these ingredients: - 1 cup (2 sticks) unsalted butter - 1 cup packed light brown sugar - 1/2 cup granulated sugar - 2 large eggs - 2 teaspoons vanilla extract - 2 cups all-purpose flour - 1 teaspoon baking powder - 1/2 teaspoon baking soda - 1/2 teaspoon sea salt (plus extra for topping) - 1 cup pecans, roughly chopped - 1/2 cup white chocolate chips (optional, for extra sweetness) Each ingredient plays a key role in this sweet delight. Unsalted butter gives a rich base. The sugars create that perfect sweetness. Eggs and vanilla add moisture and flavor. All-purpose flour binds everything, while baking powder and baking soda help the blondies rise. Sea salt enhances the taste, and pecans bring crunch. If you like, add white chocolate for a sweeter touch. With this simple list, you can create a treat that is both rich and satisfying. These blondies are a perfect mix of flavors and textures, making them a crowd-pleaser. Enjoy gathering these ingredients as you prepare for a fun baking adventure! Browning the butter adds deep, nutty flavor to your blondies. Heat unsalted butter in a medium saucepan over medium heat. Stir it often for 5-7 minutes. Watch closely. The color should turn golden brown. If it gets too dark, it will burn. Once it smells nutty, take it off the heat and let it cool for a few minutes. In a mixing bowl, combine packed light brown sugar and granulated sugar. Pour the warm browned butter into the bowl. Whisk the mixture until it is smooth and combined well. This step helps create a rich and sweet base for the blondies. Add the eggs into the sugar mixture, one at a time. Whisk well after each addition. This ensures that the eggs blend evenly into the mix. Stir in the vanilla extract to add a warm flavor. It makes the blondies even better! In a separate bowl, sift together all-purpose flour, baking powder, baking soda, and sea salt. Sifting helps eliminate lumps and mixes the dry ingredients well. Gently fold this mix into the wet ingredients. Be careful not to overmix; this keeps the blondies soft and chewy. Now it’s time to add the pecans. Gently fold in the roughly chopped pecans. If you’re using white chocolate chips, add those too. Make sure they are evenly spread throughout the batter. This gives each bite a crunchy texture. Preheat your oven to 350°F (175°C). Line a 9x13 inch baking dish with parchment paper. Leave some parchment hanging over the edges. This makes it easy to lift the blondies out later. Spread the blondie batter evenly in the dish using a spatula. Before you bake, lightly sprinkle extra sea salt on top of the blondie batter. This small step enhances the flavor and adds a nice contrast to the sweetness. Place the baking dish in the oven and bake for 20-25 minutes. To check if the blondies are done, insert a toothpick into the center. If it comes out with a few moist crumbs, they are ready. Don’t let it bake too long, or they will dry out! Let the blondies cool in the pan for about 10 minutes. Use the parchment paper to lift them out and place them on a wire rack. Allow them to cool completely before cutting into squares. This helps you make clean cuts and keeps them looking nice. To make chewy blondies, start with browned butter. This adds a rich flavor and depth, which makes each bite special. When mixing the sugars, be sure to whisk until smooth. This helps the blondies rise nicely. After adding the flour, mix gently. Overmixing makes them tough. You want a soft dough for that perfect chewy finish. Serve your blondies warm for the best taste. A light dusting of powdered sugar adds a nice touch. You can also place a few extra pecans on top for color and texture. For a dessert that wows, add a scoop of vanilla ice cream. The warm blondies and cold ice cream create a delightful treat. Watch the butter while browning. It can go from perfect to burnt in seconds. When mixing, do not rush. Take your time to blend the sugars and eggs well. Also, avoid overbaking. Check for moist crumbs with a toothpick. If it comes out clean, your blondies might be dry. Keep an eye on the timer and enjoy the process! {{image_4}} If you want a nut-free version of these blondies, it’s easy! You can use a few different ingredients to replace the pecans. Try using sunflower seeds or pumpkin seeds for a delightful crunch. You could also use chocolate chips for a sweet twist. Both options keep the texture nice while avoiding nuts. Adding new flavors can make your blondies even more exciting. You can mix in different extracts like almond or hazelnut. Try a pinch of cinnamon or nutmeg for warmth. For a tropical flair, add shredded coconut. Each option brings a unique taste to your blondies. If you need gluten-free or vegan blondies, there are simple swaps. For gluten-free, replace all-purpose flour with a 1:1 gluten-free flour blend. For a vegan option, use flax eggs instead of regular eggs. To make this swap, mix one tablespoon of ground flaxseed with three tablespoons of water. Let it sit for a few minutes until it thickens. These adjustments keep your blondies tasty while fitting your diet. To keep your blondies fresh for a few days, store them in an airtight container. Place a piece of parchment paper between layers to prevent sticking. Keep them at room temperature for up to four days. You will enjoy them best when they are soft and chewy. For long-term storage, freezing is a great option. First, let the blondies cool completely. Then, cut them into squares. Wrap each piece tightly in plastic wrap. Place them in a freezer-safe bag or container. They can last up to three months in the freezer. When ready to eat, thaw them in the fridge overnight. Choose containers that seal well to control moisture. Glass containers work well for this. You can also use plastic containers with a tight lid. Avoid metal containers, as they can affect the taste over time. If you want to keep them extra fresh, add a piece of bread to the container. This helps absorb moisture and keeps the blondies soft. You can tell when blondies are done by looking for a few signs. The top should look set, and the edges will be slightly golden. When you insert a toothpick into the center, it should come out with a few moist crumbs, not wet batter. If the toothpick is clean, the blondies may be overcooked. Yes, you can use salted butter. This will change the flavor slightly. The blondies will taste a bit saltier, which can be nice. Just keep in mind to reduce the sea salt added in the recipe so it doesn’t become too salty. You can use several nuts as substitutes for pecans. Walnuts or almonds work well. If you want a nut-free option, you can use chocolate chips or dried fruit like cranberries or raisins. Each choice brings its own flavor and texture. Yes, blondies can be made ahead of time. You can prepare the batter and store it in the fridge for a day. Then, bake them when you're ready. This makes it easy to serve fresh blondies for a gathering or event. To reheat blondies, you can use the microwave. Heat them for about 10-15 seconds to warm them up. If you want to keep them from getting soggy, avoid heating too long. You can also warm them in the oven at a low temperature for about 5 minutes. This blog post covered how to make delicious blondies with ease. We discussed key ingredients, from browning butter to folding in pecans. Each step matters for great flavor and texture. By avoiding common mistakes and following helpful tips, you can achieve the perfect blondie. Remember, variations and storage methods can enhance your baking. Enjoy creating and sharing your tasty treats!

Brown Butter Pecan Sea Salt Blondies Sweet Delight

- 1 cup canned pumpkin puree - 1 cup plain Greek yogurt (low-fat) - 1/2 cup honey or maple syrup (your choice) - 2 large eggs - 1 teaspoon vanilla extract - 1 1/2 cups whole wheat flour - 1/2 cup protein powder (vanilla or unflavored) - 1 teaspoon baking soda - 1 teaspoon baking powder - 1 teaspoon ground cinnamon - 1/2 teaspoon ground nutmeg - 1/4 teaspoon salt These ingredients form the base of our tasty bread. The pumpkin puree adds moisture and flavor. The Greek yogurt boosts protein and makes the bread soft. Honey or maple syrup gives it natural sweetness. - 1/2 cup chopped walnuts or pecans - 1/4 cup chocolate chips These add-ins can enhance the taste and texture. Nuts give a nice crunch. Chocolate chips add a sweet touch. You can mix and match these to suit your taste. - Use almond flour instead of whole wheat flour for a gluten-free choice. - Replace honey with mashed bananas or applesauce for lower sugar. These swaps can make your bread fit different diets. They also keep the bread delicious while being healthier. Experimenting can lead to your perfect recipe! Start by preheating your oven to 350°F (175°C). This step is key for even baking. Next, grab a 9x5 inch loaf pan. You can grease it with butter or spray. If you want easier cleanup, line it with parchment paper. This helps when you take the bread out later. In a large mixing bowl, add 1 cup of canned pumpkin puree. Next, add 1 cup of plain Greek yogurt. You can use low-fat yogurt for a lighter option. Then, pour in 1/2 cup of honey or maple syrup, depending on your taste. Crack in 2 large eggs and add 1 teaspoon of vanilla extract. Whisk these ingredients together until you get a smooth mix. This will be your base for the bread. In another bowl, whisk together the dry stuff. Start with 1 1/2 cups of whole wheat flour. Add 1/2 cup of protein powder, baking soda, and baking powder. Use 1 teaspoon of ground cinnamon and 1/2 teaspoon of ground nutmeg. Don’t forget to add 1/4 teaspoon of salt. Mixing these dry ingredients well helps them work together in the bread. If you want to add some crunch, fold in 1/2 cup of chopped walnuts or pecans. For a sweet touch, you can also add 1/4 cup of chocolate chips. Gently mix these extras into your batter. This step is all about flavor and texture, making your bread even more delicious. Now, take the thick batter and pour it into your prepared loaf pan. Use a spatula to spread it evenly. Place the pan in the preheated oven and bake for 50 to 60 minutes. The bread is done when a toothpick inserted in the center comes out clean. This shows that the inside is fully cooked. After baking, take the loaf out of the oven. Let it cool in the pan for about 10 minutes. Then, transfer it to a wire rack. This helps the bread cool completely. Cooling is important because it allows the flavors to settle. Enjoy the delightful smells as your kitchen fills with the aroma of pumpkin and spices! To get the best texture for your Greek yogurt pumpkin protein bread, follow these tips: - Use Room Temperature Ingredients: Make sure your eggs and yogurt are at room temp. This helps them mix better. - Don’t Overmix: When you combine wet and dry ingredients, mix just until blended. Overmixing can make the bread tough. - Check Oven Temperature: Use an oven thermometer. An accurate temperature helps the bread rise properly. Store any leftover bread in an airtight container. Keep it at room temperature for up to three days. For longer storage, wrap it tightly and freeze it. It can last for about three months in the freezer. When ready to eat, thaw it overnight in the fridge. To enjoy your bread fully, try these serving ideas: - Spread Greek Yogurt: Top a slice with Greek yogurt for extra creaminess. - Add a Drizzle of Honey: A bit of honey can enhance the sweetness. - Pair with Nuts: Serve alongside chopped nuts for added crunch. - Enjoy with Cream Cheese: A smear of cream cheese adds a rich flavor. Arrange your slices on a wooden board for a lovely presentation. Enjoy your nutritious delight! {{image_4}} To make this bread gluten-free, swap whole wheat flour with a gluten-free blend. Look for a mix that has xanthan gum, as it helps mimic the texture of wheat flour. Use 1 ½ cups of the gluten-free blend. This ensures your bread remains soft and delicious without gluten. For a vegan option, replace the eggs with flax eggs. To make one flax egg, mix 1 tablespoon of ground flaxseed with 2.5 tablespoons of water. Let it sit for 5 minutes to thicken. Use maple syrup in place of honey. Also, choose a dairy-free yogurt to keep it completely vegan. You can add more flavor to your bread by trying different spices. Consider adding a teaspoon of ginger or a pinch of cloves. These spices add warmth and depth. You might also try a splash of almond or coconut extract for a unique twist. If you enjoy chocolate, mix in a little cocoa powder or extra chocolate chips for a richer flavor. One slice of Greek yogurt pumpkin protein bread has about 150 calories. Each slice contains around 6 grams of protein, thanks to the Greek yogurt and protein powder. You also get about 4 grams of fat and 25 grams of carbs per slice. The whole wheat flour adds fiber, making this bread filling and nutritious. - Canned pumpkin puree: Rich in vitamins A and C, it supports eye health and boosts immunity. - Greek yogurt: Packed with protein and probiotics, it aids digestion and strengthens bones. - Honey or maple syrup: Natural sweeteners that provide antioxidants and energy. - Whole wheat flour: Offers more nutrients and fiber than white flour, promoting heart health. - Nuts: Walnuts or pecans add healthy fats, protein, and crunch, plus they are heart-friendly. Traditional bread often uses refined flour and sugar. This pumpkin bread swaps those for whole wheat flour and natural sweeteners. As a result, it offers more nutrients and fewer empty calories. Each slice brings you wholesome flavors and a good dose of protein, making it a better choice for your health. Yes, you can use plain yogurt. However, Greek yogurt is thicker and creamier. This gives the bread a better texture. If you use plain yogurt, the bread may be less moist. Adjust the baking time if needed, as the texture may change. This bread stays fresh for about five days at room temperature. Keep it in an airtight container to avoid drying out. You can also refrigerate it to extend freshness up to a week. If you want to enjoy it later, freezing is a great option. To freeze this bread, first cool it completely. Wrap it tightly in plastic wrap, then place it in a freezer bag. Make sure to squeeze out excess air before sealing. This helps prevent freezer burn. You can store it in the freezer for up to three months. Absolutely! You can add any nuts or seeds you like. Almonds, pumpkin seeds, or sunflower seeds work well. They add great texture and flavor. Just be sure to chop larger nuts to keep the bread even and easy to slice. You can substitute protein powder with ground oats or almond flour. If you want a lower-protein option, try adding extra whole wheat flour. Just remember that this may change the bread's texture slightly. Always start with less and adjust the dry ingredients as needed. This blog post shows you how to make Greek Yogurt Pumpkin Protein Bread. We covered key ingredients, mixing instructions, and helpful tips. You can customize this bread with various mix-ins and substitutions. Remember to try variations for gluten-free or vegan options. This bread not only tastes great but also offers healthy benefits. Enjoy baking and indulge in a nutritious treat that satisfies your cravings. Dive in and make this easy recipe your own!

Greek Yogurt Pumpkin Protein Bread Nutritious Delight

- 2 cups all-purpose flour - 1 teaspoon baking powder - 1/2 teaspoon baking soda - 1 teaspoon ground cinnamon - 1/4 teaspoon salt - 1/2 cup unsalted butter, softened - 1 cup granulated sugar - 2 large eggs - 1 teaspoon pure vanilla extract - 1/2 cup buttermilk (or milk mixed with 1/2 tablespoon vinegar) - 2 medium apples, peeled, cored, and diced - 1 tablespoon fresh lemon juice - 1/4 cup packed brown sugar - 2 teaspoons ground cinnamon (for swirling) Using Granny Smith or Honeycrisp apples is best. Their tartness balances the sweetness. Unsalted butter gives you control over salt. If you want, you can swap buttermilk for regular milk with vinegar. This keeps the bread moist and tasty. You can use whole wheat flour for a healthier option. For a dairy-free version, coconut oil works well in place of butter. If you have a nut allergy, leave out any nuts from the recipe. Adjusting sugar can also help for those watching their intake. First, set your oven to 350°F (175°C). This will get it ready for baking. Next, take a 9x5 inch loaf pan and grease it well. You can use butter or non-stick spray. This step helps the bread come out easily after baking. Now, let’s mix the dry ingredients. In a medium bowl, whisk together 2 cups of flour, 1 teaspoon of baking powder, 1/2 teaspoon of baking soda, 1 teaspoon of ground cinnamon, and 1/4 teaspoon of salt. Mix it well and set it aside. In a large bowl, cream together 1/2 cup of softened butter and 1 cup of granulated sugar. Use an electric mixer on medium speed. Mix until it looks light and fluffy, about 3 to 4 minutes. Add 2 large eggs, one at a time. Make sure each egg is mixed in well before adding the next. After the eggs, pour in 1 teaspoon of pure vanilla extract and mix briefly. Now, it’s time to combine the mixtures. Slowly add the dry mixture to the butter mixture. Alternate this with 1/2 cup of buttermilk. Start and end with the dry mix. Be careful not to overmix; aim for just combined. Finally, gently fold in the diced apples. In a small bowl, mix 1/4 cup of packed brown sugar with 2 teaspoons of ground cinnamon. This will be your cinnamon swirl. Now, pour half of the batter into the greased loaf pan. Smooth it out evenly. Then, sprinkle half of the cinnamon sugar mixture on top. Next, pour the rest of the batter into the pan and sprinkle the remaining cinnamon sugar on top. Use a knife to create a gentle swirl through the batter. Do not mix it in completely; you want a pretty marbled look. Now, it’s ready to bake! To bake the best cinnamon swirl apple bread, follow these tips: - Preheat your oven fully to 350°F (175°C) before baking. - Use room temperature butter for easy mixing. - Mix the batter gently; overmixing can make the bread tough. - Use a toothpick to check for doneness. It should come out clean. - Let the bread cool in the pan for ten minutes before moving it to a wire rack. To keep your bread fresh: - Store it at room temperature in an airtight container for up to three days. - For longer storage, wrap it tightly in plastic wrap and freeze it. - To reheat, simply slice a piece and warm it in the microwave for 15-20 seconds. - You can also toast each slice for a crispy edge and warm center. For a delightful treat, try serving your bread in different ways: - Slice the bread warm and add a pat of butter on top. - Dust with powdered sugar for a sweet touch. - Serve with a scoop of vanilla ice cream for dessert. - Pair with a cup of coffee or tea for a cozy snack. {{image_4}} You can easily make this bread gluten-free. Use a blend of gluten-free all-purpose flour. Ensure it has xanthan gum for proper texture. The bread will still be soft and tasty. Adding nuts or dried fruits can boost flavor and texture. Try walnuts or pecans for crunch. You can also add raisins or dried cranberries for sweetness. Mix in about 1/2 cup into the batter. Want to spice it up? You can add different spices. Try nutmeg or cardamom for a warm twist. Just add 1/2 teaspoon to the dry mixture. This gives your bread a unique taste that everyone will love. After baking, let the bread cool completely. Wrap it tightly in plastic wrap or foil. This keeps it moist and fresh. You can also store it in an airtight container. Keep it at room temperature for up to three days. For longer storage, consider freezing. To freeze, slice the bread first. Wrap each slice in plastic wrap, then place them in a freezer bag. Remove as much air as you can from the bag. This helps prevent freezer burn. The bread can stay frozen for up to three months. When you’re ready to enjoy it, just thaw it at room temperature. Cinnamon swirl apple bread lasts for about three days at room temperature. If you refrigerate it, it may last up to a week. But, refrigerating can make the bread dry. Always check for any signs of spoilage before eating. If the bread smells off or has mold, toss it out. Yes, you can use other apples. I like Granny Smith for their tartness. Honeycrisp also works well as they are sweet and crisp. Fuji or Braeburn apples can add a nice flavor too. Each type will change the taste a bit. Choose what you like best! To make this bread dairy-free, replace the butter with a dairy-free margarine. For the buttermilk, use almond milk or soy milk mixed with lemon juice or vinegar. This swap will keep the bread moist and tasty. This bread is great on its own, but you can serve it with more fun! Try it with a pat of butter for richness. A light dusting of powdered sugar adds sweetness. Fresh fruit or a dollop of whipped cream can make it special too. Enjoy it with your favorite hot drink! In this post, we covered key ingredients, simple steps, and helpful tips for making Cinnamon Swirl Apple Bread. You learned about ingredient choices, substitutions, and how to mix and swirl the dough. We shared storage tips and clever variations to keep things fresh. Remember, this bread can fit many tastes. I hope you enjoy baking and sharing this warm treat with others. Dive in and have fun creating something delicious!

Cinnamon Swirl Apple Bread Simple and Tasty Recipe

- 1 lb boneless, skinless chicken breasts - 1 can (15 oz) great northern beans, rinsed and drained - 1 can (4 oz) diced green chilies - 1 medium onion, diced - 3 cloves garlic, minced - 1 cup corn (frozen or canned) - 2 cups chicken broth - 1 teaspoon cumin - 1 teaspoon chili powder - ½ teaspoon cayenne pepper (adjust to taste) - 1 cup cream cheese, cubed - 1 cup shredded Monterey Jack cheese - Fresh cilantro, for garnish (optional) - Salt and pepper, to taste To make this creamy white chicken chili, gather all your ingredients first. You will start with chicken breasts as the base. Add the great northern beans for protein and texture. The diced green chilies give it a nice kick. Next, the onion and garlic add depth and flavor. Don't forget the corn; it adds sweetness and color. Chicken broth is key for a rich base. For spices, use cumin and chili powder to enhance the flavor. Adjust the cayenne pepper for your preferred heat level. The cream cheese and Monterey Jack cheese make this dish creamy and cheesy. Finally, fresh cilantro can brighten up each bowl, and salt and pepper will balance the flavors. With all these ingredients, you’re set for a delightful meal! - Start with 1 pound of boneless, skinless chicken breasts. Place them at the bottom of your slow cooker. This helps the chicken cook well. - Next, add 1 can of great northern beans, rinsed and drained. Layer them over the chicken. - Then, add 1 can of diced green chilies for some heat. Add 1 diced medium onion for flavor, and 3 minced garlic cloves for a nice aroma. - Finally, toss in 1 cup of corn, either frozen or canned. This adds sweetness and color. - Pour 2 cups of chicken broth over everything. This keeps the chicken juicy. - Sprinkle in 1 teaspoon of cumin, 1 teaspoon of chili powder, and ½ teaspoon of cayenne pepper. Adjust the cayenne to your spice level. Add salt and pepper to taste. - Gently mix the ingredients, but keep the chicken at the bottom. - Secure the lid and set your slow cooker. Cook on low for 6-7 hours or on high for 3-4 hours. Make sure the chicken is fully cooked. - After cooking, take out the chicken breasts. Use two forks to shred the chicken into bite-sized pieces. - Return the shredded chicken to the slow cooker to soak up the juices. - Now, add 1 cup of cubed cream cheese and 1 cup of shredded Monterey Jack cheese. Stir well until the cheeses melt into the chili. - Taste it and adjust the seasoning with salt and pepper if needed. Let it cook for another 15-20 minutes on low. - Serve the chili hot. You can garnish with fresh cilantro for a pop of color and flavor. To make your chicken tender, always use boneless, skinless chicken breasts. This cut cooks evenly and absorbs flavors well. Layer the chicken at the bottom of your slow cooker. This helps it cook fully. Make sure the chicken is submerged in the broth. This keeps it moist and flavorful. Even cooking is key for a great chili. When adding ingredients, layer them starting with the chicken. Then, add beans, veggies, and spices on top. This arrangement helps all flavors blend as they cook. Stir gently to mix, but keep the chicken at the bottom. Presentation matters, especially with creamy chili. Serve it in bowls and top each with shredded cheese. A dollop of sour cream adds creaminess too. For a pop of color, sprinkle fresh cilantro on top. This makes your dish look inviting and appetizing. Pair your chili with crusty bread or tortilla chips. These sides add crunch and balance the creamy texture. You can also serve it with a simple salad for a fresh touch. Cayenne pepper can be adjusted to fit your taste. If you like it mild, use less cayenne. Start with a pinch and taste before adding more. You can always add heat, but it’s hard to take it away! For a non-spicy version, leave out the cayenne pepper. You can also swap it with sweet paprika. This keeps the flavor without the heat. Enjoy your chili just the way you like it! {{image_4}} You can switch beans in this chili. Great northern beans work well, but you can try black beans or pinto beans, too. Each bean brings its own taste and texture. If you want a meatless dish, use lentils or chickpeas instead of chicken. These options still add protein and flavor. Spices can change the taste of your chili. Add smoked paprika for a deeper flavor or oregano for a fresh touch. You might try fresh herbs like cilantro or parsley, adding them at the end for a vibrant kick. You can also sneak in veggies like bell peppers, zucchini, or carrots. These add color and nutrition, making the dish even better. You can serve this chili over rice for a hearty meal. The rice soaks up the creamy sauce. Tortilla chips are great too; they add crunch and fun. Consider filling quesadillas with the chili. Just add cheese, grill them, and enjoy a tasty twist on classic flavors. You can store your chili in the fridge for about three to four days. Use airtight containers to keep it fresh. Glass or plastic containers with tight lids work best. This helps keep out air and moisture. To freeze your chili, let it cool completely first. Then, scoop it into freezer-safe bags or containers. Leave some space for expansion. You can store it in the freezer for up to three months. When you're ready to eat, thaw it overnight in the fridge. You can also use the microwave for quicker thawing. When reheating, the best method is low and slow on the stove. Stir it gently as it heats to keep the creaminess. If using a microwave, heat in short bursts, stirring in between. This will help avoid separation of the cream and cheese. Always check the temperature to ensure it's hot throughout before serving. This chili can last about 3 to 4 days in the fridge. Store it in an airtight container to keep it fresh. Make sure it cools down before you seal it. If you want to keep it longer, you can freeze it. It stays good for about 3 months in the freezer. Just remember to label it with the date. Yes, you can! To make this chili on the stovetop, start by boiling the chicken in a pot with the chicken broth. Once the chicken is cooked, shred it and return it to the pot. Next, add the beans, chilies, corn, spices, and cream cheese. Cook on low for about 30 minutes. Stir often until the chili is creamy and hot. This method is faster and still gives great flavor. You can serve this chili with many sides. Here are some tasty options: - Tortilla chips for crunch - Cornbread for a sweet touch - Rice for a filling base - Fresh avocado slices for creaminess - Sour cream for added richness These sides will make your meal even better! Enjoy mixing and matching. This blog post shared a complete guide for making Slow Cooker Creamy White Chicken Chili. You learned about key ingredients, easy steps, and tips to make it great. Remember to adjust the spice levels to your liking for the best taste. You can also try different toppings and side dishes for variety. With its comforting flavors, this chili will warm your heart. Enjoy your cooking and make it your own!

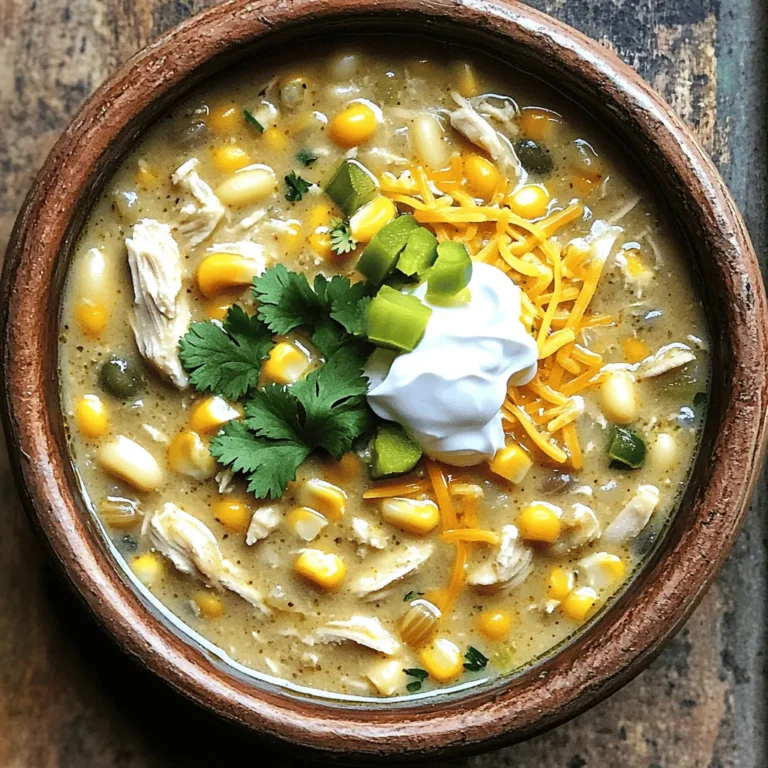
Slow Cooker Creamy White Chicken Chili Delight

- 450 g diced chicken breast - 225 g penne pasta - 950 ml chicken broth - 240 ml heavy cream - 100 g grated Parmesan cheese - 2 tablespoons olive oil - 1 teaspoon Cajun seasoning - 1 bell pepper (red or yellow), diced - 1 small onion, finely chopped - 3 garlic cloves, minced - Salt and pepper to taste - Fresh parsley for garnish To create a One Pot Creamy Cajun Chicken Pasta, you need some key ingredients. First, the chicken. I use 450 g of diced chicken breast. This tender meat cooks well and absorbs the Cajun flavors. Next, we need 225 g of penne pasta. Penne holds the sauce well, making every bite tasty. For the base, I rely on 950 ml of chicken broth. It adds rich flavor and moisture to our dish. For creaminess, I use 240 ml of heavy cream. This gives the pasta a rich texture and a smooth finish. Don't forget the 100 g of grated Parmesan cheese. It melts beautifully, adding depth to the flavors. Now, let’s talk about seasonings and veggies. I start with 2 tablespoons of olive oil for sautéing. Then, I add 1 teaspoon of Cajun seasoning for that kick. A diced bell pepper, either red or yellow, adds color and sweetness. I also include 1 small onion, finely chopped, for a savory base. Three minced garlic cloves will give us that aromatic boost. Finally, I season with salt and pepper to taste. Fresh parsley serves as a lovely garnish, bringing brightness to the dish. Each ingredient plays a role in crafting this flavorful delight. - Heat 2 tablespoons of olive oil in a large pot over medium-high heat. - Season 450 g of diced chicken breast with 1 teaspoon of Cajun seasoning, salt, and pepper. - Add the chicken to the pot and sauté for 5-7 minutes. - Cook until the chicken turns golden brown. - Once the chicken is done, remove it and set it aside. - In the same pot, add 1 diced bell pepper, 1 small finely chopped onion, and 3 minced garlic cloves. - Sauté the vegetables for about 3-4 minutes until they soften. - Add 225 g of penne pasta and 950 ml of chicken broth to the pot. - Stir well and bring the mixture to a boil. - Once boiling, cover the pot and reduce the heat. Let it simmer for 10 minutes, stirring occasionally. - When the pasta is al dente, stir in 240 ml of heavy cream. - Return the cooked chicken to the pot. - Gradually mix in 100 g of grated Parmesan cheese until the dish is creamy and well blended. - Taste and adjust seasoning if needed. This dish combines bold flavors with simple steps, making it fun to prepare. Enjoy each bite of this creamy delight! To make your One Pot Creamy Cajun Chicken Pasta even better, consider these tips: - Add a pinch of cayenne pepper for extra heat. - Try adding smoked paprika for a deep flavor. - A dash of hot sauce can give it a kick. You can adjust the seasoning to your taste. If you want more spice, add more Cajun seasoning. Taste it as you go. This way, you get the perfect flavor. For garnishes, fresh parsley adds a great touch. You can also sprinkle more Parmesan cheese on top. This makes your dish look nice and taste better. Pair this pasta with a simple green salad. A side of garlic bread also complements the meal well. If you like, serve it with some roasted vegetables for added nutrition. You can use any pasta you like for this dish. Penne works well, but farfalle or fusilli are great too. Just adjust the cooking time based on the pasta type. To make this in a slow cooker, cook the chicken first. Then add the other ingredients. Let it cook on low for about 4 hours. If you use an Instant Pot, cook for 5 minutes on high pressure. Quick-release the steam, then stir in the cream and cheese. This gives you a creamy and delicious meal in no time. {{image_4}} You can switch the chicken for shrimp or sausage. Shrimp cooks fast, so add it near the end. Sausage needs more time, so cook it first. If you prefer a vegetarian meal, use chickpeas or tofu. Trim cooking time for these proteins as they need less time to cook. Try adding seasonal veggies like zucchini or spinach. These add color and nutrition. Chop them and toss them in with the chicken. You can also stir them in during the last few minutes of cooking. This way, they stay bright and fresh. You can use different cheeses, like mozzarella or feta. This changes the flavor and texture. If you want a lighter dish, swap heavy cream for almond or coconut milk. These dairy-free options work well and keep the dish creamy. To keep your One Pot Creamy Cajun Chicken Pasta fresh, store it in the fridge. Use airtight containers for best results. This dish lasts about 3 to 4 days in the fridge. If you need to keep it longer, freezing is a great option. Place the pasta in freezer-safe bags and remove as much air as possible. It can last up to 3 months in the freezer. When it's time to enjoy leftovers, reheating is easy. You can use the stove or microwave. If using the stove, place the pasta in a pan with a splash of chicken broth. Heat over low heat, stirring gently. If using the microwave, cover the dish with a damp paper towel. Heat it in short bursts, stirring in between. To keep the creaminess intact, add a little extra cream or broth while reheating. This helps restore the dish's smooth texture. Avoid high heat; it can make the sauce separate. Enjoy every bite, just like the first time! To make this dish gluten-free, use gluten-free penne pasta. Many brands offer great options. Check the cooking time, as it may differ from regular pasta. You can also check labels on chicken broth to ensure it's gluten-free. Yes, you can add more heat! Use extra Cajun seasoning for a bolder taste. You can also add red pepper flakes or diced jalapeños while cooking. If you want it really hot, try using a spicy sausage instead of chicken. If you need a substitute for heavy cream, use half-and-half or whole milk mixed with a bit of cornstarch. Coconut milk is a good option too. Each choice will slightly change the flavor but will still give a creamy texture. This recipe makes about four servings. Each serving is filling and perfect for a family meal. You can easily adjust the recipe for more people by doubling the ingredients. This article guides you through making a delicious One Pot Creamy Cajun Chicken Pasta. You learned about key ingredients, cooking steps, and tips for flavor and storage. I encourage you to try different proteins and veggies for your personal touch. Remember, every meal can be an adventure in flavor. Enjoy your cooking journey!

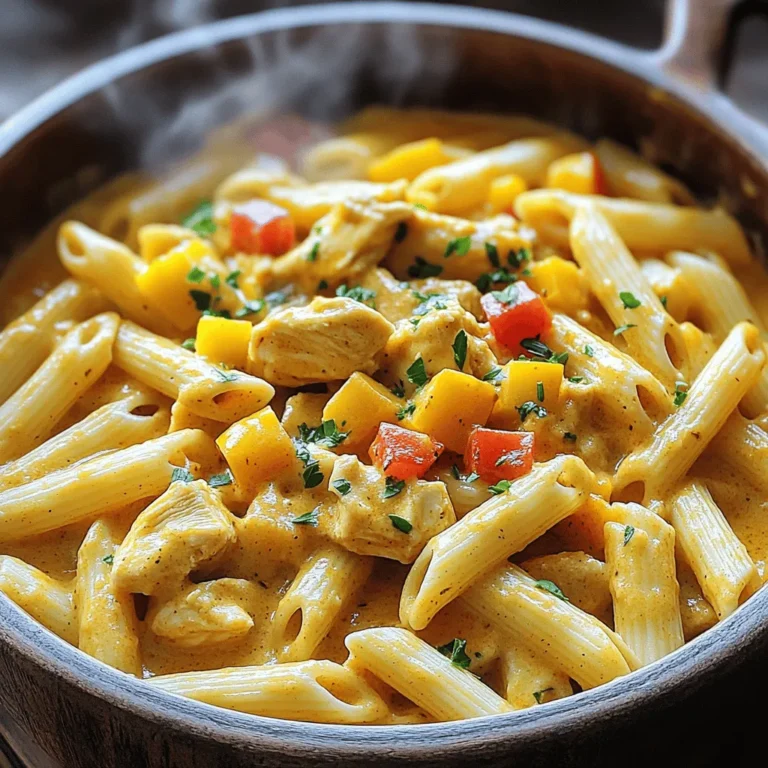
One Pot Creamy Cajun Chicken Pasta Flavorful Delight

- 1 medium head of cauliflower, cut into bite-sized florets - 1 cup all-purpose flour - 1 cup cornstarch - 1 teaspoon garlic powder - 1 teaspoon ground ginger - 1 teaspoon salt - 1/2 teaspoon freshly ground black pepper - 1 cup cold water - Oil for frying (vegetable or peanut oil works best) To make great General Tso’s Cauliflower Bites, start with fresh cauliflower. Cut the cauliflower into small florets. This helps them cook evenly and get crispy. The batter is important, too. Combine flour, cornstarch, and seasonings for a crunchy coating. You can use any oil that can handle high heat for frying. Vegetable oil is common, but peanut oil adds flavor. - 3 tablespoons soy sauce (or tamari for a gluten-free option) - 2 tablespoons rice vinegar - 2 tablespoons honey or maple syrup for a vegan alternative - 2 cloves garlic, finely minced - 1 tablespoon freshly grated ginger - 1 teaspoon sesame oil - 1/2 teaspoon red pepper flakes (adjust for spice preference) - Chopped green onions and sesame seeds for garnish For the sauce, choose soy sauce or tamari based on your diet. The sweetness comes from honey or maple syrup, making it tasty. Aromatics like garlic and ginger add depth and flavor. Use sesame oil for a rich finish. Red pepper flakes give the sauce a nice kick. Finally, garnish with green onions and sesame seeds for a pop of color and taste. First, rinse the cauliflower under cold water. This helps remove dirt. Next, cut the cauliflower into bite-sized florets. Try to keep them even for uniform cooking. After cutting, pat the florets dry with a paper towel. This step is key for getting crispy bites when frying. In a large bowl, mix the dry ingredients. Combine one cup of all-purpose flour, one cup of cornstarch, one teaspoon of garlic powder, one teaspoon of ground ginger, one teaspoon of salt, and half a teaspoon of black pepper. Next, slowly add one cup of cold water. Whisk until the batter is smooth. It should be thick enough to coat but not too thick to clump. Choose a frying oil, like vegetable or peanut oil. Pour enough oil into a deep pan to reach about two inches deep. Heat the oil over medium-high heat until it reaches 350°F (175°C). To check if the oil is ready, drop in a small spoonful of batter. If it sizzles and rises, the oil is hot enough. Dip each cauliflower floret into the batter. Make sure it is fully coated. Carefully place the battered florets into the hot oil in small batches. Avoid overcrowding the pan. Fry them for about 5-7 minutes, turning them occasionally. They should turn golden brown and crispy. Once done, use a slotted spoon to remove them and place them on a paper towel-lined plate. In a medium saucepan, combine three tablespoons of soy sauce, two tablespoons of rice vinegar, and two tablespoons of honey or maple syrup. Add two minced garlic cloves, one tablespoon of freshly grated ginger, one teaspoon of sesame oil, and half a teaspoon of red pepper flakes. Stir well and bring the sauce to a gentle simmer. Cook for 3-5 minutes, stirring occasionally, until it thickens slightly. In a large mixing bowl, add the crispy cauliflower. Pour the hot sauce over the bites. Gently toss to coat the cauliflower evenly. Be careful not to break the florets. Transfer the coated cauliflower to a serving dish. For garnish, sprinkle chopped green onions and sesame seeds on top. This adds a nice touch to your dish. To get crispy cauliflower bites, start with proper drying. After rinsing, use a paper towel to pat each floret dry. This step is key. Moisture makes them soggy. Next, manage the oil temperature. Heat your oil to about 350°F (175°C). You can test it by dropping in a bit of batter. If it bubbles and rises, you're ready to go. Keeping the oil hot helps the batter crisp up quickly. For extra flavor, consider adding spices. A pinch of smoked paprika or cayenne can boost taste. Adjust spice based on your heat preference. You can also customize the sweetness level. If you like it sweeter, add more honey or maple syrup. Just remember, balance is essential. Baking or air frying can be healthier options. To bake, preheat your oven to 425°F (220°C). Spread the battered florets on a baking sheet and spray with oil. Bake for about 20-25 minutes, flipping halfway through. For air frying, set your air fryer to 375°F (190°C). Place the florets in the basket and cook for 15-20 minutes. Check for crispiness and adjust time as needed. Both methods can yield tasty results without deep frying. {{image_4}} You can make General Tso’s Cauliflower Bites vegan. Instead of honey, use maple syrup. It adds sweetness without animal products. For a gluten-free option, switch to tamari instead of soy sauce. This keeps the flavor rich while catering to dietary needs. You might want to add protein to your dish. Chicken works well and adds heartiness. Simply cut it into bite-sized pieces and coat it like the cauliflower. Tofu is another great choice. Use firm tofu, press it to remove water, and cut it into cubes. Coat and fry it just like the cauliflower for a tasty twist. You can adjust the sauce to match your taste. If you love heat, add more red pepper flakes for a spicy kick. To balance heat, increase the honey or maple syrup for sweetness. You can also try different ingredients like hoisin sauce or chili paste for unique flavors. Each change gives your dish a new life! To store leftover cauliflower bites, let them cool down first. Place them in an airtight container. Keep the container in the fridge. These bites stay fresh for up to three days. Reheating them in an oven helps keep them crispy. If you want to freeze your cauliflower bites, first let them cool completely. Arrange them in a single layer on a baking sheet. Freeze them for about an hour. Once frozen, transfer the bites to a freezer bag. They will keep well for up to three months. When you're ready to eat, reheat them in the oven for the best texture. General Tso’s cauliflower bites last about three days in the fridge. If you freeze them, they stay fresh for about three months. Always check for any signs of spoilage before eating. Enjoy your delicious bites while they are at their best! General Tso’s Cauliflower Bites is a tasty dish made with cauliflower florets. It has roots in Chinese-American cuisine. This dish gives a fun twist to the classic General Tso’s chicken, using crispy cauliflower instead. The bites are coated in a sweet and spicy sauce, making them a perfect snack or appetizer. Yes, you can bake General Tso’s Cauliflower. To do this, preheat your oven to 425°F (220°C). After coating the cauliflower in batter, place the florets on a lined baking sheet. Spray them lightly with cooking oil. Bake for about 20-25 minutes, turning halfway through, until they are golden brown and crispy. The result will be less oily, but still delicious. To keep your cauliflower crispy, follow these tips: - Pat Dry: Make sure to dry the cauliflower well before battering. - Right Oil Temperature: Keep the oil hot while frying. This helps the batter to crisp up. - Avoid Overcrowding: Fry in small batches. Crowding lowers the oil temperature. - Rest on Paper Towels: Place fried bites on paper towels to absorb excess oil. You can enjoy General Tso’s Cauliflower Bites with several side dishes: - Steamed Rice: White or brown rice pairs nicely. - Noodles: Lo mein or fried rice adds more flavor. - Vegetable Stir-Fry: A mix of colorful veggies complements the bites. - Dipping Sauce: Serve with extra sauce for dipping. These options make your meal fun and filling! You’ve learned how to make General Tso’s Cauliflower Bites, from ingredients to cooking. We covered key tips for crispy bites and flavor boosts. Whether you bake, fry, or try unique variations, there's an option for everyone. Storing leftovers or freezing them keeps your bites fresh longer. With this easy guide, you can create a tasty dish to share. Get ready to impress friends and family with your cooking skills!

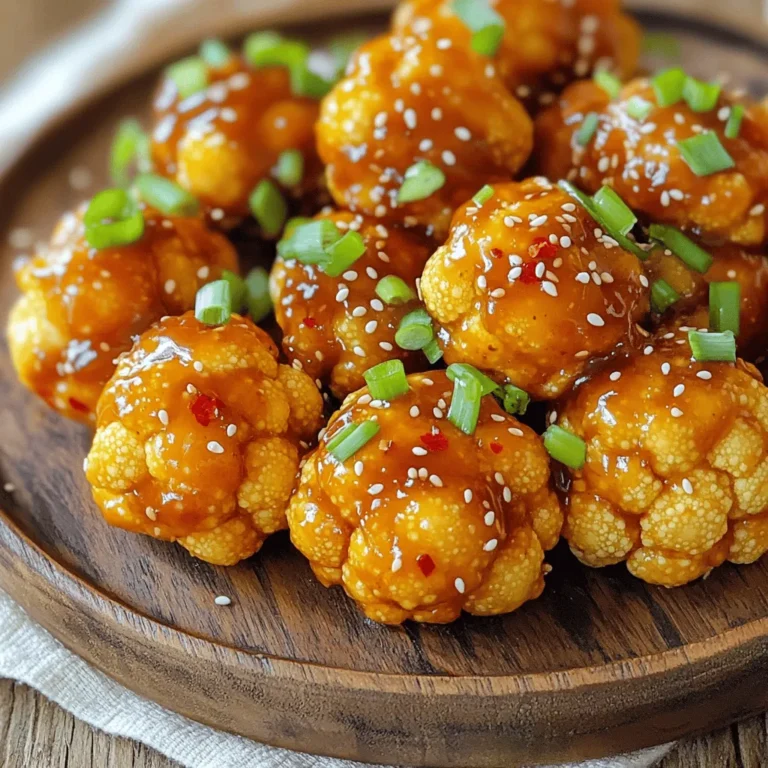
General Tso’s Cauliflower Bites Crispy and Flavorful

- 4 salmon fillets (approximately 6 ounces each) - 2 cups broccoli florets - 1 bell pepper (choose red or yellow), sliced into strips - 1 cup snap peas, trimmed of ends - 1/4 cup teriyaki sauce - 2 tablespoons olive oil - 2 cloves garlic, finely minced - 1 teaspoon fresh ginger, grated - Sesame seeds - Chopped green onions - Salt and freshly ground black pepper to taste Gather these ingredients to create a bright and tasty dish. The salmon fillets are the star, providing rich flavor. Fresh vegetables like broccoli, bell pepper, and snap peas add color and crunch. Teriyaki sauce gives a sweet and savory taste. Olive oil keeps everything moist. Garlic and ginger bring warmth and depth to the dish. Don’t forget the garnishes! Sesame seeds and green onions add a nice touch. Salt and pepper bring out the flavors even more. With these ingredients ready, you’ll be set to make a delicious meal in no time. - Preheating the oven: Start by preheating your oven to 400°F (200°C). A hot oven helps cook the salmon and veggies just right. - Lining the baking sheet: Line a large baking sheet with parchment paper. This makes cleanup easy and helps prevent sticking. - Combining ingredients: In a small bowl, mix together the teriyaki sauce, olive oil, minced garlic, and grated ginger. Stir it well so all the flavors blend together. - Setting aside the sauce: Set this sauce aside for later. It adds a delicious flavor to the salmon and veggies. - Placing salmon and vegetables on the sheet pan: Place the salmon fillets in the center of the baking sheet. Surround them with broccoli florets, sliced bell pepper, and snap peas. This makes a colorful dish. - Drizzling with teriyaki sauce: Drizzle half of the teriyaki sauce over the salmon and vegetables. Make sure everything gets some of that tasty sauce. - Baking time and techniques: Put the baking sheet in the oven. Bake for about 15-20 minutes. The salmon should be flaky, and the veggies should stay crisp. - Adding final sauces and garnishing: In the last 5 minutes, drizzle the rest of the teriyaki sauce over the salmon. After baking, sprinkle sesame seeds and chopped green onions on top for a nice finish. For the best flavor, marinate the salmon for at least 30 minutes. This helps the fish soak up the teriyaki sauce. If you want to add more taste, try adding lime juice or sesame oil to the mix. These will give the salmon a fresh twist. When prepping vegetables, cut them into similar sizes. This ensures they cook evenly. For this recipe, I like to use broccoli, bell pepper, and snap peas. Each adds a unique crunch and color. You can also mix in carrots or zucchini for extra variety. To ensure perfect doneness, bake the salmon until it flakes easily. This usually takes about 15 to 20 minutes in a preheated oven. To keep your vegetables crisp, don’t overcrowd the pan. This allows hot air to circulate and cook everything evenly. {{image_4}} You can switch out salmon for other proteins. Chicken is a great choice. Use boneless, skinless chicken breasts for a lean option. If you prefer plant-based meals, try tofu. Firm tofu absorbs flavors well and gives a nice texture. Feel free to mix in different vegetables. Carrots, zucchini, or bell peppers add color and crunch. You can also use asparagus or green beans for a fresh touch. Just make sure to cut them into similar sizes for even cooking. You can make homemade teriyaki sauce easily. Combine soy sauce, honey, and rice vinegar for a simple mix. For a twist, add pineapple juice for sweetness. Want more spice? Add sriracha or chili flakes to the sauce. Each change gives a new flavor to your dish! To keep your leftover teriyaki salmon and broccoli fresh, use proper refrigeration. Place the cooled dish in an airtight container. This helps keep moisture in and air out. Store the container in the fridge. Your leftovers will be good for 2 to 3 days. If you want to keep them longer, consider freezing instead. To reheat, use the oven for the best results. Preheat your oven to 350°F (175°C). Place the salmon and veggies on a baking sheet. Cover them with foil to keep moisture in. Heat for about 10 to 15 minutes, or until warmed through. You can also use a microwave, but this may make the fish less tender. For freezing, let the dish cool completely. Then, wrap it tightly in plastic wrap. Place the wrapped dish in a freezer-safe bag or container. This will prevent freezer burn. When you want to eat it, move the dish to the fridge to thaw overnight. For best quality, consume within 1 to 2 months. You should cook salmon in the oven for 15-20 minutes at 400°F. The salmon will be done when it flakes easily with a fork. Keep an eye on it to avoid overcooking. If you want to be sure, use a meat thermometer. The internal temperature should reach 145°F for safe eating. This ensures a moist and tender bite. Yes, you can prepare this dish in advance! To save time, chop your vegetables the night before. You can also marinate the salmon in the teriyaki sauce for an hour or overnight in the fridge. Just remember to let it come to room temperature before cooking. This helps with even cooking. You can bake it fresh when you're ready to eat. Many sides complement teriyaki salmon well. Here are a few ideas: - Steamed rice or jasmine rice for a classic pairing - Quinoa for a healthier grain option - Asian-style slaw for a crunchy contrast - Pickled vegetables for a tangy touch - Sautéed bok choy for a nice color and flavor These sides enhance the meal and provide a balanced plate. This blog post covered how to make a tasty teriyaki salmon dish. We explored the main ingredients, step-by-step instructions, and helpful tips. I shared various variations and storage tips to keep your meal fresh. You can even customize it to suit your taste. Try this recipe for a fun and healthy meal. Cooking can be easy and satisfying! Enjoy the flavors and share them with others.

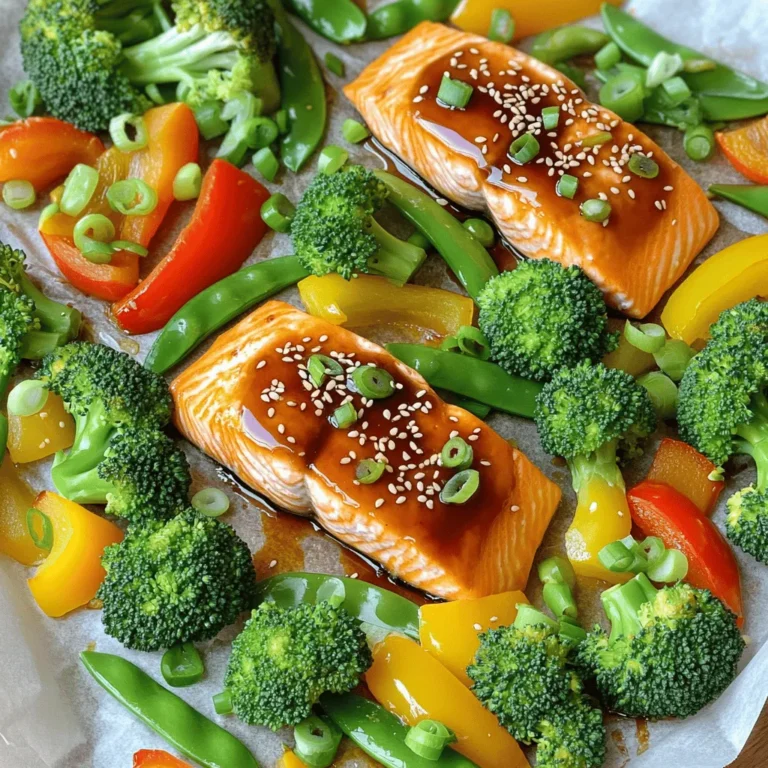
Savory Sheet Pan Teriyaki Salmon & Broccoli Recipe

For these tasty parfaits, you will need: - 2 cups Greek yogurt (plain or vanilla) - 1 cup mixed berries (strawberries, blueberries, raspberries) - 1/4 cup honey or maple syrup - 1/2 cup granola (your favorite flavor) - 1/4 cup chopped nuts (almonds, walnuts, or pistachios) - 1 teaspoon vanilla extract (optional) - Fresh mint leaves (for garnish) These ingredients come together to create a delightful snack that is both satisfying and nutritious. If you want to mix things up, consider these options: - Chia seeds for extra fiber - Protein powder for added fuel - Coconut flakes for a tropical twist - Cinnamon for a warm flavor boost These add-ins enhance the nutrition and flavor of your parfaits. To make your parfait even more special, try these toppings: - More fresh berries for color - A drizzle of honey or maple syrup - A sprinkle of seeds for crunch - Whipped cream for a touch of luxury These toppings create a beautiful and tasty finish to your parfaits. Start by taking 2 cups of Greek yogurt. You can use plain or vanilla yogurt for some extra sweetness. In a medium bowl, add the yogurt. Whisk in 1/4 cup of honey or maple syrup. If you like, add 1 teaspoon of vanilla extract for more flavor. Mix until you get a smooth and creamy texture. This blend will be the star of your parfait. Choose a clear glass or parfait dish to show off your layers. Begin by adding a generous layer of the yogurt mixture at the bottom. This layer sets the stage for your beautiful parfait. Next, add 1 cup of mixed berries on top of the yogurt. Use strawberries, blueberries, and raspberries for a colorful look. Spread them evenly to make it appealing. Now, sprinkle 1/2 cup of granola over the berries. This will give your parfait a nice crunch. Repeat the layers: yogurt, berries, and granola. Keep going until your dish reaches the desired height. Finish with a final layer of yogurt on top. To make your parfait look stunning, sprinkle 1/4 cup of chopped nuts on the top layer of yogurt. Almonds, walnuts, or pistachios work great for this. Finally, add a few fresh mint leaves as a garnish. This adds a pop of color and a refreshing touch. Your Protein Greek Yogurt Berry Parfait is now ready to enjoy! For a smooth yogurt texture, start with high-quality Greek yogurt. Whisk it well to mix in honey or maple syrup. This step helps the yogurt become creamy and easy to layer. If you want it sweeter, add a little more honey. For extra flavor, a teaspoon of vanilla extract works wonders. Adjust the thickness by choosing full-fat or low-fat yogurt based on your preference. Mix up your flavors to keep things fun. Use plain yogurt for a tangy taste or vanilla for sweetness. Try adding a pinch of cinnamon for warmth. You can also swap honey for agave syrup if you want a different sweetener. Experiment with the fruits too. Strawberries, blueberries, and raspberries all add unique flavors. You might even mix in banana slices for a new twist! Use clear glass cups to show off your layers. Begin with yogurt, then layer on berries, and top with granola. Repeat these layers until the cup is full. For a stunning finish, sprinkle chopped nuts on top. Add fresh mint leaves to give a pop of color. This not only looks beautiful but also makes it more inviting. Enjoy each bite as a feast for the eyes and palate! {{image_4}} You can change the berries based on the season. In spring, try fresh strawberries. They add sweetness and a lovely color. In summer, use blueberries and raspberries for a tart kick. Fall brings blackberries, which are juicy and rich. Winter? Go for frozen berries; they work great, too! Just thaw them before adding to your parfait. If you want a dairy-free parfait, use coconut yogurt or almond yogurt. Both give a creamy texture and rich taste. Coconut yogurt adds a nice hint of tropical flavor. Almond yogurt has a mild taste that lets the fruit shine. Make sure to check for added sugars in these yogurts. For a nut-free parfait, skip the nuts and use seeds instead. Sunflower seeds or pumpkin seeds give a great crunch. They also pack a nice protein punch. If you want a different texture, try puffed quinoa. It’s light and adds some fun to your parfait. To keep your parfaits fresh, store them in the fridge. Use airtight containers for best results. This keeps the yogurt creamy and the berries fresh. You can also layer the ingredients in separate containers. This way, you can mix them right before serving. You don’t need to reheat these parfaits. They taste best cold. If you want to serve them warm, heat just the yogurt gently. Avoid boiling, as it changes the texture. When ready to eat, layer the yogurt, berries, and granola again for a fresh look. These parfaits stay fresh for up to three days in the fridge. After that, the berries may lose their crunch. If you use nuts, add them just before eating. Nuts can get soggy if stored too long. For best taste, enjoy them within two days for peak freshness. Yes, you can prepare these parfaits ahead of time. Just layer the yogurt, berries, and granola in a clear glass. Cover it tightly with plastic wrap or a lid. Store it in the fridge for up to two days. This helps save time for busy mornings. However, I suggest adding granola right before eating. This keeps it crunchy and fresh. To adjust the sweetness, you have a few options. Start with the honey or maple syrup. You can add more or less to match your taste. If you prefer a natural touch, use ripe bananas or applesauce. These fruits add sweetness without extra sugar. You can also choose vanilla Greek yogurt for added flavor. Test different combinations until you find your perfect mix. There are many healthy toppings to choose from. Here are some favorites: - Chia seeds for extra fiber - Coconut flakes for a tropical twist - Dark chocolate chips for a hint of sweetness - Fresh fruit slices for added color and flavor - Seeds like pumpkin or sunflower for crunch Feel free to mix and match these toppings. This adds fun and variety to your parfaits. This post covered how to make delicious parfaits step by step. We explored main ingredients, optional add-ins, and tasty toppings. You learned how to layer, present, and store parfaits for the best taste. We also shared tips for texture and flavor. Finally, I offered variations and answered common questions to tailor your parfait experience. With these tips, you can create beautiful, tasty parfaits that fit your tastes. Enjoy your parfait journey!

Protein Greek Yogurt Berry Parfaits Delightful Snack

PREV 1 … 5 6 7 … 17 NEXT
tastykitchentales

explore

DessertsDinnerAppetizersDrinks

Our Policies

  • Cookie Policy
  • Copyright Policy
  • Disclaimer
  • GDPR Policy
  • Terms Of Use
Back to Top
  • About
  • Contact Us
  • Privacy Policy
© 2025 tastykitchentales