FREE DINNER EBOOK! Get your copy!
  • Cookie Policy
  • GDPR Policy
  • Disclaimer
  • Terms Of Use
  • Visit my other site: Fun Cookie Recipes
tastykitchentales
  • Home
  • Dinner
  • Desserts
  • Drinks
  • Appetizers
  • Contact
  • About
  • Privacy Policy
  • Home
  • Dinner
  • Desserts
  • Drinks
  • Appetizers
  • Contact
  • About
  • Privacy Policy
  • Cookie Policy
  • GDPR Policy
  • Disclaimer
  • Terms Of Use
Visit my other site: Fun Cookie Recipes

HOME / CATEGORIES /

Latest

You need two cups of fresh strawberries for this cake. Make sure they are ripe and sweet. First, hull the strawberries. Then, slice them thinly. This helps them mix well with the cream. Toss them with a tablespoon of granulated sugar. Let them sit for about 10-15 minutes. This process, called maceration, brings out their juicy flavor. You will use one package, which is about 14 ounces, of graham crackers. These create a tasty base for your cake. They add a nice crunch and balance the creaminess. Lay them in a single layer across the bottom of your baking dish. Make sure they cover the entire base. Two cups of heavy whipping cream are key for the cake's fluffy texture. This cream whips up light and airy. Use an electric mixer to whip it. It’s best to whip on medium speed. Gradually add in half a cup of powdered sugar and one teaspoon of pure vanilla extract. Whip until you see stiff peaks. This takes about 3-5 minutes. You will need some sugar and vanilla extract for flavor. The granulated sugar sweetens the strawberries. The powdered sugar sweetens the whipped cream. The vanilla extract adds depth to the cream. Finally, fresh mint leaves make a great garnish. They add color and a refreshing taste when you serve the cake. Start by hulling and slicing your fresh strawberries. Place them in a medium bowl. Add the granulated sugar and gently toss the strawberries. This step lets the strawberries release their juices. Let this mixture sit for 10-15 minutes. You’ll see a nice syrup form, which adds flavor to the cake. In a large mixing bowl, pour in the heavy whipping cream. Use an electric mixer to whip it on medium speed. As it thickens, slowly add the powdered sugar and vanilla extract. Keep whipping until you see stiff peaks. This should take around 3-5 minutes. Your whipped cream should be light and fluffy. Grab a 9x13-inch baking dish for your cake. Start with a single layer of graham crackers. Make sure they cover the bottom completely. Next, spread a thick layer of whipped cream over the graham crackers. Smooth it out with a spatula. Now, add a layer of the macerated strawberries, distributing them evenly. Repeat this layering. Add another layer of graham crackers, then whipped cream, and strawberries. Keep going until you finish with a top layer of whipped cream. For a nice touch, decorate with any leftover strawberries. Once your cake is assembled, cover the dish tightly with plastic wrap. Place it in the fridge for at least 4 hours. For the best flavor, let it chill overnight. This waiting time allows the graham crackers to soften and flavors to blend. Enjoy the ease of this no-bake treat! To make the best whipped cream, use cold heavy cream. Cold cream whips better and faster. Start mixing on medium speed. Gradually add powdered sugar and vanilla. This will make the cream sweet and tasty. Whip until stiff peaks form. Be careful not to overwhip, or it can turn grainy. Perfect whipped cream will be light and fluffy. For great layers, start with graham crackers. Lay them flat in the dish to cover the base. This gives a strong foundation. Next, spread whipped cream evenly over the crackers. Use a spatula to push it into the corners. After that, add a layer of strawberries. Make sure to spread them out well. Repeat this process until you reach the top. End with whipped cream and decorate with strawberries. This will create a colorful and tasty treat. To make your icebox cake look fancy, slice it into squares. Place each piece on a dessert plate. Drizzle some strawberry syrup around each slice. This adds color and flavor. Lastly, add fresh mint leaves on top for a pop of green. This will make your cake look as good as it tastes! {{image_4}} You can switch up the berries in this cake. Instead of just strawberries, try blueberries, raspberries, or blackberries. Mixing these berries gives a burst of color and flavor. Use about 2 cups of your favorite berries, sliced or whole. You can also combine different berries for a fun twist. The sweet and tart notes will blend perfectly with the creamy layers. This mix adds excitement and makes the cake even more appealing. If you need a dairy-free version, you can replace heavy cream with coconut cream. Chill a can of coconut milk overnight, then scoop the solid cream from the top. Whip this coconut cream with powdered sugar and vanilla. It creates a rich and creamy texture similar to traditional whipped cream. You can also use dairy-free graham crackers. Check the labels to ensure they fit your needs. This way, everyone can enjoy this delicious cake! To make this cake gluten-free, opt for gluten-free graham crackers. Many brands offer tasty alternatives that work well. You can also use crushed gluten-free cookies or even a nut-based crust. Just make sure the other ingredients are gluten-free too. This way, you keep the same great taste while catering to gluten sensitivities. Enjoy this cake without worry! To keep your No-Bake Strawberry Shortcake Icebox Cake fresh, wrap it well. Use plastic wrap or aluminum foil to cover the dish. This prevents drying out and keeps the cake flavorful. Always store it in the fridge. The cool temperature helps keep the layers intact. This icebox cake keeps well in the fridge for about 3-4 days. After that, the graham crackers may get too soft. If you notice any off smells or colors, it’s best to toss it. You can freeze the icebox cake, but it’s not ideal. If you choose to freeze it, slice it first. Wrap each slice in plastic wrap, then place them in a freezer-safe bag. This way, you can enjoy a piece anytime. Just remember to thaw it in the fridge for a few hours before serving. Yes, you can use frozen strawberries. Just let them thaw first. Drain any excess liquid. This helps avoid a soggy cake. Frozen strawberries can also add a nice chill to your dessert. If you don’t have graham crackers, try vanilla wafers or digestive biscuits. Both options work well and add a different flavor. You can even use crushed cookies for a fun twist. You can make this icebox cake a day ahead. Assemble it and let it chill overnight. This gives the flavors time to blend and the cake to set. The longer it sits, the better it tastes! In this blog post, we explored how to create a delicious strawberry cake. We discussed fresh strawberries, graham crackers, and whipped cream, plus simple steps for preparation. You learned tips to make perfect whipped cream and layer your cake like a pro. We also covered variations for different diets and storage methods to keep your cake fresh. Remember, with these steps, you’ll make a treat everyone loves. Enjoy your cake-making journey!

No-Bake Strawberry Shortcake Icebox Cake Delight

To create your Mediterranean Chickpea Quinoa Bowl, gather these fresh ingredients: - 1 cup quinoa, thoroughly rinsed - 2 cups vegetable broth or water - 1 can (15 oz) chickpeas, drained and rinsed - 1 cup cherry tomatoes, halved - 1 cucumber, diced into small pieces - 1/2 red onion, finely chopped - 1/4 cup Kalamata olives, pitted and sliced - 1/4 cup feta cheese, crumbled (optional) - 1/4 cup fresh parsley, chopped - 3 tablespoons extra-virgin olive oil - 2 tablespoons freshly squeezed lemon juice - 1 teaspoon dried oregano - Salt and freshly cracked pepper, to taste Each ingredient brings its own flavor and health benefits. Quinoa is a great source of protein. Chickpeas add fiber and make this bowl hearty. Cherry tomatoes provide sweetness. Cucumbers add crunch, and red onion gives a sharp bite. Kalamata olives introduce a briny taste, while feta cheese adds creaminess if you choose to include it. Fresh parsley brightens the dish. Olive oil and lemon juice create a zesty dressing, while oregano adds an earthy touch. Use these ingredients to make your bowl colorful and tasty. You can mix and match based on your preferences too! First, take one cup of quinoa and rinse it well. Rinsing helps remove the bitter taste. Next, add the quinoa to a medium pot with two cups of vegetable broth or water. Bring this mix to a boil over medium-high heat. Once it boils, lower the heat to a simmer. Cover the pot and let it cook for about 15 minutes. When all the liquid is gone, remove it from heat. Fluff the quinoa gently with a fork and let it cool. While the quinoa cooks, let’s make the dressing. In a small bowl, whisk together three tablespoons of extra-virgin olive oil and two tablespoons of freshly squeezed lemon juice. Add one teaspoon of dried oregano, a pinch of salt, and some cracked pepper. Taste it and adjust the salt and pepper to your liking. A good dressing adds life to your bowl. Now, grab a large mixing bowl. Add one can of drained chickpeas, one cup of halved cherry tomatoes, one diced cucumber, and half a finely chopped red onion. Toss in a quarter cup of sliced Kalamata olives and a quarter cup of chopped fresh parsley. Stir gently to mix everything. This mix adds great color and flavor to your bowl. Once the quinoa has cooled, add it to the bowl with the veggies and chickpeas. Carefully pour the dressing over the top. Use a spatula to toss everything together. Make sure the dressing coats all the ingredients well. This step is key for flavor! If you want to add feta cheese, sprinkle a quarter cup of crumbled cheese on top before serving. You can serve the bowls warm or chilled. For a nice touch, spoon the mixture into individual bowls. Garnish with extra parsley and olives for added color and flavor. Enjoy your healthy delight! To fluff quinoa, let it sit after cooking. Take a fork and gently stir the quinoa. This method separates the grains and makes it light. Fluffing helps each bite feel fresh and airy. It also improves the texture of your bowl. Taste the dressing before adding it to your salad. If you want more tang, add more lemon juice. For a richer flavor, increase olive oil or salt. Don’t be afraid to mix in herbs like basil or mint. This adds a personal touch to your meal. Store ingredients in airtight containers. This keeps them crisp and full of flavor. Use vegetables within a few days for the best taste. If you have leftover salad, keep it in the fridge. Just add fresh dressing before serving to keep it tasty. {{image_4}} If you want to switch up the protein, try adding grilled chicken or shrimp. Both pair well with the flavors in this bowl. You can also use tofu or tempeh for a veggie option. These proteins add great texture and taste. For a vegan twist, skip the feta cheese. You can add a sprinkle of nutritional yeast for a cheesy flavor. Try adding avocado for creaminess too. This will keep the dish plant-based while being very satisfying. Change up the veggies based on the season. In summer, add bell peppers or zucchini. In winter, roasted sweet potatoes or carrots work great. This keeps your bowl fresh and exciting all year long! To keep your Mediterranean chickpea quinoa bowls fresh, store them in an airtight container. They stay good in the fridge for up to four days. Make sure the bowls cool down before sealing. This prevents moisture, which can make your meal soggy. You can freeze these bowls for later. Portion them into freezer-safe containers. They last for up to three months in the freezer. When you are ready to eat, just take one out and let it thaw in the fridge overnight. To reheat, place the quinoa bowl in the microwave. Heat it for 1-2 minutes, stirring halfway through. Check if it's hot enough before eating. You can also warm it up in a saucepan over low heat. Adding a splash of olive oil or a bit of water helps to keep it moist. To make this recipe gluten-free, use gluten-free quinoa. Quinoa is naturally gluten-free. Always check labels on any broth you use. Some broths may have gluten. Yes, you can prepare the bowls in advance. Cook the quinoa and chop the veggies ahead of time. Store each part separately in airtight containers. This keeps everything fresh. If you want a substitute for feta cheese, try goat cheese or avocado. Both add creaminess. For a vegan option, use tofu or a vegan cheese. These bowls last about 3 to 5 days in the fridge. Store them in an airtight container. Check for freshness before eating. Yes, this dish is great for meal prep. It packs well for lunches or snacks. Just store the dressing separately to keep veggies crisp. This blog post covered a fresh quinoa salad recipe, highlighting ingredients, steps, and storage tips. You learned how to cook quinoa, prepare a tasty dressing, and combine ingredients for a bright salad. I shared useful tricks for keeping your salad fresh and variations to try. Remember, whether you stick to the basic recipe or explore the alternatives, this salad is fun and easy to make. Enjoy creating your own variations as you savor each bite!

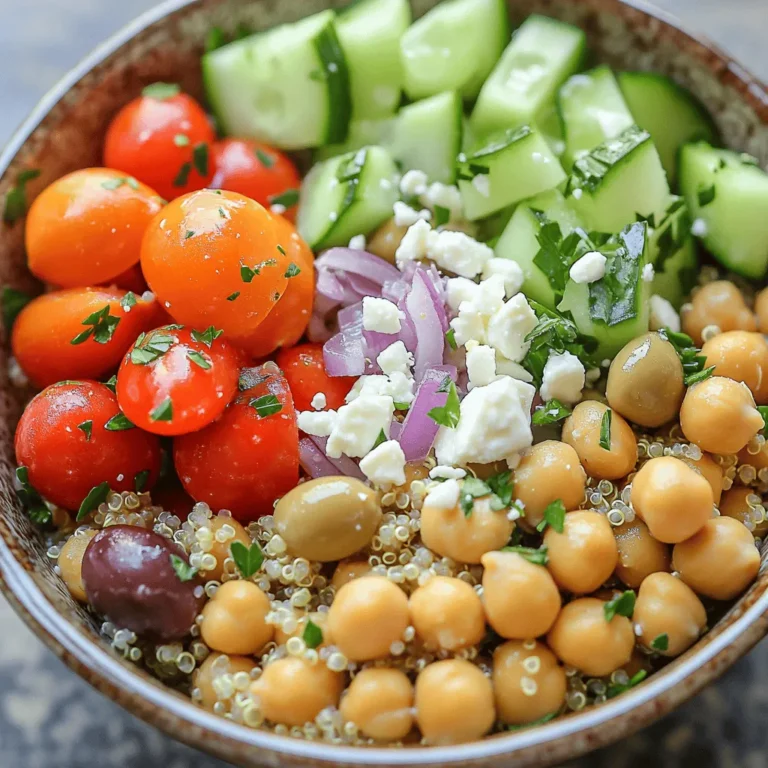
Mediterranean Chickpea Quinoa Bowls Healthy Delight

To make Garlic Sesame Beef Noodles, you need some key items. Here’s the list: - 8 oz (225g) rice noodles - 8 oz (225g) flank steak, thinly sliced against the grain - 3 tablespoons soy sauce, divided - 2 tablespoons sesame oil, divided - 4 cloves garlic, minced - 1 tablespoon fresh ginger, grated - 2 green onions, chopped (white and green parts separated) - 1 bell pepper, julienned (red or yellow adds color) - 1 tablespoon sesame seeds (toasted for flavor) - Salt and pepper to taste - Fresh cilantro leaves, for garnish Each ingredient plays a role. The rice noodles serve as the base. Flank steak brings protein. Soy sauce adds umami, while sesame oil gives depth. Garlic and ginger provide strong flavors. Green onions and bell pepper add crunch and color. You can add a few garnishes to make your dish shine. Here are some suggestions: - Extra green onions, chopped - More sesame seeds, toasted - Red pepper flakes for heat - Lime wedges for a zesty kick These garnishes enhance taste and make your dish look great. They also add freshness. Having the right tools helps you cook better. Here’s what you need: - Large pot for boiling noodles - Large skillet or wok for stir-frying - Mixing bowl for marinating beef - Cutting board and knife for chopping - Tongs or spatula for stirring These tools make the cooking process smooth. They help you create a delicious meal without fuss. To start, boil a large pot of water. Once it bubbles, add 8 oz of rice noodles. Cook them by the package guide until they are al dente. This usually takes about 4 to 6 minutes. Drain the noodles and rinse them under cold water. This stops the cooking and helps keep them firm. Set the noodles aside to use later. Next, take 8 oz of flank steak and slice it thinly against the grain. In a mixing bowl, combine the beef with 2 tablespoons of soy sauce, 1 tablespoon of sesame oil, and a pinch of salt and pepper. Mix it well. Let this sit for at least 15 minutes. This gives the beef time to soak up the flavors. Now, heat 1 tablespoon of sesame oil in a large skillet over medium-high heat. Once hot, add 4 cloves of minced garlic and 1 tablespoon of grated ginger. Stir them constantly for about 30 seconds. You want them fragrant but not burnt. Next, add the marinated beef to the skillet. Cook it for 3-4 minutes, stirring often, until the beef is browned. Once done, take the beef out and set it aside. In the same skillet, without cleaning it, add 1 julienned bell pepper and the white parts of 2 chopped green onions. Stir-fry for 2-3 minutes. You want the bell pepper tender yet crisp. This keeps the dish colorful and fresh. Return the cooked beef to the skillet. Pour in the remaining 1 tablespoon of soy sauce and add the cooked noodles. Toss everything together for about 2 minutes. This warms up the dish and blends all the flavors nicely. Once mixed, sprinkle toasted sesame seeds over the dish. Garnish with fresh cilantro leaves. Serve the noodles in deep bowls. Arrange them to show off the bright colors of the veggies. Enjoy with chopsticks for a fun touch. This dish is not just tasty; it looks great too! To cook the rice noodles just right, start with boiling water. Once it bubbles, add the noodles. Check the package for cooking time. They should be al dente, not mushy. After cooking, drain the noodles and rinse them under cold water. This stops the cooking process and keeps them firm. You can boost the flavor with a few simple swaps. Try adding chili flakes for heat. If you prefer a sweeter taste, mix in a splash of honey or sugar. You can also swap the flank steak for chicken or tofu. For a different taste, use coconut aminos instead of soy sauce. This keeps it soy-free and adds a unique flavor. Slicing beef correctly makes a big difference. Always slice against the grain. This keeps it tender and easy to chew. Use a sharp knife for clean cuts. Aim for thin slices, about 1/4 inch thick. This helps the beef cook quickly and evenly. Marinating the beef also helps make it soft and flavorful. {{image_4}} You can easily make this dish vegetarian or vegan. Swap the flank steak for tofu or tempeh. Both options soak up flavor well. Use the same marinade for these proteins. Cook them until golden brown for a nice texture. Replace the soy sauce with a gluten-free version if needed. You can also add mushrooms for a meaty flavor. If you want to change the protein, try chicken or shrimp. Thinly slice chicken breast and follow the same steps as the beef. For shrimp, use peeled and deveined shrimp. Cook them until they turn pink. Each protein gives a new taste to the dish. You can even mix proteins for a fun twist! Get creative with your veggies! You can add broccoli, snap peas, or carrots. Just chop them into bite-sized pieces. Stir-fry them for a few minutes before adding the beef. You can even toss in some baby corn or bok choy for variety. This way, you can enjoy a colorful and healthy meal. After enjoying your Garlic Sesame Beef Noodles, you may have some left. To keep them fresh, let the dish cool down first. Store it in an airtight container. Place it in the fridge if you plan to eat it within the next few days. This method helps the flavors stay vibrant. When it's time to eat again, you can easily reheat your noodles. Use a microwave-safe bowl. Add a splash of water to prevent them from drying out. Heat in short bursts, stirring in between. If you prefer, you can reheat in a skillet. Add a bit of oil, toss in the noodles, and stir until warm. If you want to save the dish for later, you can freeze it. Place cooled noodles in a freezer-safe bag. Squeeze out as much air as possible before sealing. When you're ready to eat, take them out of the freezer. Let them thaw in the fridge overnight. Heat them as mentioned above for a quick meal. Enjoying this dish later can be just as tasty! Yes, you can use different noodles. Rice noodles work great for this dish. You can also try egg noodles or udon for a different bite. Each type adds a unique flavor and texture. Just remember to adjust the cooking time based on the noodles you choose. This dish is not very spicy. You can easily adjust the heat. If you like it spicy, add some red pepper flakes or a drizzle of hot sauce. You can also use spicy soy sauce for an extra kick. Start with a little, taste, and add more if needed. Garlic Sesame Beef Noodles pair well with many sides. Try a fresh salad with crunchy veggies. Steamed broccoli or bok choy also makes a good match. If you want more flavor, serve these noodles with some sesame cucumber salad. It adds a nice crunch and coolness! In this post, we explored how to make Garlic Sesame Beef Noodles. We covered the main ingredients, cooking steps, and tips for perfect results. You can choose from various proteins and veggie options. Proper storage helps keep leftovers fresh. This dish offers great flavor and is easy to customize. Enjoy your cooking experience and make it your own!

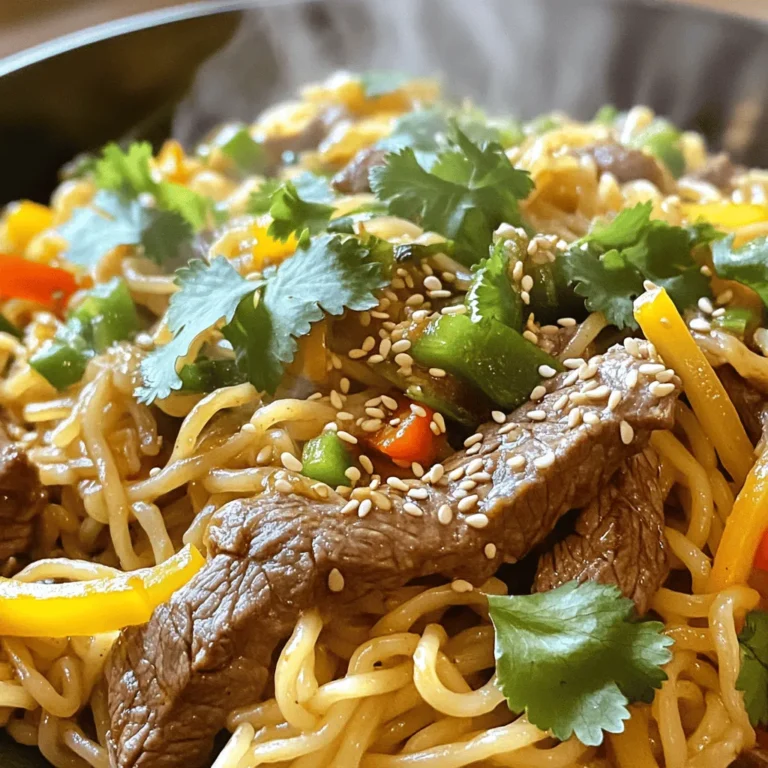
Garlic Sesame Beef Noodles Flavorful and Easy Recipe

To make the best Caramel Apple Crumble Bars, you need simple and fresh ingredients. Here’s what you’ll need: - 2 cups all-purpose flour - 1 cup packed brown sugar - 1 cup rolled oats - 1/2 teaspoon baking powder - 1/2 teaspoon baking soda - 1/2 teaspoon salt - 1 cup unsalted butter, melted - 4 medium apples, peeled, cored, and diced (approximately 4 cups) - 1 teaspoon ground cinnamon - 1/4 teaspoon ground nutmeg - 1 cup caramel sauce (can be store-bought or homemade) - 1/2 cup chopped nuts (such as walnuts or pecans, optional) Each ingredient plays a key role in creating layers of flavor and texture. The all-purpose flour and rolled oats form a sturdy base. Brown sugar gives a rich sweetness. The apples, spiced with cinnamon and nutmeg, bring warmth. Caramel sauce drizzled on top adds that gooey touch. If you like crunch, toss in some chopped nuts. These ingredients come together for a treat that is hard to resist! - Preheat the oven to 350°F (175°C). - Prepare a 9x13 inch baking pan with parchment paper. Let the paper hang over the edges for easy removal. - In a large bowl, mix: - 2 cups all-purpose flour - 1 cup packed brown sugar - 1 cup rolled oats - 1/2 teaspoon baking powder - 1/2 teaspoon baking soda - 1/2 teaspoon salt - Pour in 1 cup melted butter. Mix until crumbly. - Reserve one-third of the mixture for later. Press the rest firmly into the pan. - In another bowl, toss: - 4 medium apples, peeled, cored, and diced - 1 teaspoon ground cinnamon - 1/4 teaspoon ground nutmeg - 1 cup caramel sauce (half for the apples) - Spread the apple mixture evenly over the crust. Drizzle with the remaining caramel sauce. - Sprinkle the reserved crumble mixture over the apples. - If you like, add 1/2 cup chopped nuts on top for a crunchy finish. - Place the pan in the oven. Bake for 30-35 minutes. - Check when the topping is golden brown and the apples are tender. - Allow the bars to cool in the pan for 15 minutes. - Use the parchment paper to lift the bars out. Let them cool completely on a wire rack. - Cut into squares. Serve on a platter and drizzle with extra caramel. Consider pairing with vanilla ice cream! - Ensuring even baking: To bake your bars evenly, spread the mixture flat in the pan. Use a spatula to press the crust firmly. This helps it brown nicely. Rotate the pan halfway through baking for even heat. - Measuring ingredients accurately: Use dry measuring cups for flour and oats. Spoon flour into the cup, then level it off. Avoid packing it down. For brown sugar, pack it firmly into the cup, then level it. This gives the right texture. - Using different types of apples: Try using Granny Smith for tartness or Honeycrisp for sweetness. Each type adds its own flavor. Mix a few kinds for a more complex taste. - Flavored caramel sauce options: You can use vanilla, sea salt, or even chocolate-flavored caramel. Each adds a unique twist. Experiment with homemade versions for more control. - Incorporating other nuts and toppings: Add chopped walnuts or pecans for crunch. You can also sprinkle some oats on top for extra texture. Consider adding shredded coconut or chocolate chips for a different flavor. {{image_4}} To keep your caramel apple crumble bars fresh, follow these tips: - Refrigerating: Place the bars in an airtight container. They stay good for up to one week. If you want to avoid sogginess, use parchment paper between layers. - Freezing: For longer storage, wrap the bars tightly in plastic wrap and then foil. They last up to three months in the freezer. To enjoy later, simply thaw in the fridge overnight. When you're ready to enjoy your bars again, follow these steps to warm them up: - Preheat your oven to 350°F (175°C). - Place the bars on a baking sheet. - Heat for about 10-15 minutes until warm. This helps the caramel become gooey again. - If you're in a hurry, microwave a single bar for about 15-20 seconds. Enjoy! Each serving has about 250 calories. This recipe yields 12 bars, making it a great treat for gatherings. The bars provide essential nutrients like: - Carbohydrates: 36g for energy - Fat: 12g for richness and flavor - Protein: 3g to help keep you full These ingredients combine to create a delightful balance between sweetness and texture. You can make these bars even better with some simple swaps. Try these ideas: - Reduced Sugar: Use half the amount of brown sugar. You can also use a sugar substitute like stevia or monk fruit. - Gluten-Free: Replace all-purpose flour with almond flour or gluten-free flour blends. - Butter Alternatives: Use coconut oil for a dairy-free option. - Nut-Free: Omit nuts or use seeds like sunflower seeds for crunch without allergens. These swaps help you enjoy the flavors while making the bars a bit healthier. I like to use tart apples for the best flavor. Good options include: - Granny Smith - Honeycrisp - Fuji These apples hold their shape well. They provide a nice balance of sweet and tart. This makes the bars more flavorful. Yes, you can make these bars ahead of time. Here are some tips: - Prep: You can bake them a day or two in advance. Store them in an airtight container. - Storage: Keep them in the fridge to keep them fresh. You can also freeze them for up to three months. Just let them thaw in the fridge before serving. Look for these signs of perfect doneness: - The crumble topping should be golden brown. - The apples should be tender but not mushy. - A toothpick inserted into the center should come out clean. If you see these signs, your bars are ready! Yes, you can adjust the recipe easily. Here are some tips: - Cut the ingredients in half: This will give you about six bars. - Use a smaller pan: A smaller baking dish will work well, like an 8x8 inch pan. - Adjust baking time: Keep an eye on the bars as they bake. They may need less time. Check for doneness earlier than the recipe states. You now have all you need to create delicious caramel apple crumble bars. We covered essential ingredients, step-by-step instructions, and helpful tips. Remember to choose the right apples and store the bars properly for lasting flavor. You can enjoy making these bars with your own twists, too. Whether for a special occasion or a simple treat, these bars are sure to please. Enjoy your baking journey and relish every bite!

Caramel Apple Crumble Bars Irresistible Treat Recipe

- 4 boneless, skinless chicken thighs - 1 cup BBQ sauce (your favorite flavor) The chicken thighs bring a juicy and tender bite. They soak up the BBQ sauce well. This choice makes the dish flavorful and satisfying. You can use chicken breasts, but thighs remain moist. - 2 cups broccoli florets - 1 red bell pepper, sliced into strips - 1 medium zucchini, sliced into half-moons - 1 red onion, cut into wedges The mix of vegetables adds color and nutrition. Broccoli offers crunch and vitamins. Red bell pepper adds sweetness, while zucchini gives a soft texture. Red onion brings a mild flavor that pairs well with BBQ. - 2 tablespoons extra virgin olive oil - 1 teaspoon garlic powder - 1 teaspoon smoked paprika - Salt and freshly ground pepper to taste - Fresh parsley, finely chopped, for garnish (optional) These seasonings enhance the dish. Olive oil helps the veggies roast nicely. Garlic powder adds depth, while smoked paprika gives a subtle warmth. Salt and pepper balance the flavors. Fresh parsley is optional but adds a nice touch. Start by preheating your oven to 425°F (220°C). A hot oven helps cook the chicken and veggies evenly. Next, take the chicken thighs and put them in a mixing bowl. Pour in ¾ cup of your favorite BBQ sauce. Use your hands to coat the chicken well. Let it sit for at least 15 minutes. This step helps the chicken absorb flavor. In a large bowl, add two cups of broccoli florets, sliced red bell pepper, zucchini half-moons, and red onion wedges. Drizzle two tablespoons of olive oil over the veggies. Sprinkle in one teaspoon of garlic powder, one teaspoon of smoked paprika, and season with salt and pepper. Toss everything together until the veggies are coated. Grab a large baking sheet and place the marinated chicken in the center. Surround the chicken with the seasoned vegetables. Spread them out evenly for the best cooking results. Now, take the remaining ¼ cup of BBQ sauce. Drizzle it over both the chicken and the veggies. This extra layer of sauce adds even more flavor. Put the sheet pan in your preheated oven. Bake for 25-30 minutes. Make sure the chicken reaches an internal temperature of 165°F (74°C). The veggies should be tender and slightly caramelized. After baking, switch your oven to broil. Broil the dish for 2-4 minutes. This gives the chicken and veggies a nice caramelized finish. Keep an eye on them to avoid burning. Once done, take the pan out of the oven. Let it cool for a couple of minutes. If you want, sprinkle finely chopped parsley on top for color and freshness. Now, it's ready to serve! To get the best flavor, always marinate your chicken. Use ¾ cup of BBQ sauce to coat the chicken thighs. Let it sit for at least 15 minutes. This allows the sauce to soak in. You can even marinate it overnight for more taste. For veggies, drizzle olive oil and sprinkle garlic powder and smoked paprika. This step adds depth to the dish. Chicken thighs are juicy and tender, but timing matters. Bake them at 425°F for 25-30 minutes. Use a meat thermometer to check the internal temperature. It should reach 165°F. If you want a nice finish, broil for 2-4 minutes. This makes the chicken and veggies caramelized and tasty. To keep your veggies crisp, cut them evenly. This helps them cook at the same rate. Tossing them in olive oil and seasonings is key. Spread them out on the pan, avoiding overcrowding. Give them space to roast without steaming. Broccoli, bell peppers, and zucchini will stay vibrant and crunchy this way. {{image_4}} You can swap the veggies to match your taste. Try using: - Cauliflower florets - Carrots, sliced - Asparagus, cut into pieces - Sweet potatoes, cubed - Green beans These options add variety and bring new flavors to the dish. Each vegetable will cook well in the oven, giving you a delicious meal. The BBQ sauce can change the whole meal’s vibe. Here are a few ideas: - Honey BBQ sauce for sweetness - Spicy BBQ sauce for some heat - Mustard-based sauce for tanginess - Teriyaki sauce for an Asian twist Experiment with these flavors to find your favorite. Each sauce brings a unique kick to the chicken and veggies. Garnishes can make your dish pop. Consider adding: - Fresh cilantro for a bright taste - Chopped green onions for crunch - Crumbled feta cheese for creaminess - Sliced jalapeños for heat These toppings add both color and flavor, making your meal even more enjoyable. Feel free to mix and match! To store your leftovers, let the dish cool first. Place the chicken and veggies in an airtight container. Make sure to have enough space to keep them from getting squished. Store the container in the fridge for up to three days. This keeps the meal fresh and safe to eat. When you're ready to eat your leftovers, preheat your oven to 350°F (175°C). Place the chicken and veggies on a baking sheet. Cover them with foil to keep them moist. Heat for about 15-20 minutes or until hot. You can also use a microwave if you’re in a hurry. Just heat on high for 1-2 minutes, checking often to avoid overcooking. If you want to save some for later, this meal freezes well. Place cooled chicken and veggies in a freezer-safe container. Make sure to seal it tightly to prevent freezer burn. You can freeze it for up to three months. To reheat, thaw overnight in the fridge. Then, follow the reheating instructions above to warm it up. Enjoy the taste of BBQ chicken and veggies anytime you like! You should marinate the chicken for at least 15 minutes. This helps the chicken soak up the BBQ sauce. For more flavor, you can marinate it longer, up to 2 hours. Just keep it in the fridge during this time. Yes, you can use bone-in chicken. Just make sure to adjust the cooking time. Bone-in chicken usually needs a bit longer to cook through. Aim for 35 to 40 minutes, or until the internal temperature hits 165°F (74°C). A fresh salad pairs well with BBQ chicken and veggies. You can also serve rice or cornbread. These sides balance the meal and add more flavor. Try coleslaw for a crunchy texture and a tangy taste. Yes, this recipe is great for meal prep. You can cook it ahead and store portions in the fridge. It stays fresh for up to four days. Just reheat in the microwave or oven before enjoying. This makes weeknight dinners easy and quick! This post covered everything you need for a fun BBQ chicken meal. We talked about the best ingredients, easy steps for cooking, and clever tips for great taste. You can switch up the recipe with different veggies and sauces, too. Storing leftovers is a breeze. Always remember to adjust marinating time based on the chicken cut you use. Enjoy your tasty dish! With these tips, you'll impress everyone at the table. Happy cooking!

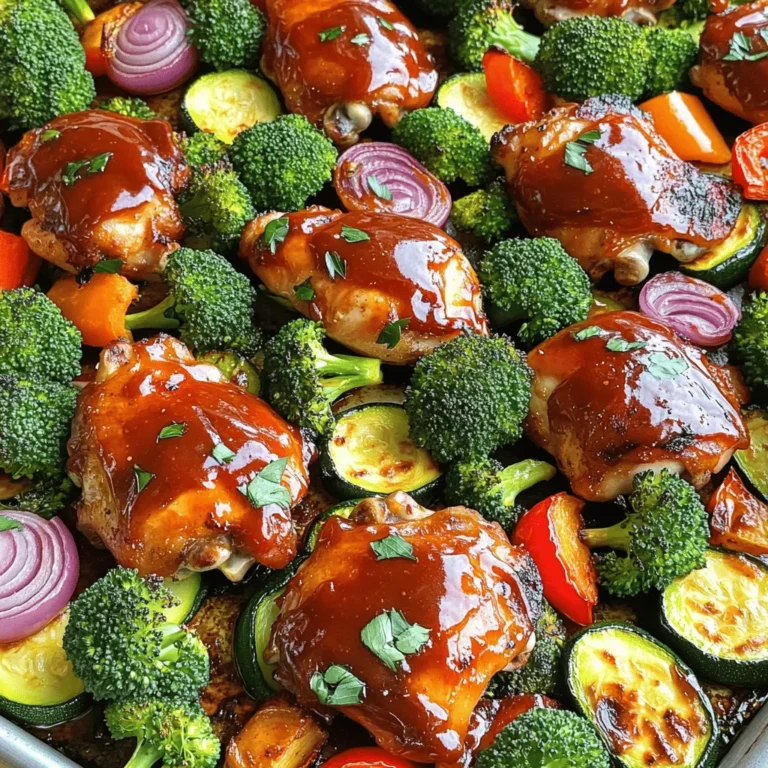
Sheet Pan BBQ Chicken & Veggies Easy and Tasty Meal

- 1 large head of cauliflower, trimmed and cut into bite-sized florets - 1 cup all-purpose flour - 1 cup plant-based milk (or regular milk) - 1 teaspoon garlic powder - 1 teaspoon onion powder - 1 teaspoon smoked paprika - 1/2 teaspoon salt - 1/2 teaspoon freshly ground black pepper - 1 cup panko breadcrumbs - 1/2 cup sweet chili sauce - 1 tablespoon olive oil - Fresh cilantro leaves or sliced green onions for garnish When you gather these ingredients, you set the stage for a tasty dish. The large head of cauliflower acts as the star, soaking up all the flavors. The flour and plant-based milk create a smooth batter that clings well. The garlic powder, onion powder, and smoked paprika add depth and warmth to the dish. Panko breadcrumbs give the wings their crunch. Sweet chili sauce brings a perfect balance of heat and sweetness. Finally, fresh herbs like cilantro or green onions brighten the dish and add a fresh kick. This combination ensures each bite bursts with flavor. The ingredients are simple yet powerful, making cooking fun and rewarding. When you have these items ready, you are just moments away from a delightful air-fried treat! To start, take your large head of cauliflower. Trim off the leaves and cut it into bite-sized florets. Aim for uniform pieces to ensure even cooking. Next, we’ll make the batter. In a big mixing bowl, combine: - 1 cup all-purpose flour - 1 cup plant-based milk (or regular milk) - 1 teaspoon garlic powder - 1 teaspoon onion powder - 1 teaspoon smoked paprika - 1/2 teaspoon salt - 1/2 teaspoon freshly ground black pepper Whisk these ingredients until smooth. The batter should be thick enough to coat the florets well. Now, take each floret and dip it into the batter. Make sure it’s fully covered but let any excess drip off back into the bowl. This way, you won’t have too much batter. After that, roll the battered cauliflower in panko breadcrumbs. Press gently to ensure a nice, even coat. This step is key for achieving that crunchy texture we all love. First, preheat your air fryer to 400°F (200°C). This step is essential for even cooking. Once it’s hot, lightly coat the air fryer basket with olive oil. You can use a spray or a brush for this. Next, arrange the coated cauliflower wings in a single layer. Avoid overcrowding the basket; this ensures proper air flow and crispiness. Air fry the wings for about 12-15 minutes. Halfway through, give the basket a shake. This helps cook them evenly. The wings should turn a golden brown color and feel crispy. After the initial frying, toss the wings in a bowl with 1/2 cup of sweet chili sauce. Make sure each piece is well-coated. Return the sauced wings to the air fryer for another 3-5 minutes. This helps caramelize the sauce, giving it a sticky glaze. When done, carefully remove the wings and garnish with fresh cilantro or sliced green onions. This adds a nice pop of color and flavor to your dish. To get great crunch, focus on your batter. A good batter sticks well to the cauliflower. Use the right ratio of flour to milk. This mix should be smooth, not too thick or thin. The panko breadcrumbs give extra crunch. Coat each floret well, pressing gently to stick. To keep your wings from sticking, spray the air fryer basket with olive oil. This step is key. You want each wing to come out easily. Arrange the florets in a single layer. If they crowd together, they won’t cook evenly. Want to spice things up? Try adding cayenne pepper or paprika to your batter. A little heat can make a big difference. You can also mix in some Italian herbs for a different taste. For sauces, you can swap sweet chili sauce with BBQ or buffalo sauce. Each sauce brings its own flavor. Experiment and find what you like best! Serving matters! Place the wings on a bright platter to catch the eye. A bowl of extra sweet chili sauce on the side is a great touch. It invites guests to dip their wings. Garnishes can elevate your dish. Fresh cilantro or sliced green onions add color and flavor. For a nutty taste, sprinkle sesame seeds on top just before serving. These small details make your dish look and taste gourmet! {{image_4}} You can add a spicy twist to your cauliflower wings. Just mix in extra chili flakes or hot sauce with the sweet chili sauce. This adds heat and a kick of flavor. If you prefer something sweet and smoky, try using barbecue sauce instead. It gives a rich, tangy taste, perfect for a summer vibe. If you need a gluten-free option, swap the all-purpose flour for almond flour or chickpea flour. These options work well and still give a nice texture. For a dairy-free choice, stick to plant-based milk. You can also use a gluten-free breadcrumb blend. This keeps the crunch while keeping things safe for your diet. These wings are great on their own or with sides. They pair well with a fresh salad or some crunchy veggies. You can also serve them with dips like ranch or extra sweet chili sauce. For meal prep, pack them in containers with your favorite sides. They make a tasty lunch or snack for later! To keep your cauliflower wings fresh, store them in an airtight container. Layer parchment paper between the wings to prevent sticking. They will stay good for about three days in the fridge. After that, they may lose crispness and flavor. For the best reheating method, use an air fryer or oven. Set the air fryer to 350°F (175°C) and reheat for about 5-7 minutes. This keeps the wings crispy. Avoid the microwave, as it can make them soggy. You can freeze cauliflower wings before or after cooking. If freezing before cooking, coat the wings and lay them on a tray. Freeze until firm, then transfer to a freezer bag. They last for about a month. If you freeze after cooking, reheat directly from frozen. Just add a few extra minutes to the cooking time. For the best results, thaw in the fridge overnight before reheating. To get crispy cauliflower wings, focus on the batter and the coating. Here are some tips: - Use panko breadcrumbs for extra crunch. They are lighter and crispier than regular breadcrumbs. - Make sure to coat each piece of cauliflower evenly in the batter. The batter should stick well without being too thick. - After coating in panko, gently press the breadcrumbs onto the cauliflower. This helps them stick better during cooking. - Avoid overcrowding the air fryer basket. This allows hot air to circulate around the wings, making them crispier. Yes, you can prepare these wings ahead of time. Here are some meal prep and storage options: - You can batter and coat the cauliflower a few hours in advance. Store them in the fridge until you are ready to air fry. - For longer storage, freeze the battered and coated wings. Place them in an airtight container. They can last up to a month in the freezer. - When you are ready to cook, there’s no need to thaw. Just air fry them for a few extra minutes. Sweet chili cauliflower wings pair well with many sides and dips. Here are some suggested options: - Serve with a fresh salad for a light meal. - Pair with carrot sticks and celery sticks for a crunchy side. - A small bowl of extra sweet chili sauce makes a great dip. - Ranch dressing or blue cheese dressing adds a creamy element. - Consider serving with some warm flatbreads or sliders for a fun twist. This post covered how to make crispy cauliflower wings, from selecting fresh ingredients to serving ideas. Remember to season well and coat evenly for the best crunch. Experiment with flavors to suit your taste, and don't forget to store or freeze leftovers properly. With these tips, you’ll master a dish that delights your taste buds and impresses your friends. Enjoy making your own flavorful wings!

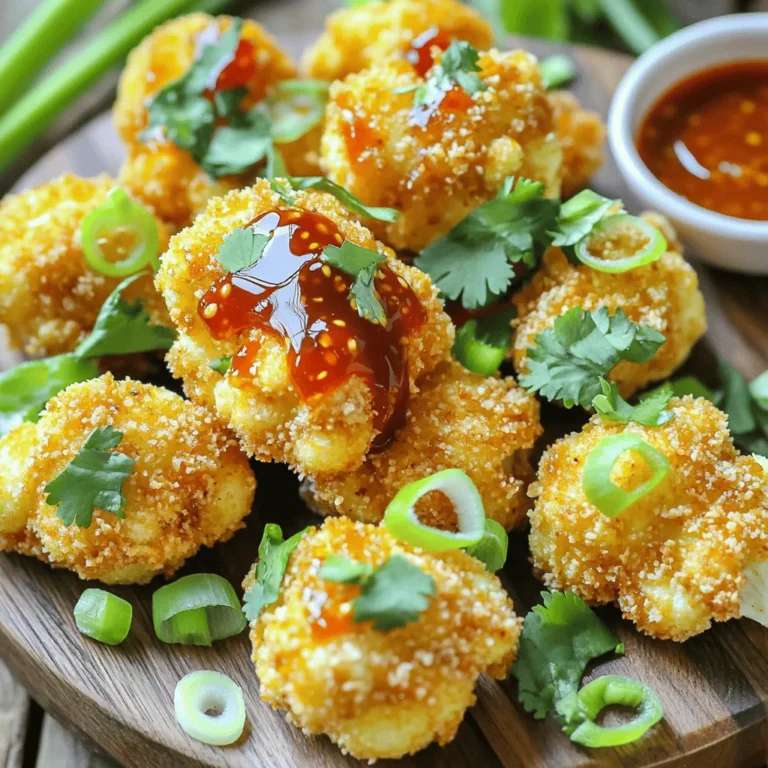
Air Fryer Sweet Chili Cauliflower Wings Delight

- 1 cup unsalted butter, melted - 1 ½ cups granulated sugar - 4 large eggs - 1 teaspoon vanilla extract - 1 cup all-purpose flour - ¾ cup unsweetened cocoa powder - ½ teaspoon baking powder - ½ teaspoon salt - 1 cup pecans, roughly chopped - 1 cup caramel sauce (store-bought or homemade) Each ingredient plays a key role in making these bars taste amazing. The unsalted butter adds rich flavor and makes the bars moist. Granulated sugar sweetens the mix and helps with texture. Eggs provide structure and help bind everything together, giving the bars a nice lift. Vanilla extract adds warmth and depth to the flavor. Flour and cocoa powder make the base of the brownie. Flour gives the bars structure, while cocoa powder brings that deep chocolate taste we all love. Baking powder helps create a soft texture, while salt balances the sweetness and enhances flavors. The pecans bring a nice crunch and a nutty taste, while caramel sauce adds sweetness and richness. If you need some swaps, here are a few ideas. Use coconut oil instead of butter for a dairy-free option. You can replace granulated sugar with brown sugar for a deeper flavor. If you prefer, try using maple syrup or agave syrup as a sweetener. For a nut-free version, just leave out the pecans. You can use chocolate chips instead for extra chocolatey goodness. If you don’t have caramel sauce, a mix of honey and butter can work in a pinch. Experiment and find what you enjoy! To start, preheat your oven to 350°F (175°C). Grease a 9x13-inch baking pan. Line it with parchment paper, leaving some paper hanging over the sides. This helps with easy removal later. In a large bowl, mix melted butter and granulated sugar. Whisk until smooth. Add four eggs, one at a time, mixing well after each. Stir in one teaspoon of vanilla extract. In another bowl, sift together one cup of all-purpose flour, ¾ cup of unsweetened cocoa powder, ½ teaspoon of baking powder, and ½ teaspoon of salt. Gradually add this dry mix to the wet mixture, stirring until just combined. Be careful not to overmix. Now, gently fold in one cup of roughly chopped pecans. Pour half of the brownie batter into your prepared pan. Spread it evenly. Drizzle half of the caramel sauce over this layer. Carefully dollop the remaining batter on top. Smooth it out, then drizzle the rest of the caramel sauce on top. Use a knife to swirl the caramel into the batter for a nice look. Bake for 25-30 minutes. Check with a toothpick; it should come out clean or with a few moist crumbs. Once done, allow the brownies to cool completely in the pan on a wire rack. When cool, use the parchment paper to lift the brownies out. Cut them into bars of your choice. For a tasty touch, dust with powdered sugar and drizzle extra caramel sauce before serving. Enjoy these rich brownie bars! To keep your brownies soft, avoid overmixing. After you add the dry mix, stir gently. Use a spatula to fold in the flour, cocoa, and salt. Stop mixing as soon as you see no flour. Overmixing makes brownies tough. Keep them light and chewy by being gentle. For fudgy brownies, you need the right balance of wet and dry ingredients. Use melted butter to keep the bars moist. The eggs add richness and help bind everything together. Don’t bake too long; check for doneness at 25 minutes. A toothpick should come out with a few moist crumbs. This gives the brownies that perfect, gooey texture. Presentation makes a big difference. Once cool, lift the brownies out using the parchment paper. Cut them into even bars. For a special touch, dust the top with powdered sugar. Drizzle with extra caramel sauce for a sweet finish. Arrange them on a nice plate to impress your guests. Enjoy the rich flavors and delightful looks! {{image_4}} You can change the nuts in your brownie bars. Try walnuts or almonds for a new taste. You can also mix in chocolate chips. Dark chocolate or white chocolate makes a great addition. Just make sure to keep the total amount of mix-ins the same. This keeps the texture perfect. Adding spices can take your brownies to the next level. A pinch of cinnamon or nutmeg adds warmth. You might also try a bit of espresso powder for a coffee flavor. If you want a fruity twist, use almond or orange extract. Each option adds a unique flavor that can surprise your taste buds. You can make these brownie bars gluten-free. Replace all-purpose flour with a gluten-free flour blend. Ensure the blend contains xanthan gum for the right texture. To make them vegan, swap eggs for flax eggs. Mix one tablespoon of flaxseed meal with three tablespoons of water. This keeps the brownies moist and tasty. To keep your caramel pecan pie brownie bars fresh, store them in an airtight container. Line the container with parchment paper. This helps prevent sticking. Place a layer of brownie bars in the container and cover them with another sheet of parchment. This keeps them moist and tasty. Store them at room temperature for up to three days. If you want to keep them longer, refrigeration is a good option. You can freeze these brownie bars for later enjoyment. First, let the bars cool completely. Then, cut them into individual squares. Wrap each square tightly in plastic wrap. Place the wrapped bars in a freezer-safe bag or container. They can last up to three months in the freezer. When ready to eat, simply thaw them in the fridge overnight. To enjoy your leftover brownie bars warm, preheat your oven to 350°F (175°C). Place the bars on a baking tray and cover them loosely with foil. Heat for about 10-15 minutes. This will warm them without drying them out. You can also microwave them for 10-15 seconds if you want a quick treat. Serve with a drizzle of extra caramel sauce for a special touch! You can use walnuts or almonds. Both give a nice crunch. If you're nut-free, try sunflower seeds. They add texture without nuts. Yes, homemade caramel sauce works great! Just ensure it’s thick and creamy. This adds a personal touch to the bars. The brownies are done when a toothpick comes out clean or with a few moist crumbs. Start checking around 25 minutes. If it’s wet, bake for a few more minutes. Let them cool completely before cutting. This blog post covered how to make delicious brownies. You learned about key ingredients and their roles. We detailed step-by-step baking instructions, from prep to serving. I shared helpful tips to avoid overmixing and achieve the perfect texture. You also explored tasty variations, storage tips, and answered common questions. Now, you're ready to bake brownies that impress. With these insights, your brownies will surely be a hit. Enjoy the process and share your tasty creations with friends!

Caramel Pecan Pie Brownie Bars Delightful and Rich

To make this dish, gather the following items: - 1 tablespoon olive oil - 1 medium onion, finely diced - 3 cloves garlic, minced - 8 oz (225g) mushrooms, sliced (use either cremini or button) - 1 teaspoon dried thyme - 1 cup orzo pasta - 4 cups vegetable broth (preferably low-sodium) - 2 cups fresh spinach, packed down - 1/2 cup cream cheese (or substitute with vegan cream cheese) - 1/2 cup grated Parmesan cheese (or use nutritional yeast for a vegan alternative) - Salt and freshly ground black pepper, to taste - Fresh parsley, chopped, for garnishing If you can’t find some ingredients, don’t worry. Here are some easy swaps: - Olive oil: Can use avocado oil or butter for a different flavor. - Mushrooms: Try using shiitake or portobello for a meatier taste. - Cream cheese: Vegan cream cheese also works well for a dairy-free option. - Parmesan cheese: Nutritional yeast gives a nice cheesy flavor without dairy. Want to make this dish even better? Consider these add-ins: - Proteins: Add cooked chicken, shrimp, or tofu for extra nutrition. - Herbs: Fresh basil or dill can enhance the flavor profile. - Vegetables: Peas, bell peppers, or zucchini can add color and crunch. These ingredients and tips will help you create a creamy and delicious one-pot meal. Enjoy exploring flavors and making it your own! First, grab a large pot and add one tablespoon of olive oil. Heat it over medium heat. Toss in one medium onion, finely diced. Let it cook for about three to four minutes. You want the onion to be soft and clear. This step builds a nice base for the dish. Now, add three cloves of minced garlic and eight ounces of sliced mushrooms to the pot. You can use either cremini or button mushrooms. Stir in one teaspoon of dried thyme for flavor. Cook this mixture for five to seven minutes. Stir often until the mushrooms soften and lose moisture. This enhances their rich taste. Next, add one cup of orzo pasta to the pot. Mix it well so the pasta gets coated in the tasty blend. Pour in four cups of vegetable broth. Season with salt and freshly ground black pepper to your liking. Increase the heat to bring it to a boil. Then, lower it to a gentle simmer. Cover the pot and let it cook for about 10 to 12 minutes. Stir occasionally until the orzo is tender and absorbs most of the liquid. To make this dish pop, use fresh ingredients. Fresh spinach and mushrooms really shine. Sauté your onion until it's soft. This step builds a strong flavor base. Don't rush the mushrooms; let them brown a bit. This adds depth. Use low-sodium broth to control salt. Add a splash of lemon juice for brightness. A dash of nutmeg enhances the creaminess. One common mistake is overcooking the orzo. Stir it often, but don’t let it mush. Another error is skimping on the seasoning. Always taste before serving. If you use frozen spinach, thaw and drain it well. This prevents a watery dish. Avoid cooking the cream cheese at high heat; it can curdle. Add it in at the end for smoothness. This creamy orzo goes well with crusty bread. A side salad with a tangy dressing complements it nicely. Pair with white wine, like a crisp Sauvignon Blanc. For a heartier meal, serve with grilled chicken or sautéed shrimp. Fresh parsley on top adds both color and flavor. Enjoy your meal with loved ones for the best experience! {{image_4}} You can easily make this dish vegan. Just swap the cream cheese for vegan cream cheese. Use nutritional yeast instead of Parmesan. This option keeps the dish creamy and tasty. You still enjoy the rich flavors without dairy. Want to add some protein? Chicken works great in this dish. Simply cook and shred cooked chicken before adding it to the pot. For a plant-based option, use firm tofu. Press it to remove water, then cube and sauté it until golden. Both choices boost nutrition and make the dish more filling. You can customize your orzo with seasonal veggies. In spring, add peas or asparagus. In summer, try zucchini or bell peppers. In fall, use butternut squash or kale. These veggies keep your meal fresh and exciting. They add color and nutrition, enhancing the dish’s flavors. To store leftovers of your creamy mushroom and spinach orzo, let it cool first. Place it in an airtight container. It will keep in the fridge for up to three days. Make sure to label the container with the date you made it. This helps you track freshness. When you’re ready to eat, reheat the orzo on the stove for best results. Add a splash of vegetable broth to help it regain its creamy texture. Stir it gently over medium heat until it is warm. You can also use the microwave. Heat it in short bursts, stirring in between. This keeps the orzo from drying out. You can freeze the orzo if you want to save it for later. Place it in freezer-safe bags or containers. It will stay good for up to three months. When you’re ready to eat, thaw it overnight in the fridge. Then reheat it on the stove. Add a bit more broth or cream cheese to bring back the creaminess. It takes about 30 minutes to make this dish. You spend 10 minutes prepping the ingredients. Cooking takes around 20 minutes, including simmering time. This makes it a quick and easy meal for busy days. Yes, you can use other pasta types. If you want a different shape, try ditalini or small shells. Adjust cooking time as needed. Check the pasta package for guidelines. The key is to ensure the pasta cooks evenly in the broth. To make it extra creamy, add more cream cheese or Parmesan. You can also try stirring in a bit of heavy cream. Another option is to blend some cooked orzo with a little broth. This will boost the creaminess and flavor. Remember to taste as you go! This blog post covered all you need for One-Pot Creamy Mushroom and Spinach Orzo. You learned about the key ingredients, tasty substitutions, and optional add-ins. We walked through simple steps to make this dish easy at home. I shared tips for great flavor and common mistakes to avoid. You also discovered fun variations and how to store leftovers. Making this dish is a joyful journey. You can impress friends and family with ease. Enjoy your cooking!

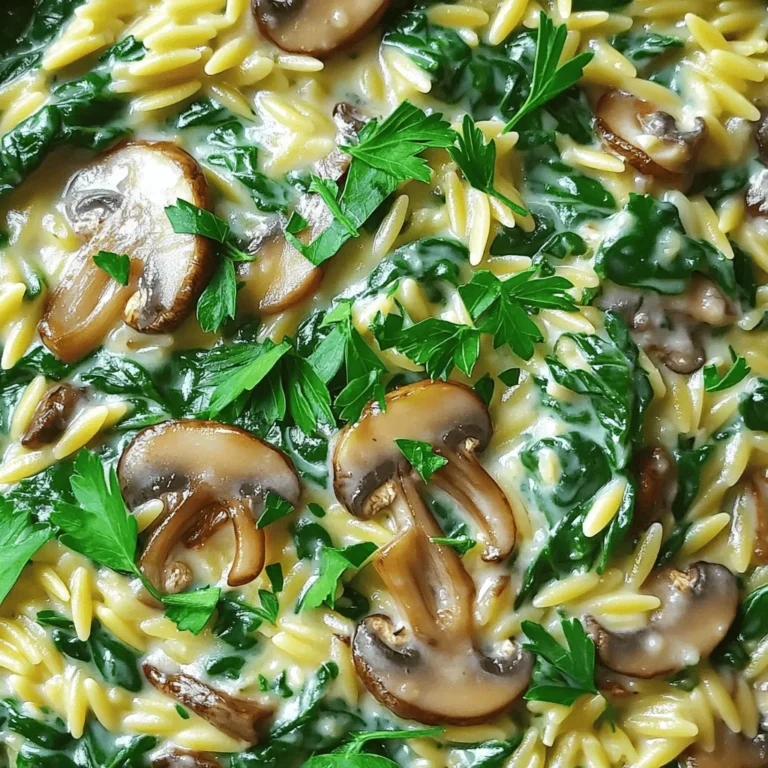
One-Pot Creamy Mushroom and Spinach Orzo Delight

For delicious chicken fajitas, you will need a few key ingredients: - 1 lb boneless, skinless chicken breasts, thinly sliced - 1 red bell pepper, sliced into thin strips - 1 green bell pepper, sliced into thin strips - 1 yellow onion, sliced into thin wedges - 3 tablespoons extra virgin olive oil - 2 tablespoons fajita seasoning (store-bought or homemade blend) - Juice of 1 lime - Salt and freshly ground black pepper, to taste - Fresh cilantro, finely chopped (for garnish) - Flour or corn tortillas, for serving - Optional toppings: sour cream and sliced avocado These ingredients come together quickly and create a colorful dish that is full of flavor. The chicken and veggies roast nicely, making each bite satisfying. You can choose between store-bought seasoning or make your own. Store-bought is quick and easy but may have added preservatives. If you make your own, you can control the flavors. A simple blend can include: - Chili powder - Cumin - Garlic powder - Onion powder - Paprika - Salt and pepper Mix these spices together for a fresh taste. I enjoy the homemade blend, as it brings out more flavor. When it comes to tortillas, you have options! Flour tortillas are soft and chewy, making them great for wrapping. Corn tortillas are gluten-free and have a nice, earthy flavor. For a twist, try using whole wheat tortillas for added fiber. Each type complements the fajitas well, so choose what you prefer. {{ingredient_image_2}} Start by preheating your oven to 425°F (220°C). This step is key for perfect roasting. A hot oven helps the chicken cook evenly and the veggies to caramelize. In a large bowl, combine 1 pound of thinly sliced chicken, 1 red bell pepper, 1 green bell pepper, and 1 yellow onion. Cut the peppers into thin strips and the onion into wedges. Drizzle 3 tablespoons of olive oil over the mixture. Add 2 tablespoons of fajita seasoning, the juice of 1 lime, and salt and pepper to taste. Toss everything well so all ingredients are coated. This ensures each bite bursts with flavor. Spread the chicken and vegetable mix evenly on a large sheet pan. Place the pan in your preheated oven. Bake for about 20 minutes. At the halfway mark, stir the mixture gently for even cooking. The chicken should be fully cooked, and the veggies should be tender when done. Once finished, remove the pan and let it rest for a few minutes. This resting time helps the flavors combine. Serve the warm mix on tortillas and enjoy! To get great flavor in your fajitas, use fresh ingredients. Fresh bell peppers and onions make a big difference. When you slice them thin, they cook evenly. Use good quality olive oil for richness. The lime juice adds a bright taste. Make sure to coat your chicken and veggies well in the seasoning. You can even let them marinate for 30 minutes before cooking. This helps the flavors blend better. If you have leftover fajitas, store them in an airtight container. Keep them in the fridge for up to three days. To reheat, use a skillet on low heat. This helps keep the chicken juicy and the veggies crisp. You can also microwave them for quick meals. Just cover them with a damp paper towel to keep moisture. For a fun presentation, use a large platter. Place the chicken and veggies in the center. Arrange tortillas around the edge. This lets everyone build their own fajita. Add a bowl of chopped cilantro and a lime wedge for color. If you have sour cream and avocado, serve them on the side. It makes for a tasty and inviting meal! Pro Tips Slice Evenly: Ensure that your chicken and vegetables are sliced into uniform pieces for even cooking. This helps everything to roast at the same rate and improves texture. Marinate for Flavor: For an extra flavor boost, consider marinating the chicken in the fajita seasoning and lime juice for at least 30 minutes before cooking. This will enhance the taste significantly. Use Fresh Ingredients: Fresh bell peppers and onions not only taste better but also bring vibrant colors to your dish. Look for firm, brightly colored produce for the best results. Customize Your Toppings: Get creative with your toppings! Try adding pickled jalapeños, diced tomatoes, or shredded cheese to your fajitas for extra flavor and texture. {{image_4}} You can easily make this dish vegetarian or vegan. Instead of chicken, use mushrooms or tofu. These options soak up flavors well. Just slice them thinly like chicken. Add the same veggies—red, green peppers, and onions. Use the same olive oil and fajita seasoning. Cook it the same way for a tasty meal. To change the heat level, add more or less fajita seasoning. If you like it mild, reduce the seasoning. For a spicy kick, add jalapeños or chili powder. Mix these into the chicken or veggie mix. This way, you control how hot it gets. You can also serve hot sauce on the side for those who want more heat. Toppings can really change how fajitas taste. Besides sour cream and avocado, try shredded cheese or fresh salsa. Guacamole adds creaminess and flavor. You can also offer chopped tomatoes and lettuce. These toppings add color and crunch. Arrange them on a tray for a fun taco bar. Let everyone build their own fajitas! To keep your fajitas fresh, let them cool first. Then, place them in an airtight container. Store the chicken and veggies separately from the tortillas. This will help keep them from getting soggy. You can keep them in the fridge for up to three days. When you're ready to eat, just take them out and enjoy! If you want to save some fajitas for later, freezing is a great option. First, cool the chicken and veggies completely. Next, pack them in a freezer-safe bag or container. Squeeze out as much air as you can. You can freeze them for up to three months. When you're ready to eat, defrost them in the fridge overnight. This keeps the flavors intact. To reheat your fajitas, use the oven for the best results. Preheat your oven to 350°F (175°C). Spread the chicken and veggies on a baking sheet. Heat them for about 10-15 minutes until hot. If you want to heat the tortillas, wrap them in foil and add them to the oven for the last five minutes. This way, everything stays nice and tasty! You bake chicken fajitas for about 20 minutes at 425°F (220°C). This high heat helps to cook the chicken and veggies quickly. Halfway through, stir the mixture gently. This ensures even cooking and browning. Yes, you can use other proteins. Try beef, shrimp, or tofu for a twist. Each protein cooks slightly differently. Adjust baking time as needed. For beef, slice it thin for quick cooking. Shrimp cooks faster, so check after 10 minutes. Tofu adds a creamy texture when roasted. The best toppings for chicken fajitas include sour cream and sliced avocado. Fresh cilantro adds a nice touch. You can also add salsa for a burst of flavor. Lime wedges are great for squeezing over your fajitas. Each topping adds a unique taste that enhances your meal! In this post, we explored how to make chicken fajitas from start to finish. We covered key ingredients, cooking steps, and tips for the best flavor. You can choose store-bought or homemade seasoning and pick your favorite tortillas. Remember, storing and reheating is easy if you follow the tips given. You can even try different proteins or spice levels to make it your own. Enjoy your fajitas, and don’t hesitate to experiment with variations and toppings!

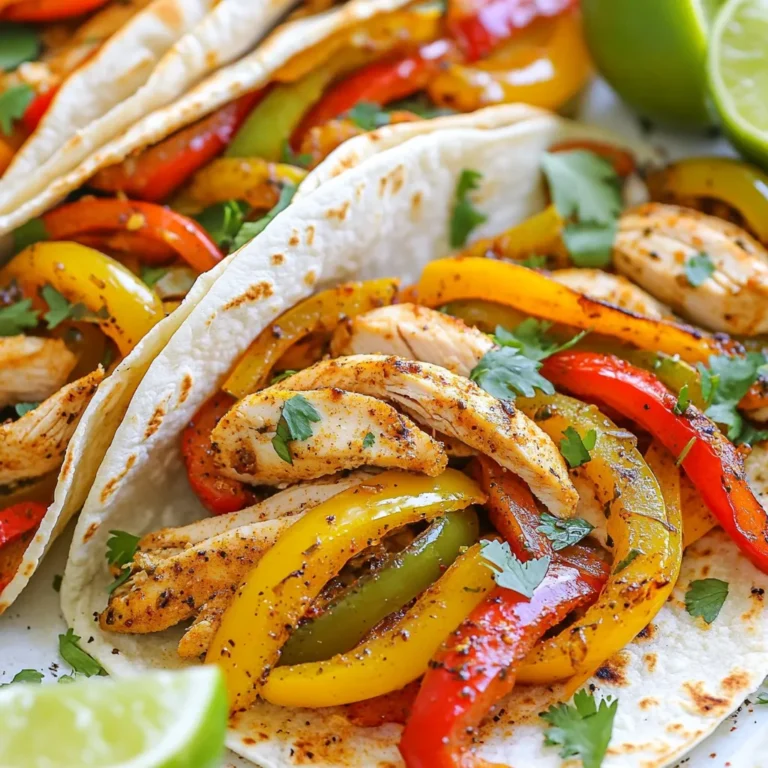
Minute Sheet Pan Chicken Fajitas Simple and Tasty

To make Nutella brownies, you will need: - 1 cup all-purpose flour - 1/2 cup unsweetened cocoa powder - 1 teaspoon baking powder - 1/4 teaspoon fine sea salt - 1/2 cup unsalted butter, melted and slightly cooled - 1 cup granulated sugar - 2 large eggs, at room temperature - 2 teaspoons pure vanilla extract - 1/2 cup Nutella (plus more for swirling) - 1/2 cup semi-sweet chocolate chips (optional) Each ingredient plays a key role. The flour gives structure, while cocoa adds rich flavor. Baking powder helps the brownies rise. The salt balances the sweetness. Melted butter makes them soft and moist. Sugar provides sweetness, and eggs bind everything together. Vanilla extract adds depth to the taste. Nutella brings that chocolate-hazelnut goodness, and chocolate chips add extra indulgence. If you need swaps, here are some options: - Use whole wheat flour for a heartier texture. - Swap cocoa powder with dark cocoa for a richer flavor. - Coconut oil can replace unsalted butter for a dairy-free option. - Try brown sugar instead of granulated sugar for a deeper taste. - If you’re out of eggs, use flaxseed meal mixed with water as a binder. - Almond butter can stand in for Nutella if you prefer a nut flavor. These swaps keep the brownies delicious while catering to different needs. Start by preheating your oven to 350°F (175°C). This ensures even baking. Next, take an 8x8 inch baking pan. You can grease it lightly or line it with parchment paper. If you line it, make sure some paper hangs over the edges. This will help you lift the brownies out later. In a medium bowl, sift together the all-purpose flour, unsweetened cocoa powder, baking powder, and fine sea salt. Sifting helps mix these dry ingredients well. Once done, set this bowl aside. In a large bowl, combine the melted butter and granulated sugar. Use a whisk to mix until smooth. Now, add the two large eggs, one at a time. Whisk well after each egg. The mixture should look creamy. Finally, stir in the pure vanilla extract until it blends in fully. Now it’s time to combine the dry mixture with the wet mixture. Use a spatula to fold the dry ingredients into the wet ones. Mix gently until just combined. It’s okay if a few streaks of flour remain. Pour half of the brownie batter into the prepared pan. Use a spatula to smooth it out. Next, drop spoonfuls of Nutella evenly on top of the batter. Take a knife or skewer to swirl the Nutella into the batter. Be careful not to overdo it; you want a nice marble effect. After that, pour the rest of the brownie batter on top. Use the spatula again to smooth it out. Add more dollops of Nutella on top and swirl again. Bake your brownies in the preheated oven for 25-30 minutes. To check if they are done, insert a toothpick into the center. It should come out with a few moist crumbs but no wet batter. This means they are ready! Once baked, let them cool in the pan for at least 10 minutes. Use the parchment paper to lift them out and place them on a wire rack to cool completely. Now you can slice them into 16 squares and enjoy with friends and family! To create a lovely swirl, use a knife or skewer. Gently drop spoonfuls of Nutella across the batter. Then, swirl it in with soft, smooth movements. Avoid over-mixing; you want bold swirls, not a single color. This makes your brownies look beautiful and appetizing. For chewy brownies, avoid over-mixing your batter. Mix just until the flour disappears. Also, baking for the right time is key. Check the brownies around 25 minutes. They should have a few moist crumbs on the toothpick. If you bake too long, they will turn dry. Serve your brownies with flair! Dust them with powdered sugar for a sweet touch. You can also drizzle melted Nutella on top. If you want to impress, add a scoop of vanilla ice cream beside each piece. This makes your dessert look fancy and taste even better. {{image_4}} If you want to make nut-free brownies, you can skip the Nutella. Use sunflower seed butter instead. This gives a similar creamy texture. You can also use a chocolate spread that is nut-free. Look for brands that say "nut-free" on the label. To make your brownies even more tasty, add nuts or spices. Chopped walnuts or pecans add a nice crunch. If you like spices, try adding a pinch of cinnamon or espresso powder. This gives a rich flavor without changing the base. You can also mix in some mint or orange zest for a fresh twist. For a gluten-free option, swap all-purpose flour with almond flour or a gluten-free blend. Make sure the baking powder is gluten-free too. These changes keep the brownies chewy and delicious. You won’t miss the gluten at all! To keep your Nutella brownies fresh, store them in an airtight container. Place parchment paper between layers to avoid sticking. Keep them at room temperature for the best taste. Avoid exposing them to heat or direct sunlight. If you want to enjoy them later, freezing is a great option. When stored correctly, these brownies last about 3 to 4 days at room temperature. If you keep them in the fridge, they can last up to a week. The flavor may change slightly in colder environments, but they will still taste great. Just make sure to check for any signs of spoilage before you dig in. For freezing, wrap the brownies well in plastic wrap. Then place them in a freezer-safe bag. Make sure to label the bag with the date. They can stay fresh for up to 3 months in the freezer. When ready to enjoy, thaw them overnight in the fridge. You can also warm them in the microwave for a cozy treat. Yes, you can make Nutella brownies without eggs. You can use unsweetened applesauce or mashed bananas as a substitute. This will keep the brownies moist and help them hold together. Use 1/4 cup of either for each egg. To check if brownies are done, insert a toothpick in the center. If it comes out with a few moist crumbs, they are done. If it has wet batter, they need more time. Bake them for 25-30 minutes and check early to avoid overbaking. Nutella brownies pair well with several treats. A scoop of vanilla ice cream adds creaminess. Fresh berries bring a tart balance. You can also serve whipped cream or a drizzle of extra Nutella for a rich touch. Yes, you can use other nut spreads. Almond butter or peanut butter work well. Choose spreads that have a similar texture to Nutella. This keeps the same creamy and rich flavor profile. To reheat brownies, place them in the oven at 350°F (175°C) for 5-10 minutes. You can also use the microwave for 10-15 seconds. This will warm them up and make them soft again. Enjoy your tasty treat! You now have all you need to make delicious Nutella brownies. We covered the ingredients, detailed measurements, and even substitutions. I shared step-by-step instructions that make it easy. You learned tips for achieving the perfect swirl and chewy texture. Try different variations, like nut-free or gluten-free options. Remember how to store and reheat your brownies to keep them fresh. Enjoy baking these tasty treats and impress your friends and family with your skills!

Ingredient Nutella Brownies That Everyone Will Love

PREV 1 … 6 7 8 … 17 NEXT
tastykitchentales

explore

DessertsDinnerAppetizersDrinks

Our Policies

  • Cookie Policy
  • Copyright Policy
  • Disclaimer
  • GDPR Policy
  • Terms Of Use
Back to Top
  • About
  • Contact Us
  • Privacy Policy
© 2025 tastykitchentales