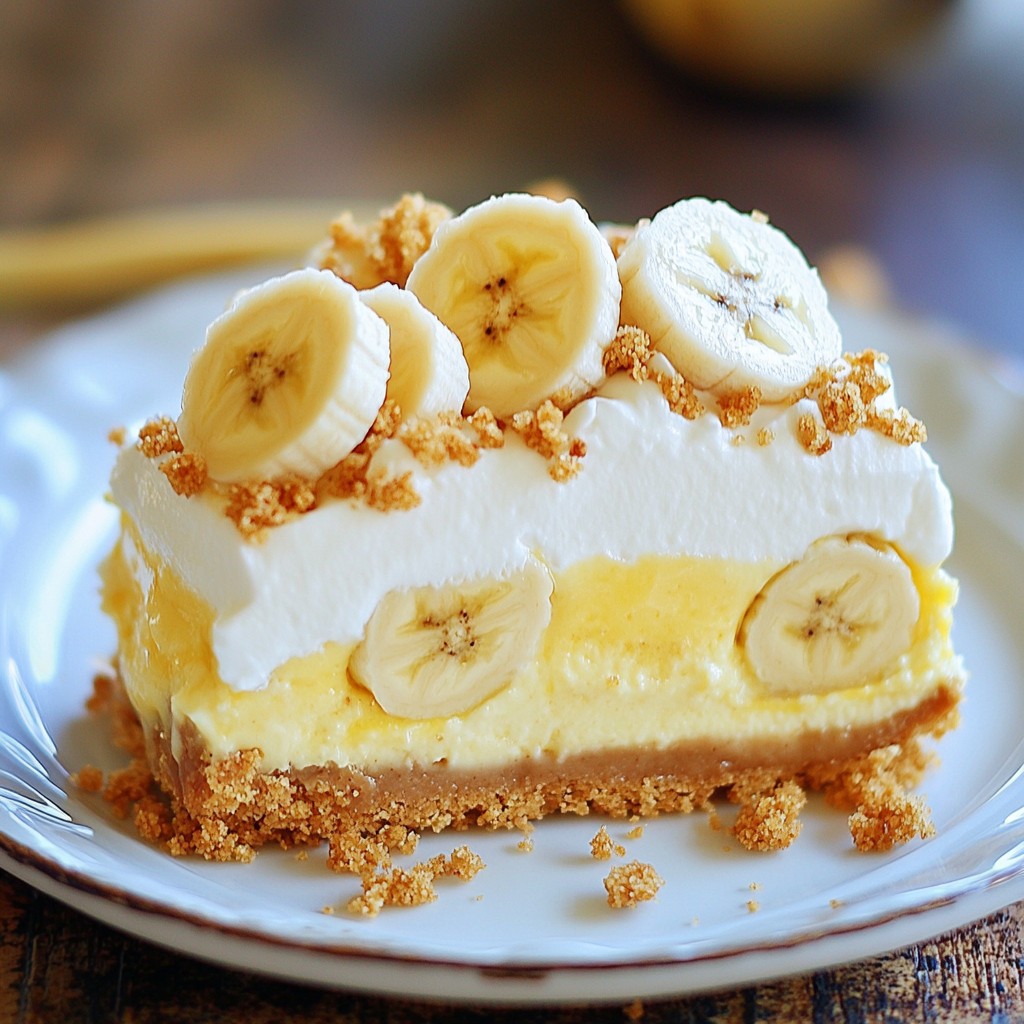
Are you ready to take your dessert game to the next level? This Banana Pudding Crunch Cheesecake combines creamy cheesecake with the classic taste of banana pudding and crunchy wafers. It’s a delightful treat that's perfect for any occasion. In this guide, I'll walk you through easy steps and share tips that will make your cheesecake a showstopper. Let’s dive into this delicious recipe and impress your friends and family!
Why I Love This Recipe
- Deliciously Creamy: This cheesecake combines the rich creaminess of cream cheese with the smoothness of mashed bananas, creating a delightful texture that melts in your mouth.
- Perfect for Any Occasion: Whether it's a family gathering, birthday party, or holiday celebration, this banana pudding crunch cheesecake is a crowd-pleaser that fits any event.
- Easy to Make: With simple ingredients and straightforward steps, even novice bakers can successfully whip up this impressive dessert without a hitch.
- Beautiful Presentation: The layers of whipped topping, fresh banana slices, and crumbled wafers not only taste great but also create a stunning visual appeal that impresses guests.
Ingredients
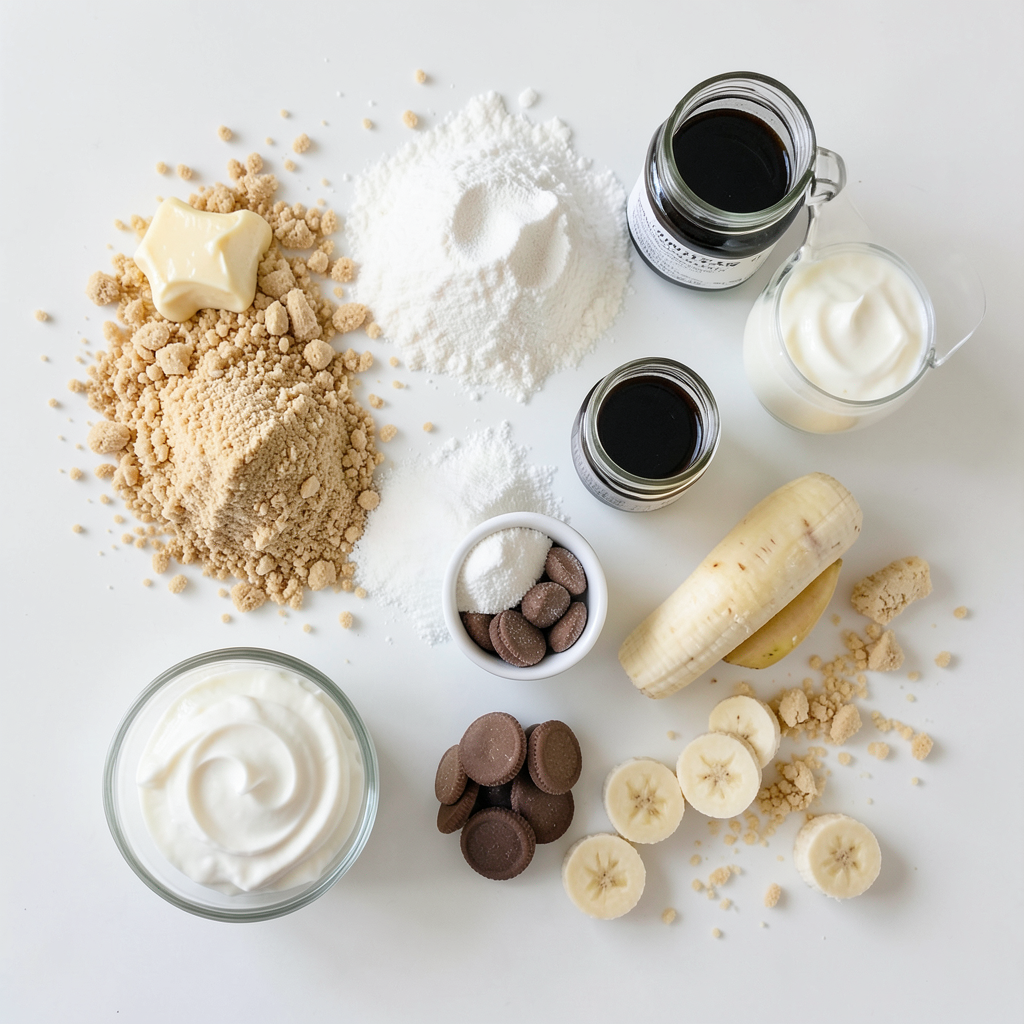
List of Ingredients
- Main ingredients for Banana Pudding Crunch Cheesecake
- 1 ½ cups graham cracker crumbs
- ½ cup unsalted butter, melted
- 1 tablespoon granulated sugar
- 2 (8 oz) packages cream cheese, softened to room temperature
- 1 cup powdered sugar
- 1 teaspoon vanilla extract
- 2 ripe bananas, mashed until smooth
- 1 cup heavy cream
- 1 cup mini vanilla wafers, crushed into small pieces
- 1 cup whipped topping (such as Cool Whip)
- Slices of banana and crumbled wafers, for garnish
- Optional ingredients for added flavor
- 1 teaspoon banana extract (for an intensified banana flavor)
When making this cheesecake, I like to use fresh, ripe bananas. They add the best flavor. The graham cracker crumbs give a nice crunch. The cream cheese and whipped topping make it creamy and smooth. If you want a stronger banana taste, add the banana extract. It really enhances the dish!
Step-by-Step Instructions
Prepare the Crust
First, preheat your oven to 350°F (175°C). In a medium bowl, mix together 1 ½ cups of graham cracker crumbs, ½ cup of melted unsalted butter, and 1 tablespoon of granulated sugar. Stir until it looks like wet sand. Next, press this mix into the bottom of a 9-inch springform pan. Make sure it’s even. Bake the crust for 10 minutes, then let it cool completely while you prepare the filling.
Make the Cream Cheese Mixture
In a large bowl, use an electric mixer to beat 2 packages of softened cream cheese. Mix it until it’s smooth and creamy. Gradually add in 1 cup of powdered sugar and 1 teaspoon of vanilla extract. Keep mixing until the mixture is fluffy and well combined.
Combine Ingredients
Now, gently fold in 2 mashed bananas and 1 teaspoon of banana extract (if you want more banana flavor) into the cream cheese mix. Be careful not to overmix; just fold until everything is combined. In a separate bowl, pour in 1 cup of heavy cream and whip it until stiff peaks form. Then, carefully fold the whipped cream into the banana mixture. Make sure to keep the texture airy.
Assemble the Cheesecake
Pour half of the banana cheesecake filling into the cooled crust. Spread it evenly. Next, sprinkle a layer of crushed vanilla wafers over the filling. Then, add the rest of the banana cheesecake mixture on top. Cover it well and chill in the fridge for at least 4 hours, or overnight if you can wait! This helps the cheesecake set right.
After chilling, remove the cheesecake from the springform pan. Top it with whipped topping and decorate with fresh banana slices and extra crumbled wafers. Enjoy this delightful dessert!
Tips & Tricks
Perfecting the Texture
Folding is key for a light cheesecake. When you mix in the whipped cream, use a gentle motion. This keeps the air inside, making your cheesecake fluffy. Always fold until you see no streaks. If you mix too hard, the air will escape.
For a fluffy filling, use room temperature cream cheese. This helps it mix easily with sugar and vanilla. Make sure you beat it until smooth. This step is crucial for a creamy texture.
Flavor Enhancements
Using fresh ingredients makes a big difference. Choose ripe bananas for the best taste. They should be soft and sweet. If you want to boost the banana flavor, add banana extract. It’s optional but highly recommended.
You can also explore other flavors. Try adding a layer of chocolate or caramel sauce. This gives a fun twist to your cheesecake. Top it with fresh berries or a sprinkle of cinnamon for extra flair.
Pro Tips
- Use Ripe Bananas: The riper the bananas, the sweeter and more flavorful your cheesecake will be. Look for bananas with brown spots for optimal taste.
- Chill Overnight: For the best texture and flavor, allow your cheesecake to chill overnight. This helps it set properly and enhances the banana flavor.
- Whipped Cream Folding: When adding whipped cream to the banana mixture, fold gently to maintain its light and airy texture. This ensures a fluffy cheesecake.
- Garnish with Style: For a beautiful presentation, layer fresh banana slices and crumbled wafers on top just before serving to keep them crisp.
Variations
Ingredient Swaps
You can switch up the crust for a fun twist. Try using crushed Oreo cookies or even almond flour for a gluten-free option. These swaps add unique flavors and textures to your cheesecake.
If you want to go beyond bananas, consider adding berries. Blueberries or strawberries mix well with the creamy filling. You might also try mango or pineapple for a tropical vibe. Each fruit brings its own taste to the dish.
Dietary Modifications
For a gluten-free cheesecake, use gluten-free cookies for the crust. Make sure to check labels when buying ingredients. This way, everyone can enjoy this treat.
To make it vegan, swap the cream cheese for a dairy-free alternative. Use coconut cream instead of heavy cream for a rich texture. You can also replace the whipped topping with a dairy-free version. This keeps the cheesecake creamy without dairy.
Storage Info
Best Storage Practices
To store leftover cheesecake, first let it cool completely. Then, cover it tightly with plastic wrap. You can also place it in an airtight container. This keeps it fresh and tasty. For best quality, eat the cheesecake within five days. After that, the taste and texture may change.
Freezing Tips
To freeze your cheesecake, slice it into pieces first. Wrap each piece in plastic wrap, then place them in a freezer-safe bag. This helps keep the flavor and texture. When ready to eat, take a slice out and thaw it in the fridge overnight. Avoid thawing at room temperature, as it may get too soft. Enjoy the delicious taste just like fresh!
FAQs
How can I make this cheesecake ahead of time?
You can easily prepare this cheesecake a day in advance. Start by making the crust and filling. Once you assemble the cheesecake, cover it tightly with plastic wrap. Chill it in the fridge for at least four hours, but overnight is best. This waiting time helps the flavors mix well. The cheesecake will taste even better the next day!
Can I use different types of bananas?
Yes, you can use different types of bananas. Ripe bananas are best for this recipe. They are sweet and have a rich flavor. Overripe bananas work too, as they are very soft and sweet. Just remember to mash them well, so they blend smoothly into your cheesecake. Avoid using green bananas, as they are too firm and lack the sweet taste you want.
What if my cheesecake doesn't set properly?
If your cheesecake does not set, it might need more chilling time. Make sure your fridge is cold enough. Sometimes, if the filling is too warm when you pour it into the crust, it can cause issues. If it is still soft after chilling, you can try placing it in the freezer for a short time. Just watch it closely to avoid freezing it completely!
This guide showed how to make Banana Pudding Crunch Cheesecake. We covered the main ingredients and optional extras. I shared step-by-step instructions for a perfect crust and filling. You learned tips for texture and flavor, along with storage best practices.
Enjoy experimenting with variations to suit your taste. You now have all the tools to craft a delicious cheesecake at home. Happy baking!