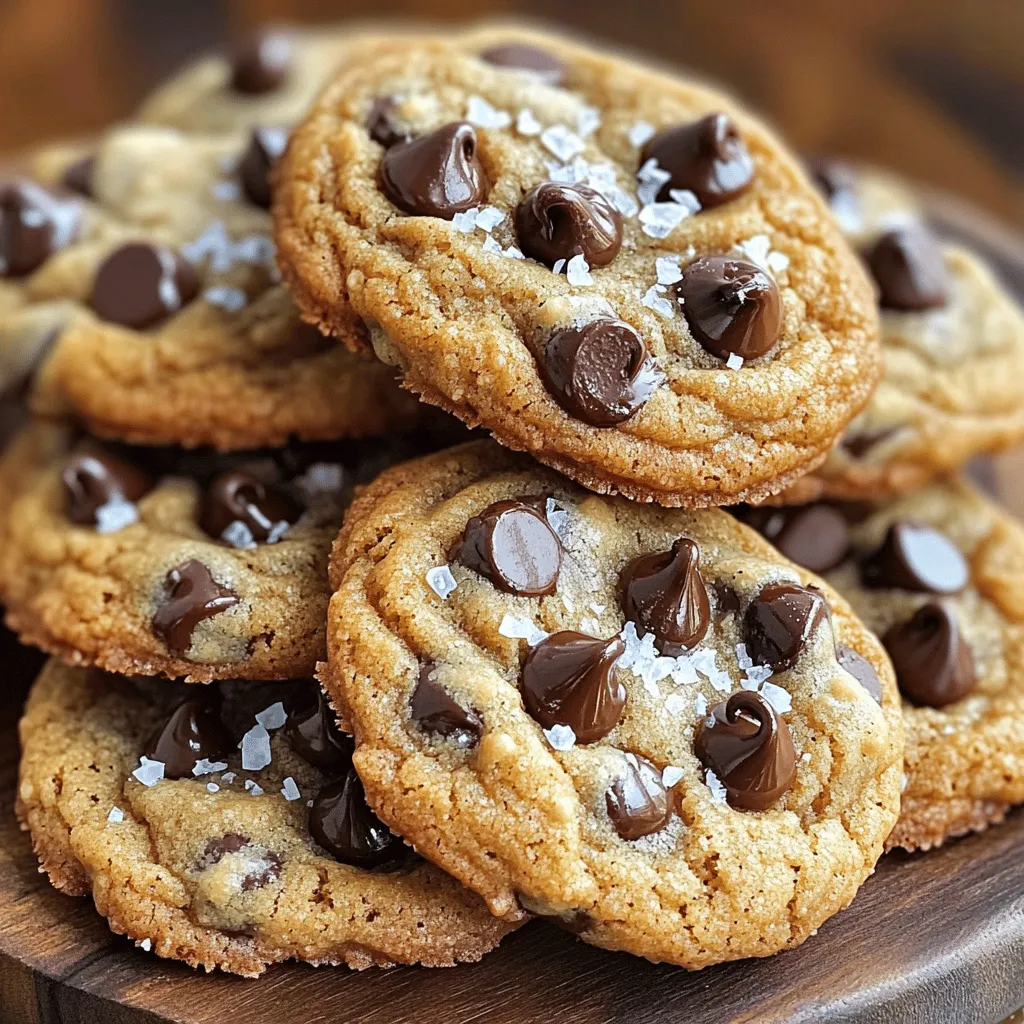
If you love chocolate chip cookies, you must try my brown butter version. This treat has deep, nutty flavors that will make your taste buds dance. In this post, I’ll share the secrets to making the perfect brown butter chocolate chip cookies, from the right ingredients to essential tips. Whether you’re a baking pro or just starting, I promise these cookies will be your new favorite!
Ingredients
List of Ingredients
– 1 cup (2 sticks) unsalted butter
– 1 cup packed brown sugar
– 1/2 cup granulated sugar
– 2 large eggs
– 2 teaspoons pure vanilla extract
– 3 cups all-purpose flour
– 1 teaspoon baking soda
– 1/2 teaspoon salt
– 1 1/2 cups semi-sweet chocolate chips
– Flaky sea salt for topping (optional)
Notes on Ingredient Quality
Using high-quality butter is key. I prefer unsalted butter for better control of salt. Fresh eggs make a big difference in texture. Choose pure vanilla extract for the best flavor. Opt for semi-sweet chocolate chips that melt well. The flour should be all-purpose for the right balance. Each ingredient plays a role in taste and texture.
Possible Substitutions
If you’re out of unsalted butter, use salted butter but skip any added salt. You can swap brown sugar for coconut sugar for a unique twist. For a lighter cookie, use egg whites only. If you want a gluten-free option, try almond flour or a gluten-free blend. Mixing in dark chocolate chips or nuts can add exciting flavors.
Step-by-Step Instructions
Preparing the Browned Butter
To start, we need to brown the butter. Grab a medium saucepan and put it on medium heat. Add 1 cup of unsalted butter to the pan. Stir the butter as it melts. It will foam at first, so keep an eye on it. When the foam goes down, the butter will turn a deep, golden brown. At this point, it will smell nutty and delicious. Once it reaches this color, take it off the heat and let it cool for a few minutes.
Mixing the Cookie Dough
Next, let’s make the cookie dough. In a large mixing bowl, pour in the browned butter. Add 1 cup of packed brown sugar and 1/2 cup of granulated sugar. Whisk these together until smooth and creamy. Now, add in 2 large eggs, one at a time. Mix well after each egg. After that, add 2 teaspoons of pure vanilla extract and mix until everything is well combined.
In another bowl, whisk together 3 cups of all-purpose flour, 1 teaspoon of baking soda, and 1/2 teaspoon of salt. Gradually add this dry mix to the wet ingredients. Use a spatula to fold it in gently. Be careful not to overmix, as we want our cookies to stay tender. Finally, fold in 1 1/2 cups of semi-sweet chocolate chips until they are evenly spread throughout the dough.
Chilling and Baking Tips
Now, it’s time to chill the dough. Cover the bowl with plastic wrap and place it in the fridge. Let it chill for at least 30 minutes, or up to an hour. This step is key! Chilling helps the flavors blend and makes the cookies chewier.
While the dough chills, preheat your oven to 350°F (175°C). Prepare two baking sheets by lining them with parchment paper. Once the dough is ready, scoop out rounds using a cookie scoop or a tablespoon. Place them on the sheets, leaving about 2 inches between each one. For a little extra flavor, sprinkle a pinch of flaky sea salt on top of each mound.
Bake the cookies for 10 to 12 minutes. They should be golden at the edges but still soft in the middle. After baking, let them cool on the sheets for 5 minutes. Then, move them to a wire rack to cool completely. Enjoy your delicious brown butter chocolate chip cookies!
Tips & Tricks
Achieving the Perfect Texture
To get the best texture, you need to chill the dough. This step helps the cookies keep their shape. If you skip this, your cookies may spread too much. Aim for a soft but slightly firm dough. Remember, don’t overmix! Overmixing can lead to tough cookies. You want a tender cookie that melts in your mouth.
Flavor Enhancements
Brown butter gives a rich, nutty flavor. To boost this, you can add a pinch of cinnamon. This small addition brings warmth without being overpowering. Using high-quality chocolate chips is also key. They melt beautifully and add depth to each bite. If you love salt, sprinkle flaky sea salt on top. It adds a delightful contrast to the sweetness.
Common Mistakes to Avoid
One mistake is not measuring flour correctly. Too much flour makes cookies dry. Use the spoon and level method for accuracy. Another common error is baking cookies too long. Keep an eye on them! They should be golden around the edges but soft in the center. Lastly, don’t forget to let them cool slightly on the baking sheet. This helps them firm up without becoming hard.
Variations
Nutty Additions
You can add nuts to your cookies for extra crunch. Chopped walnuts or pecans work great. Use about 1 cup of nuts and fold them in with the chocolate chips. This gives the cookies a rich, nutty flavor. It also adds a nice texture that many love.
Alternative Chocolate Types
Not a fan of semi-sweet chocolate? No problem! You can use milk chocolate or dark chocolate instead. Each type changes the taste of the cookie. If you want a fun twist, try adding white chocolate chips or butterscotch chips. Mix and match to find your favorite combo!
Dietary Modifications
For those with dietary needs, you can make swaps. Use vegan butter and dairy-free chocolate chips for a vegan version. If you need gluten-free cookies, use a gluten-free flour blend. These changes keep the cookies tasty while meeting your needs. Don’t be afraid to experiment!
Storage Info
How to Store Cookies
To keep your brown butter chocolate chip cookies fresh, store them in an airtight container. Make sure the cookies cool completely before sealing them. If stored properly, they can last for up to one week. You can also place a slice of bread in the container. This helps keep the cookies soft.
Freezing Cookies for Later
Freezing cookies is a great way to enjoy them later. After baking, let the cookies cool fully. Then, place them in a single layer on a baking sheet and freeze for about an hour. Once frozen, transfer them to a freezer-safe bag. They can last up to three months. Just thaw them at room temperature before eating.
Storing Cookie Dough
If you want to save cookie dough, it’s easy! Shape the dough into balls and place them on a baking sheet. Freeze the balls for about an hour. After that, transfer them to a freezer bag. This way, you can bake fresh cookies anytime. The dough can last for up to three months in the freezer. When ready to bake, just add a few extra minutes to the baking time. Enjoy your cookies fresh!
FAQs
What makes brown butter special for cookies?
Brown butter adds a rich, nutty flavor to cookies. When you heat butter, it changes. It turns a deep brown and gives off a sweet aroma. This process creates a complex taste that lifts your cookies to a new level. The toasty notes of brown butter mix well with chocolate chips. They give each bite a warm, comforting feel. Using brown butter makes your cookies stand out and taste more gourmet.
Can I use a hand mixer instead of whisking by hand?
Yes, you can use a hand mixer. A hand mixer makes it easier to blend the sugars and butter. It also helps mix in the eggs and vanilla smoothly. Just be careful not to overmix when you add the dry ingredients. Overmixing can make your cookies tough. If you prefer whisking by hand, that works too! It just takes a bit more muscle and time.
How do I know when the cookies are done baking?
Look for golden edges and soft centers. The cookies should be lightly browned around the edges. They may look a bit underbaked in the center, but that’s okay. They will continue to cook on the baking sheet after you take them out. Let them cool for a few minutes before moving them to a wire rack. This way, they firm up and are easier to handle.
In this blog post, we covered all you need for perfect cookies. I shared key ingredients, tips for making great cookie dough, and how to store your treats. Remember to use quality ingredients and avoid common mistakes. Brown butter adds a delicious flavor boost. These simple steps ensure tasty cookies every time. With these tools, you can make cookies your friends will love. Enjoy baking and tasting your creations!