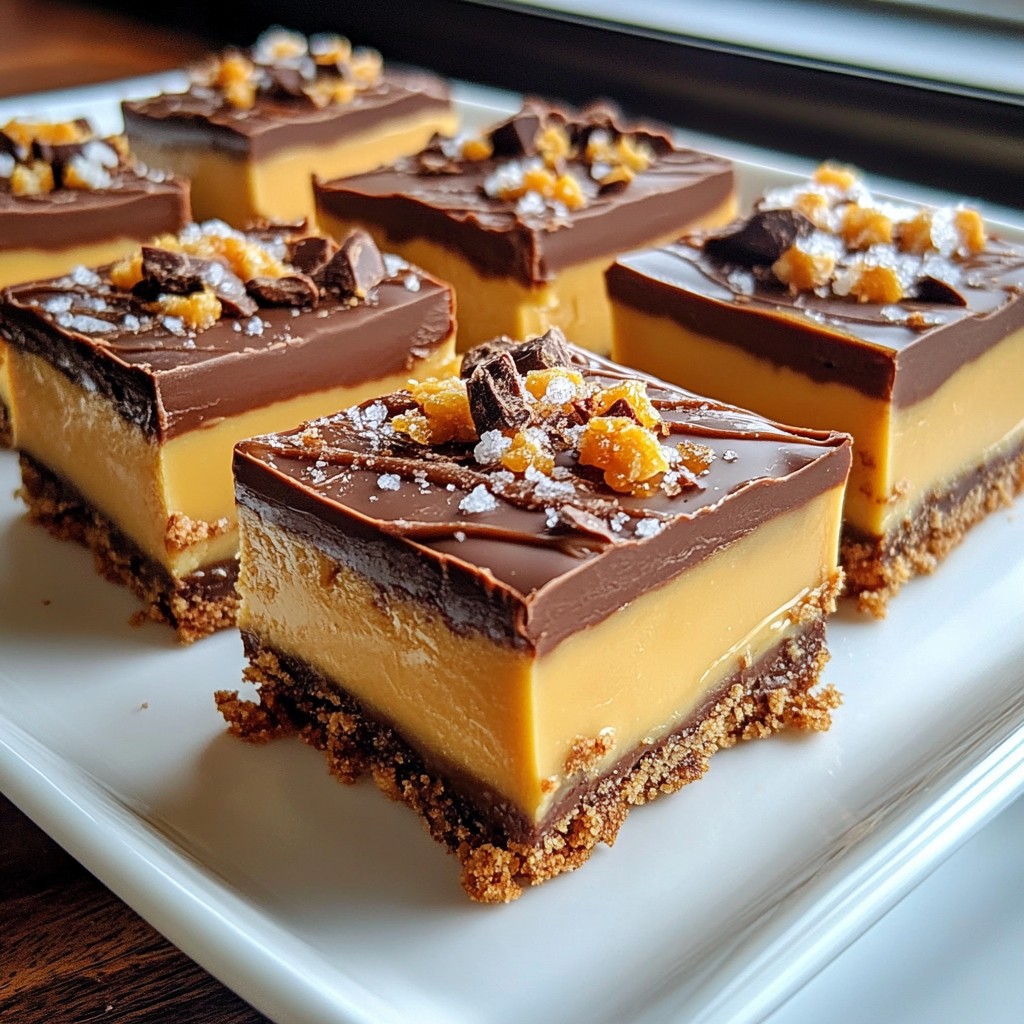
If you’re craving a sweet treat that’s both crunchy and creamy, look no further! My Butterfinger Caramel Crunch Bars combine flavors and textures in a fun way. With graham cracker crumbs, rich chocolate, and of course, Butterfinger candy bars, these bars are hard to resist. Read on to discover how to whip up this easy dessert that will impress everyone! Your taste buds will thank you!
Why I Love This Recipe
- Decadent Flavor Combination: The rich milk chocolate, creamy peanut butter, and sweet caramel create an irresistible treat that satisfies all your cravings.
- Easy to Make: This recipe comes together quickly with minimal prep time, making it perfect for last-minute dessert emergencies!
- Perfect for Sharing: With 16 bars, these treats are ideal for parties, gatherings, or just sharing with family and friends.
- Customizable Toppings: Feel free to experiment with different toppings, like nuts or drizzles, to make these bars your own!
Ingredients
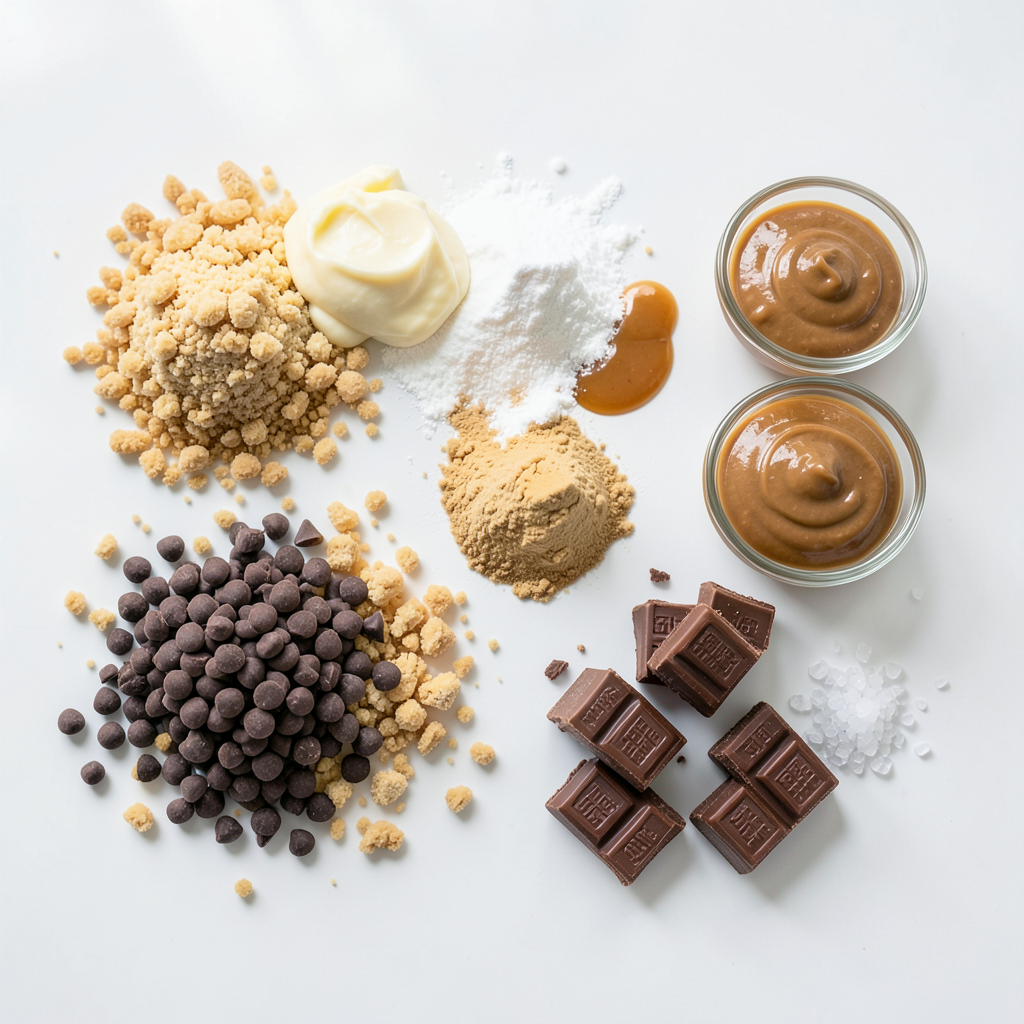
List of Ingredients
- 1 cup graham cracker crumbs
- 1 cup milk chocolate chips
- 1/2 cup unsalted butter, melted
- 1 cup crunchy peanut butter
- 1 cup powdered sugar
- 1 cup caramel sauce (store-bought or homemade)
- 1 cup Butterfinger candy bars, crushed
- Sea salt for garnish (optional)
These ingredients make your Butterfinger Caramel Crunch Bars so special. The graham cracker crumbs form a crunchy base. The milk chocolate chips bring a rich flavor. Unsalted butter helps bind everything together. Crunchy peanut butter adds a lovely texture. Powdered sugar sweetens the mix perfectly.
Caramel sauce is what makes these bars ooey-gooey. The crushed Butterfinger bars give that familiar taste. Lastly, sea salt is optional but can enhance the sweet flavors. Each ingredient plays a role in creating a treat you can't resist. Enjoy using these simple yet delicious ingredients to craft your bars!
Step-by-Step Instructions
Preparation Steps
1. Preheat the oven and prepare the baking pan
Start by preheating your oven to 350°F (175°C). Line an 8x8 inch baking pan with parchment paper. Make sure the paper hangs over the sides. This helps when lifting the bars out later.
2. Create and press the graham cracker crust
In a medium bowl, mix 1 cup of graham cracker crumbs with 1/2 cup of melted unsalted butter. Stir until it looks crumbly. Firmly press this mixture into the bottom of your prepared baking pan. This forms a solid base for the bars.
3. Cool the crust and prepare the peanut butter layer
Bake the crust for 8–10 minutes until it is golden. Once done, take it out and let it cool for a bit. In another bowl, mix 1 cup of crunchy peanut butter with 1 cup of powdered sugar and half of the crushed Butterfinger bars. Stir until well combined. Spread this peanut butter mixture evenly over the cooled crust.
4. Assemble the layers and melt the chocolate
Drizzle 1 cup of caramel sauce over the peanut butter layer. Spread it out using a spatula. In a microwave-safe bowl, melt 1 cup of milk chocolate chips. Do this in 30-second bursts, stirring in between, until the chocolate is smooth. Pour the melted chocolate over the caramel layer and spread it evenly.
5. Top with crushed Butterfinger and optional sea salt
Sprinkle the remaining crushed Butterfinger bars on top of the melted chocolate. Press them in gently so they stick. If you like, add a pinch of sea salt to enhance the flavor.
6. Chill and set the bars
Place the pan in the fridge for at least 2 hours. This allows the bars to set completely. Once they are firm, lift them out using the parchment paper overhang. Cut them into squares or rectangles for serving.
Tips & Tricks
Baking Tips
- Ensuring the perfect crust texture: To get a great crust, press the graham cracker mix firmly into the pan. It should feel solid and not crumbly. Bake it until it is just golden, about 8–10 minutes.
- Best practices for melting chocolate: Use a microwave-safe bowl. Heat the chocolate in 30-second bursts. Stir well in between. This helps avoid burning and keeps the chocolate smooth.
- Tips for cutting bars cleanly: For neat cuts, chill the bars until firm. Use a sharp knife, dipping it in warm water before cutting. Wipe the knife after each cut to keep edges clean.
Serving Suggestions
- Presentation ideas for serving: Serve your Butterfinger Caramel Crunch Bars on a nice platter. Drizzle extra caramel on top. Add whole Butterfinger bars as a decorative touch.
- Pairing with drinks or desserts: These bars pair well with milk, coffee, or hot chocolate. For dessert, try serving them with vanilla ice cream or whipped cream on the side.
Pro Tips
- Chill the Chocolate: To achieve a perfect chocolate layer, ensure the melted chocolate is slightly cooled before pouring it over the caramel. This prevents the layers from mixing.
- Use Fresh Ingredients: For the best flavor, use fresh, high-quality Butterfinger bars and caramel sauce. This will enhance the overall taste of your dessert.
- Experiment with Toppings: Feel free to customize your bars by adding nuts, sprinkles, or different types of chocolate on top for extra crunch and visual appeal.
- Cutting Tips: For clean cuts, use a sharp knife and wipe it between cuts to prevent sticking. You can also warm the knife slightly for easier slicing.
Variations
Ingredient Swaps
You can change some ingredients in Butterfinger Caramel Crunch Bars to suit your taste.
- Alternative nut butters: Instead of crunchy peanut butter, try almond or cashew butter. These nut butters add a new flavor while keeping the texture creamy.
- Using different chocolate types: Swap milk chocolate for dark chocolate or white chocolate. Dark chocolate adds a rich taste, while white chocolate gives a sweet, creamy layer.
These simple swaps can create a whole new experience with each bite.
Seasonal Variations
You can also change your bars to fit the season.
- Holiday-themed additions: For Halloween, add orange and black sprinkles on top. For Christmas, mix in peppermint bits for a minty twist. These festive touches make your bars more fun and seasonal.
- Incorporating fruits or nuts for different flavors: Try adding chopped nuts like walnuts or pecans for crunch. You can also mix in dried fruits like cranberries or cherries. These fruits bring brightness and a slight chewiness to the bars.
These variations can help you enjoy Butterfinger Caramel Crunch Bars all year long.
Storage Info
How to Store
To keep your Butterfinger Caramel Crunch Bars fresh, store them in an airtight container. I recommend using a glass or plastic container with a tight seal. This helps prevent them from drying out. You can layer parchment paper between the bars to avoid sticking. Keep them in a cool, dry place, away from heat and sunlight.
Freezing Recommendations
You can freeze these bars for later enjoyment. First, wrap them tightly in plastic wrap or aluminum foil. Then, place them in a freezer-safe container. They will stay fresh for up to three months in the freezer. When you’re ready to eat, simply take them out and let them thaw in the fridge for a few hours. Never refreeze them once they’re thawed. This way, you’ll keep the taste and texture just right!
FAQs
Can I make these bars gluten-free?
Yes, you can make these bars gluten-free. Simply use gluten-free graham cracker crumbs. Many brands offer gluten-free options that taste great. This small swap lets everyone enjoy these tasty treats.
How can I make homemade caramel sauce?
To make homemade caramel sauce, you need just sugar, water, and cream. Start by combining equal parts sugar and water in a pot. Heat on medium until the sugar dissolves. Then, let it boil without stirring until it turns golden. Remove from heat and slowly add cream while stirring. Let it cool before using in your bars.
How do I know when the bars are set?
You know the bars are set when they feel firm to the touch. After refrigerating for at least 2 hours, check if they hold their shape. If they do, they are ready to cut and serve.
What can I substitute for Butterfinger bars?
If you don’t have Butterfinger bars, try using other candy bars like Heath or Skor. Both have a similar crunchy texture and sweet flavor. You can also use crushed toffee bits for a different, but still tasty, option.
This blog post covered the must-have ingredients and steps to make tasty dessert bars. You learned how to create a rich graham cracker crust, layer in peanut butter, and top with chocolate and Butterfinger. Remember to try different nut butters or chocolate types for fun twists. Store them well to keep them fresh or freeze for later. Enjoy these treats with friends or family, and don’t hesitate to experiment. Happy baking!