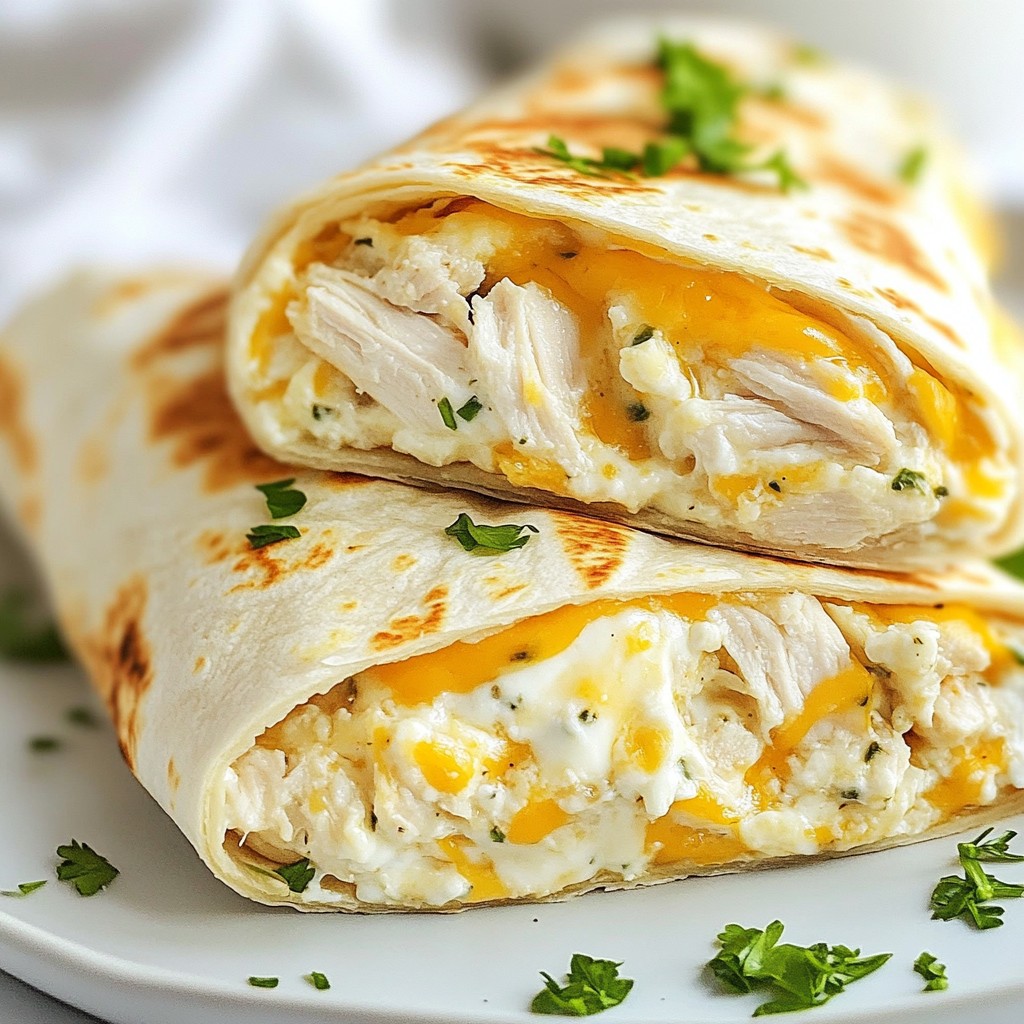
Looking for a delicious and simple meal? You’ll love these Cheesy Garlic Chicken Wraps! Packed with tender chicken, gooey cheese, and bold flavors, they’re perfect for a quick dinner or a tasty snack. In this article, I'll guide you step-by-step to create these irresistible wraps that your family will ask for again and again. Get ready to impress everyone with your cooking skills!
Why I Love This Recipe
- Quick and Easy: This recipe comes together in just 25 minutes, making it perfect for busy weeknights.
- Cheesy Goodness: The combination of mozzarella and cream cheese creates a rich and creamy filling that’s irresistible.
- Customizable: Feel free to add other veggies or spices to the filling based on your preferences or what you have on hand.
- Perfect for Dipping: These wraps pair wonderfully with marinara or your favorite dipping sauce for an extra flavor boost.
Ingredients
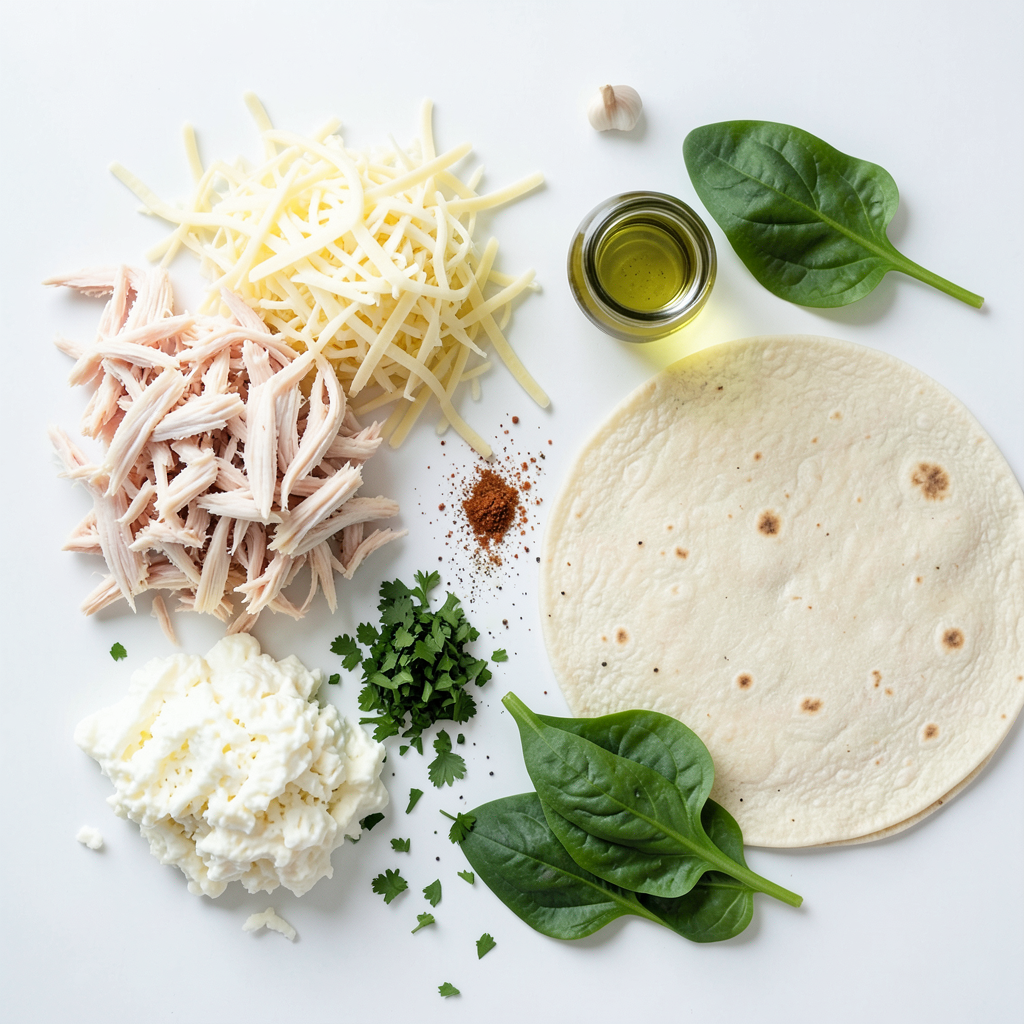
Main Ingredients
- 2 cups cooked chicken, shredded
- 1 cup mozzarella cheese, grated
- 1/2 cup cream cheese, softened
Seasonings and Herbs
- 2 tablespoons garlic, minced
- 1/4 cup fresh parsley, finely chopped
- 1 teaspoon garlic powder
- 1 teaspoon paprika
- Salt and freshly ground black pepper, to taste
Additional Components
- 4 large flour tortillas
- 1 cup fresh spinach leaves, washed and dried
- Olive oil, for cooking
You need fresh, quality ingredients for the best flavor. Start with cooked chicken. I prefer rotisserie chicken for its rich taste. Shred it into bite-sized pieces to blend well with the creamy cheeses. Next, mozzarella cheese adds a stretchy, gooey texture. Pair it with softened cream cheese for extra richness.
For seasoning, minced garlic gives a strong, fresh flavor. Adding fresh parsley brightens up the dish and adds color. Garlic powder and paprika give depth and warmth. Don't forget salt and black pepper to enhance all flavors.
For wrapping, choose large flour tortillas. They hold the filling well and create a nice texture. Fresh spinach leaves add crunch and nutrients. Lastly, olive oil helps get that perfect golden brown color while cooking.
These ingredients work together to create a wrap that is both cheesy and garlicky. The blend of textures and flavors makes every bite irresistible.
Step-by-Step Instructions
Preparing the Mixture
First, grab a big mixing bowl. Add the shredded chicken, grated mozzarella, and softened cream cheese. Toss in the minced garlic, chopped parsley, garlic powder, and paprika. Mix everything well until it is smooth. Take a small taste and adjust the seasoning with salt and pepper if needed. This step is key to getting the right flavor.
Assembling the Wraps
Next, lay out your flour tortillas on a clean surface. Spoon a good amount of the cheesy chicken mixture into the center of each tortilla. Don’t forget to add a handful of fresh spinach leaves on top. Now, carefully fold the sides of each tortilla inward. Roll them up tightly from the bottom. This will keep all the tasty filling inside.
Cooking the Wraps
Now it's time to cook! Heat a large skillet over medium heat and drizzle some olive oil in. Once the skillet is hot, place the wraps seam-side down in the pan. Cook for about 3-4 minutes on one side until the tortillas are golden brown and crispy. Carefully flip the wraps and cook the other side for another 3-4 minutes. When they are done, transfer the wraps to a cutting board and slice each one diagonally in half. Enjoy the beautiful, cheesy goodness!
Tips & Tricks
Perfecting Flavor
To adjust seasoning, start with the basic mix. Taste your cheesy chicken blend before wrapping. If it feels bland, add more salt, pepper, or garlic powder. I love using fresh herbs like parsley for a bright touch. It makes a big difference.
For the best cheese, I recommend mozzarella for its meltiness. Cream cheese adds richness. You can also try cheddar for a sharp bite or pepper jack for a spicy kick. Mix and match to find your favorite combo.
Cooking Technique
To ensure a crispy outside, heat your skillet well. A medium heat works best. Add a splash of olive oil before cooking. Place the wraps seam-side down for a nice seal. Cook each side until golden brown, about 3 to 4 minutes.
Avoid soggy wraps by not overloading them with filling. A thin layer of the cheesy mixture is key. Also, make sure to dry the spinach well. Excess water makes them soggy.
Presentation Ideas
When serving, I suggest using a rustic wooden board. Stack the wraps playfully for a fun look. You can sprinkle fresh parsley on top for color.
For an extra touch, add a small bowl of marinara sauce on the side. It makes a great dip and adds flavor. Your guests will love the vibrant look and taste!
Pro Tips
- Use Warm Tortillas: Warming the tortillas slightly before filling them makes them more pliable and easier to roll, preventing cracking.
- Experiment with Cheese: Feel free to mix different types of cheese, such as cheddar or pepper jack, to customize the flavor of your wraps.
- Add Veggies: Incorporate additional vegetables like bell peppers or onions for added crunch and nutrition.
- Perfectly Cooked Wraps: Ensure your skillet is hot enough before adding the wraps to achieve a crispy exterior without burning.
Variations
Ingredient Swaps
You can easily swap out the chicken. Try using turkey for a leaner option. If you prefer a plant-based choice, tofu works too. Both will still give you that tasty flavor.
When it comes to cheese, mozzarella is classic, but you can get creative. Cheddar offers a rich, sharp taste. Pepper jack adds a spicy kick that’s hard to resist. Mix and match to find your favorite combo.
Flavor Enhancements
Want to boost the flavor? Spice things up with cayenne for heat. Italian seasoning adds a nice herbal touch. You can even experiment with smoked paprika for a different twist. Just sprinkle in a little, taste it, and see how it changes the mix.
Don't forget about vegetables! Bell peppers add sweetness and crunch. Sautéed onions bring a savory depth. Toss them into your wrap for added texture and taste.
Wrap Alternatives
If you want a healthier wrap, consider whole wheat or spinach tortillas. They add fiber and nutrients. Plus, they taste great with the cheesy filling.
For a low-carb option, try lettuce wraps. Use large leaves like romaine or butter lettuce. They hold the filling well and give a fresh crunch. Perfect for a lighter meal!
Storage Info
Storing Leftovers
To keep your Cheesy Garlic Chicken Wraps fresh, store them in the fridge. Wrap each one tightly in plastic wrap or foil. Place them in an airtight container for added safety. This helps keep the wraps moist and tasty.
If you want to freeze them, wrap each wrap in plastic wrap, then place them in a freezer bag. Squeeze out as much air as you can before sealing. This way, they stay fresh for longer. When ready to eat, let them thaw in the fridge overnight.
Reheating Instructions
To enjoy your wraps again, reheating them is key. The best way to do this is in the oven. Preheat the oven to 350°F (175°C). Place the wraps on a baking sheet and cover them with foil. Heat for about 10-15 minutes. This keeps the outside crispy and the inside warm.
If you’re in a hurry, you can also use the microwave. Place a wrap on a microwave-safe plate and cover it with a damp paper towel. Heat for 1-2 minutes. This method is quick but may make the wraps a bit soft.
Shelf Life
In the fridge, your Cheesy Garlic Chicken Wraps last about 3-4 days. Make sure to check for any signs of spoilage. If they smell off or look different, it’s best to toss them.
In the freezer, they can last up to 2-3 months. Just remember to watch for freezer burn. If you see ice crystals forming, that means they may not taste as good anymore. Always trust your senses to decide if food is safe to eat.
FAQs
What can I serve with Cheesy Garlic Chicken Wraps?
You can pair these wraps with a few tasty sides. Here are some great ideas:
- Fresh Salad: A crisp green salad adds a nice crunch.
- Vegetable Sticks: Carrots and celery with dip are fun and healthy.
- Chips and Salsa: Crunchy chips with fresh salsa make a fun match.
- Garlic Bread: For more garlic flavor, serve warm garlic bread on the side.
- Marinara Sauce: A bowl of marinara makes a great dip for extra flavor.
Can I make these wraps ahead of time?
Yes, you can prep these wraps in advance. Here’s how:
- Prep the Filling: Make the chicken mixture and store it in the fridge.
- Assemble Later: When you're ready, just fill the tortillas and roll them up.
- Wrap and Store: Cover the assembled wraps in plastic wrap to keep them fresh.
- Cook Before Serving: Cook them just before you plan to eat for the best taste.
What if I don't have certain ingredients?
No worries! You can make some easy swaps:
- Chicken: Use turkey or even tofu for a vegetarian option.
- Cheese: Swap mozzarella for cheddar or pepper jack for a kick.
- Spinach: If you don’t have spinach, try using lettuce or kale.
- Fresh Herbs: If you lack parsley, use basil or cilantro instead.
These simple changes keep your wraps delicious and fun!
This blog post covered how to make Cheesy Garlic Chicken Wraps. We explored main ingredients like chicken and cheese, seasonings, and cooking tips. You learned to mix, assemble, and cook these tasty wraps.
In closing, I encourage you to try different ingredients and flavors. With simple swaps, you can make this dish your own. Enjoy your cooking and have fun with every bite!