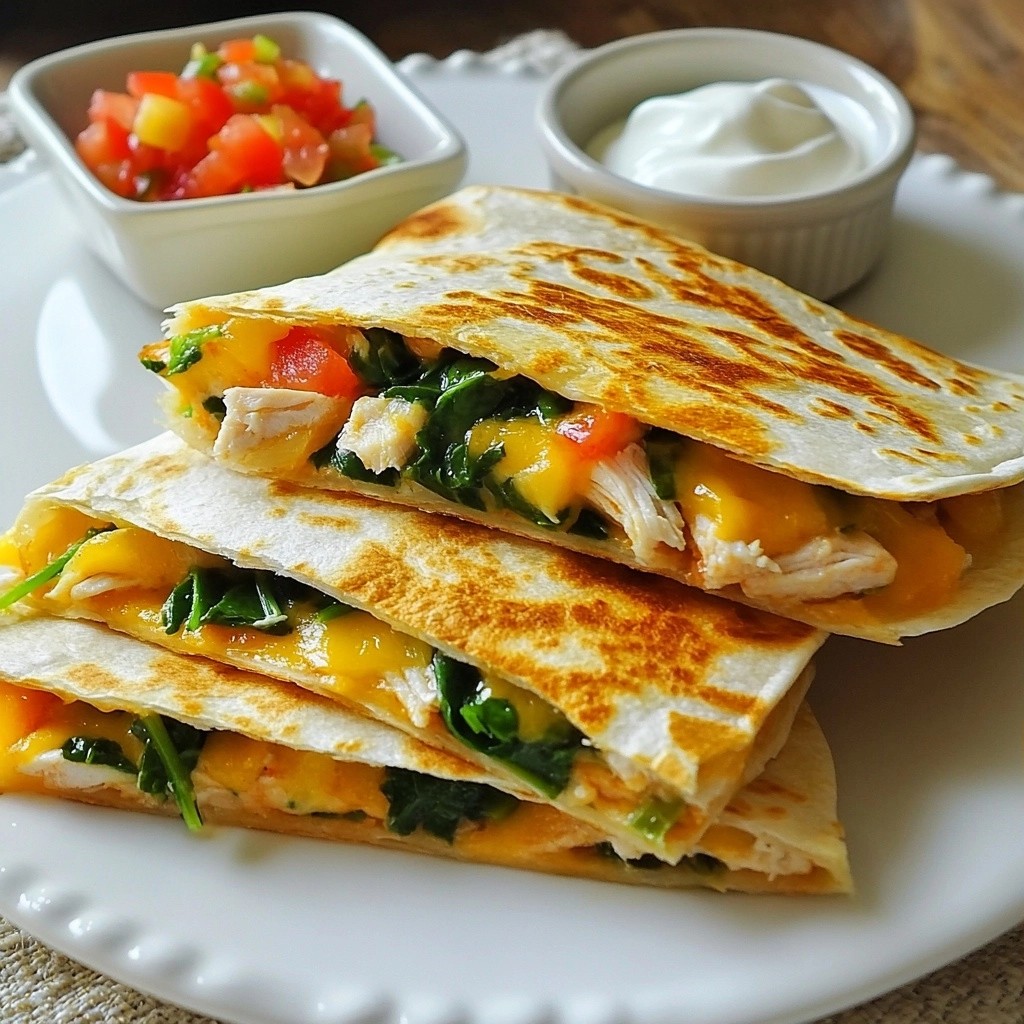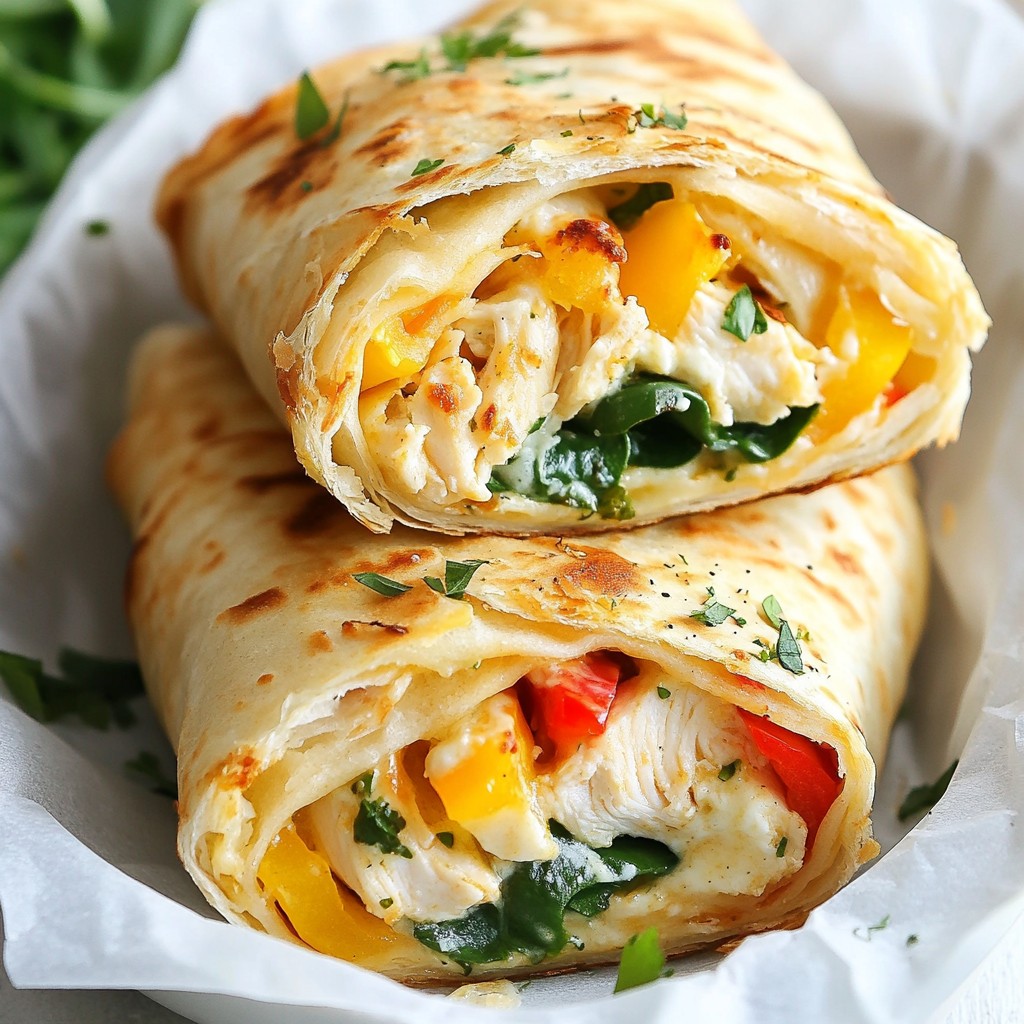
Are you ready for a meal that’s both delicious and easy? These Cheesy Garlic Chicken Wraps fit the bill! With gooey cheese, tender chicken, and a few simple ingredients, you can whip up this tasty dish in no time. Perfect for busy nights or casual gatherings, these wraps are sure to satisfy your cravings. Let’s dive into the recipe and discover the joy of cooking this delight!
Why I Love This Recipe
- Quick and Easy: This recipe can be prepared in just 30 minutes, making it perfect for busy weeknights.
- Creamy and Cheesy Filling: The combination of cream cheese and mozzarella creates a rich and indulgent filling that everyone loves.
- Versatile Ingredients: You can easily customize the wraps with your favorite vegetables or different types of cheese.
- Great for Meal Prep: These wraps store well in the fridge and can be reheated for a delicious lunch or snack later.
Ingredients
Complete List of Ingredients
To make Cheesy Garlic Chicken Wraps, gather these items:
- 2 cups cooked chicken, shredded
- 1 cup shredded mozzarella cheese
- 1/2 cup cream cheese, softened
- 3 cloves fresh garlic, minced
- 1 teaspoon dried oregano
- 1 teaspoon paprika
- Salt and freshly ground black pepper, to taste
- 4 large tortillas or flour wraps
- 1 cup fresh spinach leaves, washed and dried
- 1/2 cup assorted bell peppers, thinly sliced
- Olive oil, for brushing
Recommended Cooking Staples
You will need some common kitchen items:
- Mixing bowl for combining ingredients
- Skillet or grill pan for cooking wraps
- Spatula for flipping wraps
- Knife for slicing peppers and cutting wraps
- Measuring cups and spoons for accuracy
Suggestions for Substitutions
You can make these swaps if needed:
- Use grilled turkey instead of chicken for a different flavor.
- Swap mozzarella for cheddar or pepper jack cheese for a kick.
- Replace cream cheese with Greek yogurt for a lighter option.
- Use any leafy greens like kale instead of spinach for added nutrition.
- Try different peppers, such as jalapeños, for extra heat.

Step-by-Step Instructions
Preparation of the Cheesy Filling
To start, gather your ingredients. You need cooked chicken, mozzarella cheese, and cream cheese. In a big bowl, mix these with minced garlic, oregano, paprika, salt, and pepper. Use a fork or spoon to blend everything well. You want a smooth, creamy filling. This cheesy mix adds flavor and richness to your wraps.
Assembling the Wraps
Next, lay a tortilla flat on a clean surface. In the center, add a handful of fresh spinach leaves. Then, place a few slices of bell peppers on top. These add color and crunch. Now, scoop a generous amount of the cheesy chicken mixture over the veggies. Make sure to leave some space at the edges. This helps when you fold the wrap.
To fold the wrap, tuck in the sides first. Then, roll it up tightly from the bottom. This keeps everything inside. Repeat this with the rest of the tortillas and filling. You’ll have four delicious wraps ready to cook.
Cooking Techniques for Optimal Crispiness
For the next step, heat a skillet over medium heat. Brush the outside of each wrap lightly with olive oil. This oil helps them become golden and crisp while cooking. Place the wraps seam side down in the skillet. Grill them for about 3 to 4 minutes on each side. You want a nice brown color and a crunchy texture.
Once cooked, take the wraps out and let them cool for one minute. This makes them easier to slice. Cut each wrap in half diagonally for a nice look on the plate. Enjoy your cheesy garlic chicken wraps!
Tips & Tricks
How to Achieve a Perfectly Grilled Wrap
To get a great grilled wrap, use medium heat. Brush the outside with olive oil. This helps the wrap get crispy and golden. Place the wraps seam side down in the skillet. Grill for 3-4 minutes on each side. Look for that lovely brown color. Don't rush; allow the heat to do its job.
Storing Leftover Ingredients
If you have leftover filling, store it in an airtight container. Keep it in the fridge for up to three days. Use it to make more wraps later. If you have extra tortillas, stack them with parchment paper between each one. This keeps them fresh and prevents sticking.
Serving Suggestions and Presentation Tips
For a fun presentation, cut each wrap in half diagonally. This makes them look nice on a plate. Serve them upright in a basket lined with parchment paper. You can add a small bowl of garlic sauce or olive oil for dipping. Finish with a sprinkle of parsley for color. This adds a bright touch and makes the meal more inviting.
Pro Tips
- Use Leftover Chicken: This recipe is a great way to use up leftover rotisserie or grilled chicken. It adds flavor and saves time!
- Experiment with Cheeses: Feel free to substitute mozzarella with other types of cheese like cheddar or pepper jack for a different flavor profile.
- Add More Veggies: Incorporate additional vegetables such as mushrooms, zucchini, or olives for extra nutrition and flavor.
- Try Different Wraps: Switch out the flour tortillas for whole wheat or spinach wraps to enhance the nutritional value and add variety.
Variations
Different Protein Options (e.g., chicken, turkey, or plant-based)
You can easily change the protein in your Cheesy Garlic Chicken Wraps. If you prefer turkey, use cooked turkey breast, shredded like chicken. For a plant-based option, try cooked lentils or chickpeas. These choices add great flavor and keep the wraps fun. Each protein brings a unique taste, so feel free to switch it up based on what you have.
Customizing Veggies for Your Taste
Make your wraps fit your taste buds by adding different veggies. You can swap spinach with kale or arugula for a spicy kick. Try adding mushrooms for a savory touch or zucchini for a fresh crunch. Bell peppers come in many colors; mix them for a vibrant look. Experimenting with veggies allows you to create a wrap that feels personal and exciting.
Cheese Variations for Extra Flavor
Cheese is key to creamy wraps. While mozzarella is fantastic, you can try cheddar or pepper jack for a bolder taste. Feta cheese adds a tangy twist that pairs well with the garlic. Consider mixing cheeses for a tasty surprise. Each cheese choice enhances the flavor of your wraps and makes them even more enjoyable.
Storage Info
How to Store Cooked Wraps
To store cooked wraps, let them cool completely. Wrap each one in plastic wrap or foil. Place them in an airtight container. Store them in the fridge for up to three days. This keeps them fresh and tasty for later meals.
Freezing Instructions for Meal Prep
If you want to freeze the wraps, follow these steps. First, cool them fully. Then, wrap each wrap tightly in plastic wrap. Place them in a freezer-safe bag or container. They can stay frozen for up to three months. When ready to enjoy, simply thaw in the fridge overnight.
Reheating Tips for Best Results
For the best reheating results, use a skillet. Heat the skillet over medium heat. Place the wrap in the skillet and cover it. Cook for about 3 to 4 minutes on each side until warm. This method keeps the wrap crispy. You can also use a microwave, but it may not stay crispy. If using a microwave, heat for 30-second intervals until warm.
FAQs
Can I make Cheesy Garlic Chicken Wraps ahead of time?
Yes, you can make Cheesy Garlic Chicken Wraps ahead of time. Prepare the filling and wraps, then store them in the fridge. Wrap them in plastic or a tight container. They will stay fresh for about two days. When you are ready to eat, just grill them. This saves time and makes for an easy meal!
What dipping sauces pair well with these wraps?
Many sauces go well with these wraps. Here are a few tasty options:
- Garlic sauce: It adds more garlic flavor.
- Ranch dressing: It gives a nice creamy touch.
- Salsa: A fresh, zesty kick!
- Buffalo sauce: For a spicy twist.
These sauces enhance the wraps and make them even more enjoyable.
Is it possible to make these wraps vegetarian?
Yes, you can make these wraps vegetarian! Simply replace the chicken with a mix of veggies. Try using:
- Grilled zucchini
- Roasted mushrooms
- Chickpeas
Add more cheese for flavor! These swaps keep the wraps delicious and filling. You can enjoy a tasty meal that everyone will love.
You now have a complete guide to making cheesy wraps. We covered the ingredients, cooking steps, and tips for storing leftovers. You can also mix and match proteins and veggies to suit your taste. With these techniques, you can enjoy crispy, delicious wraps anytime. Remember, the right ingredients and methods make all the difference. Get creative and have fun in the kitchen!