Looking for a quick and tasty snack? You’ll love my Chili Honey Feta Rolls! This delightful treat packs a punch with creamy feta, sweet honey, and a hint of spice. Simple to make and perfect for sharing, these rolls are sure to impress. Join me as I guide you step-by-step through this flavorful recipe. You’ll have a delicious snack ready in no time!
Why I Love This Recipe
- Delicious Flavor Combination: The sweet honey perfectly balances the salty feta and the heat from the chili flakes, creating a delightful burst of flavor in every bite.
- Easy to Prepare: With just a few simple ingredients and straightforward steps, these rolls can be whipped up quickly, making them perfect for any occasion.
- Versatile Appetizer: These rolls are a hit at parties, gatherings, or as a tasty snack. They can be served warm or at room temperature, allowing for flexibility.
- Impressive Presentation: Drizzling them with extra honey and garnishing with parsley adds an appealing touch, making them look as good as they taste.
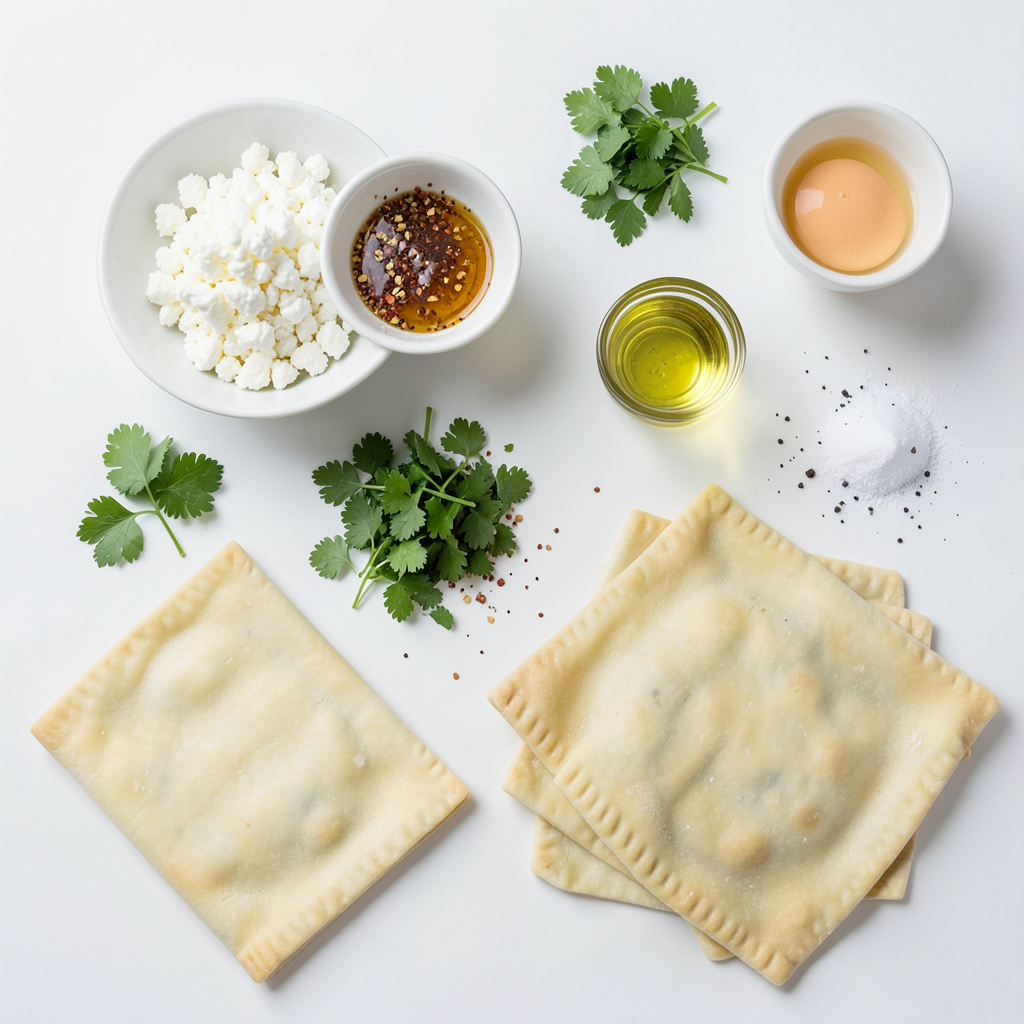
Ingredients
Main Ingredients List
- 1 cup feta cheese, crumbled
- 2 tablespoons honey
- 1-2 teaspoons chili flakes
- 1 tablespoon olive oil
Optional Ingredients
- 1 tablespoon fresh parsley, finely chopped
- 1 egg, beaten (for egg wash)
- Salt and pepper to taste
When you gather your ingredients, focus on freshness. Feta cheese should be crumbly and creamy. Honey adds sweetness, while chili flakes bring heat. Olive oil makes everything smooth and rich. If you want extra flavor, fresh parsley brightens the dish. Using an egg wash gives the rolls a golden look. Salt and pepper help enhance the flavors.
This mix of ingredients creates a delightful balance of creamy, sweet, and spicy. You can adjust the chili flakes for more or less heat. The optional ingredients let you personalize the rolls to your taste.
Step-by-Step Instructions
Preparation
1. Preheat your oven to 400°F (200°C). This ensures the rolls bake evenly and puff up nicely.
2. Prepare a baking sheet by lining it with parchment paper. This keeps the rolls from sticking.
Rolling the Puff Pastry
1. On a floured surface, take one puff pastry sheet and roll it out gently. This smooths out any creases and makes it easier to work with.
2. Use a sharp knife or pizza cutter to slice the pastry into 4x4-inch squares. This size is perfect for holding the filling.
Assembling the Rolls
1. Place about a tablespoon of the feta filling in the center of each pastry square. Be careful not to overfill; you want them to close well.
2. Fold each square over to form a triangle or rectangle. Press the edges together firmly. Use a fork to seal and create a pretty edge.
Baking the Rolls
1. Arrange the filled rolls on the prepared baking sheet. Make sure to leave space between them for even cooking.
2. Brush the tops of the rolls with the beaten egg. This gives them a shiny, golden finish when baked.
3. Bake in the preheated oven for 15-20 minutes. Watch for them to puff up and turn golden brown.
Enjoy the aroma that fills your kitchen as these rolls bake. They will be a hit at any gathering!
Tips & Tricks
Perfecting the Filling
- Adjusting spice levels: Start with one teaspoon of chili flakes. Taste the filling and add more if you like it spicier. Remember, you can always add more, but you can't take it out!
- Ensuring a creamy texture: Mix the feta cheese with honey and olive oil until smooth. This makes the filling creamy and easy to spread.
Puff Pastry Handling
- Tips for thawing: Thaw the puff pastry overnight in the fridge. If you’re short on time, let it sit at room temperature for about 30 minutes. This helps the dough stay pliable.
- How to prevent sogginess: Avoid using too much filling. A tablespoon per pastry square is perfect. Also, make sure to seal the edges well to keep moisture inside.
Serving Suggestions
- Plating and presentation ideas: Serve the rolls on a rustic wooden board. This creates a warm and inviting look.
- Additional garnishes: Drizzle a little extra honey on top and sprinkle fresh parsley. This adds color and makes the rolls even more tempting.
These tips help you craft the best Chili Honey Feta Rolls. Enjoy making them!
Pro Tips
- Use Fresh Feta: For the best flavor, opt for fresh feta cheese instead of pre-crumbled versions, as it has a creamier texture and richer taste.
- Adjust Spice Level: Feel free to customize the amount of chili flakes based on your heat preference; start with a small amount and increase gradually.
- Seal the Edges Well: Make sure to seal the edges of the pastry tightly to prevent any filling from leaking out during baking.
- Experiment with Herbs: Try adding different herbs like thyme or oregano for added depth of flavor that complements the feta and honey.
Variations
Ingredient Swaps
Cheese alternatives You can switch feta cheese with goat cheese or ricotta. Both cheeses offer a creamy texture and a unique taste. Goat cheese brings a tangy flavor, while ricotta adds a mild sweetness. Use what you have on hand or what you prefer.
Honey substitutes If you need an alternative to honey, try maple syrup or agave nectar. Both options keep the sweetness while adding their own flavor. Maple syrup gives a rich taste, while agave is lighter and less intense.
Flavor Enhancements
Adding herbs and spices Enhance your rolls by adding herbs like thyme or oregano. These herbs pair well with the cheese and honey. You can also try different spices like smoked paprika or cumin for a kick of flavor. Adjust to your taste!
Incorporating vegetables You can mix in roasted red peppers or chopped spinach for more texture and flavor. These veggies add color and nutrients to your rolls. Make sure to chop them finely so they mix well with the cheese.
Serving Styles
Dipping sauces Serve your rolls with a dipping sauce for extra fun. A yogurt dip or spicy marinara works great. You can also drizzle olive oil and balsamic vinegar for a tasty twist.
Pairing with beverages These rolls pair well with sparkling wine or iced tea. The bubbles in the wine complement the richness of the rolls. If you prefer non-alcoholic drinks, try a refreshing lemonade or a fruit spritzer.
Storage Info
Refrigeration
To keep your Chili Honey Feta Rolls fresh, store them in an airtight container. Make sure they cool completely before sealing. This method keeps the rolls moist and prevents them from drying out. In the fridge, they last about 3 to 4 days. If you want to enjoy these rolls later, refrigerating is a great option.
Freezing
You can freeze both raw and cooked rolls. For raw rolls, place them on a baking sheet and freeze until firm. Once firm, transfer them to a freezer bag. They can stay in the freezer for up to 3 months. For cooked rolls, let them cool fully, then wrap them tightly in plastic. They also last up to 3 months in the freezer.
When you're ready to enjoy your frozen rolls, thaw them in the fridge overnight. To reheat, preheat your oven to 375°F (190°C) and bake for about 15-20 minutes. This will make them hot and crispy again. Enjoy your tasty snack anytime!
FAQs
How can I make Chili Honey Feta Rolls without puff pastry?
You can use other doughs for these rolls. Try phyllo dough for a crisp texture. Tortillas work well, too. For a healthier option, use whole wheat dough. Each choice brings a unique taste and texture. Adjust baking times as needed. Phyllo may bake faster, while tortillas may need extra time.
What can I serve with Chili Honey Feta Rolls?
These rolls pair well with a fresh salad. A simple arugula salad brings a nice balance. You can also serve them with a yogurt dip. A drizzle of extra honey adds sweetness. For a fun twist, pair them with spicy salsa. Each option enhances the flavors of the rolls.
Are there any vegetarian variations of this recipe?
Yes! To make vegetarian rolls, use plant-based feta. You can also add chopped spinach or mushrooms. These add texture and flavor. Swap honey for maple syrup for a vegan option. Always check ingredient labels for hidden animal products. This way, everyone can enjoy these tasty rolls!
Today, we explored the tasty world of Chili Honey Feta Rolls. We covered main and optional ingredients, along with step-by-step instructions. You learned tips for handling puff pastry and ideas for serving. We also looked at variations and storage methods.
These rolls make a great dish for any gathering. Remember, you can adjust the flavors and fillings. Enjoy making and sharing your delicious creation!