
Do you crave a delicious treat that’s easy to make? Look no further than my Cranberry Orange Scones! In this guide, I will show you how to create flaky, moist scones that burst with citrus flavor. You’ll find clear steps, handy tips, and tasty variations that fit your needs. Whether you enjoy them with a cup of tea or as a snack, these scones will surely delight your taste buds!
Why I Love This Recipe
- Delicious Flavor Combination: The tartness of cranberries paired with the bright citrus notes of orange creates a delightful balance that is hard to resist.
- Easy Preparation: This scone recipe is quick to make, allowing you to whip up a batch in just 35 minutes, perfect for busy mornings or unexpected guests.
- Versatile Serving Options: These scones can be enjoyed warm or at room temperature, making them suitable for brunch or afternoon tea.
- Elegant Presentation: With a sprinkle of coarse sugar and a touch of orange zest, these scones not only taste amazing but look stunning on any table.
Ingredients
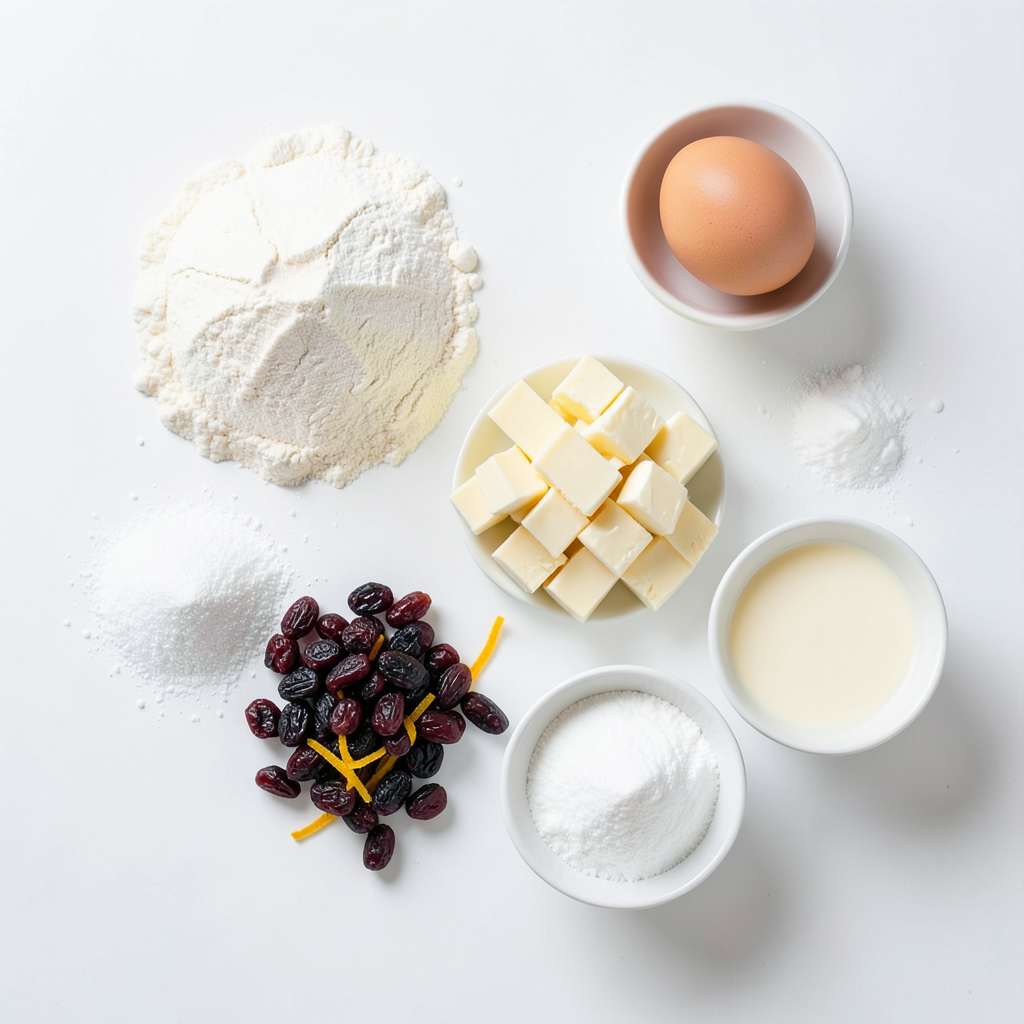
Key Ingredients for Cranberry Orange Scones
To make the best cranberry orange scones, you need the following key ingredients:
- 2 cups all-purpose flour
- 1/3 cup granulated sugar
- 1 tablespoon baking powder
- 1/2 teaspoon salt
- 1/2 cup unsalted butter, cold and cubed
- 1/2 cup dried cranberries
- Zest of 1 orange
- 1/2 cup buttermilk (or add 1/2 tablespoon vinegar to regular milk)
- 1 large egg
- 1 teaspoon vanilla extract
- Optional: 1/4 cup coarse sugar for topping
Each ingredient plays an important role. The flour gives structure, while the sugar adds sweetness. Baking powder helps the scones rise, and salt enhances the flavors. Cold butter is key to making the scones flaky.
Optional Toppings and Variations
You can customize your scones with a few tasty options:
- Sprinkle coarse sugar on top before baking for a sweet crunch.
- Serve with clotted cream or honey for a rich touch.
- Add fresh orange zest for more citrus flavor.
Feel free to experiment! These toppings can elevate your scones and make them even more delicious.
Possible Substitutions
If you need to make changes, here are some good substitutions:
- Swap all-purpose flour with whole wheat flour for a nuttier taste.
- Use coconut sugar instead of granulated sugar for a richer flavor.
- Substitute buttermilk with plain yogurt or regular milk if needed.
These options allow you to adjust the recipe based on your pantry or dietary needs.
Step-by-Step Instructions
Preheat and Prepare
First, preheat your oven to 400°F (200°C). This makes sure your scones bake evenly. Line a baking sheet with parchment paper to prevent sticking. This small step saves your scones from sticking to the pan.
Mixing Dry Ingredients
Grab a large mixing bowl. Add 2 cups of all-purpose flour, 1/3 cup of granulated sugar, 1 tablespoon of baking powder, and 1/2 teaspoon of salt to the bowl. Use a whisk to mix these dry ingredients well. This step is key for even flavor in every bite.
Working with Butter and Combining Ingredients
Now, take 1/2 cup of cold, cubed unsalted butter. Add it to your flour mix. Use a pastry cutter or your fingers to blend the butter into the flour. Keep mixing until it looks like coarse crumbs. This creates the flakiness we love in scones.
Shaping and Cutting the Scones
Transfer the dough to a lightly floured surface. Gently knead it a few times until it holds together. Shape the dough into a disc that is about 1 inch thick. Use a sharp knife or pizza cutter to slice the disc into 8 equal wedges. Place each wedge on your baking sheet, leaving some space between them.
Baking and Cooling Instructions
For a touch of sweetness, sprinkle coarse sugar on top of each scone if you like. Now, bake your scones in the oven for about 15-20 minutes. They are done when the edges are golden brown. To check, stick a toothpick in the center; it should come out clean. Let them cool on the baking sheet for a few minutes. Then, transfer the scones to a wire rack to cool completely.
Tips & Tricks
Achieving Flakiness in Scones
To make your scones flaky, keep butter cold. Work it into the flour until it looks like crumbs. This is key for that airy texture. Don’t over-mix your dough. Mix just until it comes together. A little stickiness is okay. It helps keep your scones tender.
Storing Leftover Scones
Store leftover scones in an airtight container. They stay fresh for up to two days. If you want to keep them longer, freeze them. Wrap each scone in plastic wrap first. Then, place them in a freezer bag. They’ll stay good for up to three months.
Enhancing Flavor with Additions
You can add more flavor to your scones. Consider adding nuts like walnuts or pecans. They give a nice crunch. You could also mix in chocolate chips for a sweet twist. Herbs like rosemary or thyme can add a savory touch. Experiment to find your favorite combination!
Pro Tips
- Use Cold Butter: Ensure your butter is very cold, as this helps create flaky layers in the scones. You can even freeze the butter for about 10 minutes before using it.
- Don't Overmix: When combining the wet and dry ingredients, mix just until combined. Overmixing can lead to tough scones.
- Experiment with Add-Ins: Feel free to customize your scones by adding nuts, chocolate chips, or fresh fruit to the dough for extra flavor and texture.
- Store Properly: To keep scones fresh, store them in an airtight container at room temperature for up to 2 days or freeze for longer storage.
Variations
Citrus Variants: Lemon or Lime Scones
You can switch the orange zest for lemon or lime zest. This change gives a fresh taste. Lemon scones are bright and zesty. Lime scones add a tropical feel. Just use the same amount of zest as in the original recipe. This small swap makes your scones unique and fun.
Pairing with Nuts or Other Fruits
Adding nuts or other fruits can enhance your scones. Walnuts, pecans, or almonds give a nice crunch. You can also try using blueberries or raspberries. Mix in about half a cup of your chosen nuts or fruits. They add flavor and texture. Just make sure they are evenly spread in the dough.
Gluten-Free Options for Scone Lovers
You can make gluten-free scones easily. Use a gluten-free flour blend instead of all-purpose flour. Look for blends that include xanthan gum for good texture. You may need to adjust the liquid a bit. Start with the same amount of buttermilk and add more if needed. These adjustments keep your scones light and fluffy, just like traditional ones.
Storage Info
Best Practices for Storing Scones
To keep your cranberry orange scones fresh, store them in an airtight container. This helps maintain their moist texture and flaky nature. Place a piece of parchment paper between layers to prevent sticking. For best results, consume them within two days. If you want to enjoy them later, consider freezing.
Freezing Instructions for Long-term Storage
Freezing is a great option for long-term storage. After baking, let the scones cool completely. Wrap each scone in plastic wrap. Then, place them in a freezer bag or container. Be sure to squeeze out excess air. This method keeps them fresh for up to three months. When you're ready to eat, just thaw them in the fridge overnight.
Reheating Tips for Optimal Taste
To enjoy your scones warm, preheat your oven to 350°F (175°C). Place the scones on a baking sheet. Bake for about 5-10 minutes, or until heated through. This will help restore their flaky texture. You can also use a microwave, but be careful not to overheat them. Just 10-15 seconds will do the trick. Enjoy your freshly warmed scones with your favorite jam or cream!
FAQs
What is the best way to serve cranberry orange scones?
I recommend serving cranberry orange scones warm. They taste great with clotted cream or honey. You can also add a sprinkle of fresh orange zest on top. This adds a nice touch and makes them pretty.
Can I make these scones in advance?
Yes, you can! You can prepare the dough a day ahead. Just cover it tightly and keep it in the fridge. When you're ready, shape and bake the scones. They will still taste fresh and delicious.
How can I adjust the recipe for dietary restrictions?
If you need to adjust the recipe, there are a few easy swaps. For gluten-free scones, use a gluten-free flour blend. For dairy-free scones, substitute buttermilk with almond or oat milk. Always check labels if allergies are a concern.
Cranberry orange scones are easy to bake, and many ways exist to enjoy them. We covered key ingredients, preparation steps, and helpful tips for light, fluffy scones. You now know about variations and storage details, too.
These scones brighten your day and suit many tastes. I encourage you to try different flavors and toppings. Enjoy the joy of baking and sharing these tasty treats!