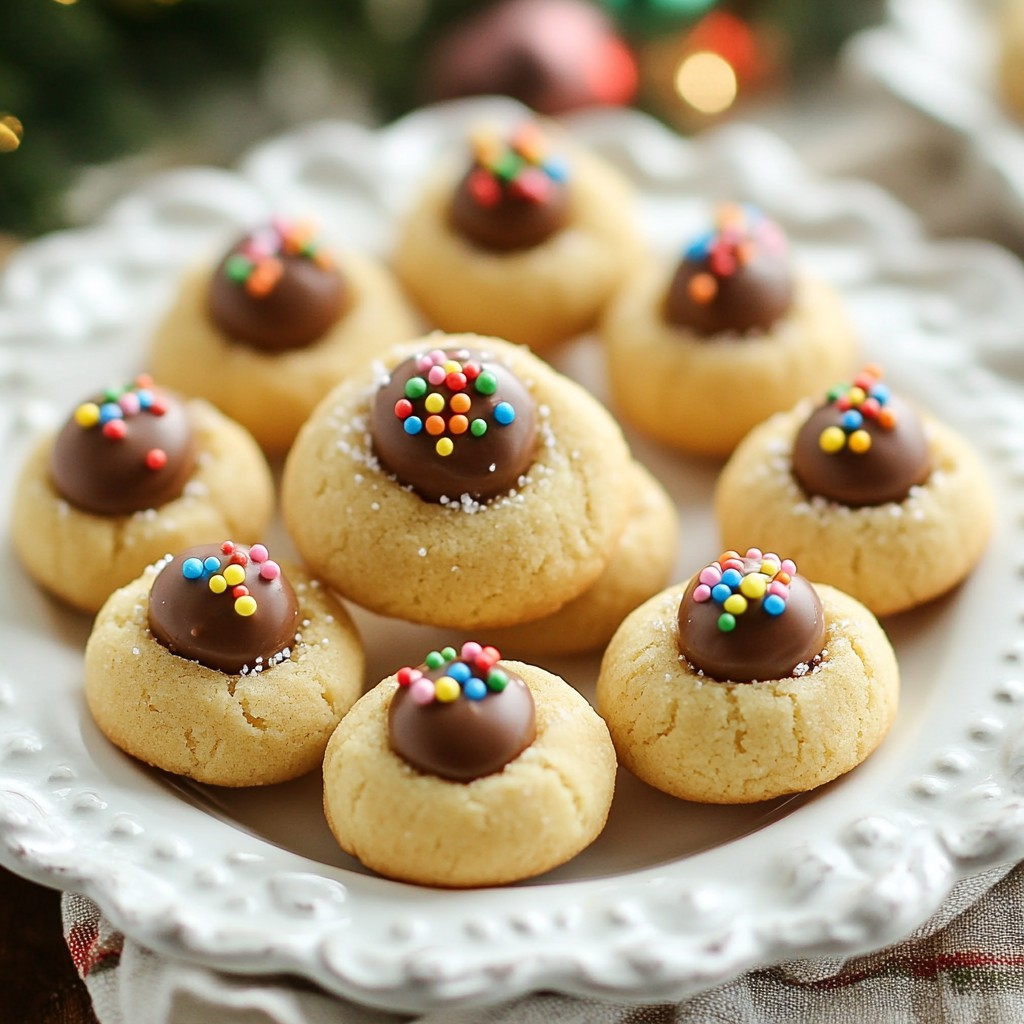
If you’re looking to make your holiday season extra sweet, you’re in the right place! These Fairy Kisses Christmas Cookies blend rich chocolate with a soft, buttery bite. Perfect for gift-giving and festive gatherings, these treats are sure to delight everyone. I’ll walk you through the simple steps and share tips to make each batch a hit. Get ready to bake up some magic this holiday season!
Why I Love This Recipe
- Delicious Flavor Combination: The blend of vanilla and almond extracts adds a unique depth of flavor to these cookies, making each bite a delightful experience.
- Festive Appearance: The addition of chocolate kisses and colorful sprinkles creates a visually appealing treat perfect for holiday gatherings.
- Easy to Make: This recipe is simple enough for bakers of all skill levels, ensuring everyone can enjoy the joy of baking during the holidays.
- Perfect for Sharing: With 24 cookies in a batch, these treats are perfect for sharing with friends and family during the festive season.
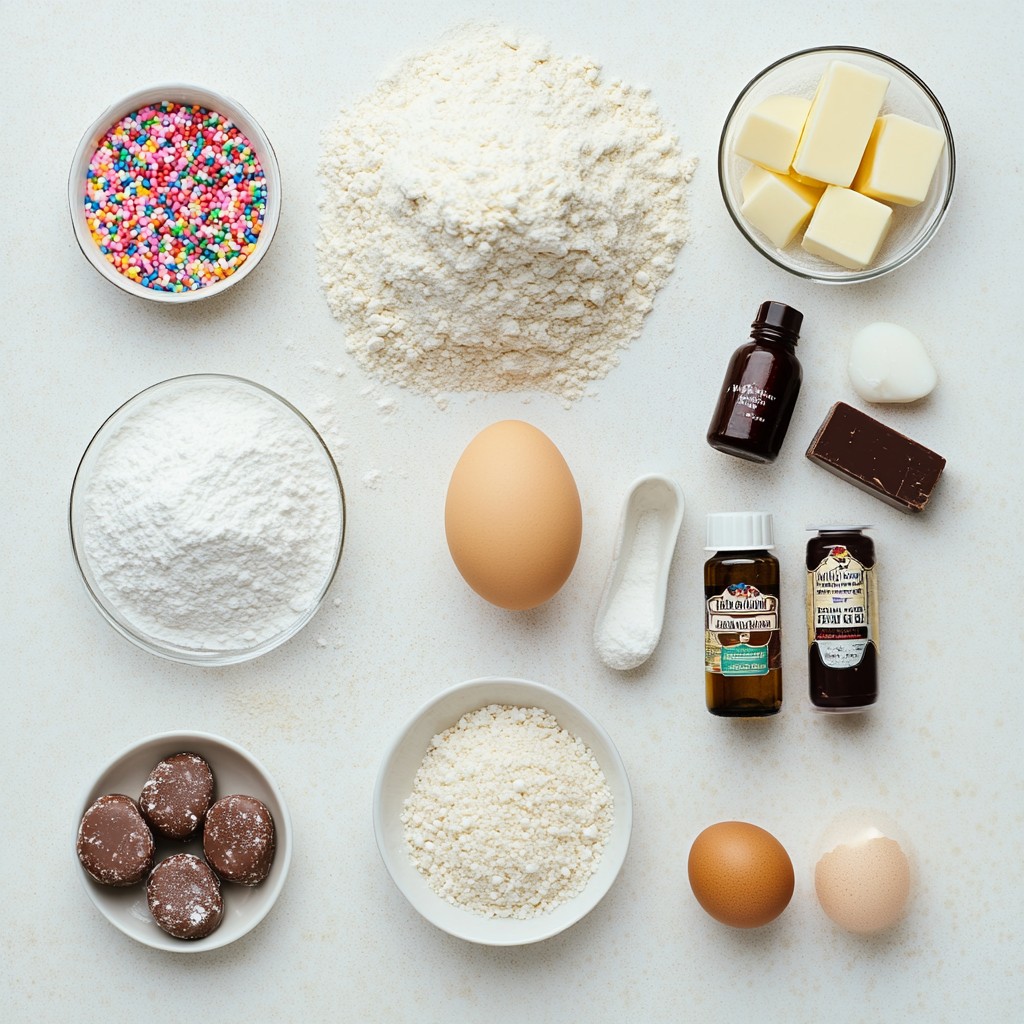
Ingredients
To make Fairy Kisses Christmas Cookies, gather these ingredients:
- 2 cups all-purpose flour
- 1/2 teaspoon baking powder
- 1/4 teaspoon salt
- 1/2 cup unsalted butter, softened
- 3/4 cup granulated sugar
- 1/4 cup powdered sugar
- 1 large egg
- 1 teaspoon vanilla extract
- 1 teaspoon almond extract
- 1 cup chocolate kisses or your favorite chocolate candies
- Festive sprinkles for decoration
These ingredients combine to create a soft and sweet cookie. The chocolate kisses add a delightful surprise in each bite. The festive sprinkles make them look extra special. You will love how simple it is to gather these ingredients. Each one plays a key role in making these cookies taste great.
Step-by-Step Instructions
Preparation Steps
1. Preheat your oven to 350°F (175°C). This helps your cookies bake evenly.
2. Line a baking sheet with parchment paper. This keeps the cookies from sticking.
3. In a medium bowl, whisk together 2 cups of flour, 1/2 teaspoon baking powder, and 1/4 teaspoon salt. Mix until everything is well blended.
4. In a large bowl, cream together 1/2 cup softened butter, 3/4 cup granulated sugar, and 1/4 cup powdered sugar. Use an electric mixer for 2-3 minutes until fluffy.
Mixing and Forming the Dough
1. Add 1 large egg, 1 teaspoon vanilla extract, and 1 teaspoon almond extract to the creamed mixture. Beat until combined and smooth.
2. Gradually mix the dry ingredients into the wet ones. Use low speed to avoid overmixing. Stop when you no longer see dry flour.
Shaping and Baking Cookies
1. Roll the dough into balls, about 1 inch wide. Place them on the baking sheet, spacing them apart.
2. Press a chocolate kiss into the center of each dough ball, making sure it sinks in slightly.
3. If you like, sprinkle colorful sprinkles around the chocolate kiss before baking.
4. Bake for 10-12 minutes, until the cookie edges are lightly golden. Watch them closely to prevent overbaking.
5. Take the baking sheet out and cool the cookies for 5 minutes. Then, move them to a wire rack to cool completely.
Tips & Tricks
Baking Tips
To bake the perfect cookies, follow these simple steps:
- Preheat your oven to 350°F (175°C). This helps cookies bake evenly.
- Line your baking sheet with parchment paper. This prevents sticking and makes cleanup easy.
- Check your oven’s temperature with an oven thermometer. Sometimes, ovens can be off by a few degrees.
- Use a cookie scoop to make all cookies the same size. This ensures they bake evenly.
- Keep an eye on the cookies while they bake. They should be lightly golden on the edges.
To avoid overbaking, set a timer for 10 minutes. Take them out when the edges look done, even if the center seems soft. They will firm up as they cool.
Decorating Ideas
Decorating your cookies can be fun and festive:
- Sprinkles add color. Use holiday-themed sprinkles for a joyful touch.
- Dip the edges in melted chocolate for a rich flavor. Then, add sprinkles before the chocolate hardens.
- Drizzle melted chocolate on top for an elegant look. Use a fork for a fun pattern.
For variety, consider using crushed candy canes or chopped nuts. This adds texture and flavor to your cookies.
Enhancing Flavor
To adjust sweetness and flavor, try these tips:
- Reduce the sugar slightly if you prefer less sweetness. Start with a 1/4 cup less.
- Experiment with extracts. Swap vanilla for peppermint for a minty twist.
- Mix in zest from oranges or lemons for a fresh, bright taste.
Using different types of chocolate can change your cookies. Try milk chocolate, dark chocolate, or even white chocolate. Each offers a unique taste and look.
Pro Tips
- Chill the Dough: For even better flavor and texture, refrigerate the cookie dough for about 30 minutes before baking. This helps prevent spreading and enhances the taste.
- Use Quality Chocolate: Opt for high-quality chocolate kisses or candies for a rich, delicious center. The better the chocolate, the better the cookie!
- Experiment with Flavors: Feel free to swap out the almond extract for other flavors like peppermint or coconut to create unique variations of these cookies for the holidays.
- Store Properly: Keep your cookies in an airtight container at room temperature for up to a week. For longer storage, freeze them in a single layer and transfer to a freezer-safe container.
Variations
Flavor Variations
You can switch the vanilla and almond extracts for other flavors. Try using lemon or orange zest for a citrus twist. You might like adding a splash of maple syrup for warmth. Cinnamon or nutmeg can bring a cozy feel to your cookies. These small changes add fun to your baking.
Ingredient Variations
For those who need gluten-free options, you can use almond flour or a gluten-free blend. Both work well in this recipe. You can also swap out chocolate kisses for caramel, peanut butter, or even fruit-flavored candies. This allows you to create cookies that fit your taste.
Festive Themed Cookies
You can make these cookies for any holiday. Try red and green sprinkles for Christmas, or pastel colors for Easter. You can also add pumpkin spice for a fall theme or peppermint for winter. Using seasonal spices adds a special touch. Think about how the colors and flavors match the season to make your cookies stand out.
Storage Info
How to Store Cookies
To keep your Fairy Kisses Christmas Cookies fresh, follow these tips:
- Cool Completely: Let the cookies cool fully before storing them.
- Use Airtight Containers: Store them in airtight containers. This keeps them soft and prevents them from drying out.
- Layer with Parchment Paper: If stacking, place parchment paper between layers. This avoids sticking and keeps them intact.
Store cookies at room temperature for up to one week. If you want them to last longer, consider freezing them.
Freezing Cookies
You can freeze both unbaked dough and baked cookies easily.
- Freezing Unbaked Dough:
1. Roll the dough into balls as you would for baking.
2. Place them on a baking sheet lined with parchment paper.
3. Freeze the balls until solid, about one hour.
4. Transfer the frozen balls to a zip-top bag. Label and date the bag for easy reference.
- Freezing Baked Cookies:
1. Allow cookies to cool completely.
2. Place them in a single layer in an airtight container.
3. Separate layers with parchment paper to avoid sticking.
4. Store in the freezer for up to three months.
When you are ready to enjoy, simply thaw at room temperature. For the best taste, bake from frozen for fresh cookies anytime!
FAQs
Common Questions
How long do Fairy Kisses Christmas Cookies last? Fairy Kisses Christmas Cookies stay fresh for about one week. Store them in an airtight container. This keeps them soft and tasty. If you want them to last longer, you can freeze them.
Can I make this recipe ahead of time? Yes, you can make the dough ahead of time. Wrap it tightly in plastic wrap. Store it in the fridge for up to three days. You can also freeze the dough for about a month. Just thaw it overnight before baking.
What is the best way to reheat cookies? To reheat cookies, set your oven to 300°F (150°C). Place the cookies on a baking sheet. Heat them for about 5 minutes. This warms them up without making them hard.
Troubleshooting Tips
What to do if cookies spread too much while baking? If your cookies spread too much, try chilling the dough before baking. Place the dough balls in the fridge for about 30 minutes. This helps the cookies hold their shape better. Also, check your oven temperature for accuracy.
How can I make cookies less sweet? To make cookies less sweet, reduce the sugar by a few tablespoons. You can also add a pinch of salt to balance the flavors. Try using dark chocolate kisses for a less sweet option.
Dietary Concerns
Is there a dairy-free option for this recipe? Yes, you can use dairy-free butter or coconut oil instead of regular butter. This swaps out the dairy. Make sure to check that chocolate kisses are dairy-free, too.
How to adjust for nut allergies? If you need to avoid nuts, use pure vanilla extract instead of almond extract. Always check the labels on ingredients to ensure they are nut-free. This way, you can enjoy the cookies safely!
You can make delicious Fairy Kisses Christmas Cookies with simple steps and easy tips. We covered the key ingredients, precise instructions, and creative variations to suit your taste. Storing them properly helps maintain freshness, and answers to common questions will help you succeed.
In conclusion, have fun baking and decorating. Share these cookies with friends and family for any celebration. Enjoy the joy each bite brings!