Are you ready to impress your friends with a mouthwatering snack? Garlic knots offer the perfect blend of gooey butter, fresh garlic, and herbs, making them a favorite for appetizers. In this easy recipe, I’ll guide you step-by-step to create these irresistible bites. Whether you're hosting a party or craving a tasty treat, these garlic knots will disappear fast. Let’s get cooking!
Why I Love This Recipe
- Easy to Make: This recipe is straightforward and requires minimal ingredients, making it perfect for both novice and experienced cooks.
- Flavorful Garlic Butter: The combination of garlic, butter, and herbs creates an irresistible aroma and taste that elevates the simple dough.
- Customizable Options: You can easily adjust the spices and cheese to suit your preferences, making it a versatile dish for any occasion.
- Perfect for Sharing: These knots make a great appetizer or side dish, ideal for gatherings where everyone can enjoy them fresh and warm.
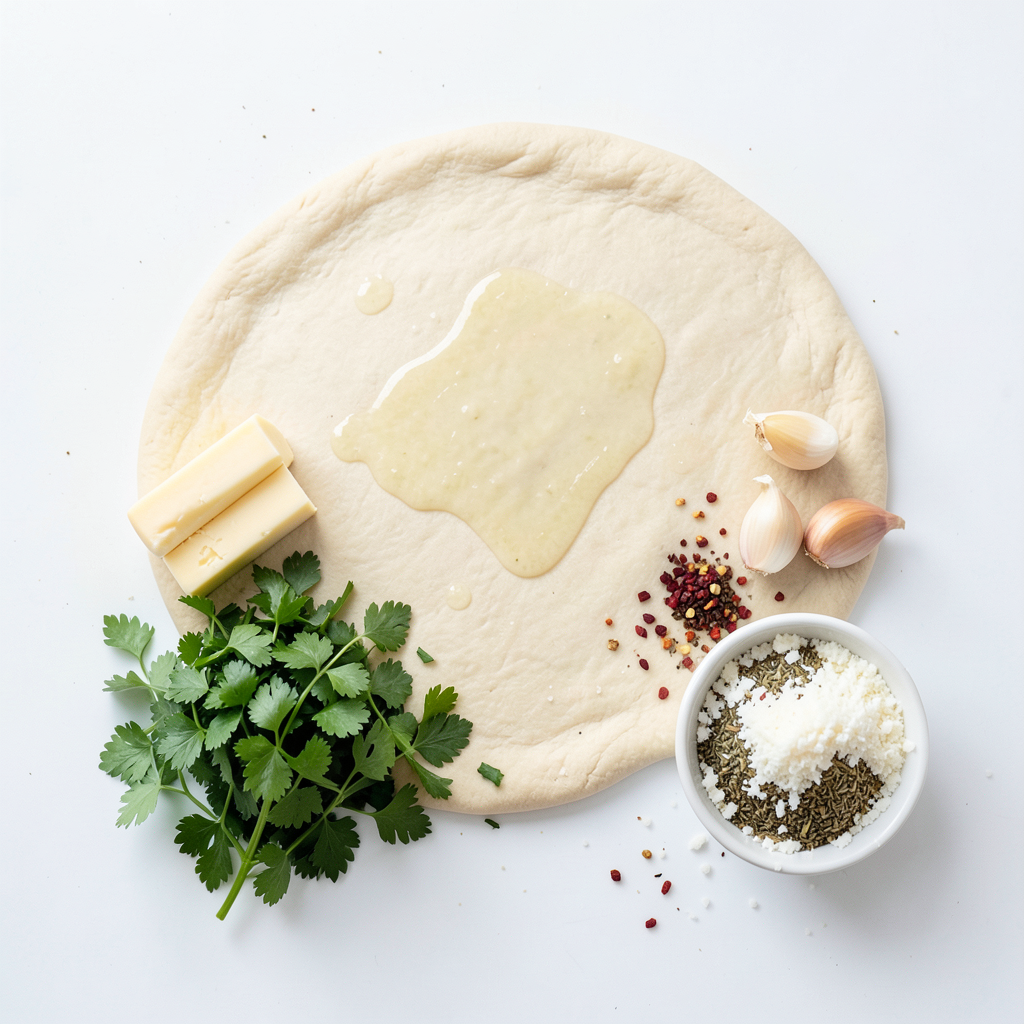
Ingredients
Main Ingredients
- 1 pound of pizza dough (store-bought or homemade)
- 4 tablespoons unsalted butter
- 4 cloves minced garlic
- 1 tablespoon chopped fresh parsley
- 1 teaspoon dried oregano
- ½ teaspoon red pepper flakes (optional)
- ½ teaspoon salt
- ¼ cup grated Parmesan cheese (optional)
Recommended Tools
- Baking sheet
- Parchment paper
- Mixing bowl
- Rolling pin
Gathering the right ingredients is key to making fantastic garlic knots. I love using fresh garlic. It gives that strong, bold taste. You can use store-bought dough if you're short on time. But making it from scratch is fun and rewarding.
Unsalted butter is best for this recipe. It allows you to control the salt level. Fresh parsley adds a pop of color and flavor. Dried oregano gives a nice herb touch, making the knots even better. The red pepper flakes add a little heat, but you can skip them if you want a milder flavor.
Don’t forget the Parmesan cheese! It’s optional, but it adds a cheesy richness that pairs well with garlic.
For tools, a baking sheet makes it easy to bake your knots. Parchment paper helps prevent sticking and makes cleanup a breeze. A mixing bowl is needed to combine your garlic butter. Lastly, a rolling pin will be handy for shaping the dough into ropes.
These ingredients and tools set you up for a great start. With the right items, you’ll create delicious garlic knots that everyone will love!
Step-by-Step Instructions
Prepping the Dough
- Preheat the oven to 375°F (190°C).
- Line a baking sheet with parchment paper.
- Divide the pizza dough into 12 equal pieces.
To start, I love preheating the oven first. It helps the knots bake evenly. While the oven warms up, I line my baking sheet with parchment paper. This makes cleanup easy and keeps the knots from sticking. Next, I take the pizza dough and cut it into 12 equal portions. This ensures that each knot bakes at the same time.
Making the Garlic Butter
- Combine melted butter with garlic, parsley, oregano, and seasoning.
- Mix thoroughly for even flavor distribution.
For the garlic butter, I melt the unsalted butter in a bowl. I then add minced garlic, fresh parsley, and dried oregano. If you like a bit of heat, sprinkle in some red pepper flakes. I mix this all together well. This step is key for getting that garlic flavor in every bite.
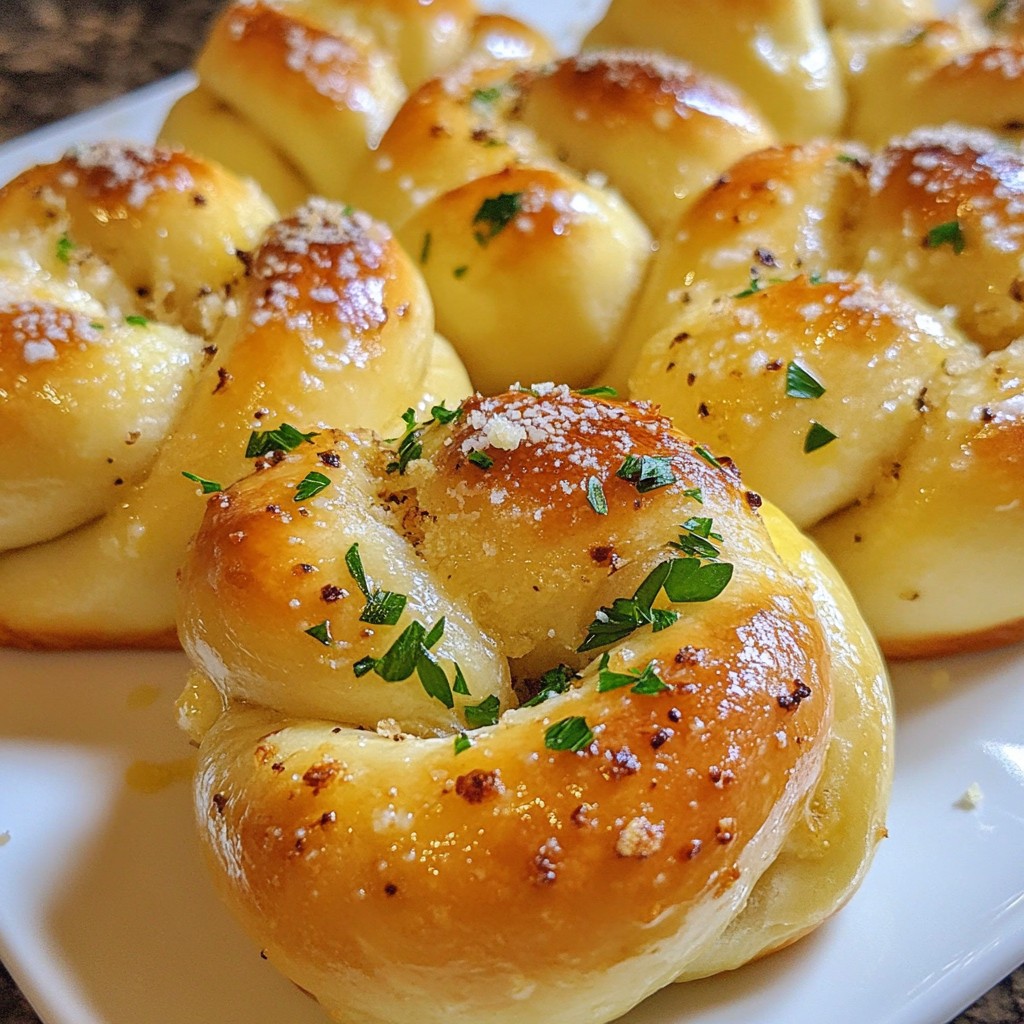
Forming the Knots
- Roll each dough piece into a rope.
- Tie each rope into a knot.
- Tuck the ends under for a neat appearance.
Now, I take each piece of dough and roll it into a long rope. It should be about 10 inches long. Then, I tie the rope into a knot. Tucking the ends underneath makes the knots look nice and tidy. This step is fun and makes each knot special.
Baking the Garlic Knots
- Brush knots with garlic butter mixture.
- Optionally sprinkle with Parmesan cheese.
- Arrange on the baking sheet and bake for 15-20 minutes.
After forming the knots, I brush each one with the garlic butter mixture. I want every knot to have that rich flavor. If I'm feeling cheesy, I sprinkle grated Parmesan on top. This adds a nice touch. Then, I place the knots on the baking sheet, leaving space between them. I bake them for 15-20 minutes. They should turn golden brown and smell amazing!
Tips & Tricks
Ensuring Flavor
- Use fresh ingredients for vibrant flavor.
- Adjust seasoning to taste, especially the red pepper flakes. More spice can kick up the flavor. If you love heat, add more!
Perfecting the Bake
- Check for a golden brown color for doneness. This color means they're ready.
- Keep an eye on baking time for the best texture. Too long can make them dry.
Enhancing Appearance
- Garnish with chopped parsley before serving. It adds color and freshness.
- Serve with a side of marinara sauce for dipping. The sauce complements the garlic knots well.
Pro Tips
- Use Fresh Ingredients: Fresh garlic and herbs significantly enhance the flavor of your garlic knots. Opt for freshly minced garlic and freshly chopped parsley whenever possible.
- Experiment with Seasonings: Feel free to add other spices or herbs such as thyme or rosemary to the garlic butter mixture for a unique twist on flavor.
- Perfect Your Knot Technique: Ensure your knots are tied snugly to prevent them from unraveling during baking. Tucking the ends underneath gives them a polished appearance.
- Serve with Dipping Sauce: A warm bowl of marinara sauce or garlic dipping sauce makes the perfect accompaniment for these savory knots, enhancing the overall experience.
Variations
Herb-Infused Garlic Knots
You can elevate your garlic knots by adding fresh herbs. Try adding basil or thyme for a new twist. These herbs bring a fresh, bright flavor. You can also experiment with flavored olive oils. They add depth and richness. Just drizzle them on your knots before baking.
Stuffed Garlic Knots
For a fun surprise, stuff your knots. You can fill them with cheese or pesto. This adds a gooey, savory touch. Use different types of cheese for variety. Mozzarella, cheddar, or feta all work well. Just make sure to pinch the dough tightly to keep the filling inside.
Gluten-Free Version
If you need a gluten-free option, it's easy to adapt. Substitute regular pizza dough with gluten-free dough. Many stores sell good options. Be sure all your other ingredients are gluten-free too. This way, everyone can enjoy these tasty treats without worry.
Storage Info
Storing Garlic Knots
To keep your garlic knots fresh, store them in an airtight container. Place them at room temperature. They taste best within 2-3 days. After that, they may dry out or lose flavor.
Reheating Tips
When reheating garlic knots, the oven is your best friend. Preheat it to 350°F (175°C) and place your knots on a baking sheet. Bake for about 5-10 minutes to restore their crispy texture.
If you're in a hurry, you can use the microwave. Heat them in short bursts of 10-15 seconds. This method works, but the knots may lose some crispness. Enjoy them warm for the best taste!
FAQs
How long do garlic knots take to bake?
Baking time is typically 15-20 minutes at 375°F (190°C). I love checking them at 15 minutes. They should look golden brown when done.
Can I use homemade pizza dough?
Yes, homemade pizza dough works perfectly for garlic knots. I often use my own dough. It gives a fresh taste that makes a big difference.
What dips pair well with garlic knots?
Marinara sauce, garlic butter, or ranch are great choices for dipping. Each dip adds a unique flavor. My favorite is marinara; it offers a nice tang.
Can I freeze garlic knots?
Yes, they can be frozen before or after baking for later enjoyment. I freeze mine before baking. This way, I can bake fresh knots anytime I want.
To wrap it up, making garlic knots is easy and fun. You learned about the key ingredients, tools needed, and step-by-step instructions to bake them perfectly. Tips like using fresh herbs and trying different fillings can elevate your dish. Remember, these knots taste best warm, and serving them with marinara sauce adds extra joy. Enjoy creating tasty garlic knots that will impress everyone!