Mini Skull Pizzas Crispy and Fun Halloween Treats

WANT TO SAVE THIS RECIPE?

Get ready to impress your friends this Halloween with Mini Skull Pizzas! These crispy and spooky treats are not only fun but also easy to make. In this guide, I’ll walk you through the simple steps to create tasty skull shapes that will thrill both kids and adults. Let’s dive into the ingredients, tips, and variations to make your Halloween unforgettable!

- 1 package of pre-made pizza dough - 1 cup pizza sauce - 1 ½ cups shredded mozzarella cheese - ½ cup sliced black olives - ¼ cup pepperoni slices (optional) - ¼ cup chopped bell peppers (various colors) - 1 teaspoon garlic powder - 1 teaspoon dried oregano - 1 egg (for egg wash) - All-purpose flour (for dusting) If you want to switch things up, you can use different dough. Try whole wheat or gluten-free pizza dough. For the sauce, consider pesto or barbecue sauce. You can also swap mozzarella for cheddar or a dairy-free cheese. To make your mini skull pizzas even tastier, add these fun toppings: - Fresh basil leaves for a pop of color. - Red onion slices for a little zing. - Cherry tomatoes for sweetness. - Spinach for a healthy boost. - Crushed red pepper flakes for heat. These ingredients make your pizzas colorful and fun! Feel free to mix and match to create flavors everyone will love. {{ingredient_image_2}} First, set your oven to 450°F (230°C). This high heat helps get a crispy crust. While the oven warms up, line two baking sheets with parchment paper. This will stop the pizzas from sticking. Take a clean countertop and dust it with all-purpose flour. Roll out the pizza dough until it is about ¼ inch thick. Use a large round cookie cutter to cut out circles, about 4 inches in size. Aim for about 12 circles; your dough might yield more or less. For each dough circle, use a smaller round cutter, around 1 inch wide. Cut out two small eye holes and a larger triangle for the mouth. Carefully take out these pieces and set them aside. Keep any dough scraps for later fun shapes. Place the skull-shaped dough on the baking sheets. Spread about one tablespoon of pizza sauce on each base, avoiding the cut-out areas. Then, sprinkle shredded mozzarella cheese on top. Use the sliced olives for eyes and place pepperoni or bell pepper pieces to make fun mouths. Take the reserved dough scraps and roll them out. Use cookie cutters to create smaller shapes like bones or other Halloween-themed items. Arrange these shapes around the pizzas on the baking sheet for extra flair. In a small bowl, beat the egg until smooth. With a pastry brush, dab the egg wash around the edges of each pizza. This will give them a lovely, golden look when baked. Next, sprinkle garlic powder and dried oregano on top for more flavor. Slide the baking sheets into your preheated oven. Bake for about 10-12 minutes. Watch them closely until the crust turns golden brown and the cheese bubbles nicely. Once baked, carefully take the mini skull pizzas out of the oven. Let them cool on the sheets for a few minutes. Then, transfer them to a serving platter. For a spooky display, serve on a decorative platter and add fresh basil for color. You might want to pair these with warm marinara sauce for dipping. To make your mini skull pizzas extra crispy, follow these tips: - Use a hot oven at 450°F (230°C) to start. - Roll the dough thin, about ¼ inch thick. - Dust your baking sheets lightly with flour or use parchment paper. - Let the pizzas bake until the edges are golden brown. This method ensures a nice crunch without burning. Keep an eye on them while baking. If you want to make your own dough, here’s a simple guide: - Combine 2 cups of all-purpose flour, 1 packet of yeast, ¾ cup warm water, and 1 teaspoon of salt. - Mix until it forms a ball, then knead for 5 minutes. - Let it rise in a warm place for about 1 hour. Making dough from scratch adds a personal touch. You can also control the ingredients to suit your tastes. Presentation is key for fun mini skull pizzas: - Use a spooky platter to serve them. - Garnish with fresh basil for color and flavor. - Arrange pizza shapes creatively on the plate. - Serve with warm marinara sauce for dipping. These small touches make your dish more inviting. They also enhance the Halloween spirit for your guests. Pro Tips Use Fresh Ingredients: Opt for fresh bell peppers and high-quality cheese to enhance the flavor of your mini skull pizzas. Experiment with Toppings: Feel free to get creative with toppings! Try adding different vegetables or meats based on your preference. Make Ahead: You can prepare the skull shapes ahead of time and store them in the fridge for up to 24 hours before baking. Adjust Oven Temperature: If your oven tends to bake unevenly, consider rotating the baking sheets halfway through for even cooking. {{image_4}} You can easily make these mini skull pizzas vegetarian. Simply skip the pepperoni and add more veggies. Think sliced mushrooms, zucchini, or spinach. They add great color and flavor. You can mix and match your favorite vegetables. Use what you have at home. This way, you keep it fun and tasty. Mozzarella is classic, but you can use other cheeses too. Try cheddar, gouda, or feta for a unique twist. Mixing cheeses can create a wonderful flavor. For a creamier texture, add some ricotta or cream cheese. These options let you get creative and add depth to each bite. Seasonal ingredients make these skull pizzas even more exciting. In fall, add pumpkin puree for a sweet touch. In spring, use fresh herbs like basil or arugula. Summer is great for ripe tomatoes or sweet corn. These swaps change the taste and keep the dish fresh. Always look for what’s in season to enhance your pizzas. To keep your mini skull pizzas fresh, you should store them in an airtight container. This will help maintain their crispiness. If you have leftover pizzas, let them cool completely first. Then, layer them with parchment paper to avoid sticking. You can store them in the fridge for up to three days. Reheating your mini skull pizzas is simple. Preheat your oven to 350°F (175°C). Place the pizzas on a baking sheet and cover them with foil. Heat for about 10-15 minutes, until warm and crispy. This method keeps the crust crunchy, unlike using a microwave, which can make them soggy. If you want to freeze your mini skull pizzas, do so before baking them. Assemble the pizzas and place them on a baking sheet. Freeze them for about an hour, then transfer them to a freezer bag. They can stay frozen for up to three months. To bake from frozen, just add a few extra minutes to the baking time. Yes, you can make Mini Skull Pizzas in advance. Prepare the skull shapes and toppings but don't bake them yet. Store the unbaked pizzas in the fridge for up to 24 hours. When you're ready, bake them straight from the fridge. Just add a few extra minutes to the bake time. You can use several things as pizza sauce substitutes. Try pesto, barbecue sauce, or even olive oil with garlic. These options add different flavors and keep the skull pizzas exciting. Just spread a thin layer on your dough base. To help the pizzas hold their shape, roll the dough evenly to about ¼ inch thick. Make sure to cut the shapes carefully, avoiding tearing. Use a baking sheet lined with parchment paper. This helps prevent sticking and keeps the skulls intact while baking. Yes, Mini Skull Pizzas are great for kids! They are fun and easy to make. Kids can help decorate their pizzas with toppings. Just keep an eye on the oven while baking. These pizzas are a hit at Halloween parties or family gatherings. You can use leftover dough scraps for fun shapes. Roll them out and cut out bones, pumpkins, or other Halloween figures. Place these shapes around your pizzas on the baking sheet. They add extra charm and make the dish even more festive. You learned about making delicious mini skull pizzas. We covered required ingredients, tasty topping options, and step-by-step instructions. You also got tips for a crisp crust and fun variations for special diets. Plus, we discussed how to store and reheat your pizzas. Enjoy creating your own unique mini skull pizzas. They are fun to make and share!

Why I Love This Recipe

  1. Creative Presentation: These mini skull pizzas are not just delicious but also visually fun, making them a perfect addition to any Halloween party or gathering.
  2. Customizable Toppings: You can easily adapt the toppings to suit your taste or dietary preferences, whether you want to go vegetarian or load them up with meats.
  3. Fun Activity: Making these pizzas can be a great family activity, allowing everyone to participate in creating their own spooky designs.
  4. Quick and Easy: With pre-made dough and simple ingredients, this recipe is quick to prepare, making it ideal for last-minute festivities.

Ingredients

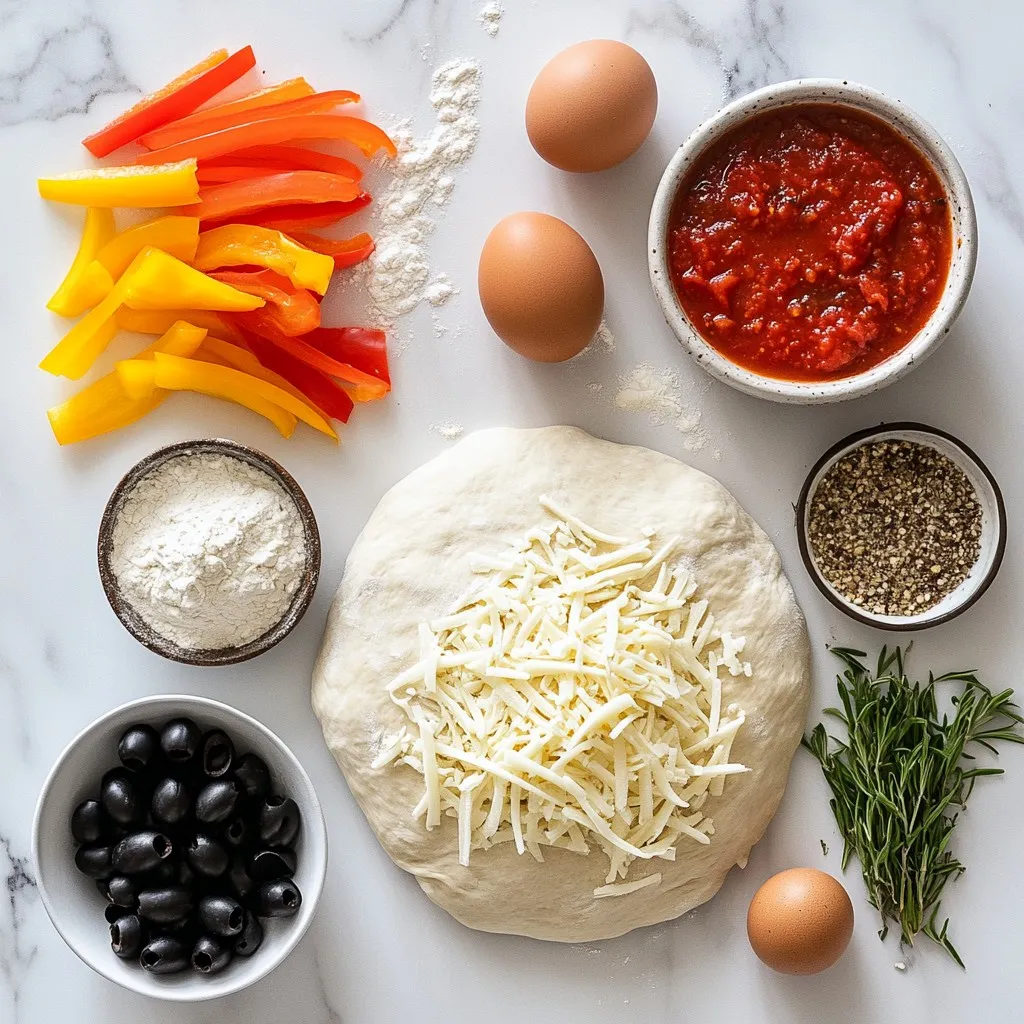
List of Required Ingredients

– 1 package of pre-made pizza dough

– 1 cup pizza sauce

– 1 ½ cups shredded mozzarella cheese

– ½ cup sliced black olives

– ¼ cup pepperoni slices (optional)

– ¼ cup chopped bell peppers (various colors)

– 1 teaspoon garlic powder

– 1 teaspoon dried oregano

– 1 egg (for egg wash)

– All-purpose flour (for dusting)

Alternative Ingredient Suggestions

If you want to switch things up, you can use different dough. Try whole wheat or gluten-free pizza dough. For the sauce, consider pesto or barbecue sauce. You can also swap mozzarella for cheddar or a dairy-free cheese.

Optional Toppings to Enhance Flavor

To make your mini skull pizzas even tastier, add these fun toppings:

– Fresh basil leaves for a pop of color.

– Red onion slices for a little zing.

– Cherry tomatoes for sweetness.

– Spinach for a healthy boost.

– Crushed red pepper flakes for heat.

These ingredients make your pizzas colorful and fun! Feel free to mix and match to create flavors everyone will love.

Step-by-Step Instructions

Preheating the Oven

First, set your oven to 450°F (230°C). This high heat helps get a crispy crust. While the oven warms up, line two baking sheets with parchment paper. This will stop the pizzas from sticking.

Preparing the Pizza Dough

Take a clean countertop and dust it with all-purpose flour. Roll out the pizza dough until it is about ¼ inch thick. Use a large round cookie cutter to cut out circles, about 4 inches in size. Aim for about 12 circles; your dough might yield more or less.

Shaping the Skull Pizzas

For each dough circle, use a smaller round cutter, around 1 inch wide. Cut out two small eye holes and a larger triangle for the mouth. Carefully take out these pieces and set them aside. Keep any dough scraps for later fun shapes.

Adding the Toppings

Place the skull-shaped dough on the baking sheets. Spread about one tablespoon of pizza sauce on each base, avoiding the cut-out areas. Then, sprinkle shredded mozzarella cheese on top. Use the sliced olives for eyes and place pepperoni or bell pepper pieces to make fun mouths.

Creating Decorative Shapes

Take the reserved dough scraps and roll them out. Use cookie cutters to create smaller shapes like bones or other Halloween-themed items. Arrange these shapes around the pizzas on the baking sheet for extra flair.

Applying Egg Wash and Seasoning

In a small bowl, beat the egg until smooth. With a pastry brush, dab the egg wash around the edges of each pizza. This will give them a lovely, golden look when baked. Next, sprinkle garlic powder and dried oregano on top for more flavor.

Baking the Mini Skull Pizzas

Slide the baking sheets into your preheated oven. Bake for about 10-12 minutes. Watch them closely until the crust turns golden brown and the cheese bubbles nicely.

Cooling and Serving Tips

Once baked, carefully take the mini skull pizzas out of the oven. Let them cool on the sheets for a few minutes. Then, transfer them to a serving platter. For a spooky display, serve on a decorative platter and add fresh basil for color. You might want to pair these with warm marinara sauce for dipping.

Tips & Tricks

How to Get Perfectly Crisp Crust

To make your mini skull pizzas extra crispy, follow these tips:

– Use a hot oven at 450°F (230°C) to start.

– Roll the dough thin, about ¼ inch thick.

– Dust your baking sheets lightly with flour or use parchment paper.

– Let the pizzas bake until the edges are golden brown.

This method ensures a nice crunch without burning. Keep an eye on them while baking.

Making the Dough from Scratch

If you want to make your own dough, here’s a simple guide:

– Combine 2 cups of all-purpose flour, 1 packet of yeast, ¾ cup warm water, and 1 teaspoon of salt.

– Mix until it forms a ball, then knead for 5 minutes.

– Let it rise in a warm place for about 1 hour.

Making dough from scratch adds a personal touch. You can also control the ingredients to suit your tastes.

Best Practices for Festive Presentation

Presentation is key for fun mini skull pizzas:

– Use a spooky platter to serve them.

– Garnish with fresh basil for color and flavor.

– Arrange pizza shapes creatively on the plate.

– Serve with warm marinara sauce for dipping.

These small touches make your dish more inviting. They also enhance the Halloween spirit for your guests.

Pro Tips

  1. Use Fresh Ingredients: Opt for fresh bell peppers and high-quality cheese to enhance the flavor of your mini skull pizzas.
  2. Experiment with Toppings: Feel free to get creative with toppings! Try adding different vegetables or meats based on your preference.
  3. Make Ahead: You can prepare the skull shapes ahead of time and store them in the fridge for up to 24 hours before baking.
  4. Adjust Oven Temperature: If your oven tends to bake unevenly, consider rotating the baking sheets halfway through for even cooking.

Variations

Vegetarian Options

You can easily make these mini skull pizzas vegetarian. Simply skip the pepperoni and add more veggies. Think sliced mushrooms, zucchini, or spinach. They add great color and flavor. You can mix and match your favorite vegetables. Use what you have at home. This way, you keep it fun and tasty.

Different Cheese Choices

Mozzarella is classic, but you can use other cheeses too. Try cheddar, gouda, or feta for a unique twist. Mixing cheeses can create a wonderful flavor. For a creamier texture, add some ricotta or cream cheese. These options let you get creative and add depth to each bite.

Seasonal Ingredient Swaps

Seasonal ingredients make these skull pizzas even more exciting. In fall, add pumpkin puree for a sweet touch. In spring, use fresh herbs like basil or arugula. Summer is great for ripe tomatoes or sweet corn. These swaps change the taste and keep the dish fresh. Always look for what’s in season to enhance your pizzas.

Storage Info

Best Ways to Store Mini Skull Pizzas

To keep your mini skull pizzas fresh, you should store them in an airtight container. This will help maintain their crispiness. If you have leftover pizzas, let them cool completely first. Then, layer them with parchment paper to avoid sticking. You can store them in the fridge for up to three days.

How to Reheat for Optimal Taste

Reheating your mini skull pizzas is simple. Preheat your oven to 350°F (175°C). Place the pizzas on a baking sheet and cover them with foil. Heat for about 10-15 minutes, until warm and crispy. This method keeps the crust crunchy, unlike using a microwave, which can make them soggy.

Freezing Tips for Meal Prep

If you want to freeze your mini skull pizzas, do so before baking them. Assemble the pizzas and place them on a baking sheet. Freeze them for about an hour, then transfer them to a freezer bag. They can stay frozen for up to three months. To bake from frozen, just add a few extra minutes to the baking time.

FAQs

Can I make Mini Skull Pizzas in advance?

Yes, you can make Mini Skull Pizzas in advance. Prepare the skull shapes and toppings but don’t bake them yet. Store the unbaked pizzas in the fridge for up to 24 hours. When you’re ready, bake them straight from the fridge. Just add a few extra minutes to the bake time.

What can I substitute for pizza sauce?

You can use several things as pizza sauce substitutes. Try pesto, barbecue sauce, or even olive oil with garlic. These options add different flavors and keep the skull pizzas exciting. Just spread a thin layer on your dough base.

How do I ensure the pizzas hold their shape?

To help the pizzas hold their shape, roll the dough evenly to about ¼ inch thick. Make sure to cut the shapes carefully, avoiding tearing. Use a baking sheet lined with parchment paper. This helps prevent sticking and keeps the skulls intact while baking.

Are Mini Skull Pizzas suitable for kids?

Yes, Mini Skull Pizzas are great for kids! They are fun and easy to make. Kids can help decorate their pizzas with toppings. Just keep an eye on the oven while baking. These pizzas are a hit at Halloween parties or family gatherings.

How can I use leftover dough scraps?

You can use leftover dough scraps for fun shapes. Roll them out and cut out bones, pumpkins, or other Halloween figures. Place these shapes around your pizzas on the baking sheet. They add extra charm and make the dish even more festive.

You learned about making delicious mini skull pizzas. We covered required ingredients, tasty topping options, and step-by-step instructions. You also got tips for a crisp crust and fun variations for special diets. Plus, we discussed how to store and reheat your pizzas.

Enjoy creating your own unique mini skull pizzas. They are fun to make and shar

- 1 package of pre-made pizza dough - 1 cup pizza sauce - 1 ½ cups shredded mozzarella cheese - ½ cup sliced black olives - ¼ cup pepperoni slices (optional) - ¼ cup chopped bell peppers (various colors) - 1 teaspoon garlic powder - 1 teaspoon dried oregano - 1 egg (for egg wash) - All-purpose flour (for dusting) If you want to switch things up, you can use different dough. Try whole wheat or gluten-free pizza dough. For the sauce, consider pesto or barbecue sauce. You can also swap mozzarella for cheddar or a dairy-free cheese. To make your mini skull pizzas even tastier, add these fun toppings: - Fresh basil leaves for a pop of color. - Red onion slices for a little zing. - Cherry tomatoes for sweetness. - Spinach for a healthy boost. - Crushed red pepper flakes for heat. These ingredients make your pizzas colorful and fun! Feel free to mix and match to create flavors everyone will love. {{ingredient_image_2}} First, set your oven to 450°F (230°C). This high heat helps get a crispy crust. While the oven warms up, line two baking sheets with parchment paper. This will stop the pizzas from sticking. Take a clean countertop and dust it with all-purpose flour. Roll out the pizza dough until it is about ¼ inch thick. Use a large round cookie cutter to cut out circles, about 4 inches in size. Aim for about 12 circles; your dough might yield more or less. For each dough circle, use a smaller round cutter, around 1 inch wide. Cut out two small eye holes and a larger triangle for the mouth. Carefully take out these pieces and set them aside. Keep any dough scraps for later fun shapes. Place the skull-shaped dough on the baking sheets. Spread about one tablespoon of pizza sauce on each base, avoiding the cut-out areas. Then, sprinkle shredded mozzarella cheese on top. Use the sliced olives for eyes and place pepperoni or bell pepper pieces to make fun mouths. Take the reserved dough scraps and roll them out. Use cookie cutters to create smaller shapes like bones or other Halloween-themed items. Arrange these shapes around the pizzas on the baking sheet for extra flair. In a small bowl, beat the egg until smooth. With a pastry brush, dab the egg wash around the edges of each pizza. This will give them a lovely, golden look when baked. Next, sprinkle garlic powder and dried oregano on top for more flavor. Slide the baking sheets into your preheated oven. Bake for about 10-12 minutes. Watch them closely until the crust turns golden brown and the cheese bubbles nicely. Once baked, carefully take the mini skull pizzas out of the oven. Let them cool on the sheets for a few minutes. Then, transfer them to a serving platter. For a spooky display, serve on a decorative platter and add fresh basil for color. You might want to pair these with warm marinara sauce for dipping. To make your mini skull pizzas extra crispy, follow these tips: - Use a hot oven at 450°F (230°C) to start. - Roll the dough thin, about ¼ inch thick. - Dust your baking sheets lightly with flour or use parchment paper. - Let the pizzas bake until the edges are golden brown. This method ensures a nice crunch without burning. Keep an eye on them while baking. If you want to make your own dough, here’s a simple guide: - Combine 2 cups of all-purpose flour, 1 packet of yeast, ¾ cup warm water, and 1 teaspoon of salt. - Mix until it forms a ball, then knead for 5 minutes. - Let it rise in a warm place for about 1 hour. Making dough from scratch adds a personal touch. You can also control the ingredients to suit your tastes. Presentation is key for fun mini skull pizzas: - Use a spooky platter to serve them. - Garnish with fresh basil for color and flavor. - Arrange pizza shapes creatively on the plate. - Serve with warm marinara sauce for dipping. These small touches make your dish more inviting. They also enhance the Halloween spirit for your guests. Pro Tips Use Fresh Ingredients: Opt for fresh bell peppers and high-quality cheese to enhance the flavor of your mini skull pizzas. Experiment with Toppings: Feel free to get creative with toppings! Try adding different vegetables or meats based on your preference. Make Ahead: You can prepare the skull shapes ahead of time and store them in the fridge for up to 24 hours before baking. Adjust Oven Temperature: If your oven tends to bake unevenly, consider rotating the baking sheets halfway through for even cooking. {{image_4}} You can easily make these mini skull pizzas vegetarian. Simply skip the pepperoni and add more veggies. Think sliced mushrooms, zucchini, or spinach. They add great color and flavor. You can mix and match your favorite vegetables. Use what you have at home. This way, you keep it fun and tasty. Mozzarella is classic, but you can use other cheeses too. Try cheddar, gouda, or feta for a unique twist. Mixing cheeses can create a wonderful flavor. For a creamier texture, add some ricotta or cream cheese. These options let you get creative and add depth to each bite. Seasonal ingredients make these skull pizzas even more exciting. In fall, add pumpkin puree for a sweet touch. In spring, use fresh herbs like basil or arugula. Summer is great for ripe tomatoes or sweet corn. These swaps change the taste and keep the dish fresh. Always look for what’s in season to enhance your pizzas. To keep your mini skull pizzas fresh, you should store them in an airtight container. This will help maintain their crispiness. If you have leftover pizzas, let them cool completely first. Then, layer them with parchment paper to avoid sticking. You can store them in the fridge for up to three days. Reheating your mini skull pizzas is simple. Preheat your oven to 350°F (175°C). Place the pizzas on a baking sheet and cover them with foil. Heat for about 10-15 minutes, until warm and crispy. This method keeps the crust crunchy, unlike using a microwave, which can make them soggy. If you want to freeze your mini skull pizzas, do so before baking them. Assemble the pizzas and place them on a baking sheet. Freeze them for about an hour, then transfer them to a freezer bag. They can stay frozen for up to three months. To bake from frozen, just add a few extra minutes to the baking time. Yes, you can make Mini Skull Pizzas in advance. Prepare the skull shapes and toppings but don't bake them yet. Store the unbaked pizzas in the fridge for up to 24 hours. When you're ready, bake them straight from the fridge. Just add a few extra minutes to the bake time. You can use several things as pizza sauce substitutes. Try pesto, barbecue sauce, or even olive oil with garlic. These options add different flavors and keep the skull pizzas exciting. Just spread a thin layer on your dough base. To help the pizzas hold their shape, roll the dough evenly to about ¼ inch thick. Make sure to cut the shapes carefully, avoiding tearing. Use a baking sheet lined with parchment paper. This helps prevent sticking and keeps the skulls intact while baking. Yes, Mini Skull Pizzas are great for kids! They are fun and easy to make. Kids can help decorate their pizzas with toppings. Just keep an eye on the oven while baking. These pizzas are a hit at Halloween parties or family gatherings. You can use leftover dough scraps for fun shapes. Roll them out and cut out bones, pumpkins, or other Halloween figures. Place these shapes around your pizzas on the baking sheet. They add extra charm and make the dish even more festive. You learned about making delicious mini skull pizzas. We covered required ingredients, tasty topping options, and step-by-step instructions. You also got tips for a crisp crust and fun variations for special diets. Plus, we discussed how to store and reheat your pizzas. Enjoy creating your own unique mini skull pizzas. They are fun to make and share!

Mini Skull Pizzas

Delicious mini pizzas shaped like skulls, perfect for Halloween festivities.
Prep Time 20 minutes
Cook Time 15 minutes
Total Time 35 minutes
Course Appetizer
Cuisine Italian
Servings 12
Calories 200 kcal

Ingredients
  

  • 1 package pre-made pizza dough
  • 1 cup pizza sauce
  • 1.5 cups shredded mozzarella cheese
  • 0.5 cup sliced black olives
  • 0.25 cup pepperoni slices (optional)
  • 0.25 cup chopped bell peppers (various colors)
  • 1 teaspoon garlic powder
  • 1 teaspoon dried oregano
  • 1 egg for egg wash
  • as needed all-purpose flour for dusting

Instructions
 

  • Preheat the oven to 450°F (230°C) and line two baking sheets with parchment paper.
  • On a clean countertop dusted with all-purpose flour, roll out the pizza dough to a thickness of about ¼ inch and cut out circles using a large round cookie cutter.
  • Use a smaller round cutter to cut out two small eye holes and a larger triangular shape for the mouth in each dough circle.
  • Place the skull-shaped dough disks onto the prepared baking sheets, spread pizza sauce over each, and sprinkle shredded mozzarella cheese. Use olives for eyes and add pepperoni or bell pepper for mouths.
  • Roll out the reserved dough scraps to create smaller shapes like bones, and position them around the pizzas on the baking sheet.
  • Beat the egg in a small bowl and use a pastry brush to dab the egg wash around the edges of each pizza.
  • Sprinkle garlic powder and dried oregano over the top of each mini skull pizza.
  • Bake for approximately 10-12 minutes until the crusts are golden brown and the cheese is bubbling.
  • Allow the mini skull pizzas to cool on the sheets for a few minutes before transferring them to a serving platter.

Notes

Serve on a spooky platter for a festive presentation.
Keyword Halloween, party food, pizzas, skull

WANT TO SAVE THIS RECIPE?