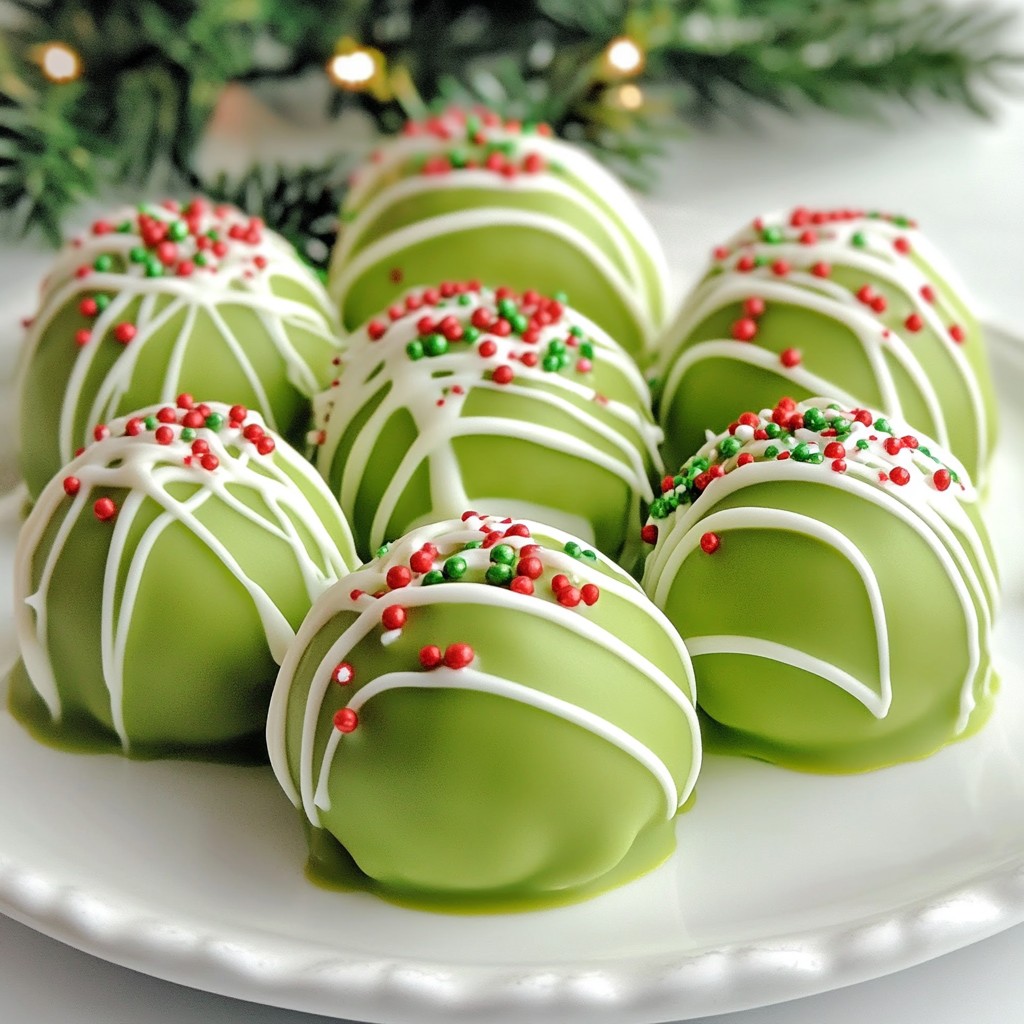
Are you looking for a fun holiday treat that’s both easy and delicious? You’ll love these No-Bake Grinch Oreo Truffles. With just a handful of simple ingredients, you can create a festive dessert that everyone will enjoy. Perfect for parties or as a gift, these truffles add a cheerful twist to your holiday treats. Let’s dive in and make some magic this season!
Why I Love This Recipe
- Festive Flavor: The combination of Oreo cookies and peppermint extract offers a delightful holiday taste that brings joy to every bite.
- No-Bake Convenience: These truffles require no baking, making them an easy and quick treat for busy holiday schedules.
- Fun for Everyone: Rolling the truffles and decorating them with sprinkles is a fun activity that friends and family can enjoy together.
- Impressive Presentation: With their vibrant green coating and elegant white chocolate drizzle, these truffles look as good as they taste!
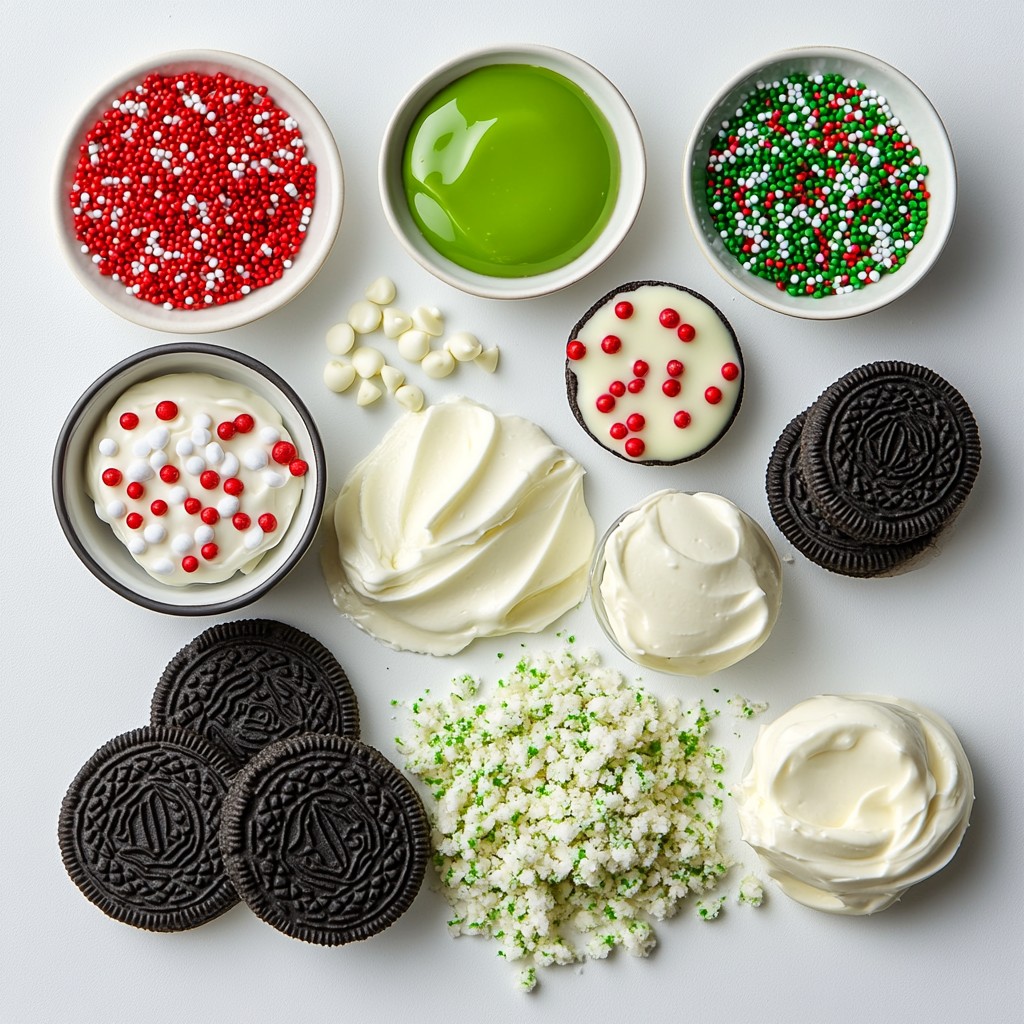
Ingredients
List of Essential Ingredients
- 2 cups Oreo cookies, finely crushed
- 1 cup cream cheese, softened to room temperature
- 1 cup green candy melts
- 1/4 cup white chocolate chips
- 1 teaspoon peppermint extract
- Red and green sprinkles for festive decoration
To make these fun No-Bake Grinch Oreo Truffles, you need simple ingredients. First, grab Oreo cookies. You want to crush them finely. Next, get some cream cheese. It must be soft so that it mixes well. Then, you need green candy melts. This will coat your truffles and give them a fun color.
Don’t forget white chocolate chips! They will add a nice touch later. You’ll also need peppermint extract for that holiday flavor. Finally, find some red and green sprinkles. They will make your truffles look extra festive.
Optional Add-Ins
- Crushed candy canes
- Mini chocolate chips
If you want to get creative, add some crushed candy canes. They give a great crunch and more minty taste. You can also use mini chocolate chips if you love chocolate. They mix well with the Oreo and cream cheese.
Step-by-Step Instructions
Preparation of Oreo Mixture
To start, grab a big mixing bowl. Add 2 cups of finely crushed Oreo cookies. Next, add 1 cup of softened cream cheese. Mix these two together well. You can use a spatula or your hands. When it's mixed, it should feel like dough.
Now, let’s add some flavor! Pour in 1 teaspoon of peppermint extract. This gives a nice minty taste. Stir until the peppermint is blended in evenly. This step is key for that holiday flavor!
Rolling Truffles
Now, it’s time to roll. Take small amounts of the mixture and form them into balls. Aim for about 1 inch wide for each ball. Place them on a parchment-lined baking sheet. Make sure to leave space between each ball.
After rolling all the truffles, cover them with plastic wrap. Put them in the fridge for around 30 minutes. This helps the truffles firm up nicely.
Coating the Truffles
While the truffles chill, let's make the coating. Melt 1 cup of green candy melts in a microwave-safe bowl. Follow the package instructions and stir until smooth. It's important to get it lump-free for a nice finish.
Once melted, dip each truffle into the green candy. Use a fork to make sure all sides are covered. Let any extra coating drip back into the bowl. Then put them back onto the parchment-lined sheet.
Before the coating hardens, sprinkle red and green sprinkles on top. This adds a fun and festive touch! Let them sit at room temperature to set or chill them again for about 15 minutes.
For an extra fancy look, melt 1/4 cup of white chocolate chips. Drizzle this over the set truffles with a fork or piping bag. Once the drizzle sets, your truffles are ready to serve! Enjoy these fun and festive treats!
Tips & Tricks
Achieving the Best Texture
To get the best texture for your truffles, start with cream cheese at room temperature. This makes it easier to mix with the Oreo cookies. If it's too cold, your dough will be lumpy. Mix until it feels smooth and uniform.
For a smoother coating, melt the green candy melts carefully. Use short bursts in the microwave, stirring often. This helps avoid lumps. If the coating is too thick, add a teaspoon of vegetable oil. This keeps it silky and easy to dip.
Decorating Ideas
To create a festive look, use red and green sprinkles. Sprinkle them on the truffles while the green coating is still wet. This way, they stick well. You can also use crushed candy canes for a minty twist.
For added flair, drizzle melted white chocolate on top. It adds a nice contrast against the green. Use a fork or a piping bag to create pretty patterns. Let the drizzle set fully before serving. This gives your truffles a fun, polished look!
Pro Tips
- Chill for Better Coating: Make sure your truffles are well-chilled before dipping. This helps the green candy melts adhere better and results in a smoother finish.
- Use Quality Ingredients: For the best flavor, opt for high-quality Oreo cookies and cream cheese. It can make a noticeable difference in the final taste of your truffles.
- Customize Your Sprinkles: Feel free to get creative with your sprinkles! Use themed sprinkles or edible glitter to make your truffles even more festive and visually appealing.
- Store Properly: Keep the truffles in an airtight container in the refrigerator. They can last up to a week, making them a great make-ahead treat for the holidays!
Variations
Flavor Variations
You can have fun with the flavors of your No-Bake Grinch Oreo Truffles. Start with different flavored Oreo cookies. For example, try mint, peanut butter, or even birthday cake Oreos. Each flavor gives a unique twist to your truffles. You can also switch up the candy melts. Instead of green, use red, blue, or yellow melts. This change can match your party theme or holiday spirit.
Dietary Adaptations
Adapting your truffles for dietary needs is easy. To make gluten-free truffles, use gluten-free Oreo cookies. They taste great and keep the same fun flavor. For a vegan option, swap the cream cheese for a plant-based cream cheese. You can find many brands that work well. These changes let everyone enjoy the festive treat without worry.
Storage Info
Best Practices for Storing Truffles
I recommend storing your No-Bake Grinch Oreo Truffles in the fridge. The cool air helps keep them firm. You can also store them at room temperature for a short time, but they may get soft.
These truffles last about one week in the fridge. Make sure to keep them in an airtight container to keep them fresh. If you want them to last longer, consider freezing them.
Tips for Freezing Truffles
To freeze your truffles, wrap each one in plastic wrap. This helps prevent freezer burn. Place the wrapped truffles in a freezer-safe bag or container.
When you want to enjoy them, take them out and let them thaw in the fridge. This keeps them tasty and fresh. Avoid thawing at room temperature as it may make them too soft.
FAQs
Can I use other cookies instead of Oreos?
Yes, you can use other cookies! Here are some tasty options:
- Chocolate sandwich cookies: These mimic the Oreo taste well.
- Vanilla wafers: They add a nice creamy flavor.
- Graham crackers: These give a different, yet delightful crunch.
- Peanut butter cookies: They add a sweet and nutty twist.
Experiment to find your favorite!
How long do these truffles take to set?
The truffles need about 30 minutes in the fridge to firm up after rolling. After coating them, let them set at room temperature or chill for about 15 minutes. This ensures the coating hardens nicely. Timing is key to a perfect bite!
Are No-Bake Grinch Oreo Truffles kid-friendly?
Absolutely! These truffles are fun and safe for kids. Here are some tips:
- Supervise: Always watch kids while they work.
- Age-appropriate tasks: Let older kids mix and roll. Younger ones can decorate.
- Avoid hot surfaces: Make sure they stay clear of the microwave when melting chocolate.
With a little help, kids can enjoy making these treats!
These No-Bake Grinch Oreo Truffles are easy to make and fun to share. We covered the key ingredients, step-by-step instructions, and helpful tips. You can also explore variations to suit dietary needs. Remember to store them properly for the best taste. Whether you enjoy them yourself or give them as gifts, these truffles will delight everyone. Now, grab your ingredients and start creating your festive treats!