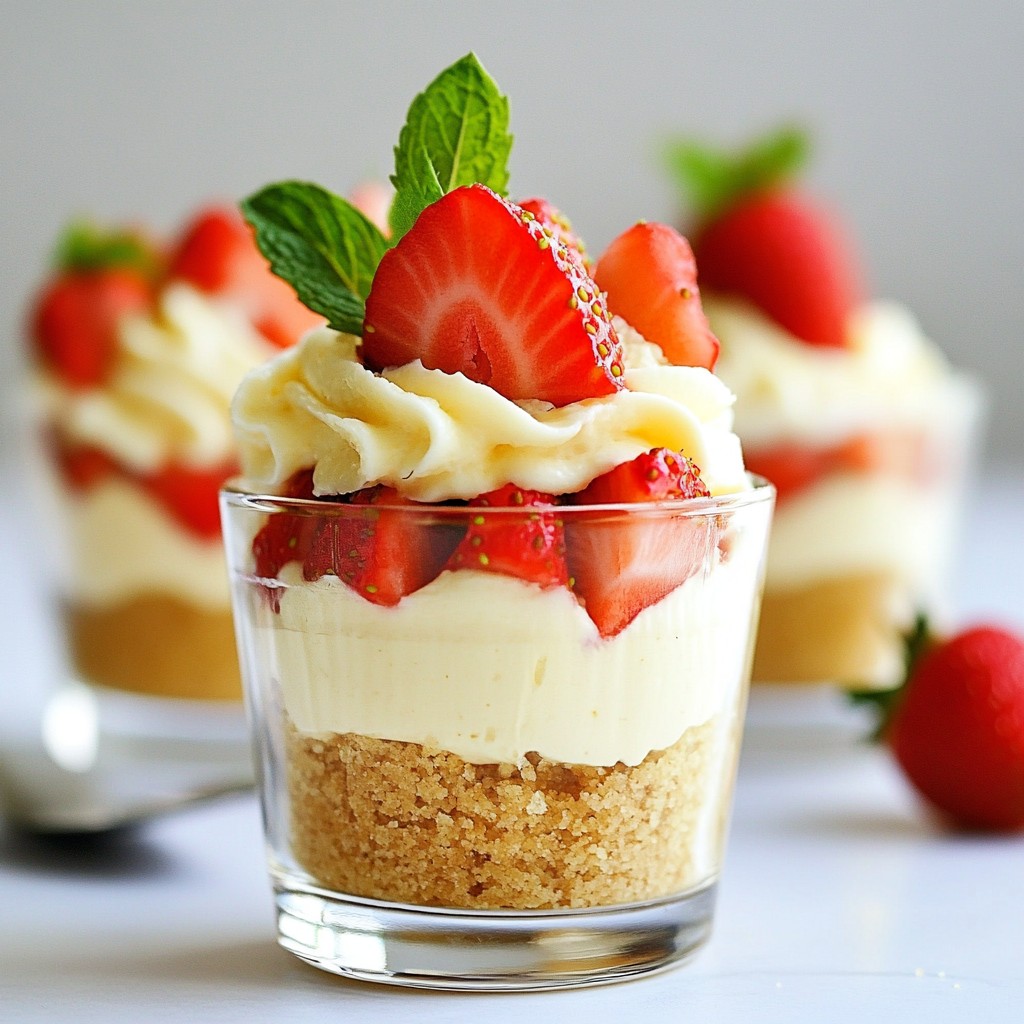
Craving a sweet treat that’s easy to make? You’re in the right place! These No-Bake Strawberry Cheesecake Cups are simple, fun, and oh-so-delicious. With just a few ingredients, you can whip up a dessert that impresses everyone. Whether you want to delight guests or treat yourself, I’ll guide you step by step. Let’s dive into this fruity, creamy delight that’s perfect for any occasion!
Why I Love This Recipe
- Quick and Easy: This no-bake recipe takes just 20 minutes of prep time, making it perfect for last-minute gatherings.
- Fresh and Flavorful: Using fresh strawberries adds a burst of flavor and vibrant color, making each bite a delight.
- Customizable: You can easily swap out strawberries for other fruits, allowing for endless variations of this classic dessert.
- Beautiful Presentation: These cheesecake cups are not only delicious but also visually appealing, adding a touch of elegance to any table.
Ingredients
Key Ingredients for No-Bake Strawberry Cheesecake Cups
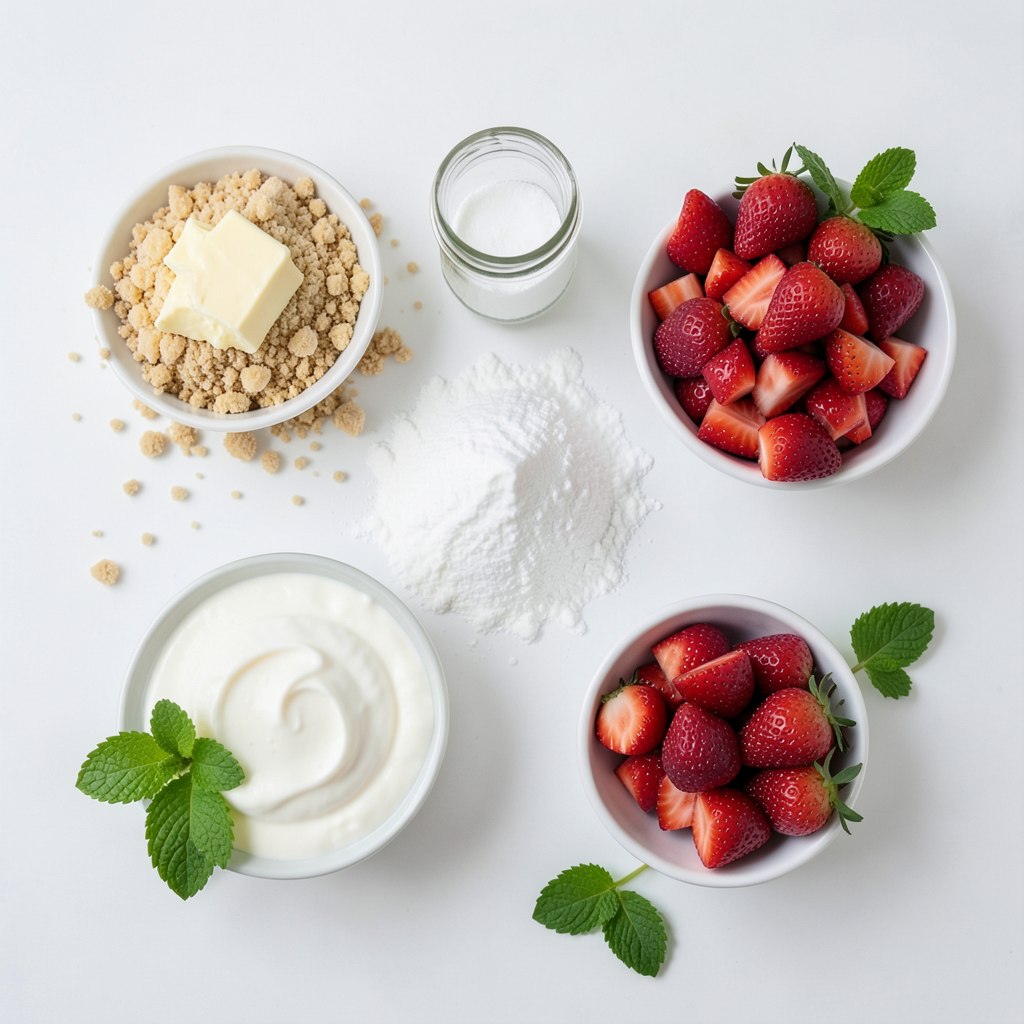
The key ingredients for this recipe are simple and easy to find. Here’s what you need:
- 1 cup graham cracker crumbs
- 4 tablespoons unsalted butter, melted
- 8 oz cream cheese, softened to room temperature
- ½ cup powdered sugar
- 1 teaspoon pure vanilla extract
- 1 cup heavy whipping cream
- 1 cup fresh strawberries, diced
These items give you a creamy, rich cheesecake flavor with a crunchy crust.
Optional Toppings and Garnishes
You can add some fun toppings to make your dessert pop! Here are some options:
- Additional strawberries for topping
- Fresh mint leaves for garnish
These not only enhance the look but also add fresh flavors.
Suggested Substitutions for Ingredients
If you need to swap out some ingredients, here are a few ideas:
- Use gluten-free graham crackers if you need a gluten-free option.
- Swap cream cheese with Greek yogurt for a lighter twist.
- Try using honey instead of powdered sugar for a different sweetness.
These substitutions can help you cater to different diets or preferences.
Step-by-Step Instructions
Detailed Preparation Steps
1. First, mix the graham cracker crumbs and melted butter in a bowl.
2. Spoon the crumb mixture into your serving cups. Press down to form a crust.
3. In a large bowl, beat the softened cream cheese until smooth, around 1-2 minutes.
4. Gradually add the powdered sugar and vanilla. Mix until there are no lumps.
5. In another bowl, whip the heavy cream until stiff peaks form. This takes a few minutes.
6. Carefully fold the whipped cream into the cream cheese mixture using a spatula.
7. Gently mix the diced strawberries into the cheesecake filling. Make sure they are even.
8. Spoon the filling into each cup over the crust. Smooth the tops with a spatula.
9. Cover the cups with plastic wrap and chill for at least 4 hours to set.
10. Before serving, top each cup with extra strawberries and a mint leaf for garnish.
Tips for Achieving the Perfect Cheesecake Filling
- Use room temperature cream cheese for a smooth texture.
- Whip the cream until stiff peaks form; this makes the filling light and airy.
- Fold gently to keep the mixture fluffy. Avoid overmixing.
- Use fresh strawberries for the best flavor. Frozen strawberries may add extra water.
Visual Guide or Video Tutorial Link
For a helpful visual guide, check out this [video tutorial](#) on making no-bake cheesecake cups. It shows each step clearly, making it easy to follow along.
Tips & Tricks
Common Mistakes to Avoid
When making no-bake strawberry cheesecake cups, it's easy to make a few common mistakes. Here are some to watch out for:
- Don’t rush the cream cheese: Make sure it’s softened. It mixes better and is smoother.
- Avoid overmixing the whipped cream: This can make it grainy. Stop as soon as stiff peaks form.
- Don’t skip chilling time: Let the cups set for at least four hours. This step is key for a great texture.
- Watch the crust: Press down firmly but not too hard. A loose crust will crumble when you serve it.
Best Practices for Storing Cheesecake Cups
Storing your cheesecake cups correctly keeps them fresh and tasty. Here are my tips:
- Keep them covered: Use plastic wrap or a lid for each cup. This prevents drying out.
- Store in the fridge: Always keep them refrigerated. They taste best cold.
- Limit stacking: If you stack the cups, place parchment paper between them. This stops them from sticking.
How to Customize Portions and Serving Sizes
Making the cheesecake cups just right for your needs is easy. Here’s how:
- Use different cup sizes: For a party, try mini cups. They make perfect bite-sized treats.
- Adjust the filling: If you want more cheesecake, add more cream cheese and whipping cream.
- Layer flavors: Try layering with more fruit or a fruit sauce. This adds color and taste.
- Experiment with toppings: Use crushed nuts, chocolate shavings, or coconut for fun twists.
Pro Tips
- Use Room Temperature Ingredients: Ensure your cream cheese is at room temperature before mixing to achieve a smooth and creamy texture without lumps.
- Whip Cream to Stiff Peaks: When whipping the heavy cream, ensure you reach stiff peaks for the best texture. This will help your cheesecake filling maintain its structure.
- Chill for Best Results: Allow the cheesecake cups to chill for at least 4 hours, or overnight if possible. This helps the flavors meld and the texture firm up perfectly.
- Garnish Creatively: Experiment with garnishes like a drizzle of strawberry puree or a sprinkle of crushed graham crackers for added texture and visual appeal.
Variations
Alternative Fruit Options for Cheesecake Cups
You can swap strawberries for other fruits. Blueberries, raspberries, or peaches are great choices. Each fruit gives a new taste and color. For a tropical twist, try adding diced mango or pineapple. Simply replace the strawberries with your favorite fruit. Adjust the sweetness if needed.
Flavor Variations (Chocolate, Lemon, etc.)
Want to change the flavor? Try chocolate or lemon! For a chocolate version, mix in cocoa powder with the cream cheese. Use half a cup for a rich taste. For lemon, add lemon juice and zest to the cream cheese mixture. About one tablespoon of juice works well. Both options will give your cups a unique flair.
Gluten-Free and Vegan Adaptations
You can easily make these cups gluten-free. Use gluten-free graham cracker crumbs for the crust. For a vegan option, substitute cream cheese with a dairy-free alternative. Use coconut cream to replace the heavy whipping cream. Mix these swaps for a delicious vegan treat. Enjoy the same great taste while fitting your diet!
Storage Info
How to Properly Store No-Bake Cheesecake Cups
To keep your no-bake cheesecake cups fresh, cover them tightly. Use plastic wrap or a lid. Store them in the fridge. They need to stay cold. Avoid leaving them out at room temperature for too long. This helps maintain their creamy texture and flavor.
Shelf Life and Freezing Tips
These cheesecake cups can last up to five days in the fridge. If you want to freeze them, do so before adding fresh strawberries. Wrap each cup tightly in plastic wrap and then foil. They can last up to three months in the freezer. Thaw them in the fridge overnight before serving.
Signs That Cheesecake Has Gone Bad
Check for any changes in color or texture. If you see mold, it’s time to toss it. Also, smell the cheesecake. A sour or off smell means it is no longer good. Always trust your senses to avoid any food safety issues.
FAQs
Can I make this recipe ahead of time?
Yes, you can make these cheesecake cups a day in advance. Just prepare them and refrigerate them. This helps the flavors blend well. Plus, it saves time when serving!
How do I know when the cheesecake is set?
The cheesecake is set when it feels firm to the touch. After chilling for at least four hours, check the sides. If they hold their shape, it’s ready to enjoy!
Can I use low-fat cream cheese?
Absolutely! Low-fat cream cheese works well in this recipe. It may change the flavor slightly, but it will still taste great. Your cheesecake will be a bit lighter, too.
What are the best ways to serve these cheesecake cups?
Serve the cheesecake cups chilled for the best taste. You can add extra strawberries on top for a pop of color. A fresh mint leaf also makes it look fancy! For a fun twist, drizzle some strawberry puree around the cups. Enjoy!
In this article, we explored how to make no-bake strawberry cheesecake cups. We covered key ingredients, prep steps, and tips for success. We also discussed variations, storage tips, and common questions. Remember, this dessert is simple and fun to customize. Don't be afraid to try new flavors or toppings. With these tips, your cheesecake cups will impress everyone. Enjoy making this treat and sharing it with others!