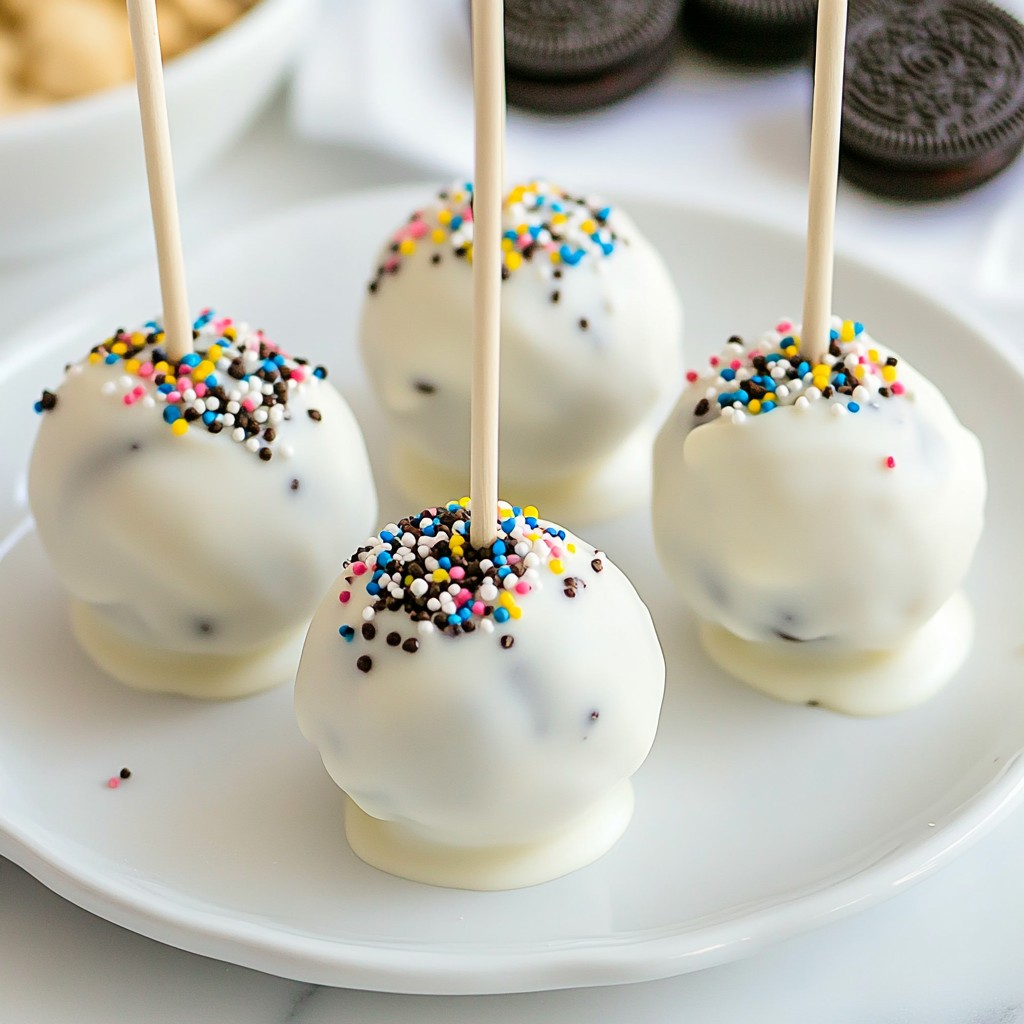
Looking for a fun, easy dessert that will wow your friends and family? Try making OREO Cookie Ball Pops! These no-bake treats combine creamy goodness with crunchy delight, all in an adorable pop shape. In this post, I'll guide you step by step on how to create these sweet bites, plus share tips for storage and serving. Get ready to impress with a dessert that’s as tasty as it is fun!
Why I Love This Recipe
- Decadent Flavor: These OREO Cookie Ball Pops are rich and indulgent, combining the classic taste of OREO cookies with creamy cream cheese.
- Fun for All Ages: They are a hit at parties, making them a delightful treat for both kids and adults alike.
- Easy to Make: This simple no-bake recipe comes together quickly, making it perfect for last-minute gatherings.
- Customizable: You can easily alter the toppings and colors to match any occasion or personal preference!
Ingredients
List of Ingredients
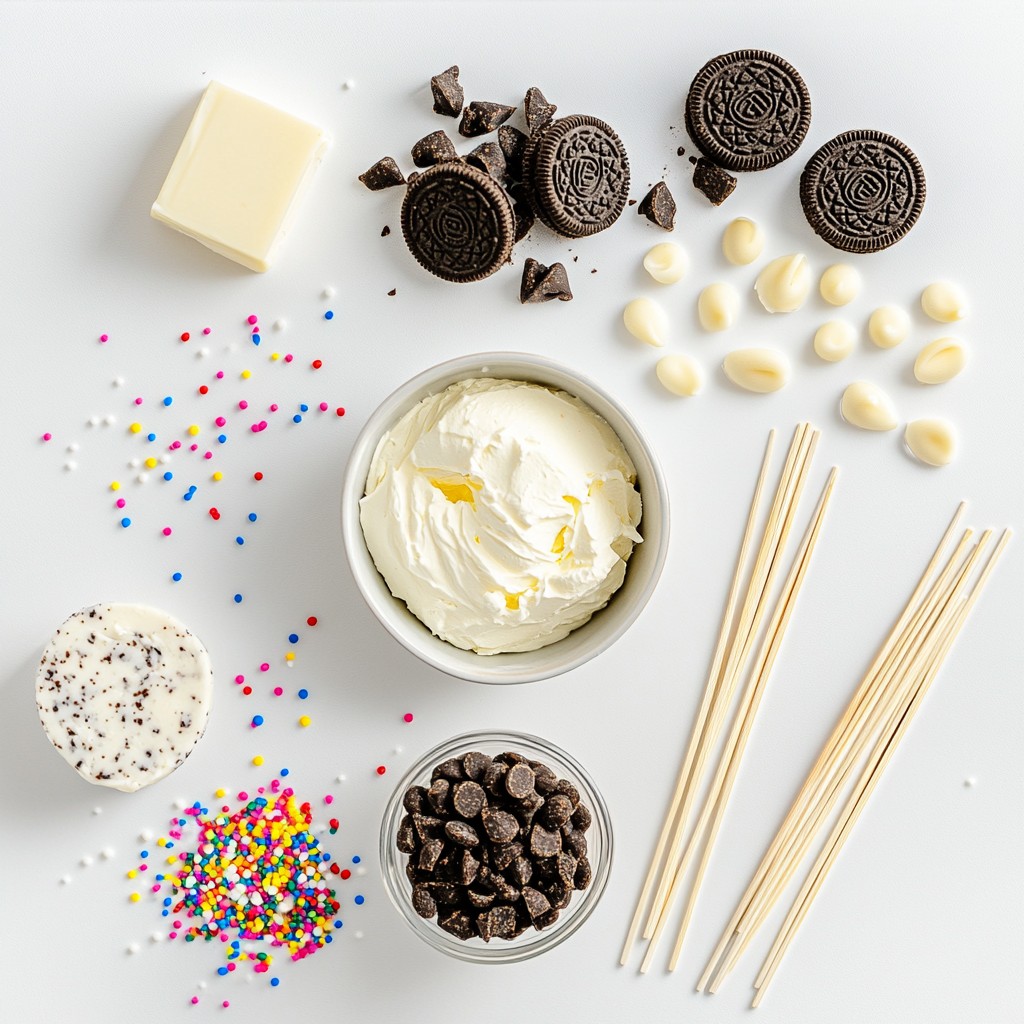
- 1 package (14.3 oz) Oreo cookies, finely crushed
- 8 oz cream cheese, softened to room temperature
- 1 cup white chocolate chips
- 1 tablespoon coconut oil
- Decorative sprinkles or additional crushed Oreos for garnish
- Lollipop sticks
Optional Additional Ingredients
- Flavor extracts (e.g., vanilla or peppermint)
- Alternative chocolate coatings (dark or milk chocolate)
Using the right ingredients is key to making OREO Cookie Ball Pops that shine. The main base comes from the Oreo cookies and cream cheese. They blend together to create a rich, sweet mixture. You can use any flavor of Oreo cookies you like. This allows you to have fun with flavors.
For the coating, white chocolate gives a nice contrast to the dark Oreos. If you want a twist, consider using dark or milk chocolate. The coconut oil helps the chocolate melt smoothly and makes it shiny.
You can also add flavor extracts to enhance the taste. A drop of vanilla or peppermint can take your pops to the next level.
Finally, be sure to have some fun garnishes ready. Decorative sprinkles or more crushed Oreos make them look festive. Lollipop sticks are a must to create that fun pop look. Gather these items, and you are ready to dive into this delicious treat!
Step-by-Step Instructions
Combining the Base Ingredients
Start by crushing the Oreo cookies finely. You can use a food processor or a zip-top bag and a rolling pin. Once crushed, put them in a large mixing bowl. Next, take 8 ounces of softened cream cheese and add it to the bowl. Mix with a spatula or your hands until it is smooth and even. Make sure there are no lumps. A uniform mixture is key for the best flavor.
Forming and Chilling the Cookie Balls
Now that you have a smooth mixture, it’s time to form the cookie balls. Take a small amount of the mixture and roll it into a ball. Aim for about one inch in size. Place each ball on a baking sheet lined with parchment paper. This step prevents sticking. Once you have rolled all the balls, it’s important to chill them. Put the baking sheet in the freezer for 15-20 minutes. This helps the cookie balls hold their shape.
Melting and Dipping the Chocolate
While the cookie balls chill, let’s prepare the chocolate coating. In a microwave-safe bowl, add 1 cup of white chocolate chips and 1 tablespoon of coconut oil. Heat the bowl in the microwave in 30-second intervals. Stir between each interval until the mixture is smooth and glossy. Make sure it does not burn. The coconut oil helps the chocolate melt evenly.
Adding Garnishes and Setting Pops
Once the cookie balls are firm, take them out of the freezer. Dip each ball into the melted white chocolate. Ensure each ball is fully coated. Gently shake off any excess chocolate. Before the chocolate sets, sprinkle decorative sprinkles or crushed Oreos on top. This adds a fun touch. Place the decorated cookie pops back onto the baking sheet. Return them to the freezer for another 10 minutes. This lets the chocolate solidify completely.
Tips & Tricks
Perfecting the Cookie Ball Texture
To avoid a crumbly texture, you must mix the Oreo cookies and cream cheese well. Use a large bowl for this. I like to use a spatula or my hands to blend until it’s smooth and creamy. If the mix feels too dry, add a little more cream cheese. This ensures your cookie balls hold together nicely.
Decorating Ideas
You can get really creative with toppings for your cookie pops. Try using colorful sprinkles for a fun look, or crushed Oreos for an extra crunch. You can also drizzle melted chocolate over the tops for a fancy touch. If you want to personalize, use themed sprinkles for holidays or events.
Serving Suggestions
When serving your OREO Cookie Ball Pops, think about how they look on the table. You can place them in a cute holder or even a cup. Pair them with milk or coffee for a sweet treat. These pops are perfect for birthday parties, holiday gatherings, or just a cozy night in.
Pro Tips
- Chill for Firmness: Ensure the cookie balls are firm before dipping in chocolate to prevent them from falling apart during coating.
- Quality White Chocolate: Use high-quality white chocolate for a smoother melt and better flavor; avoid chocolate chips if possible as they may not melt as well.
- Decorate Quickly: Add sprinkles or crushed Oreos immediately after dipping while the chocolate is still wet for better adherence.
- Storage Tips: Store the cookie pops in an airtight container in the refrigerator to maintain freshness and prevent chocolate from melting.
Variations
Flavor Combinations
You can play with different flavors for your OREO Cookie Ball Pops. Try using Mint Oreos for a fresh twist. Just swap the regular Oreos for these minty delights. If you want a taste of fall, use Pumpkin Spice Oreos. The warm spices will give your pops a unique flavor. You could also explore other fun flavors like Birthday Cake or Red Velvet. Each variation can spark new joy in your treats!
Alternative Coatings
Get creative with your coatings! While I love using white chocolate, you can try other options. Dark chocolate melts are rich and add a bold taste. Milk chocolate is sweeter and works well for kids. You can even use colored candy melts for a fun pop of color. Just melt them the same way as the white chocolate, and dip your cookie balls for a fun look.
No-Bake Versions
Want to make a no-bake version? You can skip the chilling step for a softer texture. Mix the crushed Oreos and cream cheese, then form the balls. Roll them in crushed Oreos or sprinkles right away. This way, you save time and still enjoy a tasty treat. Remember, the pops may be a bit softer, but they are just as delicious!
Storage Info
Storing Cookie Pops
To keep your OREO Cookie Ball Pops fresh, store them in the fridge. Use an airtight container to prevent them from drying out. Place a piece of parchment paper between layers if you stack them. If you want them to last longer, freeze the pops. Wrap each one in plastic wrap or foil before placing them in a freezer-safe bag. They can stay fresh for up to three months in the freezer.
Reheating and Serving
When you're ready to serve, take the pops out of the freezer. Let them thaw in the fridge for about 30 minutes. This keeps them cool but soft enough to eat. If you left them in the fridge, they should be good to go right away. Just remove them from the container and enjoy!
FAQs
Can I use low-fat cream cheese?
Yes, you can use low-fat cream cheese. However, the texture may change. It might not be as creamy as regular cream cheese. This can affect how well the cookie balls hold together. They may not be as rich and smooth, but they will still taste good.
How long do OREO Cookie Ball Pops last?
OREO Cookie Ball Pops can last up to two weeks if stored properly. Keep them in an airtight container in the fridge. If you want to keep them longer, store them in the freezer. They can stay fresh for about three months that way.
Can I make these ahead of time?
Yes, you can make these pops ahead of time. Prepare the cookie balls and freeze them before dipping. When you're ready, just melt the chocolate and dip the balls. Store the finished pops in the fridge or freezer until you need them. This helps save time during busy days or parties.
These cookie pops are fun and easy to make. You start with crushed Oreos and cream cheese, then form them into balls. Melt chocolate for dipping, add sprinkles, and chill. Remember to explore flavors and personal touches. These pops can impress at any event. Store them well for lasting freshness. With all these tips, you can create delightful treats that everyone will enjoy. So, gather your ingredients and start creating your delicious cookie pops today!