Pumpkin Cream Cheese Swirl Brownies Delicious Treat

WANT TO SAVE THIS RECIPE?

Get ready to indulge in a seasonal treat that marries rich chocolate with creamy pumpkin bliss! These Pumpkin Cream Cheese Swirl Brownies are a must-try this fall. I’ll guide you through each step, from mixing the batter to creating that stunning marbled effect. With my expert tips and straightforward instructions, you’ll master this delicious dessert that’s perfect for any occasion. Let’s dive in and bake something extraordinary!

To make these tasty brownies, you need a few key items. Here’s what you will need: - 1 cup unsalted butter, melted - 2 cups granulated sugar - 1 cup packed brown sugar - 4 large eggs - 2 teaspoons pure vanilla extract - 1 cup all-purpose flour - 3/4 cup unsweetened cocoa powder - 1 teaspoon baking powder - 1/2 teaspoon salt - 1 cup pumpkin puree These ingredients create a rich, chocolatey base that pairs perfectly with the pumpkin. The cream cheese layer adds a delicious twist. You’ll need: - 8 oz cream cheese, softened - 1/2 cup powdered sugar - 1 teaspoon ground cinnamon - 1/2 teaspoon ground nutmeg This mixture is smooth and creamy, giving the brownies that perfect swirl. To make these brownies, you will need some tools. Here’s a list of what to gather: - Mixing bowls - Electric mixer - Baking pan (9x13 inch) Having the right tools makes the process easier and more fun! First, preheat your oven to 350°F (175°C). This makes sure the brownies bake evenly. Next, take a 9x13 inch baking pan and grease it well. You can use butter or cooking spray. Then, line the pan with parchment paper. Leave some paper hanging over the edges. This will help lift the brownies out later. In a large mixing bowl, add 1 cup of melted butter. Then, mix in 2 cups of granulated sugar and 1 cup of brown sugar. Whisk these together until smooth. Next, add in 4 large eggs, one at a time. Make sure to mix well after each egg. Now, stir in 2 teaspoons of pure vanilla extract until everything is well combined. In another bowl, sift together 1 cup of all-purpose flour, 3/4 cup of cocoa powder, 1 teaspoon of baking powder, and 1/2 teaspoon of salt. Gradually fold this dry mix into the wet mix. Stir gently until just combined. Don’t worry if you see a few flecks of flour. In a medium bowl, beat 8 oz of softened cream cheese with an electric mixer until smooth. Then, add in 1 cup of pumpkin puree, 1/2 cup of powdered sugar, 1 teaspoon of ground cinnamon, and 1/2 teaspoon of ground nutmeg. Mix everything until it’s creamy and well-blended. Pour about two-thirds of the brownie batter into your prepared pan. Spread it evenly. Then, spoon dollops of the pumpkin cream cheese mix on top. Take a knife or skewer and gently swirl the pumpkin mix into the brownie batter. This creates a marbled effect. Finally, pour the remaining brownie batter on top and swirl it again gently to combine slightly. Now, place the pan in your preheated oven. Bake for 35 to 40 minutes. To check if they are done, insert a toothpick into the center. It should come out with a few moist crumbs, not wet batter. Once baked, let the brownies cool in the pan for at least 30 minutes. This helps them set properly. Use the parchment paper overhang to lift them out and move them to a cutting board. Cut into squares and enjoy your delicious pumpkin cream cheese swirl brownies! To get a lovely marbled look, follow these steps: - Layer Wisely: Spread two-thirds of the brownie batter evenly in the pan. This gives a good base. - Dollop Carefully: Add spoonfuls of the pumpkin cream cheese mix on top of the brownie layer. - Swirl Gently: Use a knife or skewer to make gentle swirls. Too much mixing will blend the colors too much. Enhance your brownie experience with these ideas: - Dust with Powdered Sugar: A light sprinkle on top adds elegance. - Add a Dollop of Whipped Cream: This adds a creamy texture that pairs well. - Serve with Ice Cream: A scoop of vanilla ice cream brings a cool contrast to the warm brownies. Prevent issues with these tips: - Underbaking: Always check with a toothpick. It should have a few moist crumbs. - Overmixing the Batter: Mix just until combined. This keeps your brownies soft and fudgy. - Ignoring Cooling Time: Let them cool in the pan for at least 30 minutes. This helps them set and makes cutting easier. {{image_4}} You can boost the taste of these brownies with fun add-ins. Try adding nuts like walnuts or pecans for a crunch. You can also mix in chocolate chips for extra sweetness. Dark chocolate chips add a rich taste, while white chocolate chips give a nice contrast. Just fold these into the brownie batter before you layer it in the pan. If you want to swap sugars, there are tasty options. Coconut sugar adds a nice caramel taste. Maple syrup is another great choice; it gives a warm flavor. Honey can work too, but keep in mind it may change the texture. Use about three-quarters of the amount listed for granulated sugar if you choose one of these. To make these brownies gluten-free, simple swaps work well. Use almond flour or a gluten-free baking mix instead of all-purpose flour. These options keep the brownies soft and moist. Make sure to check that your baking powder is gluten-free too. Always read labels to ensure every ingredient meets your needs. To keep your brownies fresh, use an airtight container. Place a piece of parchment paper between layers to prevent sticking. Store them at room temperature for up to three days. If you want to keep them longer, refrigeration is an option. Just remember that cold can change the texture slightly. To freeze brownies, first, let them cool completely. Then, cut them into squares. Wrap each square in plastic wrap tightly. Place the wrapped brownies in a freezer bag. Be sure to remove as much air as possible before sealing. You can freeze them for up to three months. This way, you can enjoy a tasty treat anytime! When you're ready to enjoy your frozen brownies, take them out and let them thaw in the fridge overnight. For a warm treat, heat them in the microwave for about 10-15 seconds. This brings back their fudgy texture. You can also warm them in an oven set to 350°F for about 5-10 minutes. Enjoy them with a scoop of ice cream or a drizzle of chocolate sauce for an extra special touch! Yes, you can use fresh pumpkin. Start by roasting a pumpkin until it's soft. Then, scoop out the flesh and blend it until smooth. This will give you a fresh taste. However, canned pumpkin is convenient and consistent. It is also less work. I often recommend sticking with canned for ease. To check if the brownies are done, use a toothpick. Stick it in the center of the brownies. If it comes out with a few moist crumbs, they are ready. If it comes out with wet batter, bake them for a few more minutes. This simple test helps you avoid overbaking. To cut clean brownie squares, use a sharp knife. First, let the brownies cool completely. This keeps them firm. Dip the knife in hot water before each cut. Wipe the knife after each slice. This will give you neat, even squares without tearing. Yes, you can make these brownies ahead of time. Bake them a day or two before your event. Store them in an airtight container to keep them fresh. They taste great even after a couple of days. You can also freeze them for longer storage. Just thaw them before serving. This post covered ingredients, steps, and tips for perfect brownies. I shared how to mix the batter and create a tasty pumpkin cream cheese layer. You learned important techniques for layering and baking. I also included variations, storage tips, and answers to common questions. These brownies can impress everyone. Enjoy experimenting with flavors and serving ideas. With practice, you will perfect this recipe and create a treat that delights all!

Ingredients

Basic Ingredients

To make these tasty brownies, you need a few key items. Here’s what you will need:

– 1 cup unsalted butter, melted

– 2 cups granulated sugar

– 1 cup packed brown sugar

– 4 large eggs

– 2 teaspoons pure vanilla extract

– 1 cup all-purpose flour

– 3/4 cup unsweetened cocoa powder

– 1 teaspoon baking powder

– 1/2 teaspoon salt

– 1 cup pumpkin puree

These ingredients create a rich, chocolatey base that pairs perfectly with the pumpkin.

Cream Cheese Mixture Ingredients

The cream cheese layer adds a delicious twist. You’ll need:

– 8 oz cream cheese, softened

– 1/2 cup powdered sugar

– 1 teaspoon ground cinnamon

– 1/2 teaspoon ground nutmeg

This mixture is smooth and creamy, giving the brownies that perfect swirl.

Equipment Needed

To make these brownies, you will need some tools. Here’s a list of what to gather:

– Mixing bowls

– Electric mixer

– Baking pan (9×13 inch)

Having the right tools makes the process easier and more fun!

Step-by-Step Instructions

Preparing the Oven and Pan

First, preheat your oven to 350°F (175°C). This makes sure the brownies bake evenly. Next, take a 9×13 inch baking pan and grease it well. You can use butter or cooking spray. Then, line the pan with parchment paper. Leave some paper hanging over the edges. This will help lift the brownies out later.

Mixing the Brownie Batter

In a large mixing bowl, add 1 cup of melted butter. Then, mix in 2 cups of granulated sugar and 1 cup of brown sugar. Whisk these together until smooth. Next, add in 4 large eggs, one at a time. Make sure to mix well after each egg. Now, stir in 2 teaspoons of pure vanilla extract until everything is well combined.

In another bowl, sift together 1 cup of all-purpose flour, 3/4 cup of cocoa powder, 1 teaspoon of baking powder, and 1/2 teaspoon of salt. Gradually fold this dry mix into the wet mix. Stir gently until just combined. Don’t worry if you see a few flecks of flour.

Creating the Pumpkin Cream Cheese Mix

In a medium bowl, beat 8 oz of softened cream cheese with an electric mixer until smooth. Then, add in 1 cup of pumpkin puree, 1/2 cup of powdered sugar, 1 teaspoon of ground cinnamon, and 1/2 teaspoon of ground nutmeg. Mix everything until it’s creamy and well-blended.

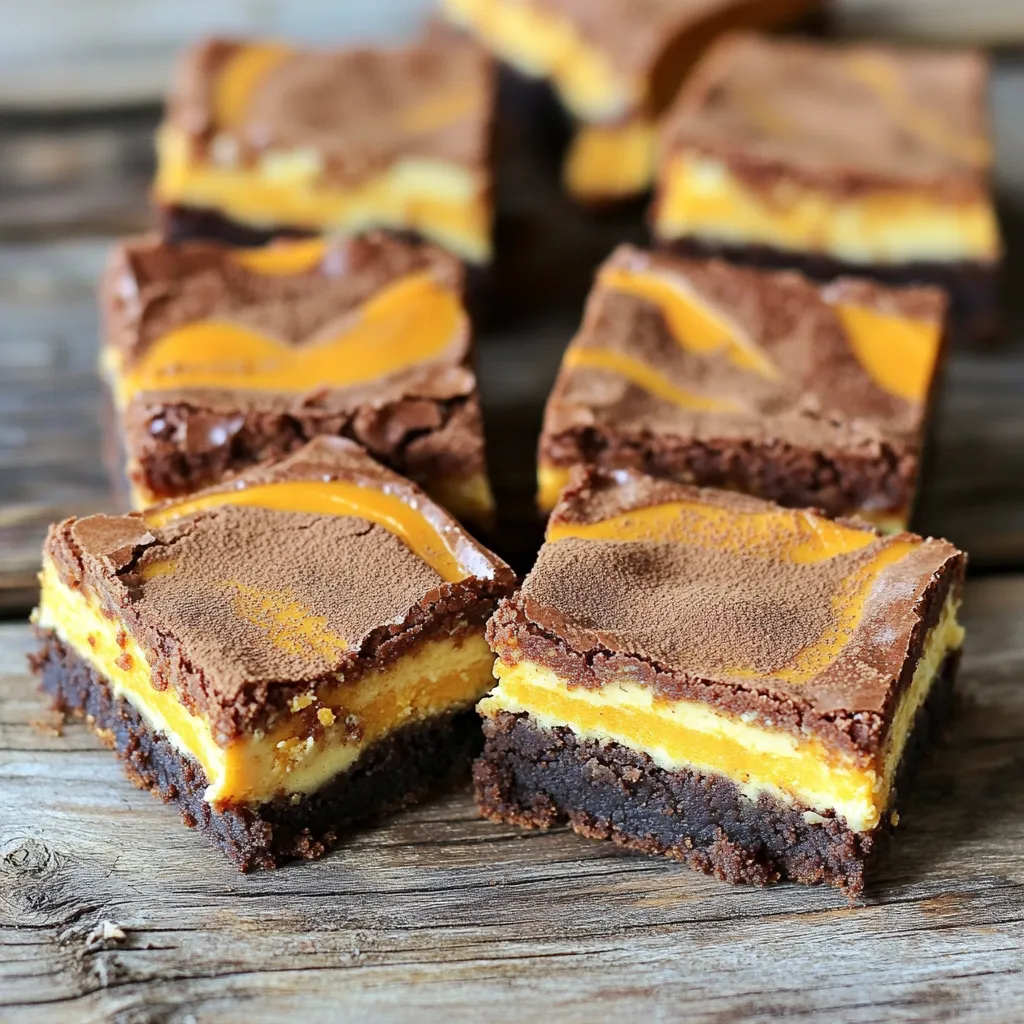
Layering and Swirling

Pour about two-thirds of the brownie batter into your prepared pan. Spread it evenly. Then, spoon dollops of the pumpkin cream cheese mix on top. Take a knife or skewer and gently swirl the pumpkin mix into the brownie batter. This creates a marbled effect. Finally, pour the remaining brownie batter on top and swirl it again gently to combine slightly.

Baking Process

Now, place the pan in your preheated oven. Bake for 35 to 40 minutes. To check if they are done, insert a toothpick into the center. It should come out with a few moist crumbs, not wet batter.

Cooling and Cutting

Once baked, let the brownies cool in the pan for at least 30 minutes. This helps them set properly. Use the parchment paper overhang to lift them out and move them to a cutting board. Cut into squares and enjoy your delicious pumpkin cream cheese swirl brownies!

Tips & Tricks

Perfecting the Swirl

To get a lovely marbled look, follow these steps:

Layer Wisely: Spread two-thirds of the brownie batter evenly in the pan. This gives a good base.

Dollop Carefully: Add spoonfuls of the pumpkin cream cheese mix on top of the brownie layer.

Swirl Gently: Use a knife or skewer to make gentle swirls. Too much mixing will blend the colors too much.

Serving Suggestions

Enhance your brownie experience with these ideas:

Dust with Powdered Sugar: A light sprinkle on top adds elegance.

Add a Dollop of Whipped Cream: This adds a creamy texture that pairs well.

Serve with Ice Cream: A scoop of vanilla ice cream brings a cool contrast to the warm brownies.

Common Mistakes to Avoid

Prevent issues with these tips:

Underbaking: Always check with a toothpick. It should have a few moist crumbs.

Overmixing the Batter: Mix just until combined. This keeps your brownies soft and fudgy.

Ignoring Cooling Time: Let them cool in the pan for at least 30 minutes. This helps them set and makes cutting easier.

Variations

Flavor Add-Ins

You can boost the taste of these brownies with fun add-ins. Try adding nuts like walnuts or pecans for a crunch. You can also mix in chocolate chips for extra sweetness. Dark chocolate chips add a rich taste, while white chocolate chips give a nice contrast. Just fold these into the brownie batter before you layer it in the pan.

Alternative Sweeteners

If you want to swap sugars, there are tasty options. Coconut sugar adds a nice caramel taste. Maple syrup is another great choice; it gives a warm flavor. Honey can work too, but keep in mind it may change the texture. Use about three-quarters of the amount listed for granulated sugar if you choose one of these.

Gluten-Free Adaptation

To make these brownies gluten-free, simple swaps work well. Use almond flour or a gluten-free baking mix instead of all-purpose flour. These options keep the brownies soft and moist. Make sure to check that your baking powder is gluten-free too. Always read labels to ensure every ingredient meets your needs.

Storage Info

How to Store Leftovers

To keep your brownies fresh, use an airtight container. Place a piece of parchment paper between layers to prevent sticking. Store them at room temperature for up to three days. If you want to keep them longer, refrigeration is an option. Just remember that cold can change the texture slightly.

Freezing Instructions

To freeze brownies, first, let them cool completely. Then, cut them into squares. Wrap each square in plastic wrap tightly. Place the wrapped brownies in a freezer bag. Be sure to remove as much air as possible before sealing. You can freeze them for up to three months. This way, you can enjoy a tasty treat anytime!

Reheating Tips

When you’re ready to enjoy your frozen brownies, take them out and let them thaw in the fridge overnight. For a warm treat, heat them in the microwave for about 10-15 seconds. This brings back their fudgy texture. You can also warm them in an oven set to 350°F for about 5-10 minutes. Enjoy them with a scoop of ice cream or a drizzle of chocolate sauce for an extra special touch!

FAQs

Can I use fresh pumpkin instead of canned?

Yes, you can use fresh pumpkin. Start by roasting a pumpkin until it’s soft. Then, scoop out the flesh and blend it until smooth. This will give you a fresh taste. However, canned pumpkin is convenient and consistent. It is also less work. I often recommend sticking with canned for ease.

How do I know when the brownies are done?

To check if the brownies are done, use a toothpick. Stick it in the center of the brownies. If it comes out with a few moist crumbs, they are ready. If it comes out with wet batter, bake them for a few more minutes. This simple test helps you avoid overbaking.

What is the best way to cut brownie squares?

To cut clean brownie squares, use a sharp knife. First, let the brownies cool completely. This keeps them firm. Dip the knife in hot water before each cut. Wipe the knife after each slice. This will give you neat, even squares without tearing.

Can I make these brownies ahead of time?

Yes, you can make these brownies ahead of time. Bake them a day or two before your event. Store them in an airtight container to keep them fresh. They taste great even after a couple of days. You can also freeze them for longer storage. Just thaw them before serving.

This post covered ingredients, steps, and tips for perfect brownies. I shared how to mix the batter and create a tasty pumpkin cream cheese layer. You learned important techniques for layering and baking. I also included variations, storage tips, and answers to common questions.

These brownies can impress everyone. Enjoy experimenting with flavors and serving ideas. With practice, you will perfect this recipe and create a treat that delights all!

To make these tasty brownies, you need a few key items. Here’s what you will need: - 1 cup unsalted butter, melted - 2 cups granulated sugar - 1 cup packed brown sugar - 4 large eggs - 2 teaspoons pure vanilla extract - 1 cup all-purpose flour - 3/4 cup unsweetened cocoa powder - 1 teaspoon baking powder - 1/2 teaspoon salt - 1 cup pumpkin puree These ingredients create a rich, chocolatey base that pairs perfectly with the pumpkin. The cream cheese layer adds a delicious twist. You’ll need: - 8 oz cream cheese, softened - 1/2 cup powdered sugar - 1 teaspoon ground cinnamon - 1/2 teaspoon ground nutmeg This mixture is smooth and creamy, giving the brownies that perfect swirl. To make these brownies, you will need some tools. Here’s a list of what to gather: - Mixing bowls - Electric mixer - Baking pan (9x13 inch) Having the right tools makes the process easier and more fun! First, preheat your oven to 350°F (175°C). This makes sure the brownies bake evenly. Next, take a 9x13 inch baking pan and grease it well. You can use butter or cooking spray. Then, line the pan with parchment paper. Leave some paper hanging over the edges. This will help lift the brownies out later. In a large mixing bowl, add 1 cup of melted butter. Then, mix in 2 cups of granulated sugar and 1 cup of brown sugar. Whisk these together until smooth. Next, add in 4 large eggs, one at a time. Make sure to mix well after each egg. Now, stir in 2 teaspoons of pure vanilla extract until everything is well combined. In another bowl, sift together 1 cup of all-purpose flour, 3/4 cup of cocoa powder, 1 teaspoon of baking powder, and 1/2 teaspoon of salt. Gradually fold this dry mix into the wet mix. Stir gently until just combined. Don’t worry if you see a few flecks of flour. In a medium bowl, beat 8 oz of softened cream cheese with an electric mixer until smooth. Then, add in 1 cup of pumpkin puree, 1/2 cup of powdered sugar, 1 teaspoon of ground cinnamon, and 1/2 teaspoon of ground nutmeg. Mix everything until it’s creamy and well-blended. Pour about two-thirds of the brownie batter into your prepared pan. Spread it evenly. Then, spoon dollops of the pumpkin cream cheese mix on top. Take a knife or skewer and gently swirl the pumpkin mix into the brownie batter. This creates a marbled effect. Finally, pour the remaining brownie batter on top and swirl it again gently to combine slightly. Now, place the pan in your preheated oven. Bake for 35 to 40 minutes. To check if they are done, insert a toothpick into the center. It should come out with a few moist crumbs, not wet batter. Once baked, let the brownies cool in the pan for at least 30 minutes. This helps them set properly. Use the parchment paper overhang to lift them out and move them to a cutting board. Cut into squares and enjoy your delicious pumpkin cream cheese swirl brownies! To get a lovely marbled look, follow these steps: - Layer Wisely: Spread two-thirds of the brownie batter evenly in the pan. This gives a good base. - Dollop Carefully: Add spoonfuls of the pumpkin cream cheese mix on top of the brownie layer. - Swirl Gently: Use a knife or skewer to make gentle swirls. Too much mixing will blend the colors too much. Enhance your brownie experience with these ideas: - Dust with Powdered Sugar: A light sprinkle on top adds elegance. - Add a Dollop of Whipped Cream: This adds a creamy texture that pairs well. - Serve with Ice Cream: A scoop of vanilla ice cream brings a cool contrast to the warm brownies. Prevent issues with these tips: - Underbaking: Always check with a toothpick. It should have a few moist crumbs. - Overmixing the Batter: Mix just until combined. This keeps your brownies soft and fudgy. - Ignoring Cooling Time: Let them cool in the pan for at least 30 minutes. This helps them set and makes cutting easier. {{image_4}} You can boost the taste of these brownies with fun add-ins. Try adding nuts like walnuts or pecans for a crunch. You can also mix in chocolate chips for extra sweetness. Dark chocolate chips add a rich taste, while white chocolate chips give a nice contrast. Just fold these into the brownie batter before you layer it in the pan. If you want to swap sugars, there are tasty options. Coconut sugar adds a nice caramel taste. Maple syrup is another great choice; it gives a warm flavor. Honey can work too, but keep in mind it may change the texture. Use about three-quarters of the amount listed for granulated sugar if you choose one of these. To make these brownies gluten-free, simple swaps work well. Use almond flour or a gluten-free baking mix instead of all-purpose flour. These options keep the brownies soft and moist. Make sure to check that your baking powder is gluten-free too. Always read labels to ensure every ingredient meets your needs. To keep your brownies fresh, use an airtight container. Place a piece of parchment paper between layers to prevent sticking. Store them at room temperature for up to three days. If you want to keep them longer, refrigeration is an option. Just remember that cold can change the texture slightly. To freeze brownies, first, let them cool completely. Then, cut them into squares. Wrap each square in plastic wrap tightly. Place the wrapped brownies in a freezer bag. Be sure to remove as much air as possible before sealing. You can freeze them for up to three months. This way, you can enjoy a tasty treat anytime! When you're ready to enjoy your frozen brownies, take them out and let them thaw in the fridge overnight. For a warm treat, heat them in the microwave for about 10-15 seconds. This brings back their fudgy texture. You can also warm them in an oven set to 350°F for about 5-10 minutes. Enjoy them with a scoop of ice cream or a drizzle of chocolate sauce for an extra special touch! Yes, you can use fresh pumpkin. Start by roasting a pumpkin until it's soft. Then, scoop out the flesh and blend it until smooth. This will give you a fresh taste. However, canned pumpkin is convenient and consistent. It is also less work. I often recommend sticking with canned for ease. To check if the brownies are done, use a toothpick. Stick it in the center of the brownies. If it comes out with a few moist crumbs, they are ready. If it comes out with wet batter, bake them for a few more minutes. This simple test helps you avoid overbaking. To cut clean brownie squares, use a sharp knife. First, let the brownies cool completely. This keeps them firm. Dip the knife in hot water before each cut. Wipe the knife after each slice. This will give you neat, even squares without tearing. Yes, you can make these brownies ahead of time. Bake them a day or two before your event. Store them in an airtight container to keep them fresh. They taste great even after a couple of days. You can also freeze them for longer storage. Just thaw them before serving. This post covered ingredients, steps, and tips for perfect brownies. I shared how to mix the batter and create a tasty pumpkin cream cheese layer. You learned important techniques for layering and baking. I also included variations, storage tips, and answers to common questions. These brownies can impress everyone. Enjoy experimenting with flavors and serving ideas. With practice, you will perfect this recipe and create a treat that delights all!

Pumpkin Cream Cheese Swirl Brownies

Indulge in the ultimate dessert with these Pumpkin Cream Cheese Swirl Brownies! This deliciously decadent recipe combines rich chocolate brownies with a creamy pumpkin filling, perfect for fall gatherings or a cozy night in. Easy to make and impossible to resist, these brownies are sure to impress. Click through to explore the full recipe and enjoy a sweet slice of autumn bliss today!

Ingredients
  

1 cup unsalted butter, melted

2 cups granulated sugar

1 cup packed brown sugar

4 large eggs

2 teaspoons pure vanilla extract

1 cup all-purpose flour

3/4 cup unsweetened cocoa powder

1 teaspoon baking powder

1/2 teaspoon salt

1 cup pumpkin puree

8 oz cream cheese, softened

1/2 cup powdered sugar

1 teaspoon ground cinnamon

1/2 teaspoon ground nutmeg

Instructions
 

Preheat the Oven: Preheat your oven to 350°F (175°C). Grease and line a 9x13 inch baking pan with parchment paper, leaving a bit of overhang on the sides to help lift the brownies out later.

    Make the Brownie Batter: In a large mixing bowl, combine the melted butter with the granulated sugar and brown sugar. Whisk these together until they're smoothly combined. Next, add the eggs one at a time, ensuring each egg is well mixed before adding the next. Stir in the vanilla extract until fully incorporated.

      Add Dry Ingredients: In a separate bowl, sift together the all-purpose flour, cocoa powder, baking powder, and salt. Gradually fold this dry ingredient mixture into the wet ingredients, stirring gently until just combined. Be careful not to over-mix; it's fine if you see a few flecks of flour.

        Prepare the Pumpkin Cream Cheese Mixture: In a medium bowl, use an electric mixer to beat the softened cream cheese until it's completely smooth. Then, add the pumpkin puree, powdered sugar, ground cinnamon, and ground nutmeg. Mix everything together until you achieve a creamy, well-blended consistency.

          Layer the Cake: Pour about two-thirds of the brownie batter into the prepared baking pan, spreading it out evenly. Next, dollop spoonfuls of the pumpkin cream cheese mixture across this layer. Using a knife or a skewer, gently swirl the pumpkin mixture into the brownie batter for a marbled effect. Finally, pour the remaining brownie batter on top, and swirl again gently to combine slightly.

            Bake: Place the pan in your preheated oven and bake for 35-40 minutes. To check for doneness, insert a toothpick into the center of the brownies; it should come out with a few moist crumbs (not wet batter).

              Cool and Serve: Once baked, allow the brownies to cool in the pan for at least 30 minutes. This will help them set properly. Use the parchment paper overhang to lift them out and transfer to a cutting board. Cut into squares and enjoy the delicious blend of pumpkin and chocolate!

                Prep Time: 20 minutes | Total Time: 1 hour | Servings: 12-16

                  - Presentation Tips: Serve these decadent brownies on a rustic wooden board, dusted with a sprinkle of powdered sugar, and pair with a dollop of whipped cream or a scoop of vanilla ice cream for an extra treat!

                    WANT TO SAVE THIS RECIPE?