Are you ready to indulge in a treat that combines rich chocolate with the warm notes of Mexican vanilla? My Rich Mexican Vanilla Bean and Chocolate Truffles Delight will guide you through a simple recipe to create these decadent bites at home. With just a few ingredients and easy steps, you'll impress friends and family with your chocolate-making skills. Let’s dive into crafting these irresistible truffles!
Why I Love This Recipe
- Decadent Flavor: These truffles combine the richness of chocolate with the warm notes of vanilla and spices, creating a truly indulgent treat.
- Customizable Coatings: With options for cocoa powder and nuts, you can easily tailor the truffles to suit your taste preferences.
- Perfect for Gifting: These truffles make a beautiful and thoughtful gift for any occasion, presented in a lovely box or decorative plate.
- Simple Preparation: Despite their gourmet appearance, these truffles are quite easy to make, requiring only a few steps and ingredients.
Ingredients
Required Ingredients
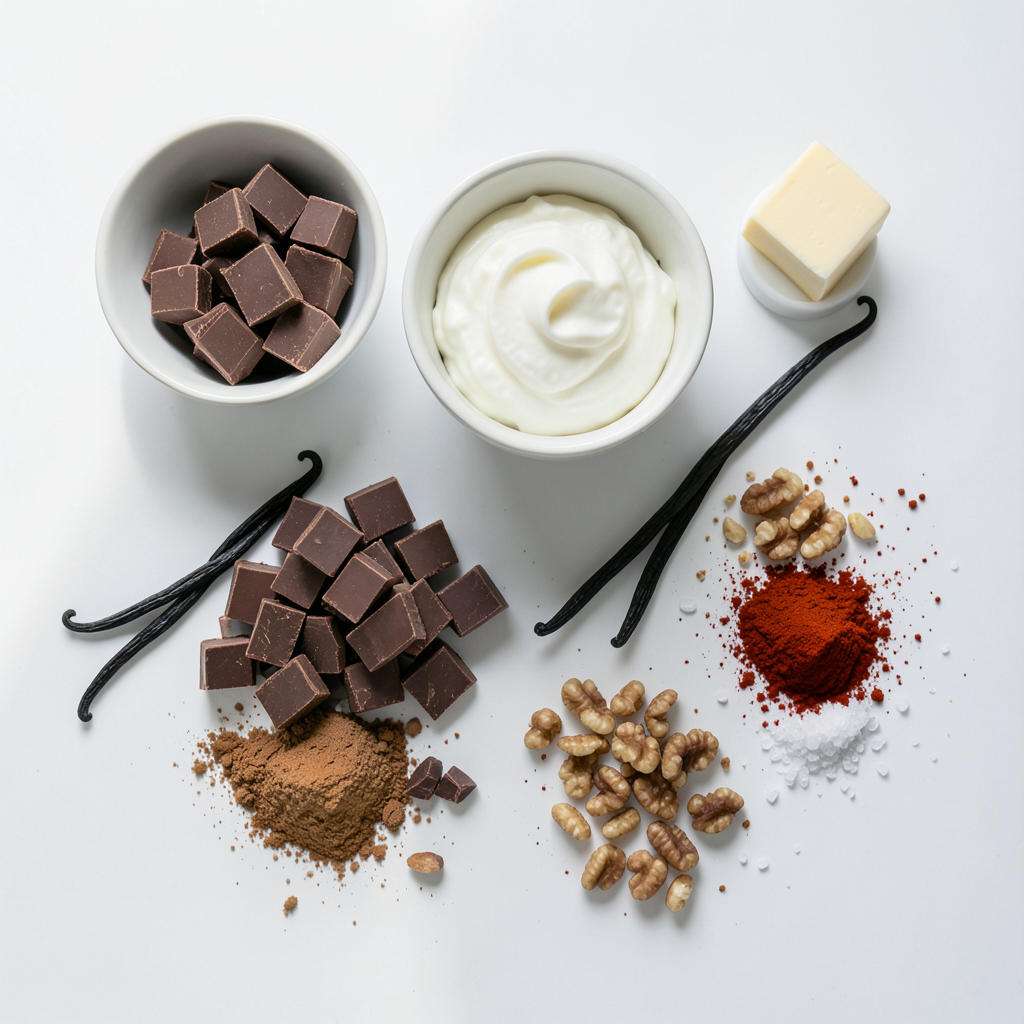
- 8 oz semi-sweet chocolate, chopped into small pieces
- 1/2 cup heavy cream
- 1 tablespoon unsalted butter
- 1 vanilla bean, halved lengthwise with seeds scraped out
- 1 teaspoon ground cinnamon
- 1/4 teaspoon cayenne pepper (adjust to taste)
- 1/2 cup cocoa powder (for rolling)
- 1/4 cup finely chopped nuts (choose between walnuts or pecans for a delicious touch)
- A pinch of sea salt, for finishing
Suggested Equipment
- Heatproof bowl
- Small saucepan
- Plastic wrap
- Melon baller or cookie scoop
- Parchment-lined tray
To make rich Mexican vanilla bean and chocolate truffles, gather these ingredients. You need semi-sweet chocolate for a smooth base. Heavy cream adds creaminess. Butter gives a rich flavor. The vanilla bean brings warmth and depth. Ground cinnamon adds a cozy spice. Cayenne pepper gives it a hint of heat. Cocoa powder coats the truffles for a nice finish. Chopped nuts add crunch, while sea salt enhances the flavors.
You can use a heatproof bowl to melt the chocolate and butter. A small saucepan heats the cream perfectly. Plastic wrap keeps the chocolate mixture fresh while it chills. A melon baller or cookie scoop helps form the truffles easily. Finally, a parchment-lined tray makes it simple to set your truffles without sticking.
Once you have all your ingredients and equipment, you can start making these delicious truffles. They are perfect for sharing or treating yourself!
Step-by-Step Instructions
Preparing the Chocolate Mixture
- First, I take 8 oz of semi-sweet chocolate and chop it into small pieces.
- I place the chopped chocolate in a heatproof bowl with 1 tablespoon of unsalted butter.
- I make sure the butter and chocolate are well mixed for even melting.
Heating the Cream
- Next, I pour 1/2 cup of heavy cream into a small saucepan.
- I heat the cream over medium heat, watching carefully until it starts to simmer.
- As soon as I see bubbles, I remove it from the heat to avoid boiling.
Mixing and Chilling
- I pour the hot cream over the chocolate and butter mixture.
- Then, I scrape the seeds from 1 vanilla bean and add them in, along with 1 teaspoon of ground cinnamon and 1/4 teaspoon of cayenne pepper.
- I let this sit for 2-3 minutes to melt the chocolate, then I stir until it is smooth.
- After mixing well, I cover the bowl with plastic wrap and chill it in the fridge for 1-2 hours.
Shaping the Truffles
- Once the chocolate mixture is firm, I use a melon baller or small cookie scoop to portion it.
- I quickly roll each portion between my palms to form small truffle balls.
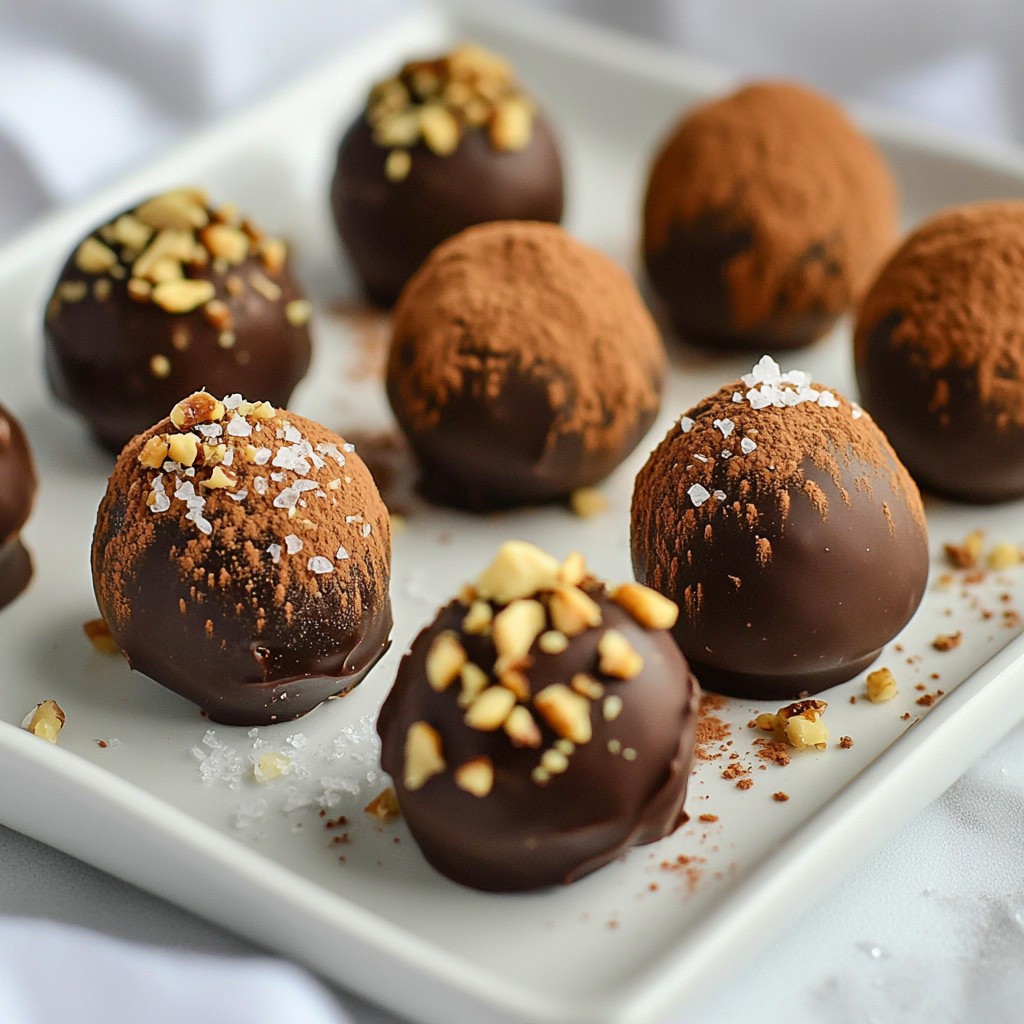
Coating the Truffles
- On a shallow plate, I spread out 1/2 cup of cocoa powder and 1/4 cup of finely chopped nuts.
- I gently roll each truffle in the cocoa powder and nuts until they are fully coated.
Final Touches
- Just before the truffles set, I sprinkle a pinch of sea salt on top of each one.
- Finally, I place the truffles on a parchment-lined tray to chill again in the refrigerator for 10-15 minutes.
Tips & Tricks
Achieving the Perfect Texture
Chilling the chocolate mixture is key. This step helps it firm up. If you skip it, your truffles might be too soft. After mixing, cover the bowl and chill for 1-2 hours. The mixture is ready when it holds its shape. You should be able to roll it easily into balls.
Substitutions and Enhancements
You can switch the chocolate if needed. Dark chocolate offers a bolder taste. Milk chocolate is sweeter and creamier. Adjust the cayenne pepper for spice. If you want heat, add a bit more. For less heat, use less cayenne. You can also play with other spices, like nutmeg.
Presentation Ideas
For an elegant look, use a decorative plate. Arrange the truffles with care. A gift box adds charm and makes a great present. Consider a light dusting of cocoa around the truffles. Chopped nuts can also add a lovely touch. This makes your truffles even more appealing.
Pro Tips
- Quality Chocolate Matters: Use high-quality semi-sweet chocolate for a rich flavor that enhances the overall taste of your truffles.
- Chill for Better Texture: Ensure that the chocolate mixture is properly chilled before rolling to achieve smooth, round truffles that hold their shape.
- Experiment with Coatings: Try rolling your truffles in different coatings like shredded coconut, crushed freeze-dried fruits, or even colored sprinkles for a fun twist.
- Balance the Heat: Adjust the cayenne pepper to your taste; a little goes a long way, and you can always add more if you prefer a spicier kick!
Variations
Flavor Variations
You can play with flavors in these truffles. For a unique twist, add spices like nutmeg or ginger. These spices add warmth and depth. They can make your truffles even more special. You can also infuse flavors using espresso or orange zest. A shot of espresso gives a rich coffee taste. Orange zest offers a bright and refreshing note. Both options can enhance the overall flavor experience.
Dietary Adjustments
If you want to make these truffles dairy-free, swap the heavy cream with coconut cream. This change keeps the truffles creamy while being dairy-free. You can also find vegan chocolate options. Look for chocolate that doesn’t contain milk or animal products. These adjustments let everyone enjoy the truffles.
Different Coatings
Coatings can change the look and taste of your truffles. Instead of cocoa powder, roll them in crushed cookies. This adds texture and flavor, making them fun to eat. You can also use shredded coconut for a tropical twist. Another option is to drizzle melted chocolate over your truffles. This adds a rich, glossy finish. Each coating can make your truffles unique and exciting!
Storage Info
Best Practices for Refrigeration
To store your chocolate truffles, keep them in the fridge. Place them in an airtight container. This helps maintain their rich flavor. Make sure they are completely cool before sealing.
Freshness is key. Truffles can absorb odors from other foods. Always check for any strange smells before enjoying them.
Freezing Tips
You can freeze truffles for later enjoyment. To freeze them properly, first let them chill in the fridge. Once firm, place them in a single layer in a freezer-safe bag. Remove as much air as possible to prevent freezer burn.
When you want to serve them, take them out of the freezer. Let them thaw in the fridge for a few hours. This way, they keep their texture and taste.
Shelf Life
In the fridge, your truffles last about one week. If stored well, they can stay fresh until then. Look for signs of spoilage, like a dull appearance or off smell. If they feel grainy or hard, it’s best to toss them. Enjoy your truffles while they are fresh for the best experience!
FAQs
What is the best chocolate to use for truffles?
For these truffles, I recommend using semi-sweet chocolate. It gives a rich taste without being too sweet. Look for high-quality chocolate with at least 60% cocoa content. Brands like Ghirardelli or Lindt work well. You will enjoy the smooth texture and deep flavor they bring.
Can I make these truffles in advance?
Yes, you can make these truffles ahead of time. Just follow these steps for best results:
- Chill the truffles for 10-15 minutes after coating them.
- Store them in an airtight container in the fridge.
- They can last up to two weeks, but they taste best fresh.
How do I adjust the spice level?
You can easily adjust the spice level to suit your taste. Here’s how:
- For more heat, add a bit more cayenne pepper.
- For a milder flavor, reduce the cayenne or omit it altogether.
- You can also adjust the ground cinnamon for warmth.
Is it possible to make these truffles without heavy cream?
Yes, you can use alternatives to heavy cream. Here are some options:
- Use coconut cream for a dairy-free version.
- Try almond milk with a thickener like cornstarch.
- You can also use cashew cream for a rich, creamy texture.
These choices will help you maintain the creaminess of the truffles.
In this guide, we explored how to make rich chocolate truffles. We covered the ingredients you need, from semi-sweet chocolate to spices. The step-by-step instructions help you create a creamy mixture and shape each truffle perfectly. Remember, chilling is key to the right texture. Feel free to play with flavors and coatings to make them your own. Enjoy sharing these treats or keeping them for yourself. Making truffles is fun, and they always impress!