Looking for a fun and easy appetizer that will impress your guests? Sushi Cups are the perfect solution! These bite-sized delights combine fresh flavors and colorful ingredients, all in a handy cup shape. In this article, I’ll share simple steps to make these tasty treats, along with tips for customizing and storing them. Get ready to bring some excitement to your next party with this sushi-inspired twist!
Why I Love This Recipe
- Unique Presentation: These sushi cups are not only delicious but also visually stunning, making them a perfect centerpiece for any gathering.
- Customizable Ingredients: You can easily swap out the fillings based on your preferences or dietary restrictions, allowing for endless variations.
- Easy to Prepare: With straightforward steps, this recipe is accessible even for beginners, ensuring that everyone can impress their guests.
- Fresh and Flavorful: The combination of fresh vegetables, creamy avocado, and savory seafood creates a burst of flavors that is truly delightful.
Ingredients
Main Ingredients
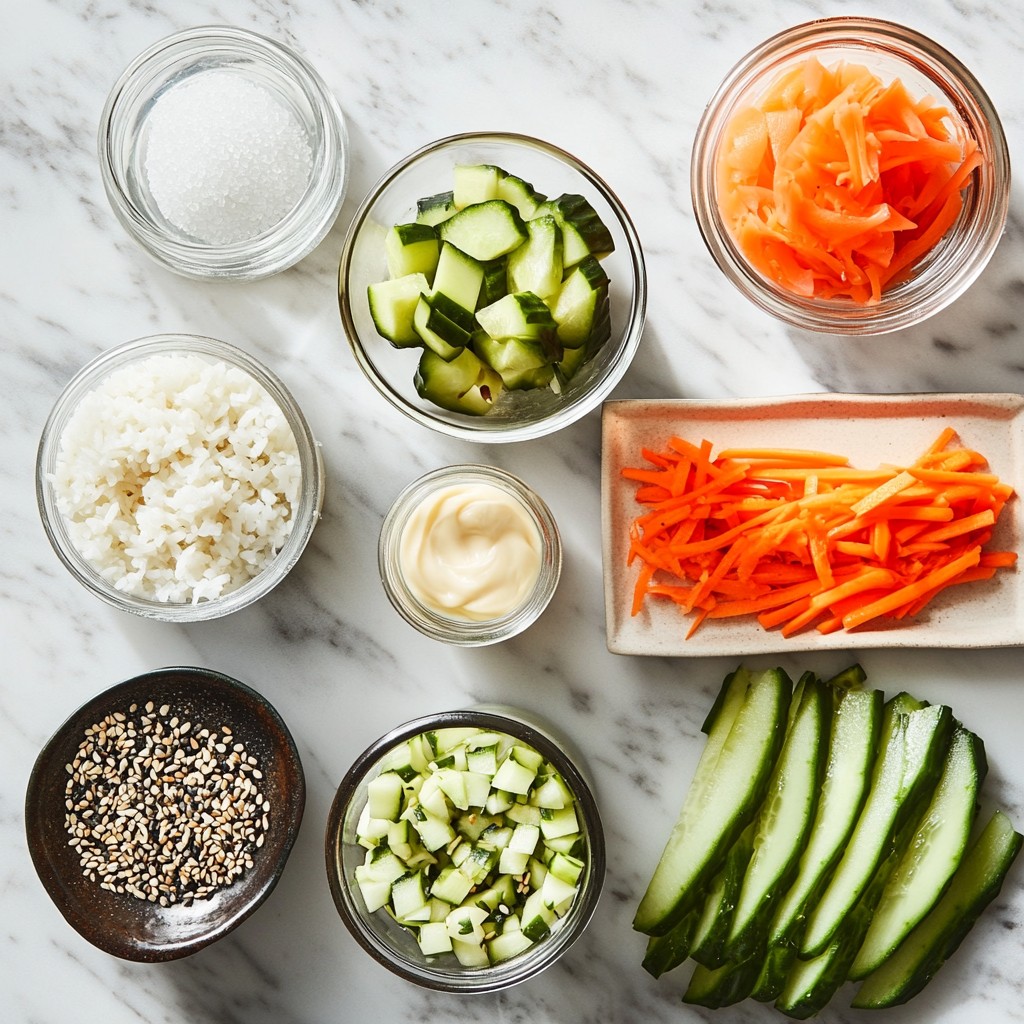
- 1 cup sushi rice
- 1 ¼ cups water
- 1 tablespoon rice vinegar
- 1 tablespoon sugar
- ½ teaspoon salt
Fillings and Toppings
- 1 cucumber, thinly sliced
- 1 carrot, julienned
- ½ avocado, sliced
- 4 ounces imitation crab or cooked shrimp, chopped
- ¼ cup mayonnaise (preferably Kewpie for extra flavor)
- 1 teaspoon sriracha (optional for heat)
Garnish Ingredients
- Nori sheets, cut into small squares for garnish
- Sesame seeds for topping
Each ingredient plays a key role in your sushi cups. The sushi rice is the base that holds everything together. It should be sticky enough to form cups but not too sticky that it becomes a mushy mess. The rice vinegar, sugar, and salt are crucial for that classic sushi flavor.
For the fillings, fresh cucumber adds a nice crunch. The julienned carrot brings color and sweetness. The avocado gives creaminess, while the imitation crab or shrimp adds protein. Kewpie mayo adds a rich taste that pairs well with the sriracha, which gives you an optional spicy kick.
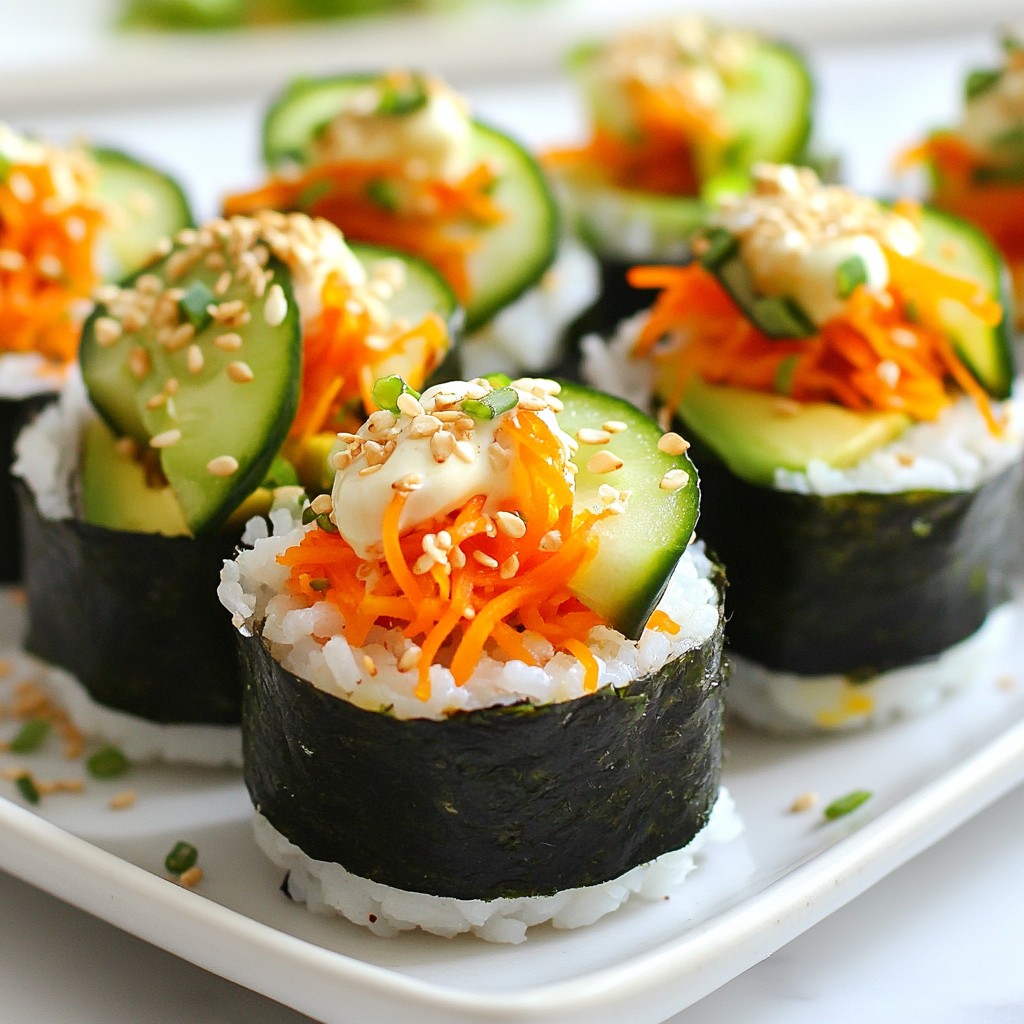
For garnishing, the nori sheets add a savory touch and a nice visual contrast. The sesame seeds give an extra crunch and nutty flavor. These ingredients together create a delightful balance of textures and tastes, making your sushi cups a hit at any party!
Step-by-Step Instructions
Preparing the Sushi Rice
- Rinse the rice: Start by placing the sushi rice in a fine-mesh strainer. Rinse it under cold water until the water runs clear. This step removes extra starch that can make the rice sticky.
- Cooking method and timing: Combine the rinsed rice with 1 ¼ cups of water in a saucepan. Bring it to a boil over medium heat. Once boiling, reduce the heat to low, cover, and simmer for 15-20 minutes. After cooking, keep it covered for 10 more minutes. This helps the rice steam and become fluffy.
- Seasoning instructions: In a small bowl, mix rice vinegar, sugar, and salt. Stir until dissolved. Once the rice cools slightly, fluff it with a fork and gently mix in the vinegar mix. Let the rice cool to room temperature.
Preparing the Fillings
- Preparing vegetables: Slice the cucumber thinly and julienne the carrot. These fresh veggies add crunch to your sushi cups.
- Mixing protein with mayonnaise: In a bowl, combine chopped imitation crab or shrimp with mayonnaise. Add sriracha if you want some heat. This mixture brings flavor and creaminess to your cups.
Assembling the Sushi Cups
- Prepping the muffin tin: Preheat your oven to 350°F if your muffin tin is not non-stick. Lightly spray the tin with cooking oil to prevent sticking.
- Layering the rice and fillings: Take a portion of rice and press it into each muffin cup. Make sure it forms a small cup that goes up the sides. Add cucumber slices and julienned carrot on top, then spoon in your crab or shrimp mix. Finish with a slice of avocado.
- Garnishing tips: Sprinkle sesame seeds over the top for a nice crunch. You can also add a small piece of nori for extra flavor. Consider topping with microgreens for a fresh look.
Tips & Tricks
Perfecting Your Sushi Rice
To make perfect sushi rice, rinse it properly. Place the rice in a fine-mesh strainer. Rinse it under cold water until the water runs clear. This step removes excess starch, which helps keep the rice fluffy.
For cooking, combine 1 cup of rinsed sushi rice with 1 ¼ cups of water. Bring it to a boil. Once boiling, lower the heat and cover the pan. Let it simmer for 15-20 minutes. After cooking, keep the pot covered for 10 more minutes. This steaming step is key for fluffy rice.
Customization Options
Sushi cups are fun because you can customize them. You can use different proteins like cooked shrimp or salmon. If you prefer a plant-based option, try tofu.
For veggies, you can use cucumbers, carrots, or even bell peppers. Don’t forget to add sauces! You can mix Kewpie mayonnaise with sriracha for a creamy, spicy kick.
Serving Suggestions
Presentation matters. Serve your sushi cups on a colorful platter. Add extra nori strips and a sprinkle of sesame seeds on top. This makes them look stunning for any gathering.
Pair your sushi cups with dipping sauces. Soy sauce or a spicy mayo works great for adding flavor. These cups are sure to impress your guests!
Pro Tips
- Rinse Thoroughly: Ensure you rinse the sushi rice until the water runs clear to achieve the perfect texture.
- Let It Steam: After cooking, allow the rice to sit covered for an additional 10 minutes to achieve optimal fluffiness.
- Chill for Texture: Chilling the assembled cups helps firm them up, making them easier to handle and serve.
- Presentation Matters: Garnish with microgreens or additional nori for an eye-catching presentation that enhances the dining experience.
Variations
Sushi Cups with Different Proteins
You can change up the protein in your sushi cups. Salmon or tuna work great. They add rich flavor. If you want a vegan option, try tofu. Just press it to remove extra water. Then, cut it into small cubes. Season it with soy sauce or your favorite marinade. This adds a tasty twist.
Ingredient Swaps
You don't have to use white rice. You can swap in brown rice or quinoa for a healthy touch. Both options add more fiber. You can also use seasonal vegetables. Fresh bell peppers or radishes can add crunch. Choose what is in season for the best taste.
Flavor Additions
Want to kick up the flavor? Add fresh herbs like cilantro or mint. They brighten up each bite. You can also mix in spice blends. A sprinkle of chili flakes adds heat. For a unique dressing, try a sesame or ponzu sauce. This gives your sushi cups a fun twist that everyone will love.
Storage Info
How to Store Leftover Sushi Cups
To keep your sushi cups fresh, store them in the fridge. Place them in an airtight container. They can last for 2-3 days this way. Freezing is another option, but it may change the texture. If you plan to freeze, wrap each cup in plastic wrap and place them in a freezer bag. They will stay good for about a month.
Best Practices for Maintaining Freshness
To keep your sushi cups fresh, always use airtight containers. This keeps air out and prevents them from drying out. I recommend eating them within 2-3 days for the best taste. If you have frozen them, try to consume them within a month for the best quality.
Reheating Instructions
If you need to reheat sushi cups, do it gently. The best way is to microwave them for short bursts. Start with 10-15 seconds at a time. This helps keep the rice from getting hard. After reheating, you can add fresh toppings like avocado or sesame seeds to boost flavor. Enjoy them warm, but be careful not to overheat!
FAQs
What are Sushi Cups?
Sushi cups are small, fun bites made with sushi rice and tasty fillings. They look great and are easy to eat. Each cup holds layers of fresh veggies, seafood, and creamy sauce. This makes them a hit at parties. They bring a twist to traditional sushi and appeal to both kids and adults. Plus, they are customizable, so everyone can make their own version.
Can I make sushi cups ahead of time?
Yes, you can make sushi cups ahead of time. Prepare the rice and fillings in advance. Keep the rice in the fridge until you are ready to assemble. You can also layer the cups a few hours before serving. Just chill them for at least 15 minutes to firm up. This helps with serving and keeps the cups intact.
What do I serve with sushi cups?
You can serve various sides and drinks with sushi cups. Some great options include:
- Edamame
- Seaweed salad
- Pickled ginger
As for drinks, try serving:
- Green tea
- Sake
- Light beers
These pairings enhance the sushi cups and create a fun dining experience.
Are sushi cups gluten-free?
Sushi cups can be gluten-free if you choose the right ingredients. Use gluten-free soy sauce or tamari for dipping. Rice is naturally gluten-free, so sushi rice works well. Be careful with imitation crab, as some brands contain gluten. Always check labels when cooking for gluten-sensitive diets. This way, everyone can enjoy these tasty treats.
In this post, we explored how to make sushi cups, from key ingredients to storage tips. We covered essential items like sushi rice and fillings such as cucumber and avocado. You learned to assemble the cups and customize with various proteins and veggies. Remember, sushi cups are not just tasty; they are easy to make and fun to serve. Enjoy experimenting with flavors and sharing your creations. You can impress your friends with this delicious dish and make memorable meals together. Happy sushi making!